Trevi XF 1550 KB User manual

ALTOPARLANTE AMPLIFICATO ALTA POTENZA
Manuale d'uso e collegamento
HIGH POWER PORTABLE SPEAKER
Connection and Operation Manual
HAUT-PARLEUR PORTABLE AMPLIFIE
Mode d'emploi et branchement
BEWEGLICHER LAUTSPRECHER
Gebrauchs- und Anschlusshandbuch
ALTAVOZ AMPLIFICADO PORTATIL
Manual para el uso y la conexión
LED
DISPLAY
USB/
Micro SD
PLAYER
XF 1550 KB
Guida d’uso
User guide
TWS
120 W
MAX
BLUETOOTH
CONNECTION
Per informazioni integrative ed aggiornamenti su questo prodotto visita www.trevi.it
For additional information and updates of this product see www.trevi.it
2 MIC
WIRELESS
UK ES FR
DK MT IE
Il microfono può essere utilizzato sul territorio Italiano.
Paesi Europei per i quali il prodotto ha restrizioni:
Regno Unito: IMPLEMENTED.
Spagna: LIMITED IMPLEMENTATION.
Francia: LIMITED IMPLEMENTATION, for professional users.
Danimarca: LIMITED IMPLEMENTATION, tuning range.
Malta:LIMITEDIMPLEMENTATION,individuallicenserequired.
Irlanda: NOT IMPLEMENTED


3
XF 1550 KB
Per evitare possibili danni all’udito, limitare il tempo di ascolto a volumi elevati
NOTE D'USO
Ascoltare a volume alto per lungo tempo, potrebbe danneggiare il vostro udito.
Evitare di posizionare il riproduttore:
• Vicino a campi magnetici.
• Vicino a fonti di calore come caloriferi e stufe.
• In luoghi molto umidi come stanze da bagno, piscine, ecc...
• In luoghi molto polverosi.
• In luoghi soggetti a forti vibrazioni.
• Non avvicinare l’orecchio all’altoparlante durante le fasi di messa punto e regolazioni del volume, e in particolare di tenere il
volume al minimo nella fase di accensione.
• Posizionare l’apparecchio in modo che ai suoi lati ci sia sempre abbastanza spazio per la libera circolazione di aria (almeno
5 cm).
• Se dei liquidi penetrano all’interno dell’apparecchio scollegare immediatamente la spina dalla presa e portare l’apparecchio
al più vicino centro assistenza autorizato TREVI.
• Prima di accendere/ricaricare l’apparecchio, controllare sempre che i cavi di alimentazione e di collegamento siano installati
correttamente.
• L’adattatore di corrente deve essere collegato a una presa vicina al dispositivo e deve essere facilmente accessibile.
• Se si nota un calore eccessivo sul dispositivo o sull’adattatore di corrente, scollegare immediatamente la spina dalla presa di
corrente principale.
• Non tirare il cavo di alimentazione
• Nessuna sorgente di fiamma nuda, quali candele accese, dovrebbe essere posta sull’apparecchio.
• L’apparecchio non deve essere esposto a stillicidio o a spruzzi d’acqua e nessun oggetto pieno di liquido, quali vasi, deve
essere posto sull’apparecchio.
• Istruire al corretto utilizzo bambini e persone con scarse conoscenze del prodotto.
• Conservare il presente manuale per futuri riferimenti.
CURA E MANUTENZIONE
Per la pulizia si consiglia l’uso di un panno morbido, leggermente inumidito. Evitate solventi o sostanze abrasive.
IMPORTANTE
Questo dispositivo e' progettato per uso domestico non professionale. La buona costruzione di questo apparecchio ne garantisce
per lungo tempo il perfetto funzionamento. Se tuttavia dovesse presentarsi qualche inconveniente, sarà opportuno consultare il
più vicino Centro Assistenza autorizzato TREVI.
TREVI persegue una politica di continua ricerca e sviluppo. Pertanto i prodotti possono presentare caratteristiche diverse da
quelle descritte.
ITALIANO

4
XF 1550 KB
ITALIANO
1. Tasto MUTE
2. Tasto FL-, selezione cartella precedente
3. Tasto EQ: equalizzazioni pre-impostate
4. Tasto 9, selezione traccia precedente
5. Tasto Registrazione
6. Tasto , Stand-by
7. Tasto FL+, selezione cartella successiva
8. Tasto FL.REP, ripetizione cartella
9. Tasto , ripetizione singolo brano, ripetizione di tutti i
brani
10. VOL +
11. Tasto, Play/Pausa
12. Tasto :, selezione traccia successiva
13. VOL -
14. Tastiera numerica per selezione traccia
15. Tasto MODE: selezione funzione
TELECOMANDO
1. Interruttore principale (accensione/spegnimento).
2. Tasto MODE, selezione funzione.
3. Tasto REC, funzione registrazione.
4. Tasto MIC PRIO, funzione priorità microfono.
5. TWS
6. Display.
7. Tasto , ripetizione
8. Tasto 9, traccia precedente.
9. Tasto, Play/Pausa.
10. Tasto :, traccia successiva.
11. Regolazione Volume generale.
12. BASS, regolazione toni bassi.
13. TREBLE, regolazione toni alti.
14. Regolazione ECHO microfono
15. MIC VOL, regolazione Volume Microfono.
16. Regolazione Volume GUITAR.
17. Ingresso GUITAR.
18. MIC, Ingresso Microfono.
19. Ingresso 12V per eventuale batteria ausiliaria (cavo in
dotazione).
20. Ingresso AUX IN.
21. Spia Led di segnalazione Batteria in ricarica.
22. Presa cavo alimentatore.
23. Ingresso TF Card (Micro SD).
24. Ingresso USB.
25. Interruttore LED, attivazione/disattivazione Led frontali
(Disco Light).
DESCRIZIONE COMANDI

5
XF 1550 KB
ATTIVAZIONE E SOSTITUZIONE DELLA BATTERIA DEL TELECOMANDO
Prima di utilizzare il telecomando inserire le batterie come descritto di seguito:
1. Rimuovere il coperchio del vano batterie come mostrato in figura;
2. Inserire 2 batterie formato “AAA” facendo attenzione alle polarità indicate e
richiudere il coperchio.
IMPORTANTE
- Smaltire le batterie usate nel rispetto delle normative sul riciclaggio nella
propria zona.
- Pericolo di esplosione se la batteria viene sostituita in modo errato.
- Sostituire solo con lo stesso tipo o equivalente.
- Se il telecomando non viene utilizzato per lunghi periodi, la batteria può perdere liquido e danneggiare il telecomando,
sostituirlo con uno nuovo se si dovesse verificare.
- NON cortocircuitare le batterie o gettarle nell'acqua, nella spazzatura generale o nel fuoco.
TRASPORTO
Premere il pulsante presente sulla maniglia del trolley, alzare il manico fino al blocco (si udira' uno scatto metallico). Per il trasporto,
agendo sulla maniglia del trolley, piegare leggermente l'apparecchio e sfruttare le due ruote posteriori.
Per lo sblocco e chiusura del trolley, premere di nuovo il pulsante sulla maniglia ed abbassare completamente il manico.
Per il trasporto è possibile utilizzare, eventualmente, anche le due maniglie poste lateralmente all'apparecchio.
ALIMENTAZIONE/RICARICA BATTERIA
Questa unità funziona con batteria interna ricaricabile al piombo da 12V 4,5Ah o alimentatore 15V 2A.
Quando la batteria è in fase di esaurimento o l'apparecchio non si accende, portare l'interruttore principale (1) in posizione
"OFF", collegare l'alimentatore in dotazione alla presa (22) del dispositivo e la spina in una presa di corrente per effettuare la
ricarica della batteria interna, la spia Led Rossa (21) si accenderà.
Stati della spia Led di segnalazione con Batteria in ricarica:
- Spia Led (21) ROSSA fissa: il dispositivo e' collegato correttamente con l'alimentatore e la batteria è in fase di ricarica.
-Spia Led (21) VERDE fissa: operazione di ricarica terminata, la batteria è carica.
Nota: Non collegare l'apparecchio ad alimentatori con tensione o polarità diverse da quelle indicate.
FUNZIONI DI BASE
ACCENSIONE/SPEGNIMENTO
Premere l'interruttore principale (1) per accendere e utilizzare l'apparecchio con la sua batteria interna.
Premere nuovamente l'interruttore principale (1) per spegnere completamente l'apparecchio o per ricaricare la batteria.
STAND-BY
E' possibile portare l'apparecchio in modalità Stand-by utilizzando il tasto (6) del telecomando.
Note:
- Non vi è nessun Led che segnali l'attivazione della funzione Stand-by.
- Lasciando l'apparecchio in Stand-by la batteria tende a scaricarsi più velocemente che utilizzando l'interruttore (1).
SELEZIONE DELLA FUNZIONE
Per cambiare la modalità di funzionamento, premere piu' volte il tasto MODE (2) sull'unità o sul telecomando per selezionare:
BLUETOOTH (sul display compare "BLUE"), USB o Micro SD (solo se sulla presa USB (24) /Slot Micro SD (23) vi è collegata una
memoria, sul display compare una piccola scritta "USB" o "SD"), AUX-IN (sul display compare "AUX").
REGOLAZIONE DEL VOLUME
1. Ruotare la manopola del VOLUME (11) per aumentare o diminuire il volume generale di riproduzione oppure utilizzare i tasti
VOL + (10) e VOL - (13) del telecomando;
2. Ruotare la manopola MIC VOL (15) per regolare il volume del segnale sull'ingresso MIC (18).

6
XF 1550 KB
ITALIANO
PRE-EQUALIZZAZIONI
Questa unità ha un sistema di equalizzazioni audio pre impostate. Premere più volte il tasto EQ (3) sul telecomando per selezionare
una delle 6 equalizzazioni audio disponibili e che meglio si adatta alla riproduzione sonora in corso.
REGOLAZIONE TONI ALTI E BASSI
Ruotare la manopola TREBLE (13) per regolare i toni alti.
Ruotare la manopola BASS (12) per regolare i toni bassi.
EFFETTO ECHO
Ruotare la manopola ECHO (14) per aumentare o diminuire l'effetto eco sull'ingresso MIC.
Nota: l'effetto eco agisce unicamente sull'ingresso microfonico.
EFFETTO DISCO-LIGHT
Per attivare l'effetto Disco-Light sull'altoparlante premere l'interruttore LED (25).
Per disattivare l'effetto Disco-Light, premere nuovamente l'interruttore LED (25).
FUNZIONAMENTO BLUETOOTH
1. Accendere l'apparecchio e selezionare la funzione bluetooth, sul display compare la scritta "BLUE";
2. Nella modalità Bluetooth la scritta "BLUE" sul display comincerà a lampeggiare e il sistema si porterà automaticamente in
modalità ricerca;
3. Attivare la funzionalità Bluetooth sul dispositivo esterno da accoppiare;
4. Avviare la ricerca dei dispositivi. Al termine selezionare il dispositivo "XF 1550 KB";
5. Inserire la password "0000" se richiesto;
6. Premere il tasto
(9) sull'unità oppure sul telecomando (11)
per avviare la riproduzione e utilizzare i tasti :(10) o 9(8)
sull'unità, oppure i tasti :(12) e 9(4) sul telecomando per la selezione dei brani.
COLLEGAMENTO TWS
Tecnologia True Wireless Stereo (TWS)
La tecnologia TWS consente all'utente di effettuare una connessione wireless tra due altoparlanti dello stesso modello e compatibili
con la funzione TWS.
Con la connessione TWS, due altoparlanti verranno automaticamente collegati (senza fili) per essere un unico sistema stereo-
altoparlante che emette il canale sinistro e destro.
COLLEGAMENTO
Avviso: I due altoparlanti devono essere dello stesso modello ed entrambi compatibili con la tecnologia TWS.
1. Disattivare la connessione bluetooth sul telefono o altro dispositivo Bluetooth se attiva;
2. Accendere entrambi i diffusori e selezionare su entrambi la modalità "Bluetooth";
3. Tenere premuto il tasto "TWS" (5) di uno dei diffusori (attivazione dell’accoppiamento TWS, si udirà un suono), dopo pochi
secondi i due altoparlanti saranno accoppiati;
4. Attivare il Bluetooth sul telefono o altro dispositivo, ricercare ed accoppiare l'apparecchio esterno all'altoparlante. Dopo la
connessione sarà possibile riprodurre musica con il sistema stereo-altoparlante TWS.
Le regolazioni sull'altoparlante principale verranno effettuate simultaneamente anche sull'altro altoparlante. Ad esempio, regolazione
del volume, selezione del brano precedente e successivo, riproduzione e pausa, accensione e spegnimento.
Note:
- In caso di mancato accoppiamento tra i 2 altoparlanti, spegnere entrambi gli apparecchi e ripetere i passi 1, 2 e 3.
- La funzione TWS funziona solamente tra diffusori uguali o con altri diffusori che utilizzano lo stesso micro processore o solu-
zione.
RIPRODUZIONE SU INGRESSO USB/ MICRO SD
1. Accendere l'apparecchio;
2. Inserire una memoria USB o una scheda Micro SD nei corrispettivi ingressi (23/24). La riproduzione verrà avviata automati-
camente;
3. Per mettere in pausa la riproduzione, premere il tasto
(9) sull'unità oppure il tasto
(11) del telecomando
; sul
display comparirà la scritta "PAUS";

7
XF 1550 KB
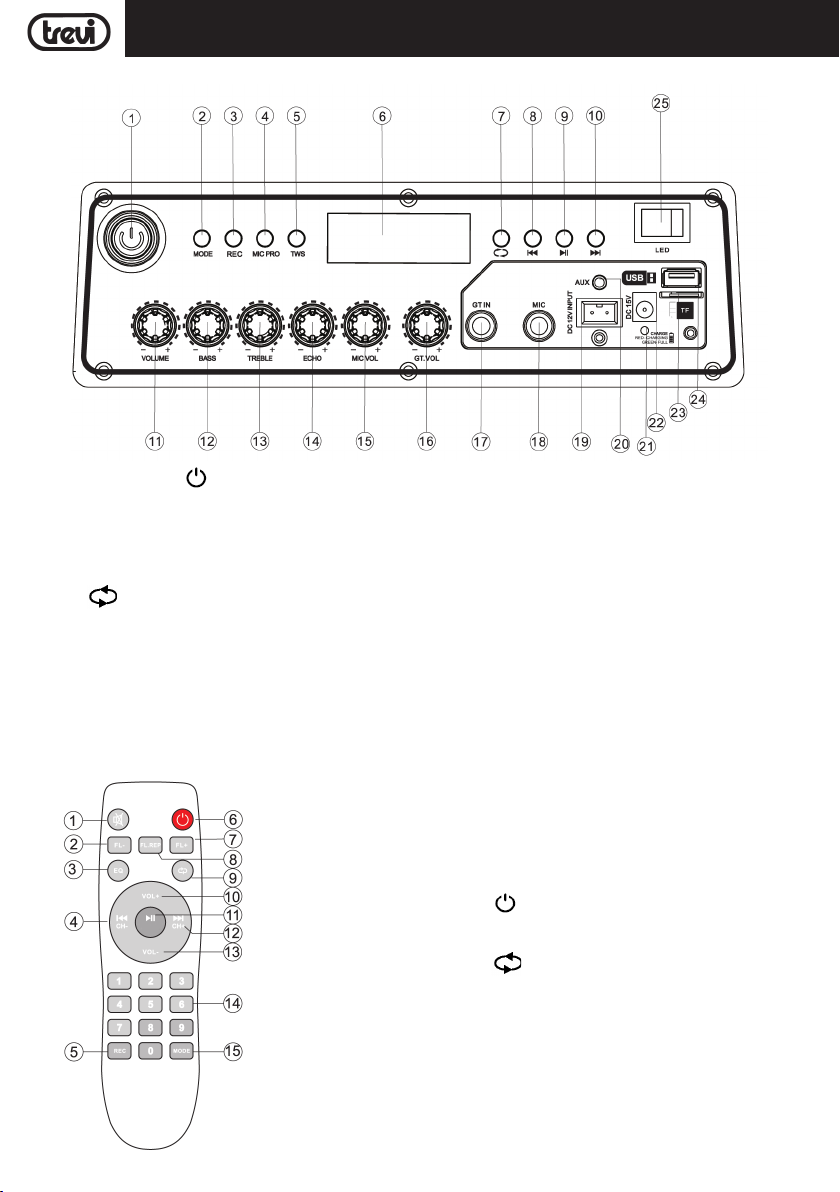
4. Per riprendere la riproduzione, premere nuovamente il tasto
(9) sull'unità o sul telecomando (11)
;
5. Premere il tasto :(10) sull'unità o il tasto :(12) sul telecomando, durante l’ascolto per passare alla traccia successiva.
Premere il tasto 9(8) sull'unità, o il tasto 9(4) sul telecomando per passare ai brani precedenti;
6. Utilizzando la tastiera numerica (14) del telecomando è possibile digitare direttamente il numero del brano musicale che si
vuole riprodurre;
7. Premere una volta il tasto (9) del telecomando, sul display comparirà la scritta "ONE" (per riprodurre continuamente la
stessa traccia); premerlo una seconda volta, sul display comparirà la scritta "ALL" (per riprodurre continuamente tutti brani
contenuti nel dispositivo USB/Micro SD);
8. Utilizzare i tasti FL- (2) e FL+ (7) del telecomando per selezionare la cartella (se presente) contenente i brani desiderati.
Note:
- Il lettore potrebbe non supportare alcuni dispositivi USB, questo è dovuto all'incompatibilità di alcuni processori.
- Per evitare interferenze dannose, collegare sempre le periferiche USB direttamente all'unità, non utilizzare cavi di prolunga.
- Dal computer formattare le memorie USB/Micro SD in FAT (16 o 32).
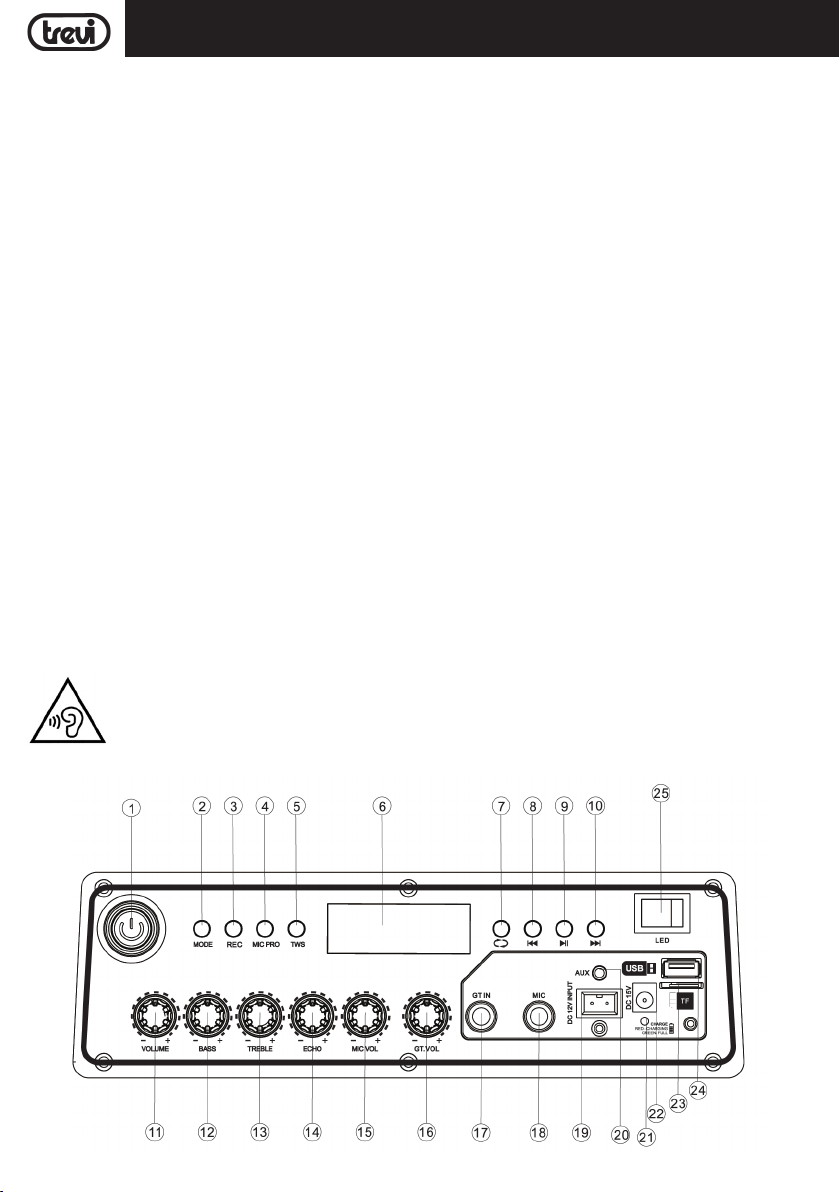
AUX-IN
1. Accendere l'apparecchio e selezionare la funzione "AUX";
2. Collegare una qualsiasi unità provvista di uscita audio tramite cavo Jack da 3,5mm all'ingresso AUX IN (20);
3. Regolare il dispositivo esterno dai propri comandi.
COLLEGAMENTO DI UNA BATTERIA AUSILIARIA
L'apparecchio è predisposto per collegare una batteria ausiliaria qualora vi trovaste con la batteria interna completamente scarica
e non vi fosse possibilità di collegare l'apparecchio ad una presa di rete.
Utilizzare la presa (19) utilizzando l'apposito cavo in dotazione, collegarvi tramite questo ad una batteria esterna da 12V facendo
molta attenzione a rispettare le polarità indicate.
MICROFONI WIRELESS (SENZA FILI)
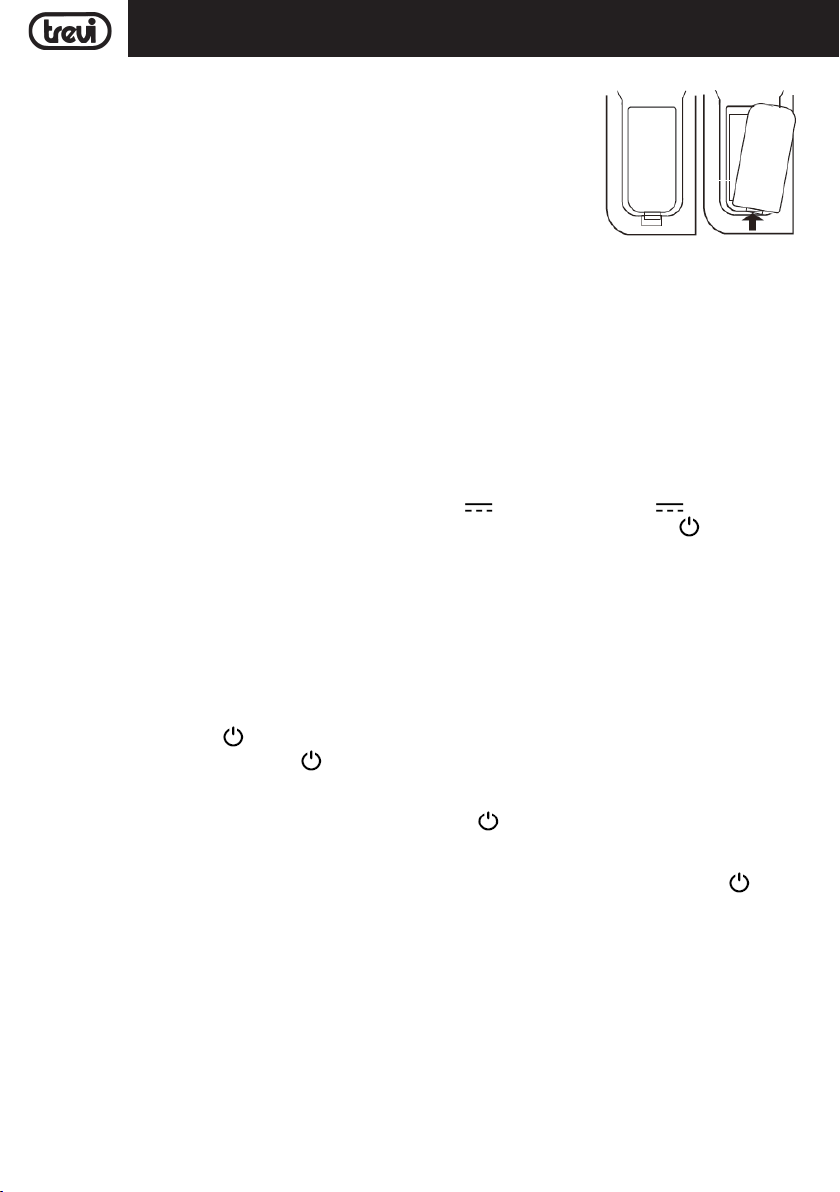
1. Rimuovere il coperchio nella parte posteriore dei Microfoni, inserire 2 batterie formato “AA” in ogni microfono facendo attenzione
alle polarità indicate e richiudere il coperchio;
2. Accendere il microfono spostando l'interruttore centrale verso l'alto. Se l'indicatore di accensione lampeggia o non si accende,
controllare se le batterie sono cariche e se sono state inserite con la polarità corretta;
3.
Regolare il volume
ruotando la manopola MIC VOL(15);
4. Se una volta acceso il microfono l'indicatore di accensione lampeggia, le batterie sono scariche, sostituirle immediatamente.
Note:
- La distanza di ricezione del microfono senza fili è di 15metri circa senza ostacoli, non utilizzare a distanze superiori.
- Se nello stesso ambiente vengono utilizzati più microfoni wireless contemporaneamente, questi devono essere impostati su
frequenze diverse e devono essere tenuti lontani almeno a 30m.
- Non mettere il dispositivo troppo vicino a lettori DVD/CD/VCD in quanto hanno frequenze che potrebbero influire sul microfono.
POSSIBILI LIMITAZIONI D’USO
- Questo apparecchio potrebbe operare su frequenze non autorizzate nella regione in cui si trova l’utilizzatore. Si suggerisce di
rivolgersi alle autorità competenti e richiedere le informazioni necessarie relative alle frequenze autorizzate nella propria regione
per i sistemi radiomicrofonici. In alcuni casi potrebbe essere necessaria una licenza ministeriale per l’uso di questo apparec-
chio. Per i possibili requisiti rivolgersi alle autorità competenti. L’utente si assume l’esclusiva responsabilità per l’acquisizione
della licenza per gli apparti radiomicrofonici e la licenziabilità dipende dalla classificazione e dall’applicazione dell’utente e della
frequenza selezionata. (D. Lgs. 269/2001 art.6 comma 3). Le frequenze utilizzate da questo prodotto sono autorizzate solo sul
territorio Italiano e potrebbero non essere utilizzabili in altri paesi. Si suggerisce di rivolgersi alle autorità competenti e richiedere
le relative informazioni.
Paesi Europei per i quali il prodotto ha restrizioni:
Regno Unito: IMPLEMENTED.
Spagna: LIMITED IMPLEMENTATION.
Francia: LIMITED IMPLEMENTATION, for professional users.
Danimarca: LIMITED IMPLEMENTATION, tuning range.
Malta: LIMITED IMPLEMENTATION, individual license required
Irlanda: NOT IMPLEMENTED
ITALIANO
UK ES FR
DK MT IE

8
XF 1550 KB
ITALIANO
REGISTRAZIONE
REGISTRAZIONE DA MICROFONO A MEMORIA USB
1. Accendere l'apparecchio;
2. Inserire una memoria USB nella presa (24);
3. Accendere il microfono;
4. Premere in tasto REC (3) sull'unità e parlare utilizzando il microfono;
5. Premere nuovamente in tasto REC (3) sull'unità per terminare la registrazione; il file registrato verrà salvato all'interno della
memoria USB.
RISOLUZIONE DEI PROBLEMI
Se si verifica un problema, attenersi alla procedura descritta nella seguente tabella.
Se il problema non può essere risolto, contattare il rivenditore o il centro assistenza.
Problema Possibili cause Soluzione
Nessun suono riprodotto quan-
do l'apparecchio viene acceso
1. Nessuna sorgente sonora in
ingresso
2. Manopola Volume a livello 0 o
regolazione volume dal teleconado
a livello 0
3. Nessun dispositivo Micro SD/USB
collegato
1. Collegare un dispositivo all'ingresso AUX-IN
2. Regolare il volume
3. Collegare USB/ Micro SD card, riprodurre
MP3
Suono distorto 1. Volume troppo alto
2. Errore file Audio
1. Abbassare il volume
2. Controllare e riprodurre un'altro file Audio
Nessun suono dal microfono 1. La presa del microfono può non
essere collegata correttamente.
2. L'interrutore di accensione sul
microfono può essere in posizione
"spento".
3. Volume del microfono basso.
1. Assicurarsi che il microfono sia collegato
correttamente alla presa.
2. Accendere il microfono.
3. Regolare correttamente il volume del
microfono
Nessun suono quando si inse-
risce un dispositivo USB/ Micro
SD Card
1. Formato file non supportato
2. USB/ Micro SD card non collegate
correttamente
1. Il formato dei file audio deve essere MP3
2. Collegare l'apparecchio USB/Micro SD card
correttamente
Impossibile caricare la batteria
o la batteria ha una durata breve
1. Il cavo di alimentazione non è inseri-
to pene nella presa
2. La batteria non è completamente
carica
3. La batteria potrebbe aver terminato il
suo ciclo di vita
1. Controllare se il cavo di alimentazione è
collegato in modo corretto
2. Normalmente ci vogliono 5-6 ore per
ricaricare completamente la batteria
3. Sostituire la vecchia batteria con una nuova
avente le stesse specifiche tecniche
Dagli altoparlanti si sentono
forti rumori
1. Microfono acceso ma troppo vicino
all'altoparlante
2. Microfono acceso ma non viene
utilizzato
3. Il Volume del microfono potrebbe
essere troppo alto
4. Un cellulare viene utilizzato troppo
vicino all'altoparlante
5. Apparecchi senza fili possono esse-
re molto vicini a chi sta utilizzando il
microfono
1. Tenere il microfono alla distanza di 2 metri
dal diffusore
2. Spegnere il microfono se non utilizzato
3. Abbassare il volume del microfono
4. Tenere il cellulare lontano dall'altoparlante
mentre si effettua una chiamata.
5. Tenere il diffusore lontano da apparecchi
wireless

9
XF 1550 KB
INFORMATIVA SULLA RIMOZIONE E LO SMALTIMENTO DELLE BATTERIE
Attenzione: Questa operazione è riservata esclusivamente al personale tecnico specializzato!
PROCEDURA PER LA RIMOZIONE DELLA BATTERIA DALL’ALTOPARLANTE AMPLIFICATO
Operare esclusivamente in assenza di collegamento dell’apparecchio alla rete elettrica!
1. Rimuovere le viti che serrano il pannello metallico posteriore dell'alloggiamento batteria;
2. Rimuoverlo e individuare la batteria;
3. Scollegare la batteria e rimuoverla. Collegarne una nuova di uguali caratteristiche e capacità.
SMALTIMENTO DELLA BATTERIA
Qualunque sia il tipo di batteria esaurita, essa non deve essere gettata tra i rifiuti domestici, nel fuoco o nell’acqua. Ogni tipo di
batteria esaurita deve essere riciclata oppure smaltita presso gli appositi centri di raccolta dedicati.
INFORMAZIONI AGLI UTENTI
ai sensi del Decreto Legislativo N° 49 del 14 Marzo 2014
“Attuazione della Direttiva 2012/19/UE sui rifiuti di apparecchiature elettriche ed elettroniche (RAEE)”
Il simbolo del cassonetto barrato riportato sull’apparecchiatura indica che il prodotto alla fine della propria vita utile deve essere
raccolto separatamente dagli altri rifiuti. L’utente dovrà, pertanto, conferire l’apparecchiatura integra dei componenti essenziali
giunta a fine vita agli idonei centri di raccolta differenziata dei rifiuti elettronici ed elettrotecnici, oppure riconsegnarla al rivenditore al
momento dell’acquisto di nuova apparecchiatura di tipo equivalente, in ragione di uno a uno, oppure 1 a zero per le apparecchiature
aventi lato maggiore inferiore a 25cm. L’adeguata raccolta differenziata per l’avvio successivo dell’apparecchiatura dimessa al
riciclaggio, al trattamento e allo smaltimento ambientale compatibile contribuisce ad evitare possibili effetti negativi sull’ambiente
e sulla salute e favorisce il riciclo dei materiali di cui è composta l’apparecchiatura. Lo smaltimento abusivo del prodotto da parte
dell’utente comporta l’applicazione delle sanzioni amministrative di cui al D.Lgs n. Decreto Legislativo N° 49 del 14 Marzo 2014.
CARATTERISTICHE TECNICHE
GENERALI
Alimentazione: .........................................................................15V 2A
batteria interna al piombo ricaricabile 12V , 4,5Ah
Consumo: ..............................................................................Max 65W
Temperatura di funzionamento: ............................................................................ 0° ~ 40°C
Umidità: ............................................................................5% ~ 90%
Potenza massima Audio: ................................................................................... 120W
Risposta in frequenza: ....................................................................... 45Hz - 20KHz
Rapporto segnale rumore: .................................................................................... 71dB
Sensibilità: ................................................................................95±3dB
Impedenza: ....................................................................................... 4Ω
Potenza di trasmissione di picco Bluetooth: ................................................................. 2,5mW
Potenza di trasmissione max Bluetooth:....................................................................... 1,9mW
Banda di trasmissione Bluetooth:................................................................................. 2,4GHz
Dimensioni: ................................................................. 435x303x656mm
Peso: ................................................................................ 12,5 Kg
MICROFONO WIRELESS
Range di Frequenza: .................................................................174MHz - 216MHz
Banda di Frequenza: ........................................................................................VHF
Modulazione: ......................................................................................... FM
Frequenza di trasmissione: .....................................................202,75MHz and 208,6MHz
Potenza di trasmissione: ...........................................................................10mW (±1)
Corrente di funzionamento: ..................................................................................<30mA
Alimentazione: .................................................2x 1,5V (tipo “AA”) non incluse
ITALIANO

10
XF 1550 KB
ENGLISH
NOTES ON USE
Listening at high volume for a long time may damage your hearing.
This is a precision electronic appliance; avoid using it in the following cases:
• Near magnetic fields.
• Near heat sources such as heaters and stoves.
• In very humid places such as bathrooms, swimming pools, etc...
• In very dusty places.
• In places subject to strong vibrations.
• Do not bring your ear close to the speaker during the setting and volume adjustment phases, and in particular to keep the
volume to a minimum in the ignition phase.
• Position the appliance so that there is always enough space on its sides for the free circulation of air (at least 5 cm).
• If liquids penetrate inside the appliance, immediately disconnect the plug from the socket and take the appliance to the nearest
authorized TREVI service center.
• Before Switch On/Recharging the appliance, always check that the power and connection cables are installed correctly.
• The power adapter must be connected to an outlet near the device and must be easily accessible.
• If you notice excessive heat on the device or on the power adapter, immediately disconnect the plug from the main power
socket.
• Do not pull on the power cable
• No naked flame sources, such as lighted candles, should be placed on the appliance.
• The appliance must not be exposed to dripping or splashing water and no objects filled with liquid, such as vases, must be
placed on the appliance.
• Instruct children and people with little knowledge of the product to use it correctly.
• Keep this manual for future reference.
CARE AND MAINTENANCE
Use a slightly damp soft cloth for cleaning. Do not use solvents and abrasive substances.
IMPORTANT
This device is designed for non-professional home use. The good construction of this device guarantees its perfect functioning
for a long time. If, however, a problem should arise, it is advisable to consult the nearest TREVI Authorized Service Center.
TREVI follows a policy of ongoing research and development. Therefore products may have different features from those described.
To avoid possible hearing damage,limit the listening time to high volumes
FRONT PANEL FUNCTIONS

11
XF 1550 KBENGLISH
TRANSPORTATION
Press the button on the handle of the trolley, lift the handle up to the block (you will hear a metallic click). For transport, by acting
on the handle of the trolley, slightly bend the appliance and take advantage of the two rear wheels.
To unlock and close the trolley, press the button on the handle again and lower the handle completely.
For transport, it is also possible to use the two handles placed laterally to the appliance.
REMOTE CONTROL
ACTIVATION AND REPLACEMENT REMOTE CONTROL'S BATTERY
1. Power Switch.
2. MODE key, to select input signal source.
3. REC, recording.
4. MIC PRIO, microphone priority.
5. TWS, true wireless stereo key.
6. Display screen.
7. , Repeat key.
8. 9, previous track key.
9. , Play/Pause key.
10. :, next track key.
11. Volume control.
12. BASS control.
13. TREBLE control.
14. Microphone ECHO.
15. MIC VOL, Microphone Volume Control.
16. GUITAR Volume Control.
17. GUITAR Input.
18. MIC, Microphone Input.
19. DC 12V External battery Input (cable supplied).
20. AUX IN Input.
21. Charge Led Display.
22. External power adapter connector.
23. TF Card jack.
24. USB jack.
25. LED Switch.
1. MUTE Key.
2. FL-, Prev. folder key.
3. EQ mode key.
4. 9, previous track key.
5. Record key.
6. , Stand-by key.
7. FL+, Next folder key.
8. FL.REP, Folder Repeat key.
9. , Repeat key.
10. VOL +, Volume increase key.
11. , Play/Pause key.
12. :, next track key.
13. VOL -, Volume decrease key.
14. Tracks select key.
15. MODE key, to select input signal source.
Before using the remote control, insert the batteries as described below:
1. Remove the battery compartment cover as shown in the figure;
2. Insert 2 "AAA" size batteries paying attention to the polarities indicated and close
the cover.
CAUTION
- Dispose of used batteries according to the recycling regulations in your area.
- Danger of explosion if battery is incorrectly replaced.
- Replace only with the same type or equivalent.
- If the remote control is not used for long periods, the battery can leak and damage the remote control, replace it with a new one
if it should occur.
- DO NOT short-circuit the batteries or throw them in water, general trash or fire.

12
XF 1550 KB
ENGLISH
POWER/BATTERY CHARGE
This unit works with internal rechargeable lead battery 12V 4,5Ah or 15V 2A adapter supply.
When the battery is running out or the unit does not turn on, turn the main switch (1) to the "OFF" position, connect the
supplied power supply to the socket (22) of the device and the plug to a power socket. power to recharge the internal battery,
the red LED (21) will light up.
- LED indicator light (17) RED fixed: the device is correctly connected to the power cable and the battery is being charged.
- LED indicator light (17) GREEN fixed: charging operation completed, the battery is charged.
Note: Do not connect the appliance to an outlet with a voltage other than that indicated.
BASIC FUNCTIONS
POWER ON/OFF
Press the main switch (1) to Turn On and use the device with its internal battery.
Press the main switch (1) again to Switch Off the device or charge the battery.
STAND-BY
It is possible to bring the appliance into Stand-by mode using the button (6) on the remote;
Caution:
- In stand-by function there is no LED indicating.
- Leaving the unit in stand-by function the battery discharges faster than using the main switch (1).
MODE SETTING FUNCTION
To change the mode function, press more times the MODE (2) key on the unit or press MODE button (15) on the remote control
to select: BLUETOOTH (on display "BLUE"), USB/Micro SD (only if the socket USB (24)/Micro SD socket (23) is connected to a
memory, a small writing "USB" or "SD" appears on the display), AUX-IN (on display "AUX").
ADJUSTING THE VOLUME
1. Turn the VOLUME knob (11) to increase or decrease the general playback volume or use the Vol+ (10) and Vol- (13) buttons
on the remote control;
2. Turn the MIC VOL knob (15) to adjust the volume of the signal at the MIC input (18).
PRE-EQUALIZER
This unit has a pre audio equalization system set. Press several times the EQ button (3) on remote control to select one of 6
available audio equalizers, and that best suits the sound playback.
SETTING TREBLE AND BASS TONE
Turn the TREBLE knob (13) to adjust the high tones.
Turn the BASS knob (12) to adjust the bass tones.
ECHO EFFECT
Turn the ECHO knob (14) to increase or decrease the echo effect on the input MIC.
Note: the echo only works on microphone input.
DISCO-LIGHT EFFECTS
Press the LED switch (25) to activate the Disco-Light effect on the loudspeaker.
Press again the LED switch (25) to deactivate the Disco-Light effect.
BLUETOOTH FUNCTION
1. Switch on the appliance and select the bluetooth function, the word "BLUE" appears on the display;
2. In Bluetooth mode the word "BLUE" on the display will flash and the system will automatically go into search mode;
3. Activate the Bluetooth feature on the external device to be coupled;
4. Initiate a search for devices. After select the "XF 1550 KB";
5. Enter the password "0000" if required;
6. Press the
(9) button
on the unit or the key (11) on remote control, to start playing and the buttons :(10) o 9(8)
on the unit, or the keys :(12) and 9(4) for selection of songs.

13
XF 1550 KB
TWS FUNCTION OPERATION
True wireless stereo (TWS) technology
TWS technology enables user to make wireless connection between two speakers which are same model and compatible with
TWS. In TWS connection, two speakers will be automatically grouped to be a Stereo- Speaker System which outputs the left and
right channel.
HOW TO ESTABLISH
Notice: Two speakers must be same model and both compatible with TWS.
1. Please switch on both speakers and select "Bluetooth" mode;
2. Press "TWS" button (5) of one of the speakers until hearing a "beep". It becomes the main speaker (left chennel), which will
automatically search and connect with another speaker (right channel). After connection, you will hear a "beep";
3. Connect mobile phone or Bluetooth player to the speaker by Bluetooth. After connection, you can play music with the TWS
Stereo- Speaker System.
TWS function operates in TWS mode, manipulations to the main speaker will be simultaneously effected in another speaker. For
example, volume adjustement, previous and next song selection, play and pause, power on and off.
Note:
- If the 2 loudspeakers are not paired, switch off both devices and repeat steps 1, 2 and 3.
- The TWS function only works between equal speakers or with other speakers that use the same micro processor or solution.
INPUT USB/MICRO SD
1. Switch On the appliance;
2. Insert a USB memory or an Micro SD card in the corresponding entries (23/24). Playback starts automatically;
3. To pause playback, press the
(9)
button on the unit or the key (11) on remote control, the display will show
"PAUS";
4. To resume playback, press the
(9)
on the unit or on the remote control (11);
5. Press :(10) button on unit or :(12) button on remote control while listening to switch to the next track.
Press the 9(8) button on unit or 9(4) button on remote to go to the previous tracks;
6. Using the numeric keypad (14) on remote control you can directly enter the number of the song you want to play;
7. Press button (9) on remote control, the display will show "ONE" (to reproduce the same track continuously); press it
a second time, the word "ALL" will appear on the display (to continuously play all the tracks contained in the USB/Micro SD
device);
8. Use the FL- (2) and FL + (7) buttons on the remote control to select the folder (if any) containing the desired tracks.
Note:
- The player may not support some USB/Micro SD devices, this is due to the incompatibility of some processors.
- To avoid harmful interference, always connect USB devices directly to the unit, do not use extension cords.
- From the computer to format the USB memory/SD FAT (16 or 32).
AUX-IN
1. Switch on the unit and select the "AUX" function;
2. Connect any unit equipped with audio output, through a cable 3.5mm jack to the AUX IN (20);
3. Use the external device from their commands.
BATTERY AUXILIARY CONNECTION
The appliance is set up to connect an auxiliary battery if you were with the internal battery completely empty and there was no
possibility of connecting the appliance to a mains socket.
Use the socket (19) using the appropriate cable provided, connect it to an external 12V battery making sure to respect the
indicated polarities.
USING THE WIRELESS MICROPHONE
1. Remove the cover on the back of the Microphones, insert 2 “AA” batteries into each microphone paying attention to the
polarities indicated and close the cover again;
2. Turn on the microphone by moving the center switch upward. If the power indicator flashes or does not light up, check if the
batteries are charged and if they have been inserted with the correct polarity;
ENGLISH

14
XF 1550 KB
ENGLISH
3. Adjust the volume by turning the MIC VOL knob (15);
4. If the power indicator flashes after the microphone is turned on, the batteries are exhausted, replace them immediately.
Note:
- The effective range of the wireless microphone is 15m. Do not use over that range.
- Do not use two microphones working on the same frequency or crosstalk and interference will occur.
- If you use more wireless microphones at the same time, they must be set to different frequencies and should be kept away at
least at 30m.
- Don’t put the device too close to a DVD/CD/VCD player as they have strong frequencies and might affect the microphone.
POSSIBLE LIMITATIONS OF USE
- This device may operate on unauthorized frequencies in the region where the user is located. We recommend that you con-
tact the competent authorities and request the necessary information relating to the frequencies authorized in your region for
wireless microphone systems. In some cases, a ministerial license may be required for the use of this appliance. For possible
requirements, contact the competent authorities. The user assumes exclusive responsibility for the acquisition of the license
for radio-microphones and licensability depends on the classification and application of the user and on the frequency selected.
(Legislative Decree 269/2001 art.6 paragraph 3). The frequencies used by this product are authorized only on Italian territory
and may not be usable in other countries. It is recommended to contact the competent authorities and request the relevant
information.
European countries for which the product has restrictions:
United Kingdom: IMPLEMENTED.
Spain: LIMITED IMPLEMENTATION.
France: LIMITED IMPLEMENTATION, for professional users.
Denmark: LIMITED IMPLEMENTATION, tuning range.
Malta: LIMITED IMPLEMENTATION, individual license required.
Ireland: NOT IMPLEMENTED
REC FUNCTION OPERATION
Recording from Microphone to USB flash drive
1. Switch on the appliance;
2. Insert a USB memory into the socket (24);
3. Switch On the microphone;
4. Press the REC (3) button on the unit and speak using the microphone;
5. Press again the REC (3) button to end recording; the recorded file will be saved in the USB memory.
TROUBLESHOOTING
If a problem occurs, follow the steps in the table below.
If the problem still can’t be solved, please contact your retailer.
Problem Possible cause Solution
No sound when power is
turned ON
1. No input sound source comes
2. Volume knob in the lowest position
3. Voice switch off
4. USB/Micro SD card not plugged
1. Input AUX signal
2. Adjust volume
3. Turn on voice switch
4. Plug USB/Micro SD card, play MP3
Distorted sound 1. Volume is too loud
2. Audio file error
1. Turn the volume down
2. Check and change the audio file
No sound from the mi-
crophone
1. Microphone socket may not be
plugged properly.
2. Microphone switch may not be on.
3. Microphone volume is on lowest
mode.
1. Ensure the microphone is correctly plugged
into the socket.
2. Turn on the microphone
3. Adjust the microphone volume as per users
wish
UK ES FR
DK MT IE

15
XF 1550 KBENGLISH
No sound comes after
inserting USB/ Micro
SD Card
1. Incorrect file format
2. USB/Micro SD may not be plugged
properly
1. File format should be MP3
2. Plug USB/Micro SD card correctly
Unable to charge or the
battery works only for
short duration
1. Connect with power cord to charge
2. Battery not fully charged
3. Battery life may have ended
1. Check if power cord connected properly
2. Extend charging time;normally it takes 6-8 hour
to fully charge
3. Replace old batteries with the same specifica-
tion as the old batteries.
Speaker makes loud
noises
1. Microphone switched on but may too
close to the speaker
2. Microphone switched on but is not
being used
3. Microphone volume may be too loud
4. Mobile phone is being used too close
to the speaker
5. Other wireless equipment may be
placed very close to the speaker
1. Keep the microphone 2 meters away from the
speaker
2. Turn off microphone if not in use.
3. Adjust microphone volume to lower mode
4. Keep mobile away from the speaker whilst a
ending a call.
5. Keep the speaker away from other wireless
equipment
INFORMATION NOTE ON THE REMOVAL BATTERY
Warning: Only high-qualified personnel should perform this operation!
BATTERY REMOVAL
The appliance should not be plugged to the mains socket when performing this operation!
1. Remove the screws that secure the rear metal panel of the battery compartment;
2. Remove it and locate the battery;
3. Disconnect the battery and remove it. Connect a new one of equal characteristics and capacity.
INFORMATION ON DISPOSAL BATTERY
Used batteries should not be disposed of with household waste or thrown into fire or water. Used batteries should be recycled or
disposed of in separate waste collection centres.
INFORMATION TO USERS
pursuant to Legislative Decree No. 49 of March 14, 2014
"Implementation of Directive 2012/19/EU on Waste Electrical and Electronic Equipment (WEEE)"
This wheeled bin symbol on the product indicates that at the end of its life must be collected separately from other waste. The
user must, therefore, take the remote control integrates the essential components that got to its life to the appropriate differen-
tiated collection centers for electronic and electro-technical waste, or return it to the dealer when purchasing a new appliance of
equivalent type, in terms of one to one, or one to zero for equipment having longer side of less than 25cm. Appropriate separate
collection for the decommissioned equipment for recycling, processing and environmentally compatible disposal helps prevent
negative impact on the environment and human health and promotes recycling of the materials making up the product. Illegal
dumping of the product by the user entails the application of administrative sanctions stated in Legislative Decree n. Legislative
Decree No. 49 of March 14, 2014.

16
XF 1550 KB
ENGLISH
TECHNICAL SPECIFICATIONS
Power Supply: .........................................................................15V 2A
internal lead acid rechargeable battery 12V 4,5Ah
Power: ..............................................................................Max 65W
Operating temperature: ........................................................................... 0° ~ 40°C
Humidity: ........................................................................... 5% ~ 90%
Output Audio power: ................................................................................... 120W
Frequency response: ....................................................................... 45Hz - 20KHz
S/N ratio: ................................................................................... 71dB
Sensibility: ................................................................................95±3dB
Impedance: ....................................................................................... 4Ω
Bluetooth peak transmission power: ............................................................................ 2,5mW
Bluetooth max power transmission:............................................................................. 1,9mW
Band transmission Bluetooth: ................................................................................. 2,4GHz
Dimensions: ................................................................. 435x303x656mm
Weight: .................................................................................12,5 kg
WIRELESS MICROPHONES
Frequency range: .................................................................174MHz - 216MHz
Frequency band: ........................................................................................VHF
Modulation: ......................................................................................... FM
Transmission frequency: .....................................................202,75MHz and 208,6MHz
Transmission power: ...........................................................................10mW (±1)
Operating current: ..................................................................................<30mA
Power supply: ................................................2x 1,5V (type “AA”) not included

17
XF 1550 KB
Pour éviter d'éventuels dommages auditifs, limiter la durée d'écoute à volume élevé
NOTES D’EMPLOI
Une écoute prolongée à un volume élevé peut endommager votre audition.
Il s'agit d'un appareil électronique de précision; évitez de l'utiliser dans les cas suivants:
• Près de champs magnétiques.
• À proximité de sources de chaleur telles que radiateurs et poêles.
• Dans des endroits très humides tels que salles de bain, piscines, etc ...
• Dans des endroits très poussiéreux.
• Dans des endroits soumis à de fortes vibrations.
• N'approchez pas votre oreille de l'enceinte pendant les phases de réglage et de réglage du volume, et en particulier pour
maintenir le volume au minimum pendant la phase d'allumage.
• Positionnez l'appareil de manière à ce qu'il y ait toujours suffisamment d'espace sur ses côtés pour la libre circulation de l'air
(au moins 5 cm).
• Si des liquides pénètrent à l'intérieur de l'appareil, débranchez immédiatement la fiche de la prise et apportez l'appareil au
centre de service TREVI agréé le plus proche.
• Avant d'allumer/de recharger l'appareil, vérifiez toujours que les câbles d'alimentation et de connexion sont correctement
installés.
• L'adaptateur secteur doit être connecté à une prise à proximité de l'appareil et doit être facilement accessible.
• Si vous remarquez une chaleur excessive sur l'appareil ou sur l'adaptateur secteur, débranchez immédiatement la fiche de la
prise d'alimentation principale.
• Ne tirez pas sur le câble d'alimentation
• Aucune source de flamme nue, telle que des bougies allumées, ne doit être placée sur l'appareil.
• L'appareil ne doit pas être exposé à des gouttes d'eau ou des éclaboussures et aucun objet rempli de liquide, comme des
vases, ne doit être placé sur l'appareil.
• Demandez aux enfants et aux personnes ayant peu de connaissances sur le produit de l'utiliser correctement.
• Conservez ce manuel pour référence future.
MANIEMENT ET ENTRETIEN
Pourlenettoyage,ilestconseilléd’utiliserunchiffondouxlégèrementhumide.Évitezl’emploi desolvantsoudesubstancesabrasives.
IMPORTANT
Cet appareil est conçu pour un usage domestique (usage non professionnel). La bonne fabrication de cet appareil garantit un
fonctionnement parfait pour une longue période. Si toutefois quelques inconvénients devaient se présenter, adressez-vous au
Centre d’Assistance agréé TREVI le plus proche.
TREVI observe une politique de recherche et de développement continus. C’est pourquoi ses produits peuvent présenter des
caractéristiques différentes par rapport à celles qui sont décrites.
FRANCAIS

18
XF 1550 KB
FRANCAIS
TELECOMMANDE
1. Interrupteur POWER ON/OFF, marche/arrêt.
2. Bouton MODE, sélectionnez la fonction
3. Bouton REC, enregistrement.
4. Bouton MIC PRIO, priorité Microphone.
5. True wireless stereo bouton (TWS).
6. Afficher.
7. Bouton , répétition.
8. Bouton 9, piste précédente.
9. Bouton, Play/Pause.
10. Bouton :, piste suivant.
11. Réglage du volume.
12. BASS, réglage des basses tonalités.
13. TREBLE, réglage de tonalité élevée.
14. Réglage ECHO
15. MIC VOL, églage du volume du microphone.
16. Contrôle du volume GUITAR.
17. Entrée GUITAR.
18. Entrée MIC
19. Entrée 12V pour toute batterie auxiliaire (câble fourni).
20. Entrée AUX-IN.
21. Indicateur LED de charge/décharge de la batterie.
22. Connecteur d'alimentation.
23. Entrée carte TF.
24. Entrée USB.
25. Interrupteur marche/arrêt LEDs frontales (Disco Light)
DESCRIPTION DE LA COMMANDE
1. Bouton MUTE.
2. Bouton FL-, dossier précédent.
3. Bouton EQ, EQ préréglé.
4. Bouton 9, sélection de piste précédente.
5. Bouton REC, enregistrement.
6. Bouton , Stand-by.
7. Bouton FL+, dossier suivant.
8. Bouton FL.REP, répétition de dossier.
9. Bouton , répétition.
10. Bouton VOL +, augmentation du volume.
11. Bouton , Lecture/Pause.
12. Bouton :, sélectionner la piste suivante.
13. Bouton VOL -, diminution du volume.
14. Boutons numériques 0-9, sélection des pistes.
15. Bouton MODE, sélection de fonction.

19
XF 1550 KB
ACTIVATION ET REMPLACEMENT DE LA BATTERIE DE TÉLÉCOMMANDE
FRANCAIS
TRANSPORT
Appuyez sur le bouton de la poignée du chariot, soulevez-la jusqu'au bloc (vous entendrez un clic métallique). Pour le transport,
en agissant sur la poignée du chariot, pliez légèrement l’appareil et tirez parti des deux roues arrière.
Pour déverrouiller et fermer le chariot, appuyez à nouveau sur le bouton de la poignée et abaissez-la complètement.
Pour le transport, il est également possible d’utiliser les deux poignées placées latéralement à l’appareil.
ALIMENTATION
Cet appareil fonctionne avec une batterie au plomb rechargeable 12V , 4,5Ah ou une alimentation électrique 15V 2A.
Lorsque la batterie est déchargée ou que l'appareil ne s'allume pas, mettez l'interrupteur principal (1) en position "OFF",
branchez l'alimentation fournie à la prise (22) de l'appareil et la fiche à une prise de courant. alimentation pour recharger la batterie
interne, la LED rouge (21) s'allumera.
Etat de la LED indicatrice lors du chargement de la batterie:
- Voyant Led (21) ROUGE: l'appareil est correctement connecté au câble d'alimentation et la batterie est en cours de chargement.
- Voyant Led (21) VERT: le chargement est terminé, la batterie est chargée.
Remarque: Ne connectez pas l'appareil à une prise avec une tension autre que celle indiquée.
FONCTIONS
MARCHE/ARRÊT
Appuyez sur l'interrupteur principal (1) pour allumer et utiliser l'appareil avec sa batterie interne.
Appuyez à nouveau sur l'interrupteur principal (1) pour éteindre complètement l'appareil ou pour recharger la batterie.
STAND-BY
Il est possible de mettre l'appareil en mode Veille à l'aide du bouton (6) de la télécommande;
Remarque:
- Il n'y a pas de LED indiquant l'activation de la fonction de stand-by.
- S'il vous plaît noter que sortant de l'unité de la fonction stand-by la batterie se vide plus vite que l'aide de interrupteur
(1).
SELECTION DE LA FONCTION
Pour changer le mode de fonctionnement, appuyez plusieurs fois sur le bouton MODE (2) sur l'appareil ou appuyez sur le
boutton MODE (15) sur la télécommande pour sélectionner: BLUETOOTH (l'écran affiche le mode "BLUE"), USB ou Micro SD
Card (uniquement si une mémoire est connectée au port USB/Micro SD, un petit message "USB" ou "SD" apparaît à l'écran),
AUX-IN (l'écran affiche "AUX").
AJUSTEMENT DU VOLUME
1. Tournez le bouton VOLUME (11) pour augmenter ou diminuer le volume général de lecture ou utilisez les boutons VOL + (10)
et VOL - (13) de la télécommande;
2. Tournez le bouton MIC VOL (15) pour régler le volume du signal sur l'entrée MIC (18).
Avant d'utiliser la télécommande, insérez les piles comme décrit ci-dessous:
1. Retirez le couvercle du compartiment des piles comme indiqué sur la figure;
2. Insérez 2 piles de taille "AAA" en faisant attention aux polarités indiquées et fermez
le couvercle.
MISE EN GARDE
- Jetez les piles usagées conformément aux réglementations de recyclage en vigueur dans
votre région.
- Risque d'explosion si la batterie n'est pas remplacée correctement.
- Remplacez uniquement par le même type ou équivalent.
- Si la télécommande n'est pas utilisée pendant de longues périodes, la pile peut fuir et endommager la télécommande, remplacez-
la par une neuve si cela se produit.
- NE PAS court-circuiter les batteries ni les jeter dans l'eau, les ordures ménagères ou le feu.

20
XF 1550 KB
FRANCAIS
PRE-EGALISATION
Cette unité a un audio ensemble du système d'égalisation pré. Appuyez sur le bouton EQ (3) sur la télécommande pour sélectionner
l'un des 6 égaliseurs audio disponibles, et qui convient le mieux à la lecture du son.
REGLAGE TONALITE AIGUS ET DES GRAVES
Tournez le TREBLE (13) pour régler les aigus.
Tournez le BASS (12) pour régler les basses.
ECHO EFFET
Tournez le ECHO (14) pour augmenter ou diminuer l'effet d'écho sur les entrées MIC.
Remarque: l'écho ne fonctionne que sur les entrées MIC.
EFFET DE LUMIÈRE DISQUE
Pour activer l'effet Disco-Light sur l'enceinte, appuyez sur le commutateur LED (25).
Pour désactiver l'effet Disco-Light, appuyez à nouveau sur le commutateur LED (25).
BLUETOOTH FONCTIONNEMENT
1. Allumez l'appareil et sélectionnez la fonction Bluetooth, le mot "BLEU" apparaît à l'écran;
2. En mode Bluetooth, le mot "BLEU" sur l'écran commencera à clignoter et le système passera automatiquement en mode de
recherche;
3. Activez la fonction Bluetooth sur l'appareil externe pour être couplé;
4. Lancez une recherche des appareils. Après sélectionnez l'option "XF 1550 PRO";
5. Entrez le mot de passe "0000" si nécessaire;
6. Appuyez sur la touche(9) de l’appareil ou de la télécommande (11) pour lancer la lecture et utilisez les touches :(10)
ou 9(8), ou les touches :(12) et 9(4) sur la télécommande pour sélectionner les pistes.
FONCTIONNEMENT DE LA FONCTION TWS
Technologie True Wireless Stereo (TWS)
La technologie TWS permet à l’utilisateur d’établir une connexion sans fil entre deux haut-parleurs du même modèle compatibles
avec TWS. Dans la connexion TWS, deux haut-parleurs seront automatiquement regroupés pour former un système stéréophonique
qui sortira les canaux gauche et droit.
CONNEXION
Remarque: Deux haut-parleurs doivent être du même modèle et tous deux compatibles avec TWS.
1. Allumez les deux enceintes et sélectionnez le mode "Bluetooth";
2. Appuyez sur le bouton "TWS" (5) de l'une des enceintes jusqu'à ce que vous entendiez un "bip". Il devient le haut-parleur principal
(gauche), qui recherchera et se connectera automatiquement avec un autre haut-parleur (canal droit). Après la connexion, vous
entendrez un "bip";
3. Connectez le téléphone portable ou le lecteur Bluetooth au haut-parleur via Bluetooth. Une fois la connexion établie, vous pouvez
écouter de la musique avec le TWS Stereo-Speaker System.
La fonction TWS fonctionne en mode TWS, les manipulations sur le haut-parleur principal seront effectuées simultanément sur un
autre haut-parleur. Par exemple, réglage du volume, sélection de la chanson précédente et suivante, lecture et pause, mise sous
tension et hors tension.
Remarque:
- Si les 2 haut-parleurs ne sont pas appariés, éteignez les deux appareils et répétez les étapes 1, 2 et 3.
- La fonction TWS ne fonctionne qu'entre des enceintes équivalentes ou avec d'autres enceintes utilisant le même microprocesseur
ou la même solution.
ENTRÉE USB/MICRO SD
1. Allumez l'appareil;
2. Insérez une mémoire USB ou une carte Micro SD dans les entrées correspondantes (23/24). La lecture démarre automati-
quement;
3. Pour interrompre la lecture, appuyez sur le bouton
(9)
sur l'appareil ou sur la touche(11) de la télécommande,
l'écran affiche l'icône "PAUS";
Table of contents
Languages:
Other Trevi Portable Speakers manuals

Trevi
Trevi XF 1000KB User manual

Trevi
Trevi XF 800 User manual

Trevi
Trevi XF 550 APP User manual

Trevi
Trevi XF 350 User manual

Trevi
Trevi XF 4100 PRO User manual

Trevi
Trevi XF 470 KB User manual

Trevi
Trevi XF 600 KB User manual

Trevi
Trevi XR 400 APP User manual

Trevi
Trevi XF 1560 KB User manual

Trevi
Trevi XF 300 POP User manual

Trevi
Trevi XR 84 BT User manual

Trevi
Trevi XF 780 KB User manual

Trevi
Trevi XF 3500 PRO User manual

Trevi
Trevi SL 3841 User manual

Trevi
Trevi XF 1200 KB User manual

Trevi
Trevi XF 1700KB User manual

Trevi
Trevi XF 440 KB User manual

Trevi
Trevi XFest XF 1560 KB User manual

Trevi
Trevi XF 3200 PRO User manual

Trevi
Trevi XF 300 User manual