Unold Backmeister 8650 User manual

Automatischer Brot- und TeigzubereiterAutomatischer Brot- und Teigzubereiter
Modell 8650Modell 8650
von 1000 bis 1300 gvon 1000 bis 1300 g
Modell 8660Modell 8660
von 1300 bis 1800 gvon 1300 bis 1800 g


Impressum:Impressum:
©©
UNOLD AG – D 68766 HockenheimUNOLD AG – D 68766 Hockenheim
Alle Rechte - auch auszugsweise – vorbehalten.Alle Rechte - auch auszugsweise – vorbehalten.
Rezepte: Rezepte:
Margret Margret
BlumBlum
Gestaltung:Gestaltung:
UNOLD AGUNOLD AG
Bedienungsanleitung 8650/8660, Stand 08/2004Bedienungsanleitung 8650/8660, Stand 08/2004

GG
GG
EE
EE
RR
RR
ÄÄ
ÄÄ
TT
TT
EE
EE
BB
BB
EE
EE
SS
SS
CC
CC
HH
HH
RR
RR
EE
EE
II
II
BB
BB
UU
UU
NN
NN
GG
GG
––
––
DD
DD
EE
EE
SS
SS
CC
CC
RR
RR
II
II
PP
PP
TT
TT
II
II
OO
OO
NN
NN
--
--
BB
BB
EE
EE
SS
SS
CC
CC
HH
HH
RR
RR
II
II
JJ
JJ
VV
VV
II
II
NN
NN
GG
GG
11
33
22
44
66
55
Deutsch Deutsch
English English
Français Français
NederlandsNederlands
11
Deckel, abnehmbar, mitDeckel, abnehmbar, mit
GriffGriff
Detachable lid withDetachable lid with
handlehandle
Couvercle amovibleCouvercle amovible
avec poignéeavec poignée
Deksel, afneembaar,Deksel, afneembaar,
met dekselmet deksel
22
Backform Backform
Bread Bread
pan pan
Moule Moule
de de
cuisson cuisson
BakvormBakvorm
33
Kneter Kneter
(2 (2
Stück) Stück)
Kneading Kneading
bladesblades
(2 pcs)(2 pcs)
Pétrisseur Pétrisseur
(2 (2
pcs) pcs)
Kneder Kneder
(2 (2
stuk)stuk)
44
GehäuseGehäuse
mit seitl. Lüftungsschlit-mit seitl. Lüftungsschlit-
zen, Backraum, Bedien-zen, Backraum, Bedien-
feld und beleuchtetemfeld und beleuchtetem
DisplayDisplay
Housing with side vents,Housing with side vents,
baking compartment,baking compartment,
control panel and illu-control panel and illu-
minated displayminated display
Habillage avec ventila-Habillage avec ventila-
tion, espace de cuisson,tion, espace de cuisson,
tableau de commandetableau de commande
et affichage illuminéet affichage illuminé
Behuizing met zijdel.Behuizing met zijdel.
ventilatiesleuven, bak-ventilatiesleuven, bak-
ruimte, bedienings-ruimte, bedienings-
panel, displaypanel, display
55
Messlöffel Messlöffel
Measuring Measuring
spoon spoon
Cuillère Cuillère
graduée graduée
MaatlepelMaatlepel
66
Messbecher Messbecher
Measuring Measuring
cup cup
Gobelet Gobelet
gradué gradué
MaatbekerMaatbeker
77
Hakenspieß zum Ent-Hakenspieß zum Ent-
nehmen des Knetersnehmen des Kneters
(nicht abgebildet)(nicht abgebildet)
Hook to remove theHook to remove the
kneading bladekneading blade
(not shown)(not shown)
Crochet pour enlever lesCrochet pour enlever les
pétrisseurspétrisseurs
(non illustré)(non illustré)
Haken voor uitnemenHaken voor uitnemen
van het knedhakenvan het knedhaken
(niet abgebeeld)(niet abgebeeld)
IIIIII

B
B
E
E
D
D
I
I
E
E
N
N
F
F
E
E
L
L
D
D
–
–
O
O
P
P
E
E
R
R
A
A
T
T
I
I
N
N
G
G
P
P
A
A
N
N
E
E
L
L
–
–
T
T
A
A
B
B
L
L
E
E
A
A
U
U
D
D
E
E
C
C
O
O
M
M
M
M
A
A
N
N
D
D
E
E
-
-
B
B
E
E
D
D
I
I
E
E
N
N
I
I
N
N
G
G
S
S
P
P
A
A
N
N
E
E
L
L
I
II
III
IV
V
VI
VII
Deutsch
English
Français
Nederlands
!
Die Tasten des Bedienfeldes
lassen sich nur betätigen,
wenn das Gerät zuvor am
EIN/AUS-Schalter eingeschal-
tet wurde.
The keys can only be acti-
vated when the appliance
has been switched on at the
ON/OFF switch
Mettez d’abord l’appareil en
ordre de marche par
l’interrupteur ON/OFF à la
côté droite, après on peut
actionner les touches.
De toetsen van het bedie-
ningspaneel kunnen alleen
worden bediend wanneer het
apparaat van tevoren aan de
AAN/UIT-schake-laar is inge-
schakeld.
I LCD-Display
zeigt die aktuellen Ein-
stellungen, den Programmab-
lauf und die Zeit bis zum
Programmende an
LCD Display
indicates the actual program
status and the time until the
end of the selected program
Affichage DCL
indique le déroulement du
programme ainsi que la du-
rée jusqu’à la fin du pro-
gramme
LCD display
geeft de instellingen en het
programmaverloop en de tijd-
sduur tot het program-
maeinde aan
II BRÄUNUNG-Taste
zur Einstellung der gewünsch-
ten Bräunung
BROWNING Key
to set the required browning
level
Touche CUISSON
pour régler le degré de bru-
nissement
BRUINING-toets
voor het instellen van de ge-
wenste bruining
III ZEITWAHL-Taste
zur Eingabe der Vorprogram-
mierzeit
TIME SELECT key
to enter the preset time
Touche SELECTION DE
TEMPS
pour programmer le temps
décalé
TIJDKEUZE-toets
voor het invoeren van de
voorgeprogrammeerde tijd
IV STUFE-TASTE
zur Einstellung in 2 Gewichts-
stufen in einigen Programmen
WEIGHT SELECT key
to changeover the 2 weight
level settings in some pro-
grams
Touche DEGRE
pour choisir le poids de pain
dans quelques programmes
STAND-toets
voor het instellen in
2 gewichtsstanden
V
MENÜ-Taste
zum Auswählen der Program-
me, siehe Kapitel „
Zeitlicher
Ablauf
“
MENU key
to select the programs, see
chapter „
Time Procedure
“
Touche MENU
pour sélectioner les pro-
grammes, voir „
Déroulement
des programmes
“
MENU-toets
voor het kiezen van de pro-
gramma’s, zie „
Tijdschema
van de programma’s
“
VI
Start/Stopp-
Taste
zum Starten und Abbrechen
des Programmablaufs
START/Stopp key
to start and to stop the pro-
gram
Touche START/STOP
pour démarrer ou arrêter les
programmes
START/STOP-toets
voor het starten en beëindi-
gen van het programma
VII
EIGENPROGRAMM
mit Taste zur Auswahl des
Programmabschnitts und Taste
zur Änderung der Zeitdauer
des jeweiligen Programmab-
schnitts
INDIVIDUAL
PROGRAMM
with one key to select the
program phase to be
amended and one key to
change the preset time
PROGR. INDIVIDUEL
avec une touche pour choisir
le segment de programme à
changer et une touche pour
ajuster le temps prépro-
grammé
EIGEN PROGRAMMA
met toets voor het kiezen van
het programmagedeelte en
toets voor het wijzigen van de
tijdsduur van het program-
magedeelte
4

OPERATING INSTRUCTIONS
We congratulate you on the purchase of your
Breadmaker
. The bread dough is prepared with two kneading blades
and is thus more thoroughly kneaded. The appliances works fully automatically and is very easy to handle. With
one’s own programs you can produce large and small quantities of bread with two different sizes. You can read in
the display in which preparation phase the
Breadmaker
is working.
The
Breadmaker
offers 9 permanently installed programs and 1 own program that you can individually program
according to your personal requirements.
You can
bake with
the
Breadmaker
with a timing delay, that means you are able to pre-program the baking proc-
ess up to 13 hours in
advance.
With the appliance you can produce:
-
white bread, dark leaven bread,
light mixed bread, bread with corn,
-
bread out of baking mixtures, or
-
bread with baking enzymes and bread for allergy patients,
-
cakes in the baking-powder program,
-
dough that is treated
otherwise,
-
jams that are boiled.
T
T
E
E
C
C
H
H
N
N
I
I
C
C
A
A
L
L
S
S
P
P
E
E
C
C
I
I
F
F
I
I
C
C
A
A
T
T
I
I
O
O
N
N
S
S
O
O
F
F
B
B
R
R
E
E
A
A
D
D
M
M
A
A
K
K
E
E
R
R
8
8
6
6
5
5
0
0
/
/
8
8
6
6
6
6
0
0
Model
8650
Model
8660
Power rating:
700 W - 230 V - 50 Hz
Dimension:
(L/W/H)
410
x
220
x
290
mm
410
x
220
x
340
mm
Weight:
7,3
kg
7,5
kg
Bread pan:
(L/W/H)
223 x 127 x 115 mm
with Quantanium
®
-coating
223 x 127 x 152 mm
with Quantanium
®
-coating
Volume:
1000
g
-
1300
g
bread
weight
1300
–
1800
g
bread
weight
Power cord:
100
cm,
firmly
mounted
100
cm,
firmly
mounted
Housing:
Sheet
steel,
enamelled
Sheet
steel,
enamelled
Lid:
Plastic,
with
control
window
Plastic,
with
control
window
Features:
•
9 programs in memory
•
1 individual program
•
Select key for different bread weights
•
Select key for different browning levels
•
Time select key for time dealy up
top 13 hrs
•
Automatic keep-warm stage
•
ON/OFF switch
Accessories:
2 small kneading blades
measuring cup and spoon
hook
to remove the kneading blades
Instruction booklet
with many recipes
2 small kneading blades
2 large kneading blades
measuring cup and spoon
hook
to remove the kneading blades
Instruction booklet
with many recipes
Subject to technical modifications.
©
UNOLD AG – D 68766 Hockenheim
All rights reserved, even for ex
cerpts.
Recipes:
Margret
Blum
Design:
UNOLD AG
Instruction booklet models 8650/8660,
updated August 2004
5

S
S
A
A
F
F
E
E
T
T
Y
Y
R
R
U
U
L
L
E
E
S
S
i
Please read these instructions carefully and keep them in a
safe place.
1.
Do not touch
hot surfaces.
Use oven gloves.
The Backmeister
is very hot
when baking has
finished!
2.
Never immers
e the
power s
upply cable
or the
breadmaker i
n water.
3.
Ensure that the
breadmaker is
always supervi
sed by an
adult if c
hildren are i
n the vicinity!
4.
When the appliance
is not being used
and before it i
s cleaned, swi
tch off the appl
iance at the ON/OFF
switch
and disconnect the power supply plug from the mains
5.
Do not use the
breadmaker if t
he power supply
cable is d
amaged, in the event
of faulty perf
ormance or if t
he
breadmaker itself is damaged. The breadmaker must only be examined and repaired by an authorised repair
workshop. Do not attempt to repair the breadmaker yourself as the guarantee will then
become null and void.
6.
The use of
alien accessorie
s that have
not been approved
by the manufacturer
can damage the
breadmaker,
and which must only be used for its intended purpose.
7.
Place the breadmaker
on a surface in such a ma
nner that it cannot
slip, as can happen when
kneading a stiff dough. This must be taken into account with advance programming when the
breadmaker operates unattended. Use a thin rubber mat on
a slippery surface so
that the danger of
slipping is prevented.
8.
The Backmeister
must be operate
d at leas
t 10 cm
from other objects.
The breadmaker
must not be
used out-
doors!
9.
Ensure that the pow
er supply cable
does not come into
contact with hot
surfaces, nor hang
down from the
worktop so that children cannot pull the cable.
10.
Never place the breadmaker on a gas or electri
c hob or alongside a hot baking oven.
11.
Utmost care must be taken
when moving the breadmaker
when it contains hot l
iquids (jam).
12.
Never remove the
baking tin during
operation.
13.
Never fill the baking tin with more than the specified quantities, par
ticularly with white bread. The bread will not
be uniformly baked and the dough will overflow! Please refer to the corresponding instructions.
14.
Provide close supervi
sion when testing new
recipes.
15.
Never switch on the appliance without pr
operly placed bread pan filled with ingred
ients.
16.
Never beat the bread pan on a working top or edge to remove the pan. This may entail damag
es.
17.
Metal foils or other materials must not be inserted into the breadmaker a
s this can give rise to the risk of a fire
or short circuit.
18.
Never cover the breadmaker with a towe
l or any other material. Heat and steam must be able to escape freel
y.
A fire can be caused if the breadmaker is covered by, or comes into contact with, combustible material, e.g. cur-
tains.
19.
Before a certain type of bread is baked overnight, you should always try out the recipe first to confirm the cor-
rect mixing ratio of the individual ingredients, that the dough is not too stiff or thin, or that the quantity is not
excessive and overflow.
The manufacturer does not
accept any l
ability if the bread
maker is used commercially or in a manne
r
that does not
conform with
these operating
instructions.
44

B
B
E
E
F
F
O
O
R
R
E
E
U
U
S
S
I
I
N
N
G
G
T
T
H
H
E
E
B
B
R
R
E
E
A
A
D
D
M
M
A
A
K
K
E
E
R
R
F
F
O
O
R
R
T
T
H
H
E
E
F
F
I
I
R
R
S
S
T
T
T
T
I
I
M
M
E
E
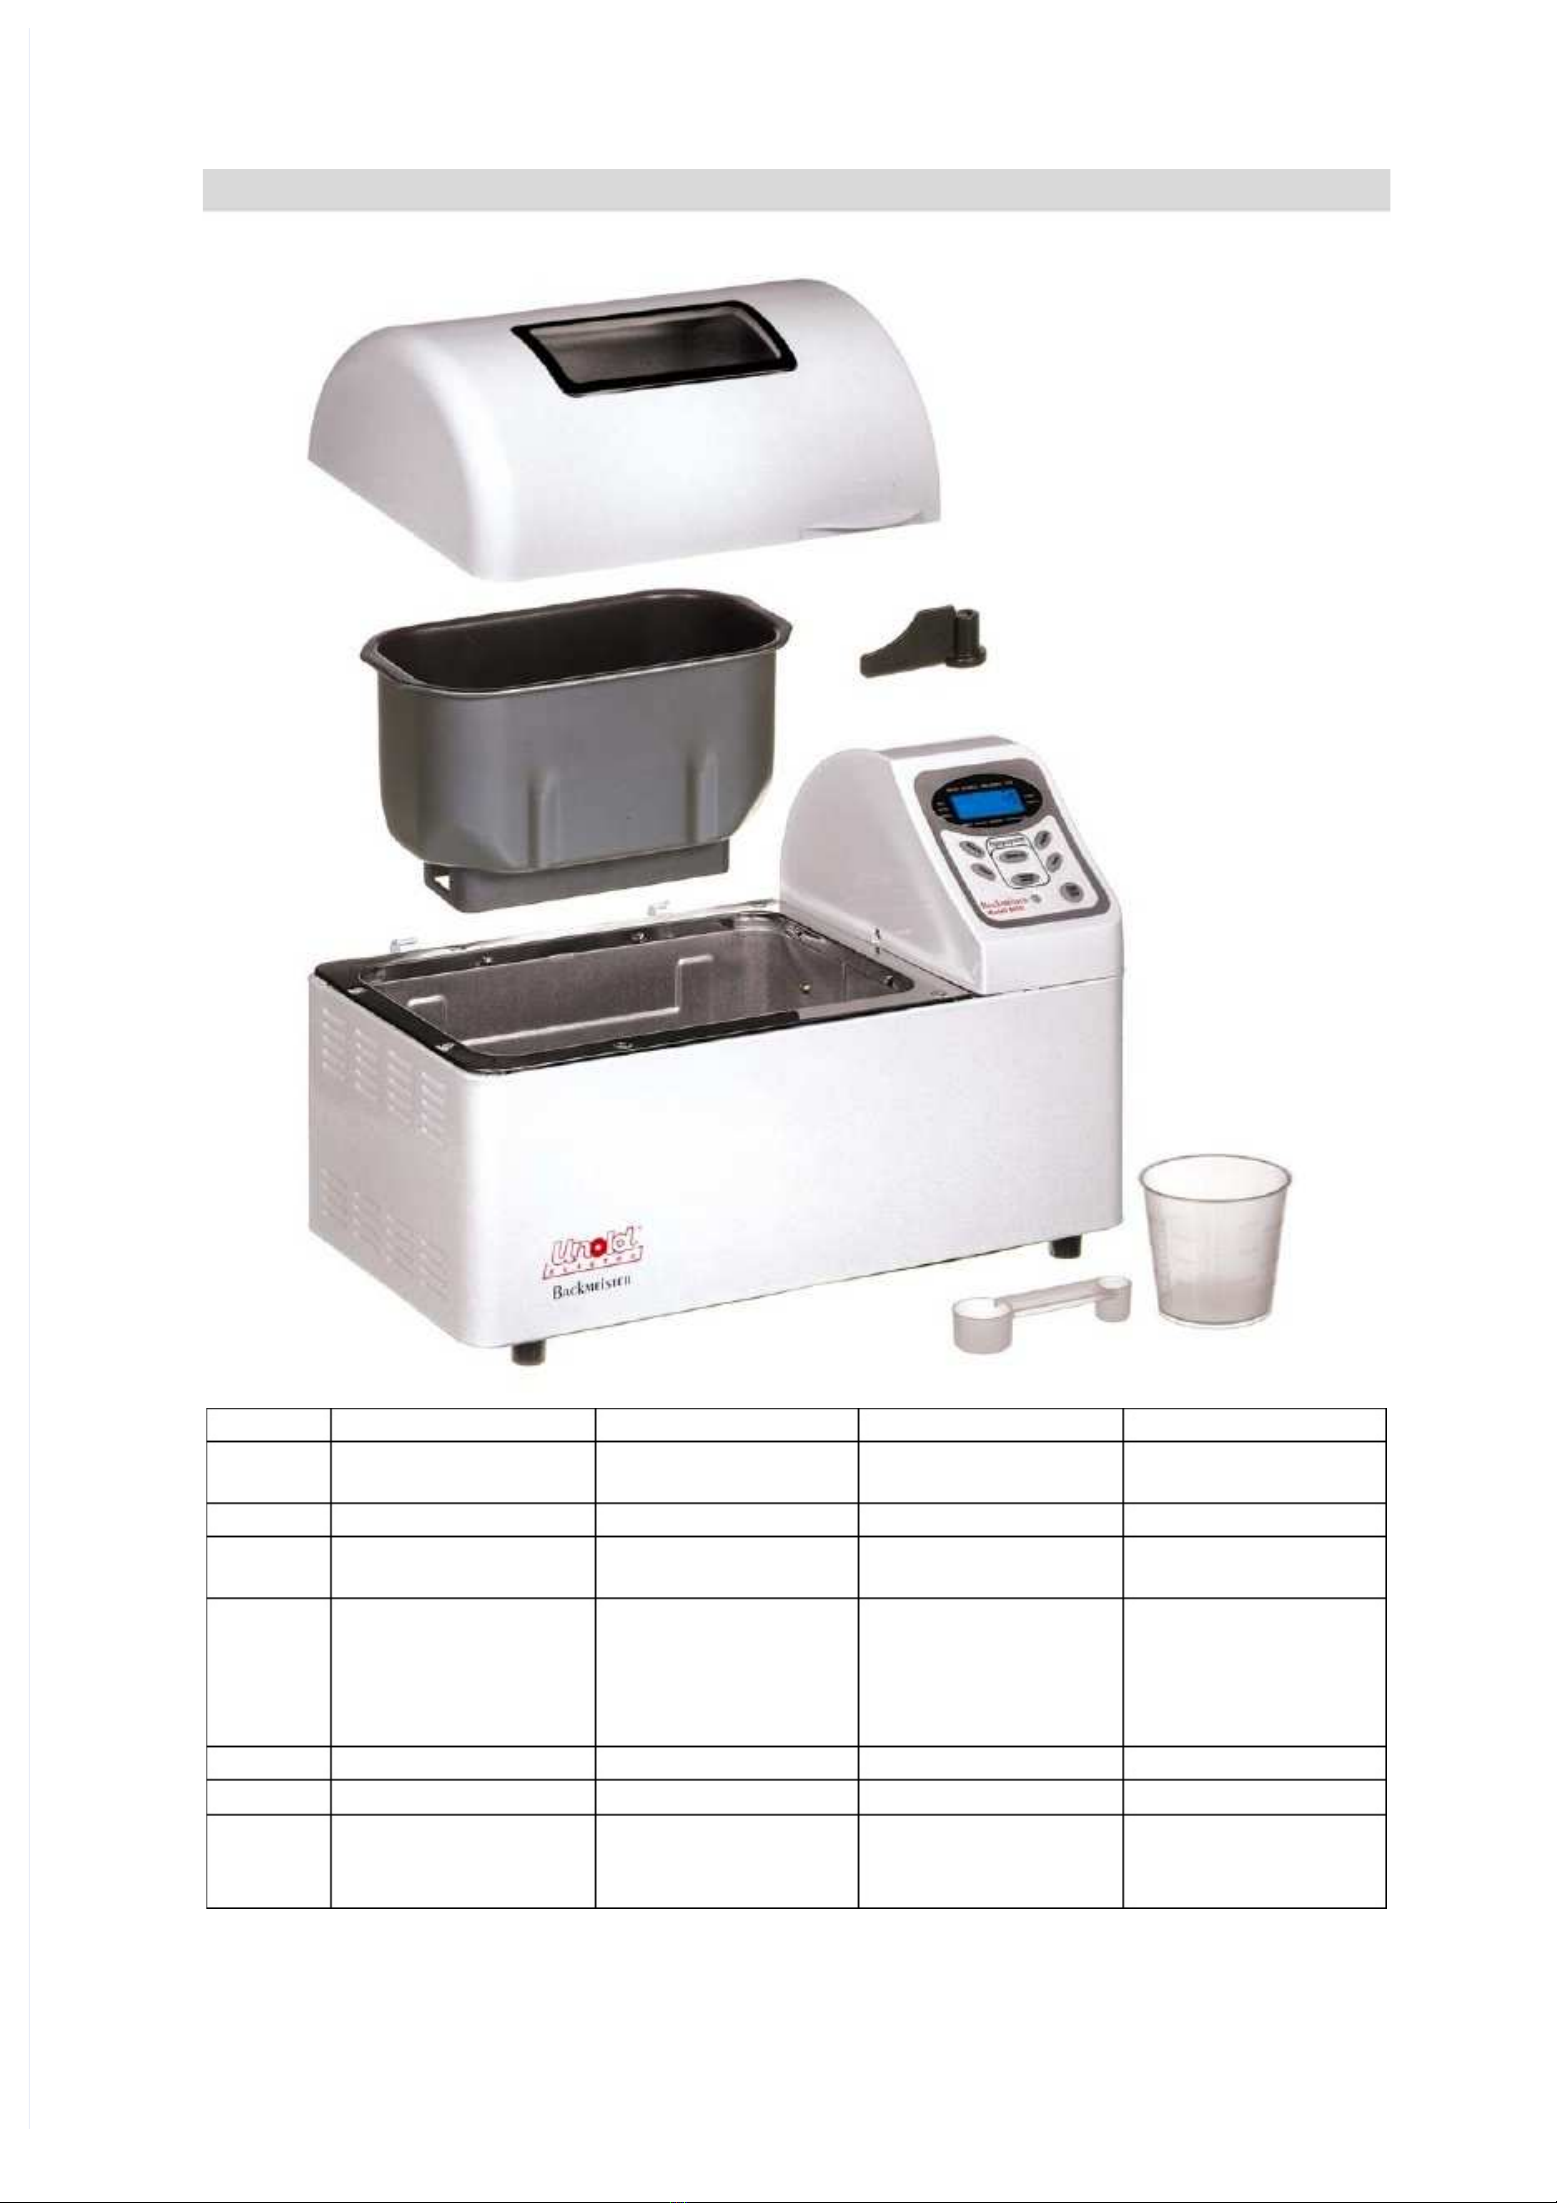
Please check, if all parts and accessories are complete and faultless. Before using the machine for the first time, re-
move all packing materials ans loose parts from the inside.
Wipe the bread pan of the
Backmeister
with warm water and a mild detergent and clean the kneading blades.
Wipe the exterior of the appliance with a damp cloth. Do not immerse the appliance into water. Dry all parts thor-
oughly. Place the bread pan into the machine. Put the plug into the receptacle and switch on the appliance. The
breadmaker is now ready for operation and can be programmed.
During the first oepration cycle, steam may be produced. We recommend to make firstly one operation cycle with
inserted idle bread pan (without kneading blades) in the program BAKING POWDER. Afterwards let the appliance
cool down. Now your breadmaker is ready for baking the first berad.
E
E
X
X
P
P
L
L
A
A
N
N
A
A
T
T
I
I
O
O
N
N
O
O
F
F
T
T
H
H
E
E
C
C
O
O
N
N
T
T
R
R
O
O
L
L
P
P
A
A
N
N
E
E
L
L
O
O
N
N
/
/
O
O
F
F
F
F
S
S
W
W
I
I
T
T
C
C
H
H
to switch the appliance on or off. This switch is located at the lower right side of the housing. If you don’t use the
appliance, you should always switch it off in order to interrupt the power supply and then take the plug out of the
receptacle.
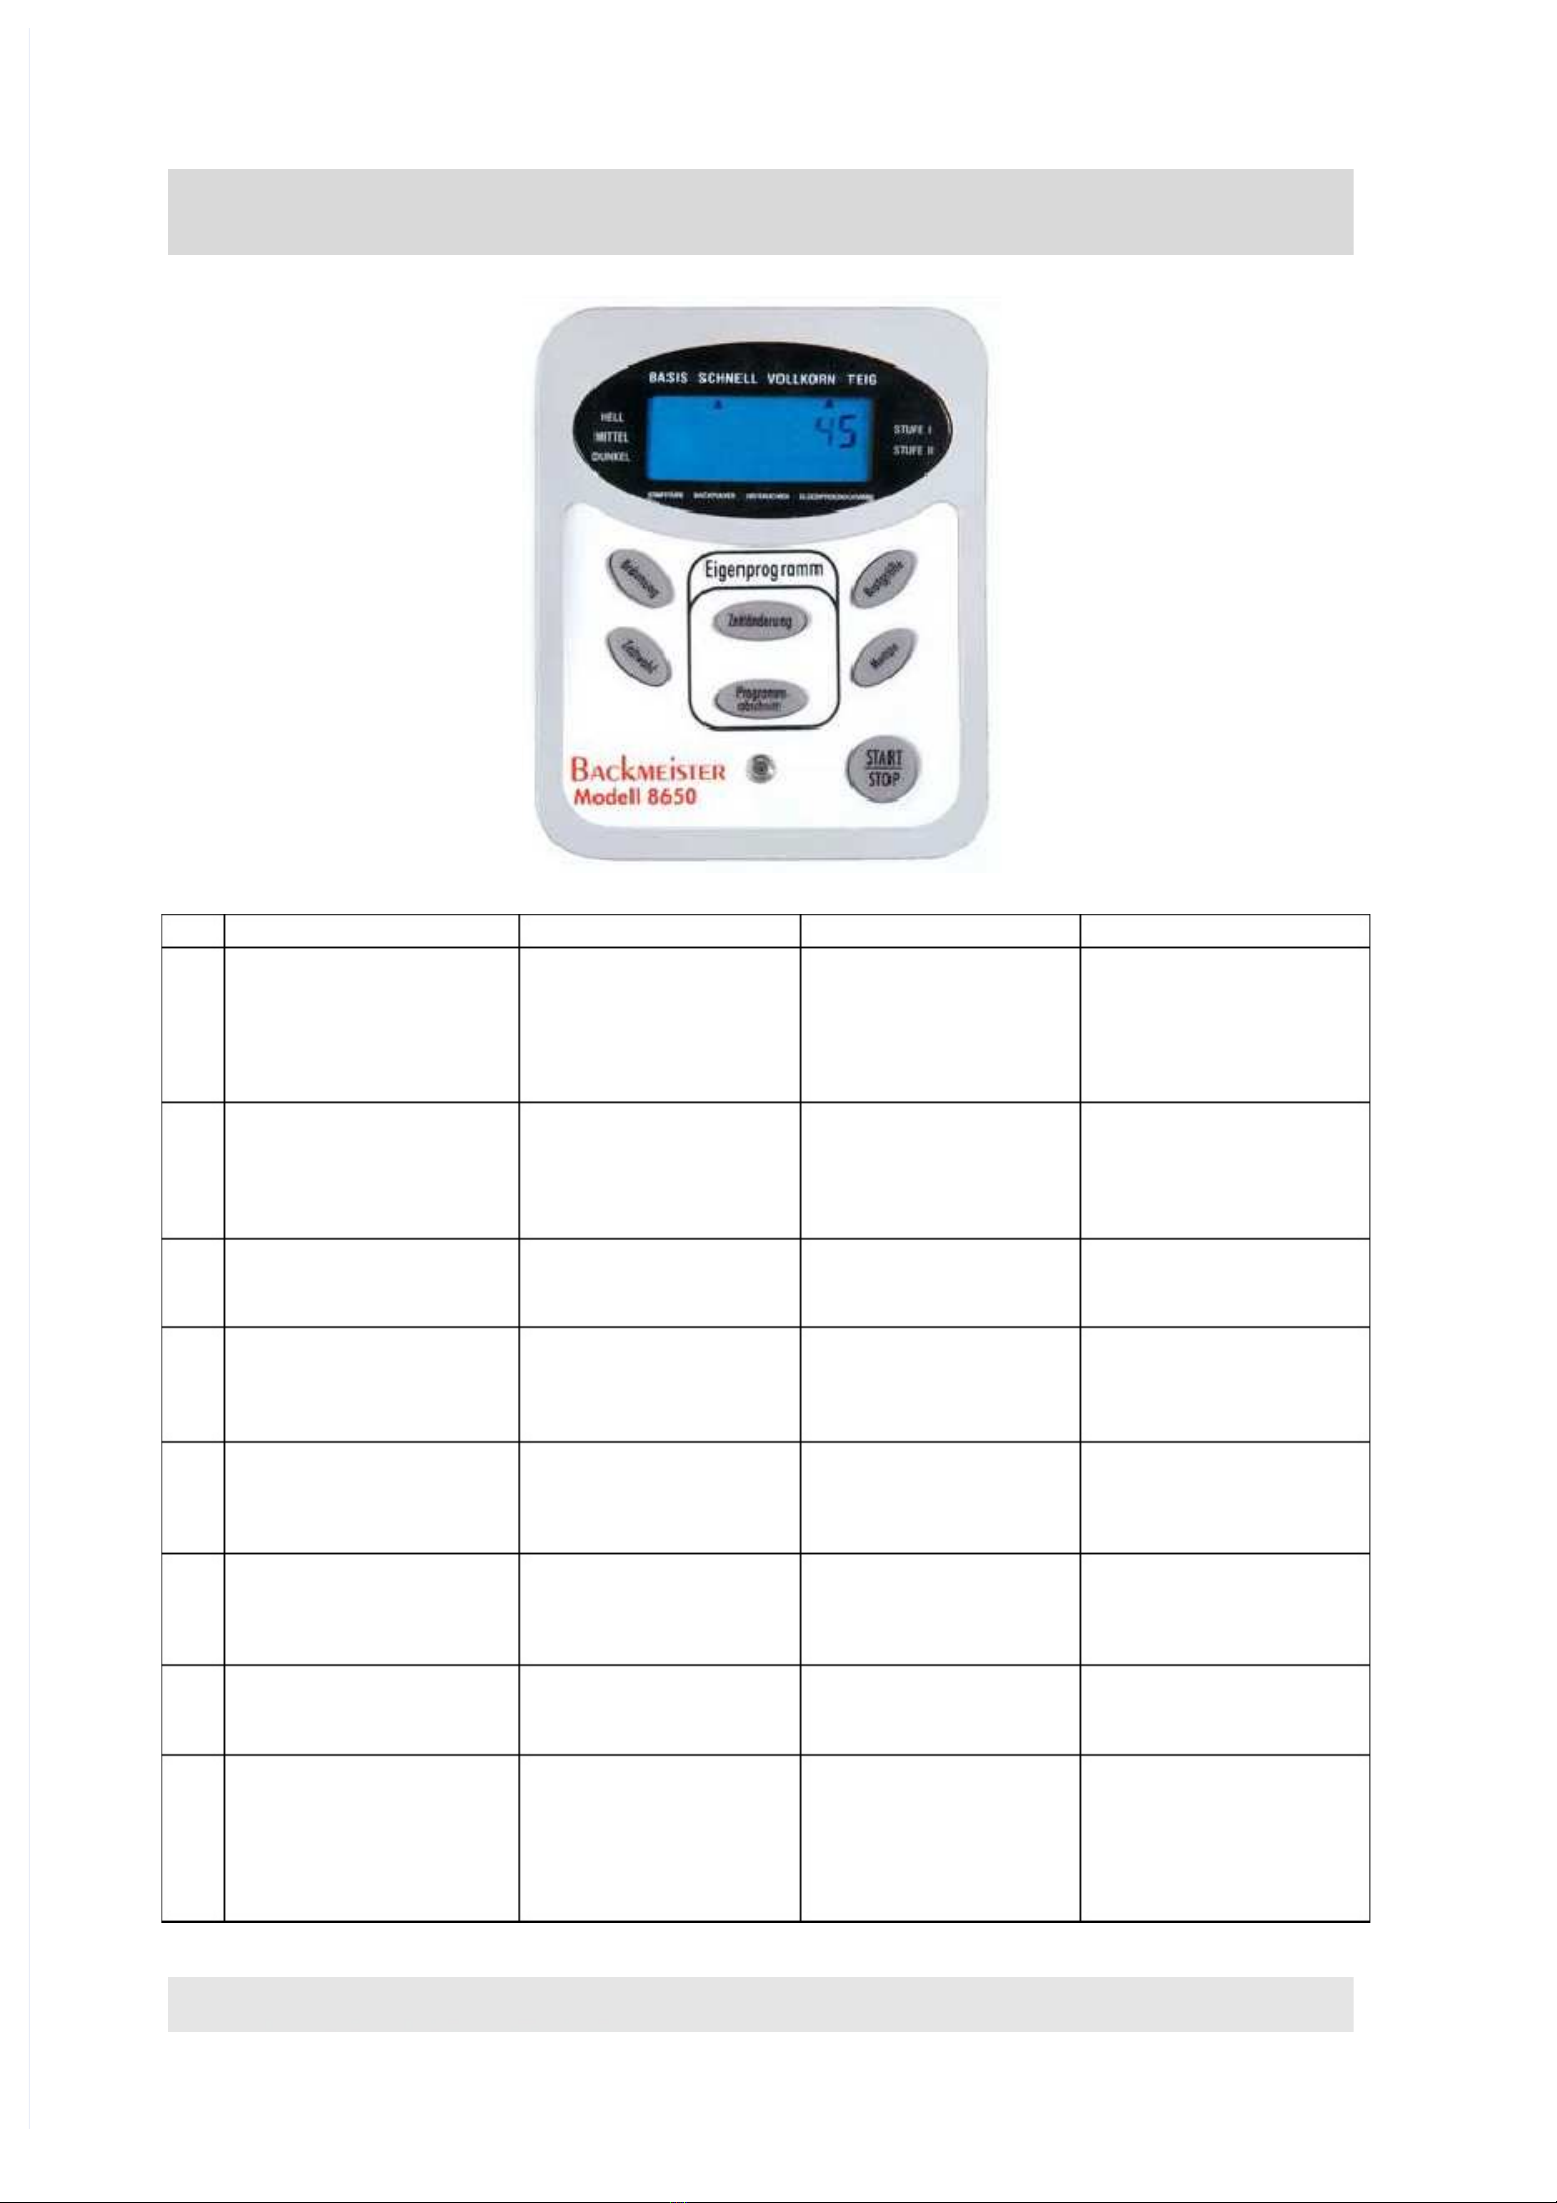
The programs can only be selected and started when the appliance has been switched on.
S
S
T
TA
R
R
T
T
/
/
S
S
T
T
O
O
P
P
B
B
U
U
T
T
T
T
O
O
N
N
for starting and terminating the program
⇒
With the Start/Stop-Button you can terminate the program in every program step. Keep the button
pressed until a bleep can be heard. The starting position of the initially chosen program is shown in
the display. Should you wish to choose
an alternative program, this can be done with the menu but-
ton. Then press the START/STOP button again.
D
D
I
I
S
S
P
P
L
L
A
A
Y
Y
BASIC SETTING
As soon as the
plug is inserted in the socket, the
display shows the duration of the
last program used. After a longer
period of non.-use this is the programm
BASIS
3:30
- (the figures blink). The arrow points to
BASIS, SIZE I
and
browning
MEDIUM
. The breadmaker is ready for operation displayed.
During operation the program step can be read from the time-remaining clock as well as from the details on the dis-
play. The details are in English and mean:
PREHEAT
=
the
liquid
and
the
ingredients
are
being
warmed
up
to
the
optimum
temperature,
if
neces-
sary (if not necessary, there is not operation in this stage);
KNEAD
=
is
shown
when
the
appliance
commences
the
kneading
phase;
ADD
=
a
bleep
can
also
be
heard.
Ingredients
are
now
to
be
added;
RISE
(1-3)
=
the
various
raising
phases
are
shown;
BAKE
=
baking
is
being
carried
out;
COMPLETE
=
the
baking
is
finished
-
the
bread
can
now
be
removed;
KEEP WARM
=
the
baked
articles
will
be
kept
warm
for
1
hour.
T
T
I
I
M
M
E
E
S
S
E
E
T
T
T
T
I
I
N
N
G
G
The program (with the exception of BAKING-POWDER, RAPID; RAPID + DOUGH, RAPID + WHOLEMEAL, and JAM)
can be started with a timing delay. You must add the hours and minutes after which the preparation is to be started
to the time that
is automatically applicable for the program and, if appropriate, the 1 hour
keep-warm time (following
the baking process).
Example:
It is evening 8:00 p.m.
and you wish to have freshly baked white bread at 7
:00 in the morning:
The ingredients in the prescribed order are put into the pan, which is then put into the appliance. Care must be
taken that the yeast does not come into contact with liquid. Choose the required program with the
MENU
button
and enter the required browning with the
BROWNING
button and the required bread size with the
STUFE
button.
In this example we choose program 1 =
BASIC, STUFE II, MEDIUM
that requires 3:30 hours, plus a keep-warm
time of 1 hour (i.e.
total time of 4:30 hours), which means that the
program must begin at 2:30 a.m. in
the night.
The time (in the example, it is 8:00 p.m.) that lies between the programming and your breakfast is 11 hrs. In order
to get fresh warm bread at 7:00 in the morning, you must increase the program duration by means of the timing
button
ZEITWAHL
to 11 hrs (in steps pf 10 min.). When the display shows the program duration of 11 hrs you can
start the operation by pressing the START/STOP button.
45

The program is then started automatically early enough to have freshly baked bread at 7:00 h in the morning. If you
should not take out the bread immediately, the keeping warm
time of 1 hr starts.
For time delayed baking please do not use perishable ingredients such as milk, eggs, fruit, yoghurt or
onions, etc.
M
M
E
E
N
N
U
U
With the Menu button you can call up the individual programs that are described in detail in the table “Timing Proc-
ess”. The programs are used for the following preparations:
Basic
for white and mixed bread. This is the most widely used program.
Basic wholemeal
for
wholemeal
bread
Basis dough
for
making
dough
Quick
for
quick
preparation
of
white
and
mixed
bread
Quick wholemeal
for
quick
preparation
of
wholemeal
bread
Quick dough
for quick preparation of dough - e.g. dough for pizza
Jam
for boiling jams and marmalades
Baking powder
for cakes and biscuits baked with baking powder
Yeast pastries
for preparation of sweet yeast dough
Individ. program
for
individual
programming
of
the
program
process,
see
the
chapter
“Individual program”
B
B
R
R
O
O
W
W
N
N
I
I
N
N
G
G
With this button the browning can be set at
LIGHT-
HELL
, MEDIUM-
MITTEL
or DARK-
DUNKEL
.
S
S
I
I
Z
Z
E
E
This enables the following setting in the various programs acc. to the recommendations in the recipes:
Model
8650
Model
8660
SIZE I
=
for
a
small
bread
weight
750
-
1000
g
1000
-
1300
g
SIZE
II
=
for
a
larger
bread
weight
1300
–
1500
g
1500
–
1800
g
I
I
N
N
D
D
I
I
V
V
I
I
D
D
U
U
A
A
L
L
P
P
R
R
O
O
G
G
R
R
A
A
M
M
You
can
activate
this
program
with
the
button
PROGRAM
STEP
PROGRAMMABSCHNITT
and TIME CHANGE
ZEITÄNDERUNG
. We refer to the chapter “Jndividual program”, in which the
process is described in detail.
T
T
H
H
E
E
F
F
U
U
N
N
C
C
T
T
I
I
O
O
N
N
S
S
O
O
F
F
T
T
H
H
E
E
B
B
R
R
E
E
A
A
D
D
M
M
A
A
K
K
E
E
R
R
A
A
L
L
A
A
R
R
M
M
F
F
U
U
N
N
C
C
T
T
I
I
O
O
N
N
The alarm sounds:
whenever the appliance is connected to the mains and is switched on by means of the ON/OFF switch; this
means, that the appliance is ready for operation and can be
programmed;
whenever pressing any of the buttons;
during the second kneading process, to warn that seeds, fruit, nuts or other ingredients have now to be
added.
after the baking process, the appliance bleeps often during the keep-warm phase to warn you that the programm
has finished.
R
R
E
E
P
P
E
E
A
A
T
T
F
F
U
U
N
N
C
C
T
T
I
I
O
O
N
N
A
A
F
F
T
T
E
E
R
R
P
P
O
O
W
W
E
E
R
R
O
O
U
U
T
T
A
A
G
G
E
E
Should the electricity supply have been cut off during the operation of the
Breadmaker
, the appliance will re-start,
on re-instatement of the supply, automatically from the point arrived at when the cut-off occurred as long as the
pause is not longer than 2 m
inutes.
If the break in the electricity supply last more than 2 minutes and the display shows the basic setting, the Bread-
maker must be re-started. This is only practical if the dough was not further than the kneading phase when the
break occurred. Otherwise the program must be started from the very beginning or can be continued by program-
ming the individual program
accordingly.
S
S
A
A
F
F
E
E
T
T
Y
Y
F
F
U
U
N
N
C
C
T
T
I
I
O
O
N
N
S
S
If the temperature in the
appliance, due to previous use, is too high (above 40
°C) for a newly chosen program, when
an attempt to re-start is made, the display will show
HOT
and an alarm sound will be heard. Should this occur, re-
move the pan and wait until the appliance has cooled off and is back to the beginning of the originally chosen pro-
gram.
46

T
T
H
H
E
E
P
P
R
R
O
O
G
G
R
R
A
A
M
M
P
P
R
R
O
O
C
C
E
E
S
S
S
S
O
O
F
F
T
T
H
H
E
E
B
B
R
R
E
E
A
A
D
D
M
M
A
A
K
K
E
E
R
R
P
P
L
L
A
A
C
C
I
I
N
N
G
G
O
O
F
F
T
T
H
H
E
E
B
B
R
R
E
E
A
A
D
D
P
P
A
A
N
N
Hold onto the anti-stick baking pan with two hands and set it exactly in the middle of the base in the baking room.
Carefully push the pan down until it clicks in. Eventually it is necessary to turn the two drawers at the underside until
the pan clicks into place (see page 7).
Fix the two kneaders onto the drive shafts. Eventually it is necessary to turn the kneaders slightly until they click into
place. The top of the driving shaft must project about 2 mm over the opening of the kneader. We recommend prior
to placing the kneaders to fill the holes with heat-resisting margarine (not fat-reduced margarine). This avoids the
dough to stick below the kneaders and facilates to remove the kn
eaders from the bread.
P
P
O
O
U
U
R
R
I
I
N
N
G
G
I
I
N
N
T
T
H
H
E
E
I
I
N
N
G
G
R
R
E
E
D
D
I
I
E
E
N
N
T
T
S
S
The ingredients must be poured into the pan in the order prescribed in the recipe. In case of heavy dough with high
rye or wholemeal portion we recommend to reverse the order of ingredients, i.e. to fill in first the dry yeast and the
flour, and finally the liquid to endure a better kneading result.
S
S
E
E
L
L
E
E
C
C
T
T
I
I
N
N
G
G
T
T
H
H
E
E
P
P
R
R
O
O
G
G
R
R
A
A
M
M
Select the required program p with the
MENU
button.
Select the SIZE/
STUFE
appropriate for the program.
Select the required BROWNING/
BRÄUNUNG
.
You can set a delay with the TIMING BUTTON/
ZEITWAHL
.
Press the
START/STOP
button.
M
M
I
I
X
X
I
I
N
N
G
G
A
A
N
N
D
D
K
K
N
N
E
E
A
A
D
D
I
I
N
N
G
G
D
D
O
O
U
U
G
G
H
H
The Breadmaker mixes and kneads the dough
automatically as long as necessary to reach the proper consistency.
P
P
A
A
U
U
S
S
E
E
After each kneading process there is
a pause to allow the liquid to slowly penetrate the yeast and the fl
our.
D
D
O
O
U
U
G
G
H
H
R
R
A
A
I
I
S
S
I
I
N
N
G
G
After each kneading phase the Breadmaker produc
es the optimal temperature for the raising of the dough.
B
B
A
A
K
K
I
I
N
N
G
G
The bread baking automatic regulates the baking temperature and the timing automatically.
K
K
E
E
E
E
P
P
I
I
N
N
G
G
W
W
A
A
R
R
M
M
When the baking is over, a peep sound can be heard several times to indicate that the bread or food can be re-
moved. At the same time a
keep-warm time of 1 hour begins.
E
E
N
N
D
D
O
O
F
F
T
T
H
H
E
E
P
P
R
R
O
O
G
G
R
R
A
A
M
M
P
P
R
R
O
O
C
C
E
E
S
S
S
S
After the end
of the program
process, take out
the pan
with the help
of hand-cloths and
leave for about
30-30 min-
utes. Then remove the bread carefully from the pan. Please do not knock the pan against the table, as this might
damage the pan. If the bread does not immediately fall onto the cooling wire, waggle the kneading drive from below
until the bread falls out. If the kneader is stuck in the bread, use the hooked skewer. Push it on the underside of the
still-warm bread in the (almost) round opening of the kneader and fold it on the bottom edge of the kneader, ideally
at the point where the kneader blade is. Then pull the kneader up with the hooked skewer. You can then see exactly
where the blade is in the bread.
47

T
T
I
I
M
M
I
I
N
N
G
G
P
P
R
R
O
O
C
C
E
E
S
S
S
S
O
O
F
F
T
T
H
H
E
E
P
P
R
R
O
O
G
G
R
R
A
A
M
M
S
S
B
A
S
I
S
B
A
S
I
S
+
V
O
L
L
K
O
R
N
B
A
S
I
S
+
T
E
I
G
S
C
H
N
E
L
L
S
C
H
N
E
L
L
+
V
O
L
L
K
O
R
N
S
C
H
N
E
L
L
+
T
E
I
G
K
O
N
F
I
T
Ü
R
E
B
A
C
K
-
P
U
I
L
V
E
R
H
E
F
E
-
K
U
C
H
E
N
B
A
S
I
C
B
A
S
I
C
+
W
H
O
L
E
-
M
E
A
L
B
A
S
I
S
+
D
O
U
G
H
R
A
P
I
D
R
A
P
I
D
+
W
H
O
L
E
M
E
A
L
R
A
P
I
D
+
D
O
U
G
H
J
A
M
B
A
K
I
N
G
P
O
W
D
E
R
C
A
K
E
Choice of
bread size
I
II
I
II
-
I
II
Timing switch
•
•
•
•
•
•
•
Choice of
browning
•
•
•
•
Adding
of
ingre-
dients – signal dur-
ing 2nd kneading
Display shows ADD
•
•
•
•
•
•
•
•
•
•
•
Total time
in hours
3:20
3:30
3:30
3:40
1:50
1:58
2:08
0:45
1:20
2:00
3:09
3:20
Times in Minutes:
Pre-heat. Motor not
working - heat
on/off (5/25 s)
17
20
37
40
22
5
5
9
Pre-
heat
15
11 22
Slow
stirring
left
3
3
3
3
3
3
3
3
3
3
1st kneading
right
2
2
2
2
2
2
2
2
2
2
2nd kneading
changing
right/ left
Heating on/ off
(5s/25s)
13 13
13
13
16
20
20
16
Stir-
ring
+
Boiling
45
Stir-
ring
16
8
13 13
1st raising
Heating on/ off
45
45
45
45
45 45
Dough
smooth
1
1
1
1
1
1
2nd raising
Heating
on/
off
18
18
18
18
45
without
heat
7
7
15
without
heat
18 18
Dough
smooth
1
1
1
1
1
1
1
1
3rd raising
Heating
on/
off
45
45
35
35
22
without
heat
25
35
39
39
Baking
55
62
55
62
55
55
80
56
56
End of the pro-
gramming process
Pause
Keep-warm
Heating on/ off
20s/10s at 85°C
60
60
60
60
60
60
with-
out
heat
20
with-
out
heat
16
60 60
The handling of the individual program is described in the following chapter “Individual program”.
48

I
I
N
N
D
D
I
I
V
V
I
I
D
D
U
U
A
A
L
L
P
P
R
R
O
O
G
G
R
R
A
A
M
M
This new generation
BACKING MASTER
has available several programs that include a program called INDIVIDUAL
PROGRAM because you can program it yourself.
You
can
include some
of
the
pre-programmed parts
of
the
basic works
setting as
well as
being able
to change
the
timings of individual program phases or even leaving out various program processes. This gives you the possibility of
individually making your bread or even preparing dough.
Initially for the basic setting of INDIVIDUAL PROGRAM we offer
the following information
:
INDIVIDUAL PROGRAM
The program offers the following
options
Select
browning
degreeg
yes
Acoustic
signal
for
adding
ingredients (in the kneading
phase)
yes
Time
delay
yes
Sizes
I
and
II
no
The manufacturer’s pre-set program corresponds to the
program “Yeast cakes”. The duration of the respective
program phases can be adjusted within the limits listed
below:
Total time
in hours
3:50
Pre-heat
- heating on/off
Preset time
presetting from / to
0:22
0-30 minutes
Kneading
Preset time
presetting from / to
0:18
0-30 minutes
1st raising
Preset time
presetting from / to
0:45
0-120 minutes
(2:00 hours)
2nd raising
Preset time
presetting from / to
1:25
0-120 minutes
(2:00 hours)
3rd raising
Preset time
presetting from / to
OFF
0-120 minutes
(2:00 hours)
Baking
Preset time
presetting from / to
1:00
0-60 minutes
(1:00 hour)
Keep-warm
Preset time
presetting from / to
60
OFF or 1:00 hr
Carry out as follows:
Select
EIGENPROGRAMM
/Individual
program
with the menu button.
Chose the appropriate sector with the program
sector button
PROGRAMMABSCHNITT
. The dis-
play shows the first program phase
PREHEAT
and
the preset time for this phase (0:22 min.).
You
may
now
adjust
the
preset
time
ny
pressing
the time change button
ZEITÄNDERUNG
within
the limits shown in the schedule, i.e. 30 min for
this phase. If you want to shorten the time, con-
tinue to press the key after reaching 30 min., it will
restart at 0 and you set for example 10 minutes.
The setting options are listed in the schedule on
the left side. If you want to cancel a certain pro-
gram phase, press the button
ZEITÄNDERUNG
,
until the display shows OFF.
Then confirm the adjustment by pressing the pro-
gram sector button
PROGRAMMABSCHNITT
once.
Press the program sector button
PROGRAMM-
ABSCHNITT
again to move to the next program
sector for which the programmed time will be dis-
played.
When the times in the table of the appropriate
program sector are exceeded by pressing the time
change button
ZEITÄNDERUNG
,
OFF
appears in
the display; this will cause this sector to be ignored
in the program process.
Whenever you make any changes, each program
sector, even if no changes are made, must be con-
firmed by pressing the program sector button
PROGRAMMABSCHNITT
.
After
having
adjusted
resp.
confirmed
all
program
phases, the display shows again the first phase
PREHEAT
.
Now leave the program setting by pressing the
START/STOP
button once. The display now
shows the total preset time for the indivdual pro-
gram.
Press the START/STOP button again to start the
program.
On the next page you
will find two exampes for working with the individual program:
49

S
S
t
t
o
o
l
l
l
l
e
e
n
n
w
w
i
i
t
t
h
h
w
w
h
h
i
i
t
t
e
e
c
c
h
h
e
e
e
e
s
s
e
e
Mod.
8650
Mod.
8660
Weight
approx
700
g
1400
g
Eggs
1
2
White
cheese
20%
125
g
250
g
Rum
2
½
tblsp
5
tblsp
Bitter
almond
oil
2
drops 4
drops
Juice
and
peels
of
½
lemon
1
lemon
Melted
butter
90
g
180
g
flour
type
405
250
g
500
g
Sultanas
60
g
125
g
Almonds, grated
60 g
125 g
Hazelnuts,
grated
60
g
125
g
Candied
lemon
peel
20
g
40
g
Bakin
powder
¾
bag.
1½
bag
Salt
2
pinches
3
pinches
Vanilla sugar
½ bag
1 bag
Sugar
100
g
200g
Individual program: Knead
= 20 minutes
Proceed as follows:
Adjust the program phases as describe
d above
•
PREHEAT;
OFF
•
KNEAD:
20
•
RISE I - Rise III:
OFF
•
BAKE:
OFF
•
KEEP WARM :
OFF
After
kneading
remove
the
dough
from
the
bread-
maker and form a
cake (a stolen is a German speciality
formed like a bread). Bake in the oven at 180°C for
approx 60 minutes.
The following recipe is provided for the preset indi-
vidual program without any amendments.
Crunchy white bread
Mod.
8650
Mod.
8660
Weight
approx.
680
g
900
g
Water
250
ml
280
ml
Flour
type
1050
500
g
675
g
Butter
20
g
30
g
Salt
1
tsp
1½
tsp
Dry
yeast
¾
bag
1
bad
Individual program: basic setting
The program corresponds to the basic settings of the
individual program. If there should be any amend-
ments memorized from previous operations, first re-
store the basic settings as described on the previous
page. The display must show a total program duration
of 3:50 hrs.
C
C
L
L
E
E
A
A
N
N
I
I
N
N
G
G
A
A
N
N
D
D
M
M
A
A
I
I
N
N
T
T
E
E
N
N
A
A
N
N
C
C
E
E
Before the
Backmeister
is used for the first time, wash the baking container and kneader with warm water and a
mild washing-up liquid. All parts must be dried thoroughly before mounting them.
Always switch off the appliance and remove the plug
from the mains before cleaning it.
Always allow the
breadmaker to cool down before it is cleaned and stored. It takes approximately 30 min. for the breadmaker to cool
down before it can be used again
Remove all ingredients and crumbs from the lid, case and baking chamber with a moist cloth.
Never immerse the
breadmaker in water and never fill the baking chamber with water.
The lid can be removed for easy clean-
ing; simply open the lid to an angle
of 40° and then withdraw.
Wipe the baking tin with a moist cloth. The inside of the tin can be rinsed with warm water and a washing-up liquid.
Do not soak the tin
in water for prolonged periods. Do not use any sharp or abrasive detergents.
Both the kneader and driving shaft should be cleaned immediately after use. The kneader may be difficult to remove
if it remains in the baking tin. In such an event fill the container with warm water and allow it to soak for approx. 30
minutes. The kneader can then be easily removed for cleaning.
The bread pans is equipped with a high quality
QUANTANIUM
®
non-stick coating. Never use metal objects or
scourers to clean the surface of the non-stick container. It is normal for the colour of the non-stick surface to change
in the course of time. This does not
influence the non-stick function.
Condensation from the steam accumulates between the inside and outside lid during baking and flows off the lid
when baking has been completed. This is normal. Any discolouration of the lid is of no consequence, but it can be
removed with an
appropriate cleaner.
Before the breadmaker is packed away for storage ensure that it has completely cooled down, is clean and dry, and
that the lid is closed.
50

A
A
N
N
S
S
W
W
E
E
R
R
S
S
T
T
O
O
Q
Q
U
U
E
E
R
R
I
I
E
E
S
S
O
O
N
N
T
T
H
H
E
E
A
A
P
P
P
P
L
L
I
I
A
A
N
N
C
C
E
E
A
A
N
N
D
D
H
H
A
A
N
N
D
D
L
L
I
I
N
N
G
G
T
T
h
h
e
e
b
b
r
r
e
e
a
a
d
d
s
s
t
ti
ic
c
k
k
s
s
i
i
n
n
t
t
h
h
e
e
p
p
a
a
n
n
a
a
f
f
t
t
e
e
r
r
b
b
a
a
k
k
i
i
n
n
g
g
Allow the bread to cool off for approx. 20-30 min., then turn the pan cautiously without pushing it on the table. If
necessary, slightly waggle the blades (kneader connections). Before baking is commenced, rub a little oil on the
kneaders. Before placing the kneaders into the bread pan, fill the holes in the kneaders with heat resisting mar-
garine to avoid dough from sticking at the
underside.
H
H
o
o
w
w
c
c
a
a
n
n
t
t
h
h
e
e
h
h
o
o
l
l
e
e
s
s
i
in
n
t
t
h
h
e
e
b
b
r
r
e
e
a
a
d
d
f
f
r
r
o
o
m
m
t
t
h
h
e
e
k
k
n
n
e
e
a
a
d
d
e
e
r
r
b
b
e
e
a
a
v
v
o
o
i
i
d
d
e
e
d
d
?
?
Before the last raising phase, you can remove the kneader with floured fingers (see the timing of the program
process on the display. Should you not wish to do that, after baking use the hooked skewer. If care is taken, lar-
ger holes are avoidable.
T
T
h
h
e
e
d
d
o
o
u
u
g
g
h
h
f
fl
lo
o
w
w
s
s
o
o
v
v
e
e
t
t
r
r
h
h
e
e
b
b
r
r
e
e
a
a
d
d
p
p
a
a
n
n
.
.
This may occur, when wheat flour is used, which rises more due to
the higher gluten portion.
Remedy:
reduce the flour quantity and adapt the other ingredients. The baked bread will have a great
volume;
Add 1 tbsp of melted margarine on top of the flour;
select a shorter program, for example the program RAPID/
SCHNELL
.
T
T
h
h
e
e
b
b
r
r
e
e
a
a
d
d
r
r
i
i
s
s
e
e
s
s
,
,
b
b
u
u
t
t
s
s
i
i
n
n
k
k
s
s
i
i
n
n
t
t
h
h
e
e
b
b
a
a
k
k
i
i
n
n
g
g
p
p
h
h
a
a
s
s
e
e
a)
if a “V” form channel appears in the br
ead flour gluten is missing, tha
t means that the flour contains too littl
e
protein (occurs in rainy summers) or the flour is damp. In
this case we recommend:
Select the program RAPID/
SCHNELL.
Add to the flour 1 tbsp wheat gluten for every 500 g of flour.
b)
if the bread sinks
like a funnel in
the middle then it could
be that:
the water temperature was too high;
to much water was used;
flour gluten is missing.
W
W
h
h
e
e
n
n
c
c
a
a
n
n
t
t
h
h
e
e
B
B
r
r
e
e
a
a
d
d
m
m
a
a
k
k
e
e
l
l
i
i
r
r
d
d
b
b
e
e
o
o
p
p
e
e
n
n
e
e
d
d
d
d
u
u
i
i
r
r
n
n
g
g
t
t
h
h
e
e
b
b
a
a
k
k
i
i
n
n
g
g
p
p
r
r
o
o
c
c
e
e
s
s
s
s
?
?
Basically it is always possible when the kneading takes place. During this time, one can add small amounts of
flour or liquid. If the bread has to have a particular appearance after baking, take the following steps: before the
last raising, carefully and shortly open the lid (see the program process table), make a cut in the crust with a
sharp pre-warmed knife, spread seeds or flakes on the surface or spread a potato-flour and water mixture on the
crust so that it shines after baking. This is the last phase in which the BREADMAKER lid can be opened, otherwise
the bread will sink.
T
T
h
h
e
e
b
b
r
r
e
e
a
a
d
d
c
c
r
r
u
u
s
s
t
t
i
i
s
s
n
n
o
o
t
t
b
b
r
r
o
o
w
w
n
n
e
e
n
n
o
o
u
u
g
g
h
h
.
.
Mix 1 egg yolk with 1 tsp
of sweet cream and brush the dough top after the
last kneading cycle.
W
W
h
h
a
a
t
t
d
d
o
o
t
t
h
h
e
e
t
t
y
y
p
p
e
e
f
fi
ig
g
u
u
r
r
e
e
s
s
m
m
e
e
a
a
n
n
w
w
i
i
t
t
h
h
f
f
l
l
o
o
u
u
r
r
?
?
The lower the figure the less roughage is contained in the flour and the lighter it is and the more it rises because
it contains a higher proportion of gluten. Please find below a schedule with the different types for Germany, Aus-
tria, and Switzerland as well as some explanations.
Description German
Type No.
Austrian
Type No.
Swiss
Type No.
Wheat flour
very
fine,
white,
e.g.
for
cake
405
480
400
plain
white
flour
for
bread
550
780
550
medium
flour
1050
1600
1100
dark
wheat
flour
1600
1700
1900
Rye flour
very
fine
815
500
720
fine
997
960
1100
medium
1150
960
1100
wholemeal,
rough
1740
2500
1900
W
W
h
h
a
a
i
t
t
is
s
l
l
f
f
o
o
u
u
r
r
g
g
l
l
u
u
t
t
e
e
n
n
?
?
The higher the type figure, the less gluten is in the flour and the less the dough rises. The highest gluten portion
is found in flour of the German type
550.
W
W
h
h
a
a
i
t
t
is
s
w
w
h
h
o
o
l
l
e
e
m
m
e
e
a
a
l
l
f
f
l
l
o
o
u
u
r
r
?
?
Wholemeal flour can be made from all sorts of grain, even wheat. The designation whole meal means that the
flour is ground from the whole grain and thus has more roughage. Therefore wheat wholemeal flour is somewhat
darker. Wholemeal bread is not necessarily darker as is often assumed.
51

W
W
h
h
a
a
t
t
h
h
a
a
s
s
t
t
o
o
b
b
e
e
n
n
o
o
t
t
e
e
d
d
w
w
h
h
e
e
n
n
u
u
s
si
in
n
g
g
r
r
y
y
e
e
f
f
l
l
o
o
u
u
r
r
?
?
Rye flour does not contain any binding substances, thus pure rye bread does not rise very much. To make it edi-
ble, a RYE WHOLEMEAL BREAD must be made with leaven dough. The dough will only rise when at least ¼ of
the total flour quantity is replaced by
type 550 flour
.
W
W
h
h
i
i
c
c
h
h
d
d
i
i
f
f
f
f
e
e
r
r
e
e
n
n
l
l
t
t
f
f
o
o
u
u
r
r
s
s
c
c
a
a
n
n
b
b
e
e
u
u
s
s
e
e
d
d
?
?
a)
Corn, rice, potato flour
can be used in particular for allergy patients or persons suffering from sprue or
celiaca. See the recipes in
the respective chapter.
b)
Spelt flour
ist very expensive, but free of chemical residues as spelt grows only on poor grounds. Spelt flour
is ideal for allergy patients. All recipes for flour type 405, 550, 1050
can be prepared as well with spelt flour.
c)
Hard wheat flour
(durum) is ideal for French baguette due
to its consistency.
H
H
o
o
w
w
c
c
a
a
n
n
f
f
r
r
e
e
s
s
h
h
b
b
r
r
e
e
a
a
d
d
b
b
e
e
m
m
a
a
d
d
e
e
m
m
o
o
r
r
e
e
e
e
d
di
ib
b
l
l
e
e
?
?
If a boiled purée is put with the
flour and kneaded in the fresh bread is more edible.
I
I
n
n
w
w
h
h
a
a
t
t
p
p
r
r
o
o
p
p
o
o
r
r
t
t
i
i
o
o
n
n
c
c
a
a
n
n
o
o
n
n
e
e
u
u
s
s
e
e
r
r
a
a
i
i
s
s
i
i
n
n
g
g
s
s
u
u
b
b
s
s
t
t
a
a
n
n
c
c
e
e
s
s
?
?
It can be bought in various quantities, so one must observe the manufacturer’s details on the packing and the
quantity set in relation to the amount of
flour used, with both yeast and leaven dough.
T
T
h
h
e
e
b
b
r
r
e
e
a
a
d
d
t
t
a
a
s
s
t
t
e
e
s
s
o
o
f
f
y
y
e
e
a
a
s
s
t
t
:
:
a)
if sugar
is used,
leave it
out but t
he bread
will not
be so
brown.
b)
add to the
water a quant
ity of spiri
ts vinegar,
for a small
loaf = 1½ t
bsp - for
a large loaf
2 tbsp
c)
replace the
water with
buttermilk or
kefir, thi
s will
improve the
freshness of
the bread.
T
T
E
E
C
C
H
H
N
N
I
I
C
C
A
A
L
L
D
D
E
E
F
F
A
A
U
U
L
L
T
T
S
S
O
O
F
F
T
T
H
H
E
E
B
B
R
R
E
E
A
A
D
D
M
M
A
A
K
K
E
E
R
R
Default
Cause
Remedy
Smoke coming out of the
baking chamber or vents
Ingredients sticking to baking chamber
or on the outside of the baking
tin
Switch off the machine, disconnect the
mains plug; wait until cooled down, then
clean the baking chamber and tin. Before
using the breadmaker for the first time,
make one baking cycle with inserted bread
pan, but without ingredients in the program
BACKPULVER to remove eventual residues.
Bread has partly collapsed
and is moist at the bottom
Bread remained too long in tin after be-
ing kept warm
Remove bread latest after end of keep-
warm function, to allow the steam to es-
cape.
Bread cannot be easily re-
moved from the tin.
The loaf is sticking to the kneading kni-
fe.
Before baking the next bread, clean knead-
ing knife and shaft after If necessary fill the
tin with warm water and soak for 30
min.
The kneader can then be easily removed.
Incorrect
program
Check
selected
menu;
set
another
program.
START/STOP key was touched while
breadmaker was operating.
Discard ingredients and start anew
Ingredients have not been
properly mixed or the
bread has not been prop-
erly baked.
Lid has been opened too long or too
of-
ten.
Only open the lid very shortly to add
ingre-
dients after the signal in the phased KNEAD
or RISE 2. Do not open in a later phase.
Long
power
outage
during
operation.
Throw
away
the
ingredients
and
restart
from the beginning, or continue the process
in the individual program.
The rotati
on of
the kneaders
is bloc
ked.
Check, if
the kneaders
are bloc
ked by
seeds
or other ingredients. Remove the bread pan
and check, if the catch at the underside ro-
tates. The shaft must project about 2 mm
on top of the kneaders.
If none of these options help, contact our
after-sales service.
Baking pan springs up dur-
ing the kneading process
The side springs on the base in the inner
housing have lost their strength.
Open the appliance lid which will interrupt
the program. Take out the pan
and pull up
the springs a little. Replace the pan and
close the lid. The appliance will carry on
working.
The dough is too thick, the kneading
hooks are blocked and push up the pan.
Open the lid. Add liquid to the
dough and
close the lid again.
52

D
D
E
E
F
F
A
A
U
U
L
L
T
T
S
S
T
T
O
O
H
H
A
A
N
N
D
D
L
L
I
I
N
N
G
G
O
O
R
R
R
R
E
E
C
C
I
I
P
P
E
E
M
M
I
I
S
S
T
T
A
A
K
K
E
E
S
S
Mistake
Cause
Remedy
Bread
rises
too
much.
Too
much
yeast,
too
much
flour
not enough salt, or a combination of
these causes
a/b
Bread does not rise or
only insufficiently
No or insufficient yeast
Old yeast.
Liquid too hot
Yeast came into contact with liquid
Wrong or old flour.
Too much or insufficient liquid.
Not enough sugar
a/b
e
c
d
e
a/b/g
a/b
Dough rises and flows
over the baking tin.
Very soft water so that yeast fermentation is s
tronger.
Too much milk has influenced yeast fermentation
f/k
c
Bread
has
collapsed.
Bread
volume
larger
than
the
tin
causing
it
to
collapse
Too early or too fast yeast fermentation due to
warm water, warm bak-
ing chamber or high humidity level.
a/f
c/h/i
Bread is dented after bak-
ing.
Not enough gluten in the
flour.
Too much liquid
l
a/b/h
Stiff
lumpy,
texture
Too
much
flour
or
insufficient
liquid
Not enough yeast or sugar
Too much fruit, wholemeal or other ingredients.
Old or poor quality flour
a/b/g
a/b
b
e
Not
baked
in
the
centre.
Too
much
or
insufficient
liquid.
High amount of moisture.
Recipe with moist ingredients, e.g. yoghurt.
a/b/g
h
g
Open, coarse texture or
full of holes.
Too much water.
No salt.
High amount of moisture; water was too warm.
Liquid was too hot.
g
b
h/i
c
Mushroom-like surface
that has not been properly
baked
Bread volume larger than the tin
Too much flour, particularly with white bread.
Too much yeast or insufficient salt.
Too much sugar
Sweet ingredients
in addition to
the sugar.
a/f
f
a/b
a/b
b
Bread
has
not
cooled
down
sufficiently.
j
Unevenly sliced or lumpy
bread.
Flour
was
not
properly
kneaded
in
at
the
sides
g/l
a)
Measure
the
ingredients
correctly.
b)
Match
the
quantity
of
ingredients
accordingly
and
check
whether
an
ingredient
has
been
forgotten.
c)
Use
another
liquid
or
allow
it
too
cool
down
to
room
temperature.
d)
Add
the ingred
ients i
n the
sequence
listed
in the
recipe.
Produce a
small
hole in
the c
entre and
immediately
add the crumbled or dried yeast. Avoid direct contact between yeast and liquid.
e)
Only
use
fresh
and
properly
stored
ingredients.
f)
Reduce
the
overall
quantity;
do
not
use
more
that
the
specified
quantity
of
flour.
Reduce
all
ingredients
by
one third.
g)
Correct
the
amount of
liquid.
If mois
t
ingredients
are
used
then
the
amount of
liquid
must
be
reduced.
h)
Use
1-2
tablespoons
less
during
wet
weather.
i)
Do
not
use
the ti
ming
program
in
hot
weather.
Use
cold
liquids.
Use
the
program
SCHNELL
or
ULTRA-
SCHNELL to shorten the rising phases.
j)
Immediately
remove
the
bread
from
the
tin
after
baking
and
allow
it
to
cool
down
on
a
grid
for
at
least
15 minutes before it is cut.
k)
Diminish
the
yeast
or
all
ingredients
by
one
quarter
of
the
specified
amount.
l)
Do
not
grease
the
bread
pan.
m)
Add
one
tablespoon
of
wheat
gluten
to
the
dough.
53

C
C
O
O
M
M
M
M
E
E
N
N
T
T
S
S
O
O
N
N
B
B
A
A
K
K
I
I
N
N
G
G
1
1
.
.
I
I
N
N
G
G
R
R
E
E
D
D
I
I
E
E
N
N
T
T
S
S
As
each
ingredient has
a
particular role
in
the
success of
bread-making, the
measuring
is
important as
the
correct
order of adding ingredients.
The important ingredients
, such as liquid, flour, salt, sugar and yeast (both dry and fresh yeast can be used) af-
fect the successful results in the preparation of bread and dough. Therefore always use the appropriate quantities in
the correct proportions to one another.
Use lukewarm ingredients if you are immediately starting to bake. If the TIME program is to be used, the ingredients
must be cold so that the yeast does not
ferment too soon.
Margarine, butter and milk only affect the taste of the bread.
Sugar can be reduced by 20% so that the crust will be lighter and thinner without otherwise affecting the baking re-
sults. Should you prefer a softer and lighter crust, you can replace the sugar with h
oney.
Gluten, that is formed through kneading, provides the structure of the bread. The ideal flour mixture contains 40%
wholemeal flour and 60% white flour.
Should you wish to add whole grains, soften them up overnight. Appropriately reduce the quantity of flour and liquid
(up to 1/5 less).
Leaven
is indispensable in the making of rye flour bread. It contains milk and vinegar acid bacteria that cause the
bread to be light and slightly sour. Making it up oneself takes up quite some time. Therefore we use in the following
recipes
concentrated leaven-dough powder
which comes in packs of 15 g (for 1 kg of flour). The quantities in
the recipes (
½
- ¾ - 1
bag) must be followed to cut down
on bread crumbing.
If
leaven-dough powder
is used in other concentrations, (packs of 100 g for 1 kg flour), 1 kg of flour must be re-
duced by 80 g or as appropriate to suit
the recipe.
Liquid leaven dough
, available packed in bags, can also be used well. As far as quantities are concerned adjust to
the details on the packing. Fill the leaven dough into
a measuring jug and add the appropriate quantity of liquid men-
tioned in the recipe.
Wheat leaven dough
, that can also be bought dried, improves the dough quality, the freshness and the taste. It is
milder than rye leaven dough.
Bake leaven bread in the BASIS
or the VOLLKORN programs, so that it rises and
bakes properly.
Wheat bran
should be added to the dough when a particularly roughage-full and light bread is required. Use 1 tbsp
for 500 g of flour
and raise the quantity of liquid by ½ tbsp.
Wheat gluten
is a natural helper out of grain protein. It makes the bread lighter, gives a better volume, sinks less
often and is more wholesome. This is particularly the case with wholemeal breads and pastries and those made from
self-ground flour.
Colour malt
, which we use in several recipes, is a dark-roasted barley malt. It is used to obtain a darker crumb and
crust (such as black bread). A rye malt is also available and is not so dark. Such malts are available in whole food
shops.
Bread seasoning
can be added to all mixed breads. The quantity used depends on the taste and the information of
the manufacturer.
Pure lecithin powder
is a natural a natural emulsion that raises the baking volume, makes the crumb tender and
softer and prolongs the
freshness.
All the above boldly-
printed baking substances and in
gredients are available
in whole food, health food
shops and the health food
departments of grocery stores or from flour
mills.
2
2
.
.
A
A
D
D
J
J
U
U
S
S
T
T
I
I
N
N
G
G
T
T
H
H
E
E
I
I
N
N
G
G
R
R
E
E
D
D
I
I
E
E
N
N
T
T
S
S
In cases where certain ingredients are increased or reduced, ensure that the proportions in the original recipe are
maintained. In order to achieve a perfect result, take note of
the following basic rules on adjusting the ingredients:
Liquid/flour: The dough must be soft (not too s
oft), slightly sticky and not s
tringy. Light dough is
in a ball, whereas
with heavier dough, such as rye wholemeal or other wholemeal breads, this is not the case. Check the dough 5 min-
utes after the first kneading. Should it be too moist, add more flour until the correct consistency is achieved. If the
dough is too dry, knead in spoonful by
spoonful of water.
Replacing liquids: Should you replace ingredients in the recipes which contain liquid (such as cream-cheese, yoghurt,
etc.), the appropriate liquid quantities must be adjusted accordingly. When using eggs, break then into the measur-
ing jug and fill up with liquid to the
required level.
If you live high up (above 2,500 ft.), the dough rises more quickly. In such regions the amount of yeast can be re-
duced by ¼ to ½
TS, to avoid excessive rising. The same is the case in regions where soft water is present.
54

3
3
.
.
A
A
D
D
D
D
I
I
N
N
G
G
A
A
N
N
D
D
M
M
E
E
A
A
S
S
U
U
R
R
I
I
N
N
G
G
T
T
H
H
E
E
I
I
N
N
G
G
R
R
E
E
D
D
I
I
E
E
N
N
T
T
S
S
A
A
N
N
D
D
Q
Q
U
U
A
A
N
N
T
T
I
I
T
T
I
I
E
E
S
S
Always first add
the liquid
and then
the yeast. O
nly in
case of
very heavy
dough such
as rye
bread, we
recommend
to fill in first the flour and the dry yeast and to pour the liquid on top to ensure proper kneading. However, if this is
combined with the TIME function, make sure, that any contact between yeast and liquid is avoided until the program
starts.
In order to prevent the yeast from fermenting too soon (in particular using the time delay), contact between the
yeast and the liquid must be avoided.
Always use
the
same
units in
measuring, which
means
that with
the
indication of
tablespoon and
teaspoons either
use the measuring spoon supplied with baking automatic or spoons which are normally used in
the household.
Weighing in grams is preferable due to their accuracy. The supplied measuring jug can be used for millilitres meas-
urements.
Abbreviations in the
recipes mean:
tbsp
=
level
tablespoon
(or
measuring
spoon
large)
tsp.
=
level
tea
spoon
(or
measuring
spoon
small)
g
=
grams
ml
=
millilitres
bag
=
package
dry
yeast
of
7
g
content
for
500
g
flour
–
corresponds
to
20
g
fresh
yeast
A
A
d
d
d
d
i
i
n
n
g
g
o
o
f
f
f
f
r
r
u
u
i
i
,
,
t
t
n
n
u
u
t
t
s
s
o
o
r
r
s
s
e
e
e
e
d
d
s
s
If you should wish to include further ingredients, this can be done
in all programs (except jams) as soon as the
signal
sound is heard. If the ingredients are added too early, they can
be ground up by the kneader.
Q
Q
u
u
a
a
n
n
t
ti
i
i
it
t
e
e
s
s
o
o
f
f
t
t
h
h
e
e
r
r
e
e
c
c
i
i
p
p
e
e
s
s
The following recipes show mostly different quantities, i.e. for stage I and II of both models. Model 8660 is supplied
with two sets of different kneading blades, the smaller ones are for small bread in stage I, the larger ones for large
bread in stage II.
Should there be no sizes mentioned in the recipes because they do not exist in the prescribed program, then the
small and also the large quantities will be successful for the appropriate type in the mentioned program. The pro-
grams without size selection are
programd appropriately.
4
4
.
.
B
B
R
R
E
E
A
A
D
D
W
W
E
E
I
I
G
G
H
H
T
T
S
S
A
A
N
N
D
D
V
V
O
O
L
L
U
U
M
M
E
E
S
S
In the following recipes you will
find apprimate: You will establish that the
weights for pure white bread are
less than
those for wholemeal bread. This is because white flour rises more and therefore is somewhat limited.
In spite of these exact weight details, certain differences may occur. The actual bread weight is very much depend-
ant on the humidity in the
air on preparation.
All breads that have a high proportion of wheat will achieve a greater volume and in
the highest weight class will rise
above the pan edge after the last raising. Nevertheless, they do not overflow. The bread bulging over the pan edge
will be somewhat lighter browned as the bread in the pan.
It is recommended that the FAST program is used for sweet breads, then the lesser quantities (only these) can be
baked with the prescribed recipe also in the HEFEKUCHEN program; thus the bread will be lighter. Select the yeast
pastries program and then the Size I.
5
5
.
.
B
B
A
A
K
K
I
I
N
N
G
G
R
R
E
E
S
S
U
U
L
L
T
T
S
S
The baking results are in particular dependant upon the local situation (soft water, high humidity, great heights state
of the ingredients, etc.). For this reason, the figures in the recipes are only clues and have to be adapted accordingly
If one or other recipe is not successful, do not give up, moreover try to find out the cause and try again, for example
with alternative quantity proportions.
Before you bake a bread overnight with the timer delay, we recommend that you make a trial bread so that, in cer-
tain circumstances, the recipe can be
altered.
55

R
R
E
E
C
C
I
I
P
P
E
E
S
S
F
F
R
R
O
O
M
M
T
T
H
H
E
E
U
U
N
N
O
O
L
L
D
D
B
B
R
R
E
E
A
A
D
D
M
M
A
A
K
K
E
E
R
R
K
K
I
I
T
T
C
C
H
H
E
E
N
N
G
G
e
e
n
n
e
e
r
r
a
a
l
l
All recipes are based on products available on the German market, in particular on German four types. You will find a
short description of the used flour types on page 51. The recipes for ready to make mixtures and the recipes for per-
sons suffering from an allergy are not completely included, as these recipes are based on special products available
on the German market. The manufacturer cannot assume any guarantee for unknown products which are sold in
other countries. Therefore you should take your usual recipes and modify them with regard to the maximum quan-
tities. You may also use ready-to-bake mixtures for bread. Please follow the instructions on the products.
C
C
L
L
A
A
S
S
S
S
I
I
C
C
A
A
L
L
B
B
R
R
E
E
A
A
D
D
R
R
E
E
C
C
I
I
P
P
E
E
S
S
C
Cl
la
a
s
s
s
s
i
i
c
c
a
a
l
l
W
W
h
h
i
i
t
t
e
e
b
b
r
r
e
e
a
a
d
d
Mod
e
865
0
l
Model 8660
Stufe
I
Step
II
Step
I
Step
II
Ingredients
for
a
bread
weight
of
740
g
1080
g
1080
g
1580
g
Water
350
ml
500
ml
500
ml
700
ml
Salt
1
tsp
1
½
tsp
1
½
tsp
2
tsp
Sugar
1
tsp
1
½
tsp
1
½
tsp
2
tsp
Semolina
150
g
200
g
200
g
300
g
Flour
type
550
350
g
500
g
500g
700
g
Yeast
¾ bag
1 bag
1 bag
1 ½ bag
Program:
SCHNELL
(Rapid) +
VOLLKORN
(wholemeal)
C
C
o
o
u
u
n
n
t
t
r
r
y
y
b
b
r
r
e
e
a
a
d
d
Model
8650
Model
8660
Step
I
Step
II
Step
I
Step
II
Ingredients
for
a
bread
weight
of
750g
950
g
950
g
1500
g
Milk
275
ml
350
ml
350
ml
550
ml
Margarine/butter
25
g
30
g
30
g
50
g
Salt
1
tsp
1
½
tsp
1
½
tsp
2
tsp
Sugar
1
tsp
1
½
tsp
1
½
tsp
2
tsp
Flour
1050
500
g
650
g
650
g
1000
g
Dry yeast
¾
bag
1
bag
1
bag
1
½
bag
Program:
BASIS
F
F
r
r
e
e
n
n
c
c
h
h
w
w
h
h
i
i
t
t
e
e
b
b
r
r
e
e
a
a
d
d
Model
8650
Model
8660
Step
I
Step
II
Step
I
Step
II
Ingredients
for
a
bread
weight
of
860
g
1280
g
1280
g
1750
g
Water
375
ml
550
ml
550
ml
750
ml
Salt
1
tsp
1
½
tsp
1
½
tsp
2
tsp
Vegetable oil
1 tblsp
1 ½ tsp
1 ½ tsp
2 tblsp
Flour
type
405
525
g
700
g
700
g
1050
g
Wheat
flour
75
g
100
g
100
g
150
g
Sugar
1
tsp
1
½
tsp
1
½
tsp
2
tsp
Dry
yeast
¾
bag
1
bag
1
bag
1
½
bag
Program:
SCHNELL
(Rapid)
I
I
t
t
a
a
l
l
i
i
a
a
n
n
w
w
h
h
i
i
t
t
e
e
b
b
r
r
e
e
a
a
d
d
Model
8650
Model
8660
Step
I
Step
II
Step
I
Step
II
Ingredients
for
a
bread
weight
of
900
g
1300
g
1300
g
1820
g
Water
375
ml
570
ml
570
ml
750
ml
Salt
1
tsp
1
½
tsp
1
½
tsp
2
tsp
Vegetable oil
1 tblsp
1 ½ tblsp
1 ½ tblsp
2 tblsp
Sugar
1
tsp
1
½
tsp
1
½
tsp
2
tsp
Flour
type
550
475
g
650
g
650
g
950
g
Corn semolina
100
g
150
g
150
g
200
g
Dry
yeast
¾
bag
1
bag
1
bag
1
½
bag
Program:
SCHNELL
(Rapid)
56

S
S
u
u
l
l
t
t
a
a
n
n
a
a
b
b
r
r
e
e
a
a
d
d
Model
8650
Model
8660
TIP:
Add
sultanas
o
dried
fruits
after
the beep
at
the 2
r
nd
kneading.
Step
I
Step
I
Ingredients
for
a
bread
weight
of
850
g
1100
g
1100
g
1700
g
Water
275
g
350
ml
350
ml
550
ml
Margarine/butter
30
g
40
g
40
g
60
g
Salt
½
tsp
¾
tsp
¾
tsp
1
tsp
Honey
1
tblsp
2
tblsp
2
tblsp
3
tblsp
Flour
type
405
500
g
650
g
650
g
1000
g
Cinnamon
¾
tsp
1
tsp
1
tsp
1
½
tsp
Dry
yeast
¾
bag
1
bag
1
bag
1
½
bag
Sultanas
(or
dried
fruits)
75
g
100
g
100
g
150
g
Program:
SCHNELL
(Rapid) or
HEFEKUCHEN
(Yeast cake).
Attention!
In
the
program
Hefekuchen (Yeast
cake)the bread
will become
lighter, therefore
never
use more than the quantities of Step 1.
S
S
w
w
e
e
e
e
t
t
b
b
r
r
e
e
a
a
d
d
Model
8650
Model
8660
Step I
Step
II
Step
I
Step
II
Ingredients for a bread weight of
750 g
1180
g
1180
g
1560
g
Fresh
milk
275
ml
400
ml
400
ml
550
ml
Margarine/butter
25
g
35
g
35
g
50
g
Eggs
2
4
4
5
Salt
1
tsp
1
½
tsp
1
½
tsp
2
tsp
Honey
2
tblsp
3
tblsp
3
tblsp
4
tblsp
Flour
type
550
500
g
700
g
700
g
1000
g
Dry
yeast
¾
bag 1
bag
1
bag
1
½
bag
Program:
SCHNELL
(Rapid) or
HEFEKUCHEN
(Yeast cake)
Attention!
In
the
program
Hefekuchen
(Yeast
cake)the
bread
will
become
lighter,
therefore
never
use more than the quantities of Step 1.
P
P
o
o
p
p
p
p
y
y
s
s
e
e
e
e
d
d
b
b
r
r
e
e
a
a
d
d
Model
8650
Model
8660
TIP: Before baking open the machine, brush the dough
with water and sprinkle it with some poppy
seed.
Step
I
Step
II
Step
I
Step
II
Ingredients
for
a
bread
weight
of
850
g
1380
g
1380
g
1900
g
Water
375
ml
570
ml
570
ml
750
ml
Wheat
flour
type
550
500
g
670
g
670
g
1000
g
Corn semolina
75
g
130
g
130
g
150
g
Sugar
1
tsp
1
½
tsp
1
½
tsp
2
tsp
Salt
1
tsp
1
½
tsp
1
½
tsp
2
tsp
Poppy
seed,
whole
or
grinded
50
g
75
g
75
g
100
g
Butter
15
g
20
g
20
g
30
g
Nutmeg
grated
1
pinch 2
pinches
2
pinches
3
pinches
Parmesan
cheese
grated
1
tblsp
1
½
tblsp
1
½
tblsp 2
tblsp
Dry
yeast
¾
bag 1
bag
1
bag
1
½
bag
Program:
SCHNELL
(Rapid) or
HEFEKUCHEN
(Yeast cake)
Attention!
In
the
program
Hefekuchen
(Yeast
cake)
the
bread
will
become
lighter,
therefore
never
use more than the quantities of Step 1.
B
B
u
u
t
t
t
t
e
e
r
r
m
m
i
i
l
l
k
k
b
b
r
r
e
e
a
a
d
d
Model
8650
Model
8660
Step
I
Step
II
Step
I
Step
II
Ingredients
for
a
bread
weight
of
860
g
1150
g
1150
g
1750
g
Butter
milk
375
ml
550
ml
550
ml
750
ml
Salt
1
tsp
1
½
tsp
1
½
tsp
2
tsp
Sugar
1
tsp
1
½
tsp
1
½
tsp
2
tsp
Flour
type
1050
500
g
760
g
760
g
1000
g
Dry
yeast
¾
bag 1
bag
1
bag
1
½
bag
Program:
BASIS
57
This manual suits for next models
1
Table of contents
Other Unold Kitchen Appliance manuals

Unold
Unold 48556 User manual

Unold
Unold ALLESSCHNEIDER CURVE User manual

Unold
Unold 48525 User manual

Unold
Unold 48556 User manual

Unold
Unold 28495 User manual

Unold
Unold 68865 User manual

Unold
Unold 48795 User manual

Unold
Unold 58850 User manual

Unold
Unold RETRO User manual

Unold
Unold QUADRO 48480 User manual

Unold
Unold 48645 User manual

Unold
Unold 8775 User manual

Unold
Unold METALL PLUS User manual

Unold
Unold 48040 User manual

Unold
Unold PROFI 78816 User manual

Unold
Unold Latte Bricco User manual

Unold
Unold 28105 User manual

Unold
Unold 78856 User manual

Unold
Unold QUADRO 48480 User manual

Unold
Unold 78816 User manual