manuals.online logo
Brands
  1. Home
  2. •
  3. Brands
  4. •
  5. VENETA
  6. •
  7. Window Blind
  8. •
  9. VENETA 65101-10242-G User manual

VENETA 65101-10242-G User manual

#65101-10242-G
Bottom Bracket
Medium & Long
Screws for Wood
Clips & Rollers
Bolt
How to install your
Vertical Honeycomb Blind
measuring
tape
drill with
2mm bit
phillips bit or
screwdriver
pencil knife
Required Tools
Installation
Bracket
How to install your
Vertical Honeycomb Blind
2
Head Rail
4
Fixed Vertical Rail
3
Clips & Rollers
1
Installation Brackets
Installing inside the window frame…
At top of window or door frame, measure 80mm
in from each end and mark with a pencil. This is
the edge of the outer brackets.
Place brackets in position flush with the front
of the window opening and mark where the
screws will go.
We recommend drilling pilot holes for the
screws using a 2mm bit.
Fix the brackets into position using 2 long screws for each bracket.
If more brackets are supplied, space them evenly between the first two brackets.
Installing outside the window frame…
Measure 80mm in from top left and top right of where blind will sit (normally edge of
architrave) and mark with a pencil. This is the edge of the outer brackets.
Position the top of bracket 3mm above the architrave and mark where the screws will go.
We recommend using a spirit level to align brackets if not installing on the architrave.
We recommend drilling pilot holes for the screws using a 2mm bit.
Fix the brackets into position using 2 long screws for each bracket.
If more brackets are supplied, space them evenly between the first two brackets.
Position the top lip of the headrail under
the top front lip of the brackets as per
diagram to the right.
Push the headrail up at the back to click
into position as per diagram to the right.
Note: Do not untie the cords at
the top of the vertical rail.
Attach the floor bracket to the
end cap of unmovable vertical
rail, shown in right drawing.
Push the fixed vertical rail from
down to up as right drawing.
Attach fixed vertical rail by
pushing the fixing hanger into the
gap of head rail as drawing.
Attach clips to rollers (clips are attached to top of fabric).
Wall Plugs for
Brick or Cement
using a 6mm bit
(if requested)
Please write a review on our
website at…
www.venetablinds.com.au
Feedback?
We would love to know how you
went with your installation…
Installation bracket
Head rail
Side view
Need HELP?
Call our
Customer Service team
for assistance
1300 836 382
Included Hardware
The hardware can be found in
the end of every box.
Difficulty: ★★★★☆
1 2
80mm
80mm
Space Evenly
Installation Bracket
Head Rail
End Cap
Fixed
Vertical Rail
Bottom
Bracket
Fabric
Movable
Vertical Rail
Cord
Bead
Clips & Rollers
Support Shaft
#65101-10242-G
How to install your
Vertical Honeycomb Blind
5
Movable Vertical Rail
7
Bottom Bracket
6
Fabric Clips and Rollers
8
Tension Cord
Note: for Centre Opening model, repeat steps 3 to 7 for the other side of the blind.
As per the drawings to the right, decide which
way you will face the bottom bracket
to be screwed to the wall or the floor.
Tilt the bottom of the fixed vertical rail out
into the room and insert the bottom
bracket into the slot in the bottom of the
fixed vertical rail.
We recommend drilling a pilot hole for
the screw using a 2mm bit.
Fix the bracket into place using a
medium screw.
Note: photo on right is taken from the
rear of the blind.
Note: Slide the support shaft along the head rail to the
required spot.
Align the movable vertical rail to the sliding support shaft
in head rail.
Insert and screw the bolt until firm.
Press onto headrail from the front of the blind.
NOTE: The rollers should be facing away from you.
Remove the rubber band from the cord and bead.
Left or right stack
• At the opposite end to the fabric stack on the headrail, you will find the bead
housing located within the end cap.
• Insert the beaded cord into the bead housing from the top.
Note: The string needs to be inserted into the slot.
Centre opening
• For the right hand fabric stack, take the beaded cord to
the far left hand side end cap & insert the beaded cord
into the bead housing from the top.
• For the left hand fabric stack, take the beaded cord to the
far right hand side end cap & insert the beaded cord into the
bead housing from the top.
Note: Use your hand to push the fabric back to reveal the housing – fabric will bounce back.
How to install, operate and maintain your
Vertical Honeycomb Blind
9
Vertical Alignment
If the movable vertical rail is not vertical, adjust the screw as per image.
Turn the screw either clockwise or anti-clockwise to make the rail vertical.
Note: the fabric can be crinkled and will bounce back into place.
Operating your
Blind
Maintaining your
Blind
To operate the blind simply grab the movable vertical rail to slide the blind.
Use a warm damp cloth or a mild detergent for tougher stains.
Dab the affected area, but do not rub the fabric. Finish with just a warm damp cloth.
Allow the fabric to dry in the closed position.
3
Spot Cleaning
If ultrasonically cleaning the blind please specify that a mild solution must be used.
Note the rails should never be immersed in liquid.
4
Ultrasonic Cleaning
Please write a review on our
website at…
www.venetablinds.com.au
Feedback?
We would love to know how you
went with your installation…
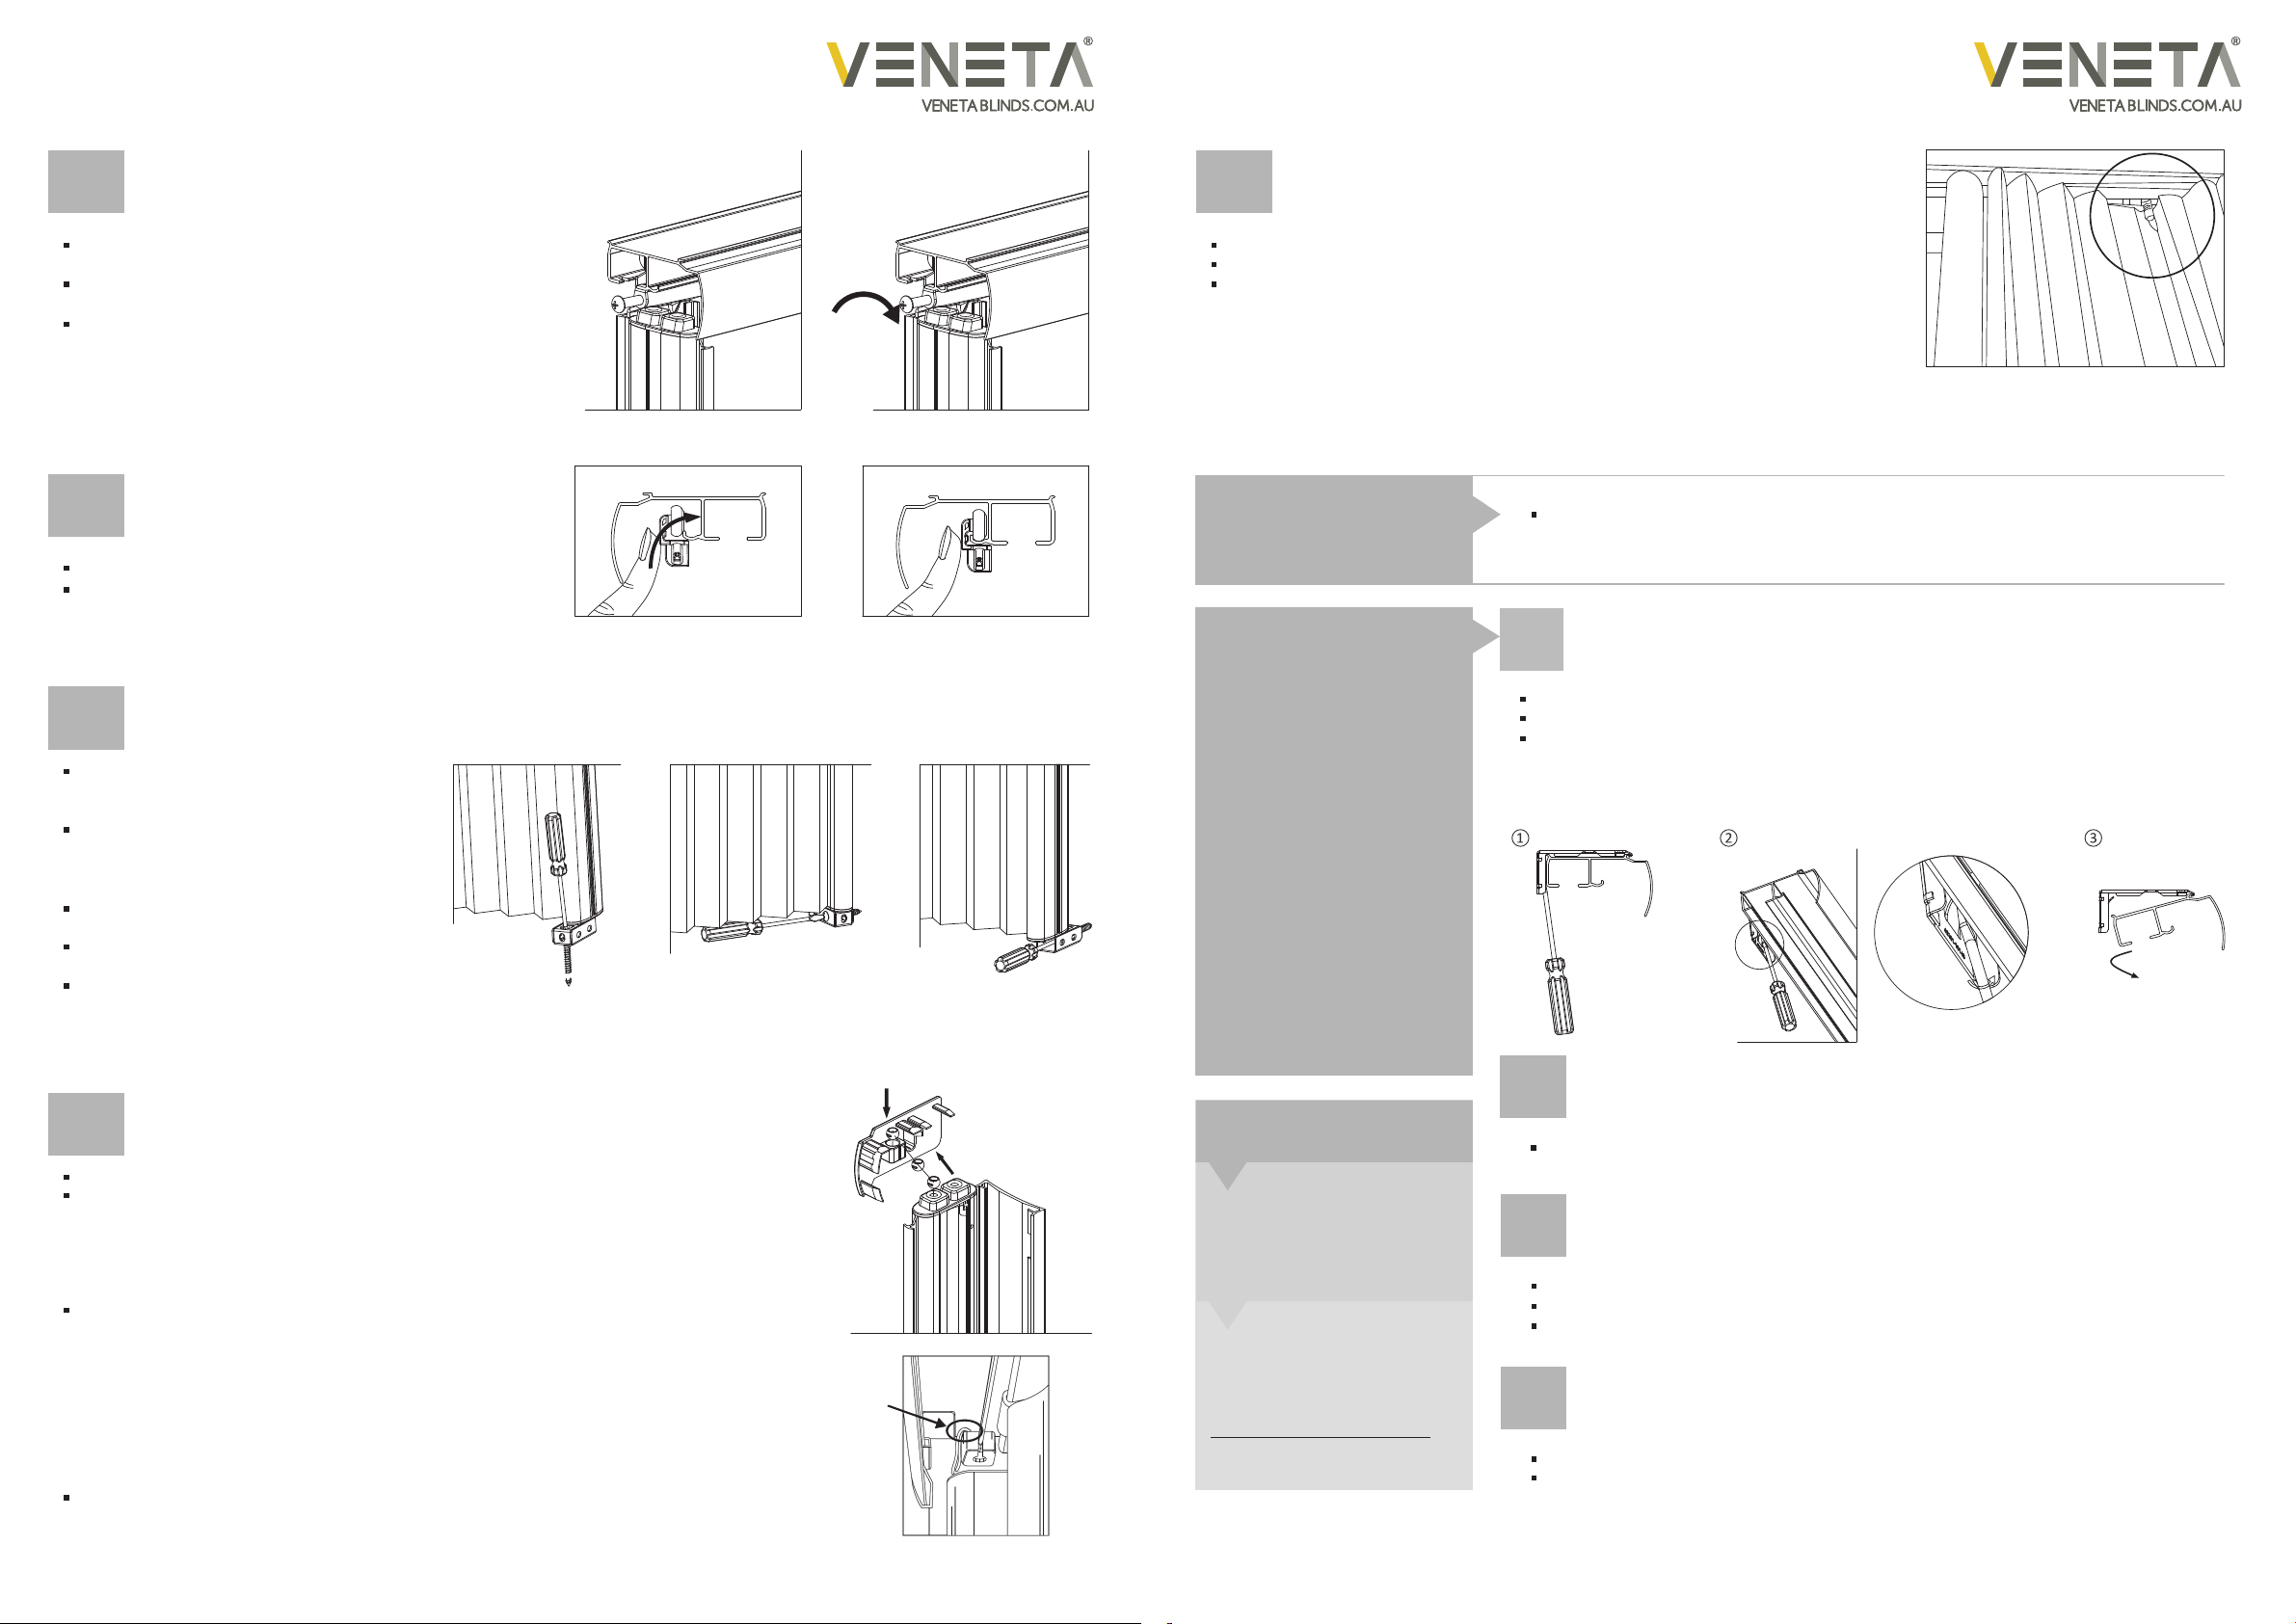
1Removing your blind
Remove the blanket from the head rail.
Hold the blanket, and then to remove the vertical rail from the head rail.
Refer to below guide to remove the head rail.
a. Position a flat head screw driver between the back of the headrail and bracket.
b. Push screw driver upwards
c. Pull back of headrail down to unclip bracket from headrail.
d. Repeat for all other brackets.
Dust can be removed using a feather duster or vacuum with brush attachment
on low suction.
2
Dusting
3 4
Great Job… Enjoy your new Veneta Blinds!
Keep the end of
cord upwards.

Other VENETA Window Blind manuals

VENETA Cordloop Instruction sheet

VENETA

VENETA Cordloop Instruction sheet

VENETA Vertical Honeycomb Blind User manual

VENETA

VENETA Vertical Honeycomb Blind User manual

VENETA 65101-11752-D Instruction sheet

VENETA

VENETA 65101-11752-D Instruction sheet

VENETA 65101-20145-A Instruction sheet

VENETA

VENETA 65101-20145-A Instruction sheet

VENETA Smartfit Honeycomb Blind User manual

VENETA

VENETA Smartfit Honeycomb Blind User manual

VENETA 65101-50725-D Instruction sheet

VENETA

VENETA 65101-50725-D Instruction sheet

VENETA 65101-40168-E Instruction sheet

VENETA

VENETA 65101-40168-E Instruction sheet

VENETA Smartfit Day & Night Honeycomb User manual

VENETA

VENETA Smartfit Day & Night Honeycomb User manual

VENETA 65101-40160-D Instruction sheet

VENETA

VENETA 65101-40160-D Instruction sheet

VENETA 65101-40159 Instruction sheet

VENETA

VENETA 65101-40159 Instruction sheet

VENETA 65101-21717-B Instruction sheet

VENETA

VENETA 65101-21717-B Instruction sheet

VENETA Smartfit Single Cell Honeycomb Blind Instruction sheet

VENETA

VENETA Smartfit Single Cell Honeycomb Blind Instruction sheet

VENETA Skylight Honeycomb Blind User manual

VENETA

VENETA Skylight Honeycomb Blind User manual

VENETA Zebra Blind User manual

VENETA

VENETA Zebra Blind User manual

VENETA 65101-21734-E Instruction sheet

VENETA

VENETA 65101-21734-E Instruction sheet

Popular Window Blind manuals by other brands

rollease acmeda SS38 Assembly manual

rollease acmeda

rollease acmeda SS38 Assembly manual

Roto ZFA M Mounting instructions

Roto

Roto ZFA M Mounting instructions

IKEA FYRTUR E1753-60 manual

IKEA

IKEA FYRTUR E1753-60 manual

Isotra VS 4 Assembly manual

Isotra

Isotra VS 4 Assembly manual

woundwo Rollo Series Instructions for use

woundwo

woundwo Rollo Series Instructions for use

LEHA ELRO-L Installation and instruction manual

LEHA

LEHA ELRO-L Installation and instruction manual

Louvolite Roller System 32 Fitting and operating instructions

Louvolite

Louvolite Roller System 32 Fitting and operating instructions

Hella TOP MINI plus RvU Installation instructions and instructions for use

Hella

Hella TOP MINI plus RvU Installation instructions and instructions for use

3 Day Blinds MINI BLINDS Classic quick start guide

3 Day Blinds

3 Day Blinds MINI BLINDS Classic quick start guide

Markilux 710 manual

Markilux

Markilux 710 manual

YewdaleDefiant C40-90T Manufacturing Instructions

YewdaleDefiant

YewdaleDefiant C40-90T Manufacturing Instructions

Dometic FP200 Installation and operating manual

Dometic

Dometic FP200 Installation and operating manual

MHZ 04-2251 Operation

MHZ

MHZ 04-2251 Operation

Lafayette Heartland Woods Woodland Harvest Series installation instructions

Lafayette

Lafayette Heartland Woods Woodland Harvest Series installation instructions

Velux FHU manual

Velux

Velux FHU manual

IKEA FYRTUR 100 manual

IKEA

IKEA FYRTUR 100 manual

Diaz DF comfort 20 manual

Diaz

Diaz DF comfort 20 manual

fakro ARZ user manual

fakro

fakro ARZ user manual

manuals.online logo
manuals.online logoBrands
  • About & Mission
  • Contact us
  • Privacy Policy
  • Terms and Conditions

Copyright 2025 Manuals.Online. All Rights Reserved.