manuals.online logo
Brands
  1. Home
  2. •
  3. Brands
  4. •
  5. VENETA
  6. •
  7. Window Blind
  8. •
  9. VENETA 65101-20145-A Instruction sheet

VENETA 65101-20145-A Instruction sheet

85mm
85mm
How to install your
#65101-20145-A
Cordless Timber Venetian Blind
Required Tools
Included Hardware
measuring
tape
drill with
2mm bit
phillips bit or
screwdriver
pencil knife
The hardware can be found in
the end of every box.
1Installation Brackets
Installing inside the window frame…
At the top of the window frame measure 85mm in from each side
and measure 72mm (103mm for blind with valance) back from the
front of the window opening; this is the edge of the back of the
bracket.
Place bracket in position and mark where the screws will go.
We recommend drilling pilot holes for the screws using a 2mm bit.
First peel off the paper at the backside of the bracket and then fix
brackets into position using 2 long screws.
If more brackets are supplied, space them evenly between the first
two brackets.
Installing outside the window frame…
Measure 85mm in from the top left and top right of where the blind
will be positioned and 51mm up from the top of the window opening;
this is the edge of the top of the bracket.
Place the brackets in position and mark where the screws will go.
We recommend using a spirit level to align brackets if not installing
on the architrave.
We recommend drilling pilot holes for the screws using a 2mm bit.
First peel off the paper at the backside of the bracket and then fix
brackets into position using 2 long screws.
If more brackets are supplied, space them evenly between the first
two brackets.
Position the top front of the blind under the top front
lip of the brackets.
Push the blind up at the back and click into position
as per diagram.
Ensure the blind has clicked firmly into place.
2Install Blind
Hold Down
Bracket
Installation
Bracket
Medium & Long
Screws for Wood
Wall Plugs for Brick
or Cement using
a 6mm Bit
(if requested)
How to install your
Cordless Timber Venetian Blind
3Install Valance Connector (Optional)
4
Valance Connector
(Optional)
Clip Plug
(Optional)
Clip Receptor
(Optional)
Wood Wand
Valance Return
Connector
(Optional)
The valance is connected as below drawing:
Attach the Valance (Optional)
Hook the adjustable valance clip receptors onto the headrail and space them evenly.
Make sure receptors are not in an obstructive position with the drum support or wand tilter
inside the headrail and the brackets.
Attach the adjustable valance clip plug into the channel on the backside of the valance.
Refer to the receptor position on the headrail to decide where to position on the valance.
Valance Connector is only supplied for connecting spliced valances.
Insert the valance connector into the slot on the back of the valance as below drawing:
Difficulty: ★☆☆☆☆
1
#65101-20145-A
2
With or Without Valance
With Valance
Without Valance
Peel off the paper
Installation
continued…
click!
Operating your
Blind
How to operate and maintain your
Cordless Timber Venetian Blind
5Hold Down Brackets
Position hold down bracket vertically inside window frame where the
bottom rail hangs naturally, mark where the 2 screws will go.
We recommend drilling pilot holes for the screws using a 2mm bit.
Fix bracket into position using 2 medium screws.
Insert bracket knob into bottom rail.
Repeat for bracket at other end of bottom rail.
Position hold down bracket horizontally outside window frame where
the bottom rail hangs naturally, mark where the 2 screws will go.
We recommend drilling pilot holes for the screws using a 2mm bit.
Fix bracket into position using 2 medium screws.
Insert bracket knob into the bottom rail.
Repeat for bracket at other end of the bottom rail.
How to install your
Cordless Timber Venetian Blind
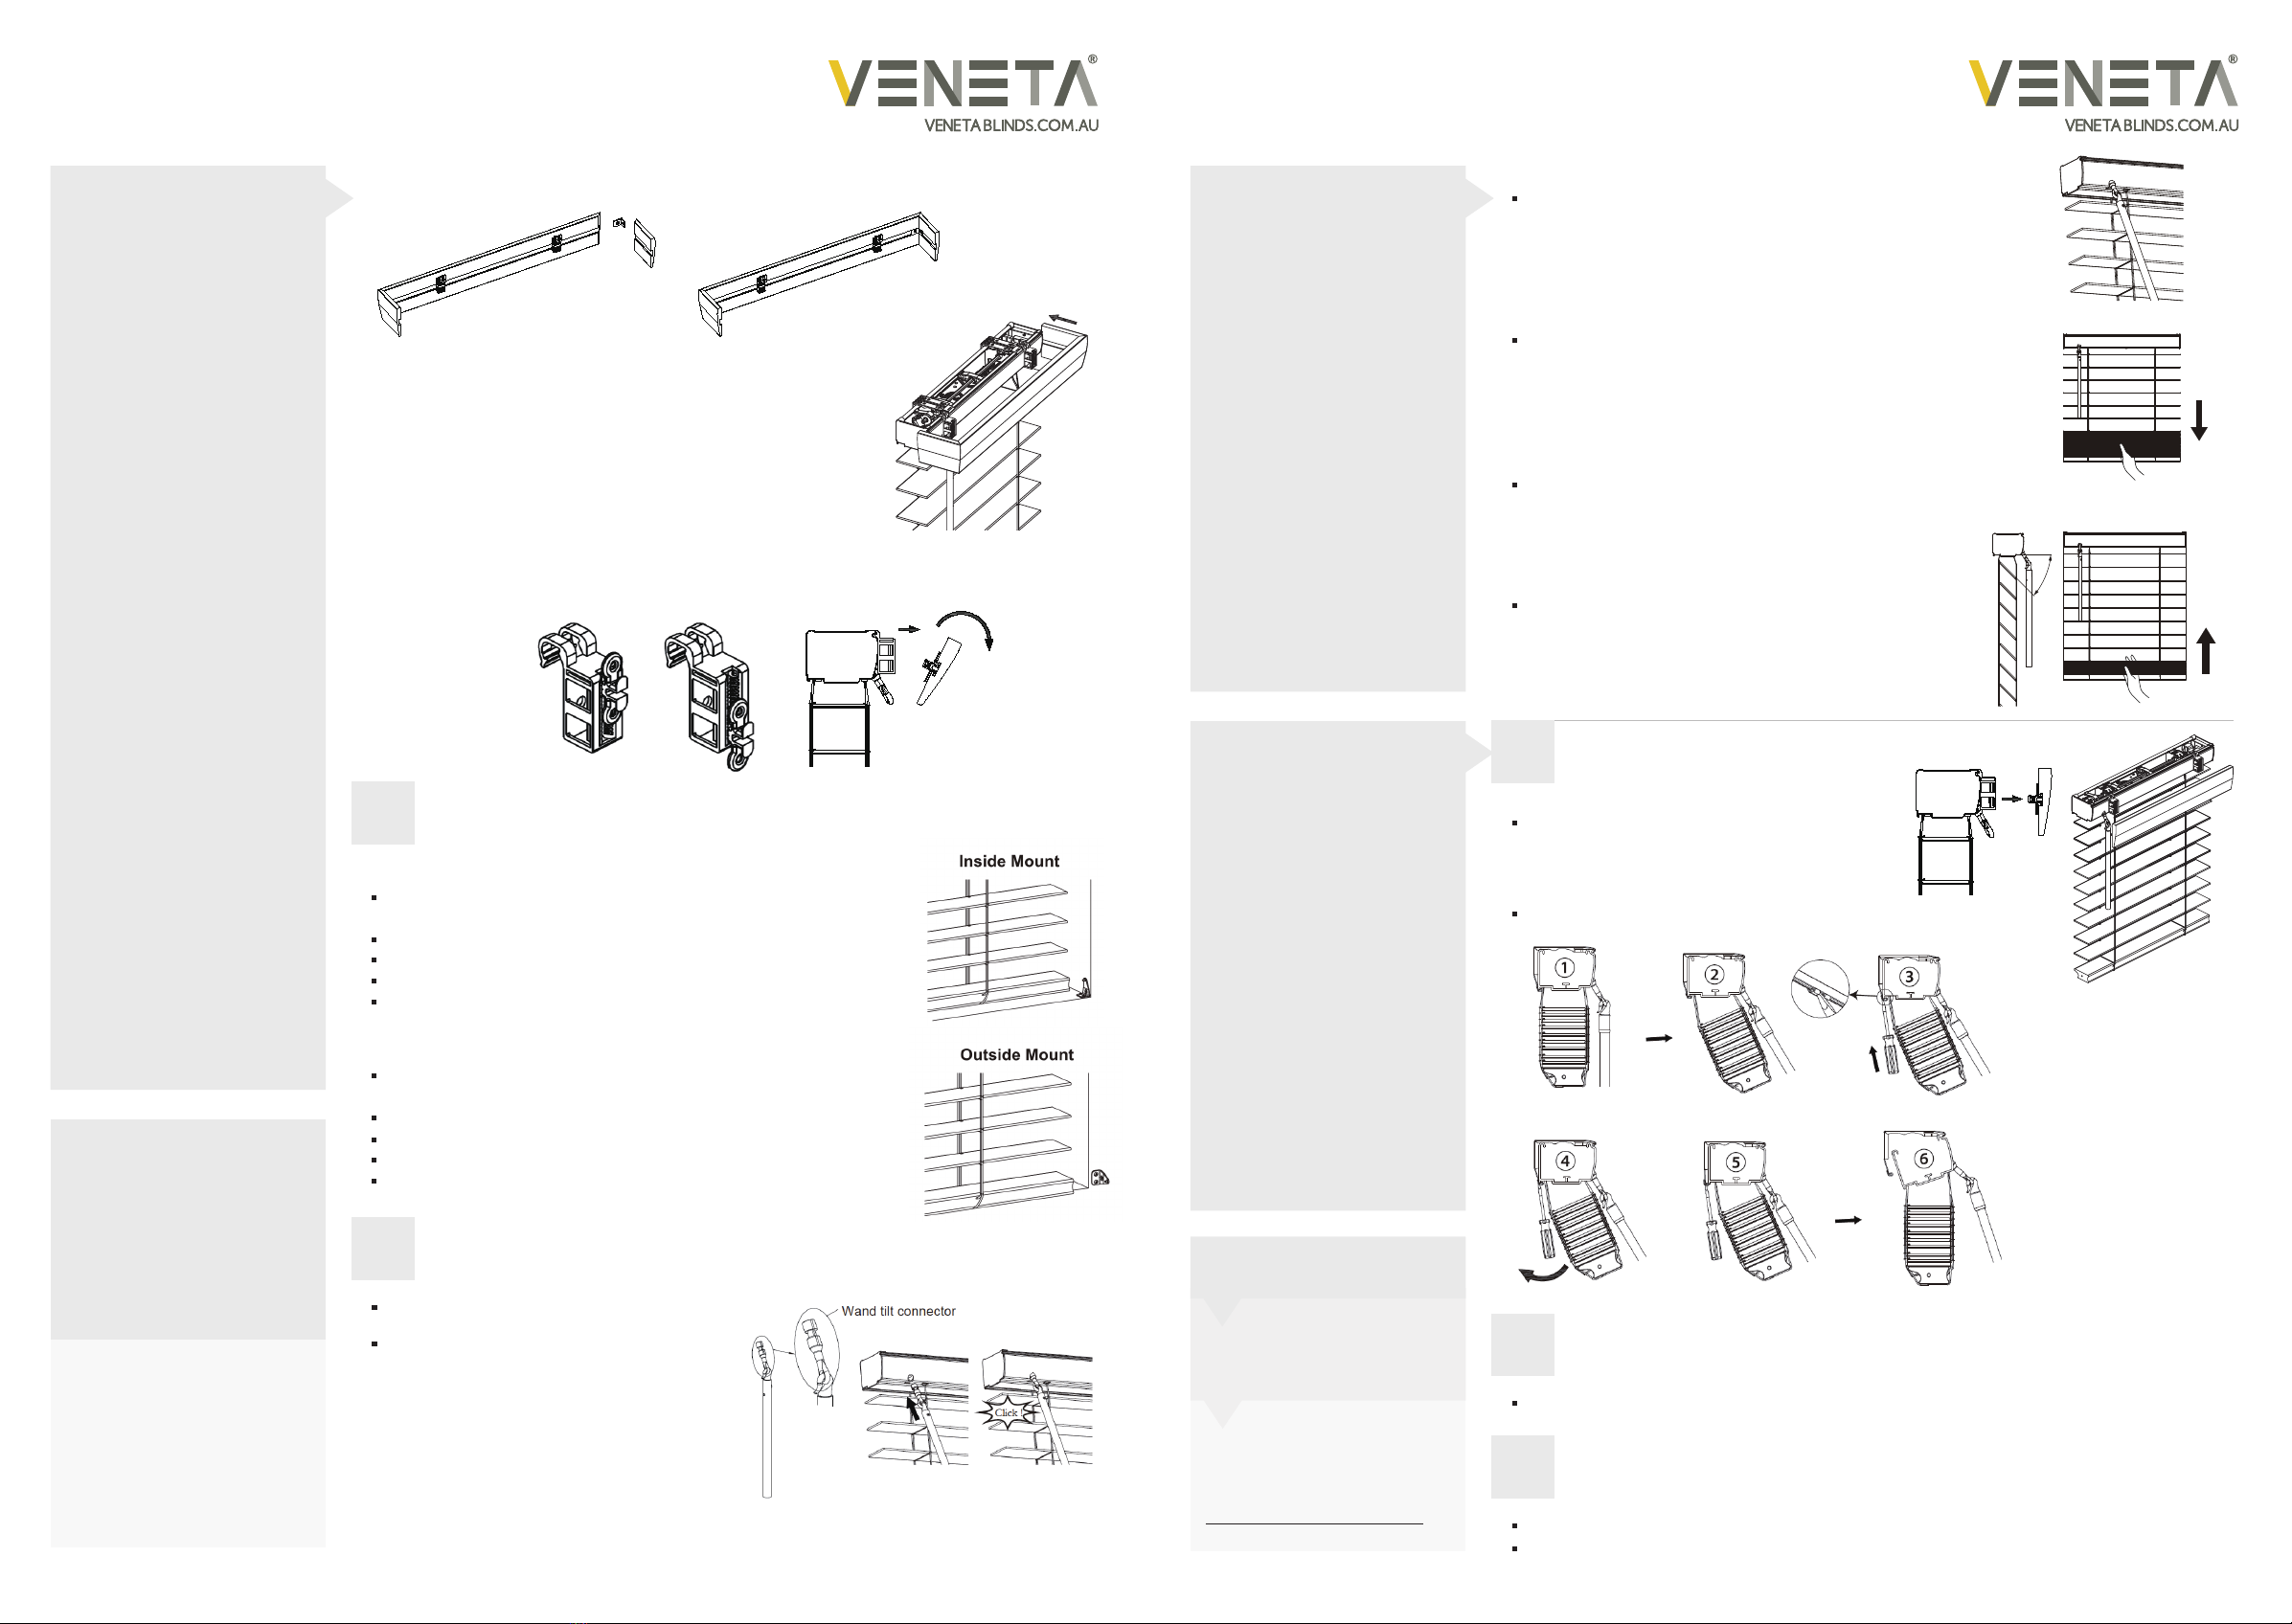
Attach the valance return connector if needed
(Outside Mount).
Attach the valance to the headrail by inserting the plugs into
the receptors.
Refer to the right drawing. Slightly move the receptors left or
right along the headrail so the plugs are in alignment with
receptors to ensure right insertion of plug.
If you wish to adjust the valance position vertically, pull out
the valance and reinsert into the desired position. When
removing the valance from the headrail, hold the valance as
shown on the picture and pull it out (do not flip upward).
Installing inside the window frame...
Installing outside the window frame...
#65101-20145-A #65101-20145-A
3 4
Maintaining your
Blind
2Dusting
Dust can be removed using a feather duster or vacuum with brush attachment on low suction.
1Removing your Blind
Remove the valance and valance clip plugs away
from the receptors first if valance is included.
Remove the blind from brackets as per picture below.
3Spot Cleaning
Clean your Timber Venetians using a warm damp cloth.
Do not use solvents or chemicals.
Please write a review on our
website at…
www.venetablinds.com.au
We would love to know how you
went with your installation…
Feedback?
45°
6Assemble the Wand
Great Job… Enjoy your new Veneta Blinds!
Insert wand tilt connector into the bottom of headrail
till they are clicked.
Do not take down the wand after installed.
Installation
continued…
Need HELP?
Customer Service
1300 836 382
“the best compliment
you can give
is a referral”
Rotate wand to attain desired slat position.
The slats need to be opened at any angle and keep even
when pulling the bottom rail down by hand.
Note: Do not put the slats in a closed up or closed down
position while lifting the bottom rail.
Gently tilt the slats toward you at 45 degree before lifting
the bottom rail up by hand.

Other VENETA Window Blind manuals

VENETA 65101-21734-E Instruction sheet

VENETA

VENETA 65101-21734-E Instruction sheet

VENETA Smartfit Single Cell Honeycomb Blind Instruction sheet

VENETA

VENETA Smartfit Single Cell Honeycomb Blind Instruction sheet

VENETA Skylight Honeycomb Blind User manual

VENETA

VENETA Skylight Honeycomb Blind User manual

VENETA 65101-40160-D Instruction sheet

VENETA

VENETA 65101-40160-D Instruction sheet

VENETA Smartfit Day & Night Honeycomb User manual

VENETA

VENETA Smartfit Day & Night Honeycomb User manual

VENETA 65101-11752-D Instruction sheet

VENETA

VENETA 65101-11752-D Instruction sheet

VENETA 65101-21717-B Instruction sheet

VENETA

VENETA 65101-21717-B Instruction sheet

VENETA 65101-40168-E Instruction sheet

VENETA

VENETA 65101-40168-E Instruction sheet

VENETA Cordloop Instruction sheet

VENETA

VENETA Cordloop Instruction sheet

VENETA 65101-50725-D Instruction sheet

VENETA

VENETA 65101-50725-D Instruction sheet

VENETA Vertical Honeycomb Blind User manual

VENETA

VENETA Vertical Honeycomb Blind User manual

VENETA 65101-40159 Instruction sheet

VENETA

VENETA 65101-40159 Instruction sheet

VENETA 65101-10242-G User manual

VENETA

VENETA 65101-10242-G User manual

VENETA Smartfit Honeycomb Blind User manual

VENETA

VENETA Smartfit Honeycomb Blind User manual

VENETA Zebra Blind User manual

VENETA

VENETA Zebra Blind User manual

Popular Window Blind manuals by other brands

YewdaleDefiant R20B Fitting instructions

YewdaleDefiant

YewdaleDefiant R20B Fitting instructions

rollease acmeda Zipscreen Extreme installation manual

rollease acmeda

rollease acmeda Zipscreen Extreme installation manual

WAREMA P2.Q Series INSTALLATION AND CARE INSTRUCTIONS

WAREMA

WAREMA P2.Q Series INSTALLATION AND CARE INSTRUCTIONS

Vista Simplicity Rechargeable Motorization quick start guide

Vista

Vista Simplicity Rechargeable Motorization quick start guide

NESLING Coolfit instructions

NESLING

NESLING Coolfit instructions

LuxaFlex Timber product manual

LuxaFlex

LuxaFlex Timber product manual

SelectBlinds Architect Roman Shades installation guide

SelectBlinds

SelectBlinds Architect Roman Shades installation guide

ALTA SOLANA SHADES PRODUCT CARE & WARRANTY

ALTA

ALTA SOLANA SHADES PRODUCT CARE & WARRANTY

TUISS Easi-Fit installation guide

TUISS

TUISS Easi-Fit installation guide

MHZ 04-2501 Installation and operating instructions

MHZ

MHZ 04-2501 Installation and operating instructions

Hella TOP MINI plus RvA Operating guidelines

Hella

Hella TOP MINI plus RvA Operating guidelines

Velux FHLC installation instructions

Velux

Velux FHLC installation instructions

Tudelu Closure installation manual

Tudelu

Tudelu Closure installation manual

ODSIF Luxury roller blind system user guide

ODSIF

ODSIF Luxury roller blind system user guide

weinor VertiTex II Maintenance instructions and directions for use

weinor

weinor VertiTex II Maintenance instructions and directions for use

Nien Made 10793478499762 instructions

Nien Made

Nien Made 10793478499762 instructions

Style selections AS3072C Assembly instructions

Style selections

Style selections AS3072C Assembly instructions

Cosiflor FE quick start guide

Cosiflor

Cosiflor FE quick start guide

manuals.online logo
manuals.online logoBrands
  • About & Mission
  • Contact us
  • Privacy Policy
  • Terms and Conditions

Copyright 2025 Manuals.Online. All Rights Reserved.