manuals.online logo
Brands
  1. Home
  2. •
  3. Brands
  4. •
  5. Civco
  6. •
  7. Medical Equipment
  8. •
  9. Civco Ultra-Pro II User manual

Civco Ultra-Pro II User manual

Ultra-Pro II™
Needle Guidance System
For use with Esaote transducers
Reference Guide
1
Transducer Corresponding
Bracket
Center Line
Crossing Depth
AC2541 AC2541 2.4cm, 4.4cm, 6.8cm
AL2442 AL2442 2.4cm, 4.4cm, 6.8cm
BC441 BC441 4.6cm, 7.7cm
CA123 CA123 2.6cm, 5.7cm
CA421, CA430,
CA431
CA430 4.7cm, 8.1cm
CA541 CA541 4.6cm, 7.7cm, 14.4cm
CA631 CA631 5.6cm, 9.6cm
LA332 LA332 2.4cm, 3.5cm, 6.5cm
LA435 LA435 .9cm, 1.6cm, 2.4cm
LA522, LA523,
LA532
LA523 1.1cm, 2.4cm, 4.2cm
LA533 LA533 1.9cm, 4.0cm
SC3123 SC3123 2.4cm, 5.4cm
2
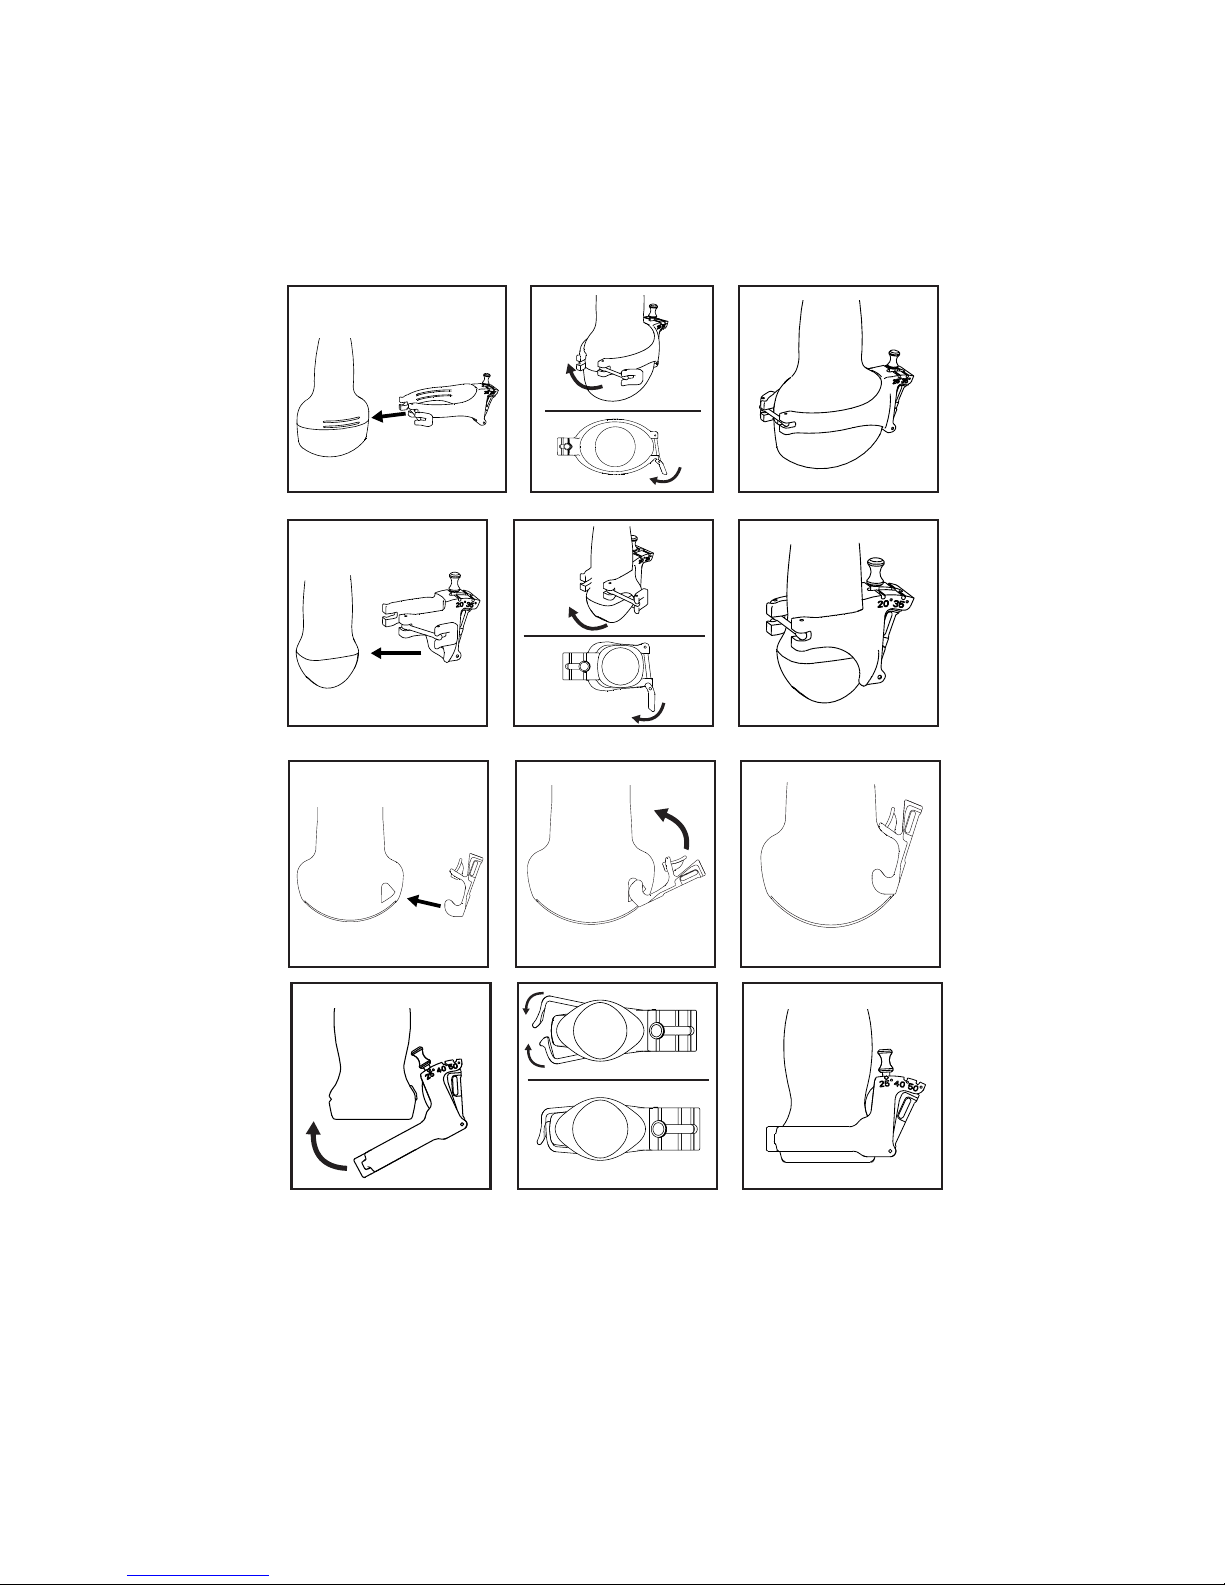
*Before inserting biopsy needle, ensure orientation groove on bracket is aligned with orientation rib on
transducer handle. (See diagram 1 below.)
* Før indsættelse af biopsikanylen, skal det kontrolleres at orienteringsrillen på konsollen er rettet op med
orienteringsforhøjningen på transducerhåndtaget. (Se diagrammet herunder.)
* Voordat u de biopsienaald inbrengt, verzeker dat de oriëntatiegroef op de beugel is uitgelijnd met de
oriëntatierib op de transducerhendel. (Zie diagram 1 hieronder.)
* Ennen biopsianeulan asettamista varmista, että kannattimen suuntaura on kohdistettu ultraäänianturin
suuntavakoon. (Ks.diagrammi 1 alla.)
* Avant d’introduire l’aiguille de biopsie, s’assurer que la cannelure d’orientation du bracelet est alignée avec
l’arête d’orientation située sur le manche du transducteur (voir diagramme 1 ci-dessous).
* Sorgen Sie vor der Einführung der Biopsienadel dafür, dass die Orientierungsrille auf der Klemme an der
Orientierungsrippe auf demTransducer-Griff ausgerichtet ist. (Siehe Graphik 1 unten.)
* ȆȡȚȞȞĮİȚıȐȖİIJİIJȘȕİȜȩȞĮȕȚȠȥȓĮȢȕİȕĮȚȦșİȓIJİȩIJȚȘİȖțȠʌȒʌȡȠıĮȞĮIJȠȜȚıȝȠȪIJȠȣʌȜĮȚıȓȠȣ
İȓȞĮȚ İȣșȣȖȡĮȝȝȚıȝȑȞȘ ȝİ IJȘȞ İȖțȠʌȒ ʌȡȠıĮȞĮIJȠȜȚıȝȠȪ ıIJȘ ȜĮȕȒ IJȠȣ ȝȠȡijȠIJȡȠʌȑĮ
ǹȞĮIJȡȑȟIJİıIJȠįȚȐȖȡĮȝȝĮʌĮȡĮțȐIJȦ
* Prima di inserire l’ago per biopsia, controllare che la linea di orientamento sulla staffa sia allineata con la
nervatura di orientamento sull’impugnatura del trasduttore (fare riferimento al diagramma qui di seguito).
*
生検用針を挿入する前に、ブラケット上の方向付け溝がトランデューサハンドルの方向付け脈と揃っていることを確認します。(下記の図表を参照してください。)
* 생검 니들을 삽입하기 전에, 브래킷의 방향 표시 홈이 변환기 핸들의 방향 표시 리브에 맞춰져 있는지 확인하십시오. (아래의 그림 1 참조)
* Før innsetting av biopsinål, sikres at orienteringssporet på braketten er innrettet med orienteringsribben på
transducerhåndtaket. (Se diagram 1 under.)
* Antes de introduzir a agulha da biópsia,certifique-se de que o furo de orientação no suporte está alinhado
com a rebarba de orientação na pega do transdutor. (Consultar diagrama 1 a seguir.)
 ɉɪɟɠɞɟ ɱɟɦ ɜɫɬɚɜɢɬɶ ɢɝɥɭ ɞɥɹ ɛɢɨɩɫɢɢ ɭɛɟɞɢɬɟɫɶ ɱɬɨ ɨɪɢɟɧɬɚɰɢɨɧɧɵɣ ɩɚɡ ɧɚ
ɞɟɪɠɚɬɟɥɟɫɨɜɦɟɳɟɧɫɨɪɢɟɧɬɚɰɢɨɧɧɵɦɪɟɛɪɨɦɧɚɪɭɱɤɟɞɚɬɱɢɤɚɋɦɫɯɟɦɭɧɢɠɟ
 ᦦܹ⌏㒘㒛ᦦ䩜Пࠡˈ䇋⹂ֱᠬᶊϞⱘᅮ৥ῑϢ᥶༈᠟ᶘϞⱘᅮ৥
㙟ᇍ唤DŽ˄খ㾕ϟ೒
* Antes de insertar la aguja para biopsia, confirme que la ranura de orientación en el soporte está alineada
con el borde de orientación en el asa del transductor. (Vea el diagrama 1 abajo.)
* Innan du sätter i biopsinålen kontrollerar du att riktningsskåran på konsolen är inriktad mot riktningsräfflan
på transduktorhandtaget. (Se diagram 1 nedan.)
* %L\RSVL L÷QHVLQL \HUOHúWLUPHGHQ |QFH GHVWHN NÕVPÕQGDNL \|Q ROX÷XQXQ WUDQVGXVHU
NXOEXQGDNL\|QoXEX÷XLOHKL]DODQPDVÕQDGLNNDWHGLQ$úD÷ÕGDNLúHNLOHEDNÕQ
WAARSCHUWING
ADVARSEL
VAROITUS
AVERTISSEMENT
WARNHINWEIS
ȆȇȅȈȅȋǾ
AVVERTENZA
AVISO
ADVERTENCIA
VARNING
WARNING
AC2541, BC431, CA123, CA541, LA533
ADVARSEL
警告鄗⛙
UYARI
BC431
**
CA123
*
*
AC2541, CA541
*
LA533
경고ɉɊȿȾɍɉɊȿɀȾȿɇɂȿ
3
I. Attaching Bracket to Transducer
Påsætning af konsollen på transduceren
Bevestigingsbeugel voor transducer
Kannattimen kiinnittäminen ultraäänianturiin
Fixation du bracelet sur le transducteur
Befestigung der Halterung am Schallkopf
ǼijĮȡȝȠȖȒIJȠȣȆȜĮȚıȓȠȣȈIJȒȡȚȟȘȢıIJȠȂȠȡijȠIJȡȠʌȑĮ
Fissaggio del supporto al trasduttore
ブラケットをトランスデューサに取り付ける변환기에 브래킷 부착Slik festes braketten til transduceren
Ligar o suporte ao transdutor
ɉɪɢɤɪɟɩɥɟɧɢɟɞɟɪɠɚɬɟɥɹɤɞɚɬɱɢɤɭ
蓩㓧㩅碟瘸虰⯃ₙ
Acoplamiento del soporte al transductor
Att ansluta konsol till transduktor
'HVWHN.ÕVPÕQÕQ7UDQVGXVHUH7DNÕOPDVÕ
AC2541, CA541
2 3
1
AL2442
2 3
1
4
CA421, CA430, CA431, CA631
2 3
1
LA332
2 3
1
CA123
2 3
1
BC441
231
5
LA435, LA522, LA523, LA532
LA533
2 3
1
1
2
2 3
1
SC3123
6
12
UU
1
U
U
U
U
2
U
II. Selecting Bracket Angle (for multi-angle brackets only)
Valg af konsolvinkel (kun ved konsoller til flere vinkler)
Beugelhoek selecteren (alleen voor meerhoekige beugels)
Kannattimen kulman valitseminen (vain monikulmaisille kannattimille)
Sélection de la position de réglage du bracelet (pour les braceletes à
plusieurs positions de réglage uniquement)
Auswahl des Halterungswinkels (nur für mehrwinkel-halterungen)
ǼʌȚȜȠȖȒIJȘȢīȦȞȓĮȢȆȜĮȚıȓȠȣ(ȂȅȃȅīǿǹȆȁǹǿȈǿǹȆȅȁȁǹȆȁȍȃīȍȃǿȍȃ)
Selezione dell’angolazione del supporto (solo per supporti
multi-angolazione)
ブラケットアングルを選択する(マルチアングルブラケットのみ)브래킷 각도 선택 (복수 각도 브래킷)Slik innstilles brakettvinkelen (bare for flervinklede braketter)
Seleccionar o ângulo do suporte (apenas para suportes multi-ângulo)
ȼɵɛɨɪɭɝɥɚɞɟɪɠɚɬɟɥɹɌɈɅɖɄɈȾɅəɆɇɈȽɈɊȺɄɍɊɋɇɕɏȾȿɊɀȺɌȿɅȿɃ
折㕸㓧㩅邘矑᧤
⅔釭䞷ℝ⮩邘矑㓧㩅
᧥

Selección del ángulo del soporte (SÓLO PARA SOPORTES CON ÁNGULOS MÚLTIPLES)
Att välja konsolvinkel (enbart för multivinkelkonsoler)
'HVWHN<HUL$oÕVÕQÕQ6HoLPL\DOQÕ]oRNDoÕOÕGHVWHNOHULoLQ
7
1 2 3
III. Covering theTransducer and Bracket
Overtræk af transducer og konsol
Bedekking van transducer en beugel
Ultraäänianturin ja kannattimen suojaaminen
Enveloppement du transducteur et du bracelet
Abdeckung des Meßkopfes und des Halters
 ȀȐȜȣȥȘIJȠȣȂȠȡijȠIJȡȠʌȑĮțĮȚIJȠȣȆȜĮȚıȓȠȣ
Copertura del trasduttore e del supporto
トランスデューサとブラケットをカバーする。변환기와 브래킷 커버 덮기Slik settes kappen på transducer og brakett
Cobrir o transdutor e suporte
ɉɨɤɪɵɬɢɟɞɚɬɱɢɤɚɢɞɟɪɠɚɬɟɥɹ
眀⇞虰⯃✛㓧㩅
Cómo cubrir el transductor y el soporte
Att täcka omvandlaren och konsolen
7UDQVGXVHUYH'HVWH÷L.DSODPD
8
12
3i
8.5FR, 14,15,16,17,18,20,21,22, 23GA
2.9, 2.1, 1.8, 1.6, 1.5, 1.2, .9, .8, .7, .6mm
3
IV. Attaching Needle Guide to Bracket
Påsætning af nålestyret på konsollen
Bevestiging van naaldgeleider aan beugel
Neulanohjaimen kiinnittäminen kannattimeen
Fixation du guide d’aiguille sur le bracelet
Befestigung der Führungshilfe an der Halterung
 ȉȠʌȠșȑIJȘıȘȅįȘȖȠȪǺİȜȩȞĮȢıIJȠȆȜĮȓıȚȠ
Fissaggio della guida per ago al supporto
ニードルガイドをブラケットに取り付ける브래킷에 니들 가이드 부착Slik festes nålsonden til braketten
Colocar um guia de agulha no suporte
 ɉɪɢɤɪɟɩɥɟɧɢɟɩɪɨɜɨɞɧɢɤɚɢɝɥɵɤɞɟɪɠɚɬɟɥɸ
蓩朗⺋石犀碟瘸㓧㩅ₙ
Acoplamiento de la guía de aguja al soporte
Att fästa nålstyrning vid fäste
ø÷QH.ÕODYX]XQXQ'HVWHN.ÕVPÕQD7DNÕOPDVÕ
9
1
1
2
V. Activating Needle Guide Quick-Release
Aktivering af nålestyrets lynåbner
Activering van snelle ontgrendeling van naaldgeleider
Neulanohjaimen pikairrotuksen aktivoiminen
Activation du démontage rapide du guide d’aiguille
Aktivierung der Schnelltrennfunktion der Nadelführung
 ǼȞİȡȖȠʌȠȓȘıȘȅįȘȖȠȪǺİȜȩȞĮȢȉĮȤİȓĮȢǹʌĮıijȐȜȚıȘȢ
Attivazione dell’attacco rapido della guida per ago
ニードルガイドクイックリリースをアクティブにする니들 가이드 신속 배출 작동Slik aktiveres hurtigutløseren for nålsonden
Activar a libertação rápida do guia da agulha
ɉɪɢɜɟɞɟɧɢɟɜɞɟɣɫɬɜɢɟɦɟɯɚɧɢɡɦɚɛɵɫɬɪɨɝɨ   
  ɜɵɫɜɨɛɨɠɞɟɧɢɹɩɪɨɜɨɞɧɢɤɚɢɝɥɵ
穸㿊朗⺋石犀㉺抮摙磦
Activación de la liberación rápida de la aguja
Att aktivera snabblossning av nålstyrning
ø÷QH.ÕODYX]XQXQ+Õ]OÕ6HUEHVW%ÕUDNPDøúOHYLQLQ$NWLYH(GLOPHVL
10
Ultra-Pro II™Needle Guidance System
฀฀฀฀฀฀฀฀฀฀฀฀฀needle-guided (or catheter) procedures with the use of diagnostic ultrasound
transducers.
฀฀฀฀฀฀฀฀฀฀฀฀฀฀฀฀฀฀฀฀฀฀฀฀฀฀฀฀฀฀฀฀฀฀transducer, see your system’s manual.
฀฀฀฀฀฀฀฀฀฀฀฀฀฀integrity of packaging is violated or if expiration date has passed.
฀฀฀฀฀฀฀฀฀฀฀฀resterilization may create a risk of contamination of the device, cause patient infection
or cross-infection.
I. Attaching Bracket toTransducer
฀฀฀฀฀฀฀฀฀฀฀฀฀ensure bracket is properly cleaned, sterilized or disinfected before each use.
฀฀฀฀฀฀฀฀฀1. Attach bracket to transducer by aligning locating features. Ensure bracket is
firmly attached.
II. Selecting Bracket Angle
For multi-angle brackets only.
1. Pull up lock pin.
2. Move to desired angle.
3. Press lock pin securely into position.
III. Covering the Transducer and Bracket
฀฀฀฀฀฀฀฀฀฀฀฀฀฀harm cover.
฀฀฀฀฀฀฀฀฀฀฀฀฀฀cover. Always place a cover over transducer and bracket to protect patients and users
from cross-contamination.
1. Place an appropriate amount of gel inside cover and/or on transducer face. Poor
imaging may result if no gel is used.
2. Insert transducer into cover making sure to use proper sterile technique. Pull
cover tightly over transducer face to remove wrinkles and air bubbles, taking
care to avoid puncturing cover.
3. Secure cover with enclosed bands.
4. Inspect cover to ensure there are no holes or tears.
IV.Attaching Needle Guide to Bracket
1. Using proper sterile technique, snap unlocked needle guide onto attachment
area of bracket.
2. Push lock into locked position.
3. Select appropriate size needle guide insert and slide into position.
฀฀4. Before using component for first time,perform needle path verification to verify
system and biopsy guide relationships, as described in system manual.
5. For multi-angle brackets,verify bracket angle corresponds with system software
before each use.
6. Use appropriate needle length to reach target area.
V.Activating Needle Guide Quick-Release
1. Press tab toward bracket to activate needle guide quick-release function.
INTENDED
USE
WARNING
WARNING
WARNING
English
NOTE
11
Ultra-Pro II™Needle Guidance System English
VI. Disposal
฀฀฀฀฀฀฀฀฀฀฀฀components after each use.
VII. Removing Bracket from Transducer
฀฀฀฀฀฀฀฀฀VIII. Disassembling Bracket for Cleaning
For multi-angle brackets only.
IX. Cleaning, Disinfecting and Sterilizing Bracket
฀฀฀฀฀฀฀฀฀฀฀฀฀฀฀of infection control to patients, co-workers and themselves.To avoid cross-contamination,
follow infection control policies established by your facility.
฀฀฀฀฀฀฀฀฀฀฀฀฀฀฀฀฀฀฀฀฀฀฀effectiveness and compatibility.If choosing to use a reprocessing protocol other than those
listed, a validation must first be completed to ensure effectiveness and compatibility.
฀฀฀฀฀฀฀฀฀1. After each use, remove bracket and needle guide from transducer, discarding
single-use, disposable components. Remove visible contaminants from bracket
surface using a small, soft instrument brush. Keep bracket from drying out until
complete cleaning can be accomplished.
2. Soak bracket for minimum of five minutes in neutral pH,low foaming enzymatic
detergent, such as ENZOL®Enzymatic Detergent (Johnson & Johnson).While
immersed,use instrument brush to remove trapped contaminants from surfaces
and features. If visible contaminants cannot be easily removed, repeat soaking
procedure for an additional five minutes.Remove bracket from cleaning solution
and remove any remaining residue with dry wipe. Follow cleaning solution
manufacturer’s directions for use and recommendations for concentration.
฀฀฀฀฀฀฀฀฀฀฀฀®ortho-Phthalaldehyde Solution
(Johnson & Johnson) or equivalent .55% ortho-phthalaldehyde-based solution.
Follow manufacturer’s instructions and recommendations for concentration,
time of contact and post-process procedure.
฀฀฀฀฀฀฀®Activated Dialdehyde
Solution (Johnson & Johnson) or equivalent 2% glutaraldehyde-based solution,
฀®(Johnson & Johnson) or equivalent 3.4% glutaraldehyde-based
solution, or a hydrogen peroxide-based solution. Follow manufacturer’s
instructions and recommendations for concentration,time of contact and post-
process procedure.
฀฀฀฀฀฀฀฀฀฀฀฀฀฀discontinue use of bracket and contact your ultrasound system support
representative.
WARNING
NOTE
WARNING
WARNING
123
1
22
1

Other manuals for Ultra-Pro II

1

Other Civco Medical Equipment manuals

Civco Astra Tee Base User manual

Civco

Civco Astra Tee Base User manual

Civco Astra VR Programming manual

Civco

Civco Astra VR Programming manual

Civco Ultra-Pro II User manual

Civco

Civco Ultra-Pro II User manual

Civco 610-1238 User manual

Civco

Civco 610-1238 User manual

Civco Astra Tee Base Programming manual

Civco

Civco Astra Tee Base Programming manual

Civco GUS G10VP User manual

Civco

Civco GUS G10VP User manual

Civco ASTRA User manual

Civco

Civco ASTRA User manual

Civco ACCUCARE User manual

Civco

Civco ACCUCARE User manual

Civco GUS G14KA User manual

Civco

Civco GUS G14KA User manual

Civco VIRTUTRAX Series User manual

Civco

Civco VIRTUTRAX Series User manual

Civco GUS G14T-3-EU User manual

Civco

Civco GUS G14T-3-EU User manual

Civco Envision User manual

Civco

Civco Envision User manual

Civco Astra Tee Base Programming manual

Civco

Civco Astra Tee Base Programming manual

Civco Ultra-Pro 3 User manual

Civco

Civco Ultra-Pro 3 User manual

Civco ASTRA Setup guide

Civco

Civco ASTRA Setup guide

Civco Ultra-Pro II Needle Guidance System User manual

Civco

Civco Ultra-Pro II Needle Guidance System User manual

Civco 610-2052 User manual

Civco

Civco 610-2052 User manual

Civco CRADLE User manual

Civco

Civco CRADLE User manual

Civco Astra Tee Base User manual

Civco

Civco Astra Tee Base User manual

Civco CIV-Flex Poly Series User manual

Civco

Civco CIV-Flex Poly Series User manual

Civco AccuCARE Micro-Touch Stabilizer User manual

Civco

Civco AccuCARE Micro-Touch Stabilizer User manual

Civco Astra Tee Series User manual

Civco

Civco Astra Tee Series User manual

Civco Astra Tee Base User manual

Civco

Civco Astra Tee Base User manual

Civco Thermoplastics User manual

Civco

Civco Thermoplastics User manual

Popular Medical Equipment manuals by other brands

Blatchford Multiflex Standard Instructions for use

Blatchford

Blatchford Multiflex Standard Instructions for use

Vermeiren PEPI instruction manual

Vermeiren

Vermeiren PEPI instruction manual

Handicare LinidoSolutions LI2403.150 Series manual

Handicare

Handicare LinidoSolutions LI2403.150 Series manual

Chattanooga Intelect Advanced 2765CS user manual

Chattanooga

Chattanooga Intelect Advanced 2765CS user manual

Sirona Cerec operating manual

Sirona

Sirona Cerec operating manual

Spencer 100 Series Instructions for use

Spencer

Spencer 100 Series Instructions for use

Stryker Power-PRO XT Maintenance manual

Stryker

Stryker Power-PRO XT Maintenance manual

Dynatronics DYNATRON SmarTRAC Operator's manual

Dynatronics

Dynatronics DYNATRON SmarTRAC Operator's manual

Abbott i-STAT Alinity Quick reference guide

Abbott

Abbott i-STAT Alinity Quick reference guide

brewer Brewer FLEX Installation & operation manual

brewer

brewer Brewer FLEX Installation & operation manual

Covidien Kendall SCD 700 Series Operation and service manual

Covidien

Covidien Kendall SCD 700 Series Operation and service manual

Orliman TP-6101A INSTRUCTIONS FOR USE AND PRESERVATION

Orliman

Orliman TP-6101A INSTRUCTIONS FOR USE AND PRESERVATION

MTS Systems 111 Series Product information

MTS Systems

MTS Systems 111 Series Product information

Mortara ELI 380 user manual

Mortara

Mortara ELI 380 user manual

Nasco Life/form LF01005U instruction manual

Nasco

Nasco Life/form LF01005U instruction manual

EKOM DK50 PLUS/M MOBILE user manual

EKOM

EKOM DK50 PLUS/M MOBILE user manual

laerdal VitalSim manual

laerdal

laerdal VitalSim manual

LegWorks ATK HydraPro user guide

LegWorks

LegWorks ATK HydraPro user guide

manuals.online logo
manuals.online logoBrands
  • About & Mission
  • Contact us
  • Privacy Policy
  • Terms and Conditions

Copyright 2025 Manuals.Online. All Rights Reserved.