manuals.online logo
Brands
  1. Home
  2. •
  3. Brands
  4. •
  5. ELNA
  6. •
  7. Sewing Machine Accessories
  8. •
  9. ELNA 202-490-003 User manual

ELNA 202-490-003 User manual

Elna International Corp. SA / 08.06.2022
Stitching line
Ligne de
piqûre
A
Right side of fabric
Endroit du tissu
Cut to less than half of
the seam allowance.
Coupez à moins de la moitié
de la marge de couture.
5/8 inch (16 mm)
seam allowance
Marge de couture
de 5/8 po (16 mm)
LAP-SEAM FOOT
(Finished width 9 mm)
Ref: 202-490-003
This foot can provide perfect looking and durable
seams. Medium-heavy weight to heavy weight
fabrics are recommended.
* This foot cannot be used when the thickness of
fabric folded twice exceeds 1.5mm or with sti
fabrics.
Caution:
- Make sure to press the Lockout key when
attaching and detaching the foot.
- For models without the Lockout key, turn the
power switch o when attaching and detaching
the foot.
MACHINE SETTINGS:
Stitch pattern: Straight stitch (Center needle
position)
* Please refer to your machine’s instruction
manual for presser foot attachment and removal
information.
How to Sew:
1. Cut the fabric leaving 5/8 inch (16 mm) seam
allowance.
2. Place fabrics together and sew aligning the
stitching line with the guideline A on the foot.
- 2 seam lines shown on the right side of the
fabric:
Place the wrong sides of the fabric together and
sew.
- 1 seam line shown on the right side of the fabric:
Place the right sides of the fabric together and
sew.
* If you do not mark the stitching line on the
fabric, place the fabric next to the 5/8 inch seam
guide line on the needle plate and sew.
3. Open the fabric at. Cut the left seam
allowance to less than half or 1/4 inch (5-7 mm).
PIED DE RECOUVREMENT
(Largeur nie 9 mm)
Ref: 202-490-003
Ce pied permet d’obtenir des coutures parfaites
et durables.
Les tissus moyens à lourds sont recommandés.
* Ce pied ne peut pas être utilisé lorsque
l’épaisseur du tissu plié deux fois dépasse 1,5
mm ou avec des tissus rigides.
Attention:
- Veuillez à appuyer sur la touche de verrouillage
lors de la xation/retrait du pied.
- Pour les modèles sans la touche de verrouillage,
éteignez la machine lors de la
xation/retrait du pied.
RÉGLAGES DE LA MACHINE:
Motif de point: Point droit (aiguille en position
centrale)
* Veuillez vous reporter au mode d’emploi de
votre machine pour les informations concernant la
xation et le retrait du pied-de-biche.
Comment coudre:
1. Coupez le tissu en laissant une marge de
couture de 5/8 po (16 mm).
2. Placez les tissus ensemble et cousez en
alignant la ligne de piqûre avec la ligne directrice
A du pied.
- 2 lignes de couture indiquées sur l’endroit du
tissu :
Placez le tissu envers contre envers ensemble et
cousez.
Place the wrong sides of the fabric together and
sew.
- 1 ligne de couture indiquée sur l’endroit du tissu
: Placez le tissu endroit contre endroit ensemble
et cousez.
* Si vous ne marquez pas la ligne de piqûre sur le
tissu, placez le tissu à côté de la ligne de guidage
de 5/8 po sur la plaque à aiguille et cousez.
3. Ouvrez le tissu à plat. Coupez la marge de
couture de gauche à moins de la moitié ou 1/4 po
(5-7 mm).
Elna International Corp. SA / 08.06.2022
3 ”
(8 cm)
B
C
D
CD
B
4. Fold the right seam allowance (the one without
cutting) to the seam line to lap the left seam
allowance (the other one cut in half-width). Fold
the seam allowance to the left.
* Fold the fabric edge to form a 3 inch (8 cm)
seam allowance.
After inserting the folded portion of the fabric
into the curl of the foot, the machine will keep
feeding the curl smoothly and evenly.
5. Sew several stitches slowly aligning the seam
line ((2)) with the guideline B on the foot.
Raise the foot with the needle down and insert
the folded portion of the fabric into the slit C of
the foot. Lower the foot while pulling the folded
portion of the fabric over D.
6. Sew while aligning the seam line with the
guideline B of the foot.
* Increase the stitch length when the stitch
length is too short.
4. Repliez la marge de couture de droite (celle
qui n’a pas été coupée) sur la ligne de couture
pour recouvrir la marge de couture gauche (l’autre
coupée en deux). Pliez la marge de couture vers
la gauche.
* Pliez le bord du tissu pour créer une marge
de couture de 3 po (8 cm). Après avoir inséré la
partie pliée du tissu dans la courbure du pied,
la machine continue d’entraîner la courbure en
douceur et uniformément.
5. Cousez plusieurs points lentement en alignant
la ligne de couture ((2)) avec la ligne directrice B
du pied.
Relevez le pied-de-biche avec l’aiguille en bas et
insérez la partie pliée du tissu dans la fente C du
pied. Abaissez le pied tout en tirant la partie pliée
du tissu sur D.
6. Cousez en alignant la ligne de couture avec la
ligne directrice B du pied.
* Augmentez la longueur du point lorsque celle-ci
est trop courte.
Elna International Corp. SA / 08.06.2022
Stichlinie
Línea de costura
A
Rechte Stoseite
Anverso de la tela
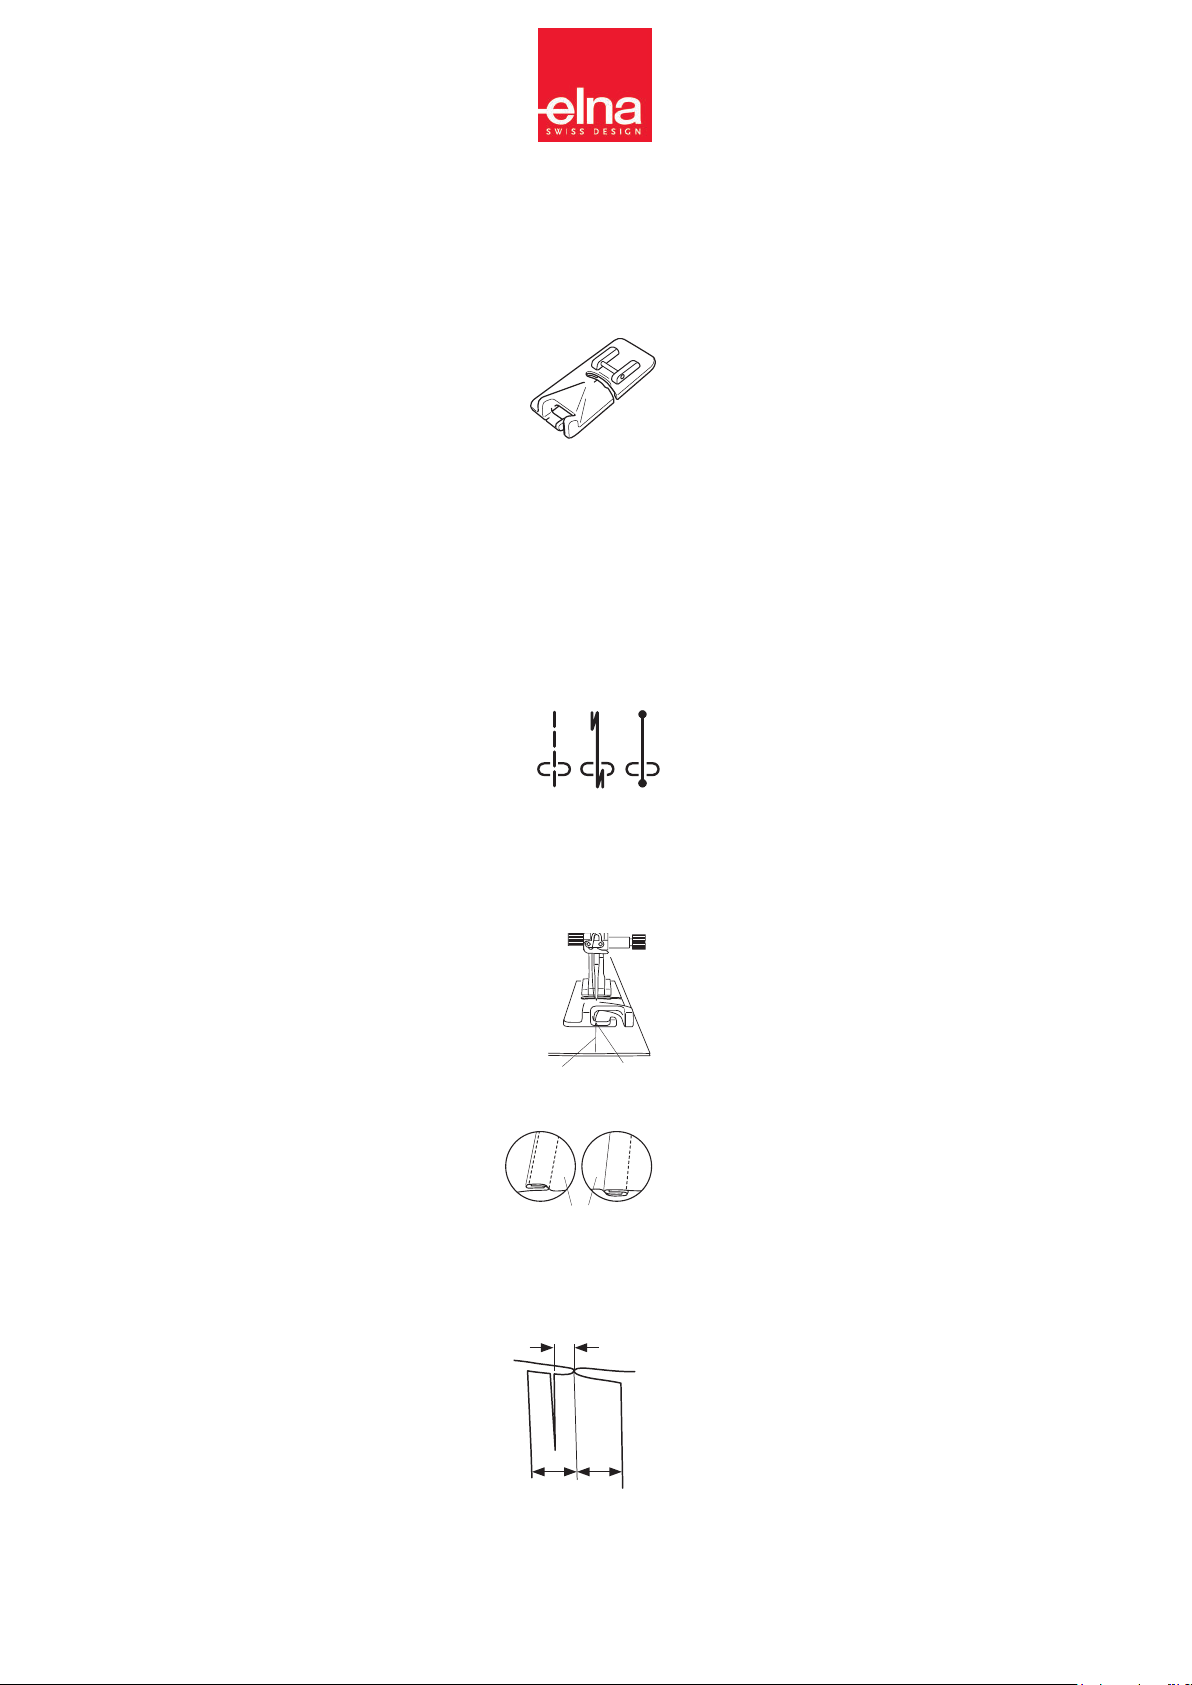
Schneiden Sie auf weniger als
die Hälfte der Nahtzugabe ab.
Corte menos de la mitad
del margen de costura..
16 mm Nahtzugabe
Margen de costura
de 5/8” (16 mm)
KAPPNAHTFUß
Ref: 202-490-003
Mit diesem Nähfuß fertigen Sie perfekt
* Der Fuß kann nicht verwendet werden, wenn die
Vorsicht:
- Achten Sie darauf, die Sperrtaste zu drücken,
wenn Sie den Fuß anbringen und abnehmen.
- Schalten Sie bei Modellen ohne Sperrtaste den
Netzschalter aus, wenn Sie den Fuß anbringen
und abnehmen.
MASCHINENEINSTELLUNGEN:
Stichmuster: Geradstich (Mittlere Nadelposition)
* Informationen zum Anbringen und
Abnehmen des Nähfußes nden Sie in der
Bedienungsanleitung Ihrer Maschine.
Nähen:
1. Schneiden Sie den Sto mit einer Nahtzugabe
von 16 mm zu.
2. Legen Sie die Stoe zusammen und nähen Sie,
Legen Sie die linken Stoseiten aufeinander und
nähen Sie.
- 1 Nahtlinie auf der rechten Stoseite:
Legen Sie die rechten Stoseiten aufeinander und
nähen Sie.
* Wenn Sie die Stichlinie nicht auf dem Sto
markieren, platzieren Sie den Sto neben der
16-mm-Nahtführungsline (5/8 Zoll) auf der
Stichplatte und nähen Sie.
3. Klappen Sie den Sto ach auf. Schneiden Sie
die linke Nahtzugabe auf weniger als die Hälfte
PIE PARA COSTURA SOLAPA
(ancho de la pieza acabada 9 mm)
Ref: 202-490-003
Con este pie puede crear costuras duraderas que
se vean perfectas.
Se recomienda usar telas de peso medio-pesado
a pesado.
* Este pie no se puede utilizar si el grosor de la
tela plegada dos veces es superior a 1.5
mm ni con telas rígidas.
Precaución:
- Asegúrese de presionar la tecla de Bloqueo al
instalar y desinstalar el pie.
- Para los modelos que no cuentan con una tecla
de Bloqueo, apague la alimentación durante la
instalación y desinstalación del pie.
CONFIGURACIÓN DE LA MÁQUINA:
Patrón de puntada: Puntada recta (posición de
aguja central)
* Consulte el manual de instrucciones de su
máquina para obtener información sobre la
instalación y desinstalación del pie prensatelas.
Cómo coser:
1. Corte la tela dejando un margen de costura de
5/8” (16 mm).
2. Coloque las telas juntas y cosa alineando la
línea de costura con
la guía A del pie.
- Se ven 2 líneas de costura por el anverso de la
tela:
Coloque los reversos de la tela juntos y empiece
a coser.
- Se ve 1 línea de costura por el anverso de la
tela:
Coloque los anversos de la tela juntos y empiece
a coser.
* Si no marca la línea de costura en la tela,
colóquela junto a la línea de guía de costura de
5/8” de la placa de la aguja y empiece a coser.
3. Abra la tela por completo. Corte el margen de
costura izquierdo a menos de la mitad o a 1/4”
(5-7 mm).
aussehende und robuste Kappnähte an.
Mittelschwere bis schwere Stoffe sind empfohlen.
auf dem Nähfuß ausrichten:
- 2 Nahtlinien auf der rechten Stoffseite:
oder auf 5-7 mm ab.
(Fertige Breite 9 mm)
Dicke des zweimal gefalteten Stoffs mehr als
1,5 mm beträgt oder der Stoff steif ist.
wobei Sie die Stichlinie an der Führungslinie A
Elna International Corp. SA / 08.06.2022
”
(8 cm)
B
C
D
CD
B
nach links.
* Falten Sie die Stokante so, dass Sie eine
weiter.
Führungslinie B auf dem Nähfuß aus.
Heben Sie den Fuß mit abgesenkter Nadel an und
führen Sie den gefalteten Stoteil in den Schlitz
C am Nähfuß ein. Senken Sie den Nähfuß ab,
während Sie den gefalteten Teil des Stoes über
D ziehen.
6. Nähen Sie und richten Sie dabei die Nahtlinie
* Falls die Stichlänge zu kurz ist, verlängern Sie
sie.
4. Doble el margen de costura derecho (el que
no está cortado) hacia la línea de costura para
solapar el margen de costura izquierdo (el que se
ha cortado a media anchura). Doble el margen de
costura hacia la izquierda.
* Pliegue el borde de la tela para formar un
margen de costura de 3” (8 cm). Tras introducir
la porción doblada de la tela en el bucle del pie,
la máquina seguirá haciendo que el bucle avance
suave y uniformemente.
5. Cosa varias puntadas poco a poco mientras
alinea la línea de costura ((2)) con la guía B del
pie.
Suba el pie con la aguja hacia abajo y introduzca
la parte doblada de la tela en la hendidura C del
pie. Baje el pie mientras jala de la parte doblada
de la tela para colocarla sobre la parte D.
6. Empiece a coser mientras alinea la línea de
costura con la guía B del pie.
* Aumente la longitud de la puntada cuando esta
sea demasiado corta.
4. Falten Sie die rechte Nahtzugabe (ohne
Nahtzugabe (mit der halben Schnittbreite) zu
überdecken. Falten Sie die Nahtzugabe
Nahtzugabe mit einer Länge von 8 cm erhalten.
Maschine den Stoff problemlos und gleichmässig
5. Nähen Sie langsam mehrere Stiche und richten
an der Führungslinie B am Nähfuß aus.
Schnitt) auf die Nahtlinie, um die linke
Nachdem Sie den gefalteten Stoffteil in der
Führung des Nähfußes platziert haben, führt die
Sie dabei die Stichlinie ((2)) an der

Other ELNA Sewing Machine Accessories manuals

ELNA 202-237-000 User manual

ELNA

ELNA 202-237-000 User manual

ELNA 202-103-202 User manual

ELNA

ELNA 202-103-202 User manual

ELNA 202-238-001 User manual

ELNA

ELNA 202-238-001 User manual

ELNA 202-084-206 User manual

ELNA

ELNA 202-084-206 User manual

ELNA 495-526-20 User manual

ELNA

ELNA 495-526-20 User manual

ELNA 795-816-116 User manual

ELNA

ELNA 795-816-116 User manual

ELNA W1 User manual

ELNA

ELNA W1 User manual

ELNA 202-096-201 User manual

ELNA

ELNA 202-096-201 User manual

ELNA 202-420-002 User manual

ELNA

ELNA 202-420-002 User manual

ELNA 202-098-203 User manual

ELNA

ELNA 202-098-203 User manual

ELNA 202-142-007 User manual

ELNA

ELNA 202-142-007 User manual

ELNA 202-156-004 User manual

ELNA

ELNA 202-156-004 User manual

ELNA 200-314-028 User manual

ELNA

ELNA 200-314-028 User manual

ELNA 202-255-004 User manual

ELNA

ELNA 202-255-004 User manual

ELNA 202-091-206 User manual

ELNA

ELNA 202-091-206 User manual

ELNA 202-239-002 User manual

ELNA

ELNA 202-239-002 User manual

ELNA 611-511-001 User manual

ELNA

ELNA 611-511-001 User manual

ELNA 202-080-202 User manual

ELNA

ELNA 202-080-202 User manual

ELNA 580+ User manual

ELNA

ELNA 580+ User manual

ELNA 202-082-204 User manual

ELNA

ELNA 202-082-204 User manual

ELNA 202-248-004 User manual

ELNA

ELNA 202-248-004 User manual

ELNA 202-488-008 User manual

ELNA

ELNA 202-488-008 User manual

ELNA 202-235-008 User manual

ELNA

ELNA 202-235-008 User manual

ELNA 434 User manual

ELNA

ELNA 434 User manual

Popular Sewing Machine Accessories manuals by other brands

Pfaff P45 PD 2-L instruction manual

Pfaff

Pfaff P45 PD 2-L instruction manual

Hinterberg Design Machine quilting frame instructions

Hinterberg Design

Hinterberg Design Machine quilting frame instructions

Bernina Pantograph Kit user manual

Bernina

Bernina Pantograph Kit user manual

Arrow NORMA JEAN 350 owner's manual

Arrow

Arrow NORMA JEAN 350 owner's manual

Baby Lock General Purpose Zig Zag Foot instructions

Baby Lock

Baby Lock General Purpose Zig Zag Foot instructions

Mitsubishi Electric LU-ST KIT instruction manual

Mitsubishi Electric

Mitsubishi Electric LU-ST KIT instruction manual

Singer YC-485EC manual

Singer

Singer YC-485EC manual

Brother PR-620 installation manual

Brother

Brother PR-620 installation manual

Brother F036N quick start guide

Brother

Brother F036N quick start guide

Baby Lock BLES8-CST instructions

Baby Lock

Baby Lock BLES8-CST instructions

manuals.online logo
manuals.online logoBrands
  • About & Mission
  • Contact us
  • Privacy Policy
  • Terms and Conditions

Copyright 2025 Manuals.Online. All Rights Reserved.