ELNA W1 User manual

Caution
This accessory is a unique large binder suitable
for finishing quilts with an approximately 1/2”
(15 mm) wide finished size binding. This binder
can be used with the Upper feed device on a
machine with the dual feed mechanism.
Please refer to your machine’s instruction
manual for accessory attachment and removal
information.
Make sure to press the Lockout key when
replacing the foot and attaching the binder.
For models without the Lockout key, turn the
power switch off when attaching and detaching
the foot and binder.
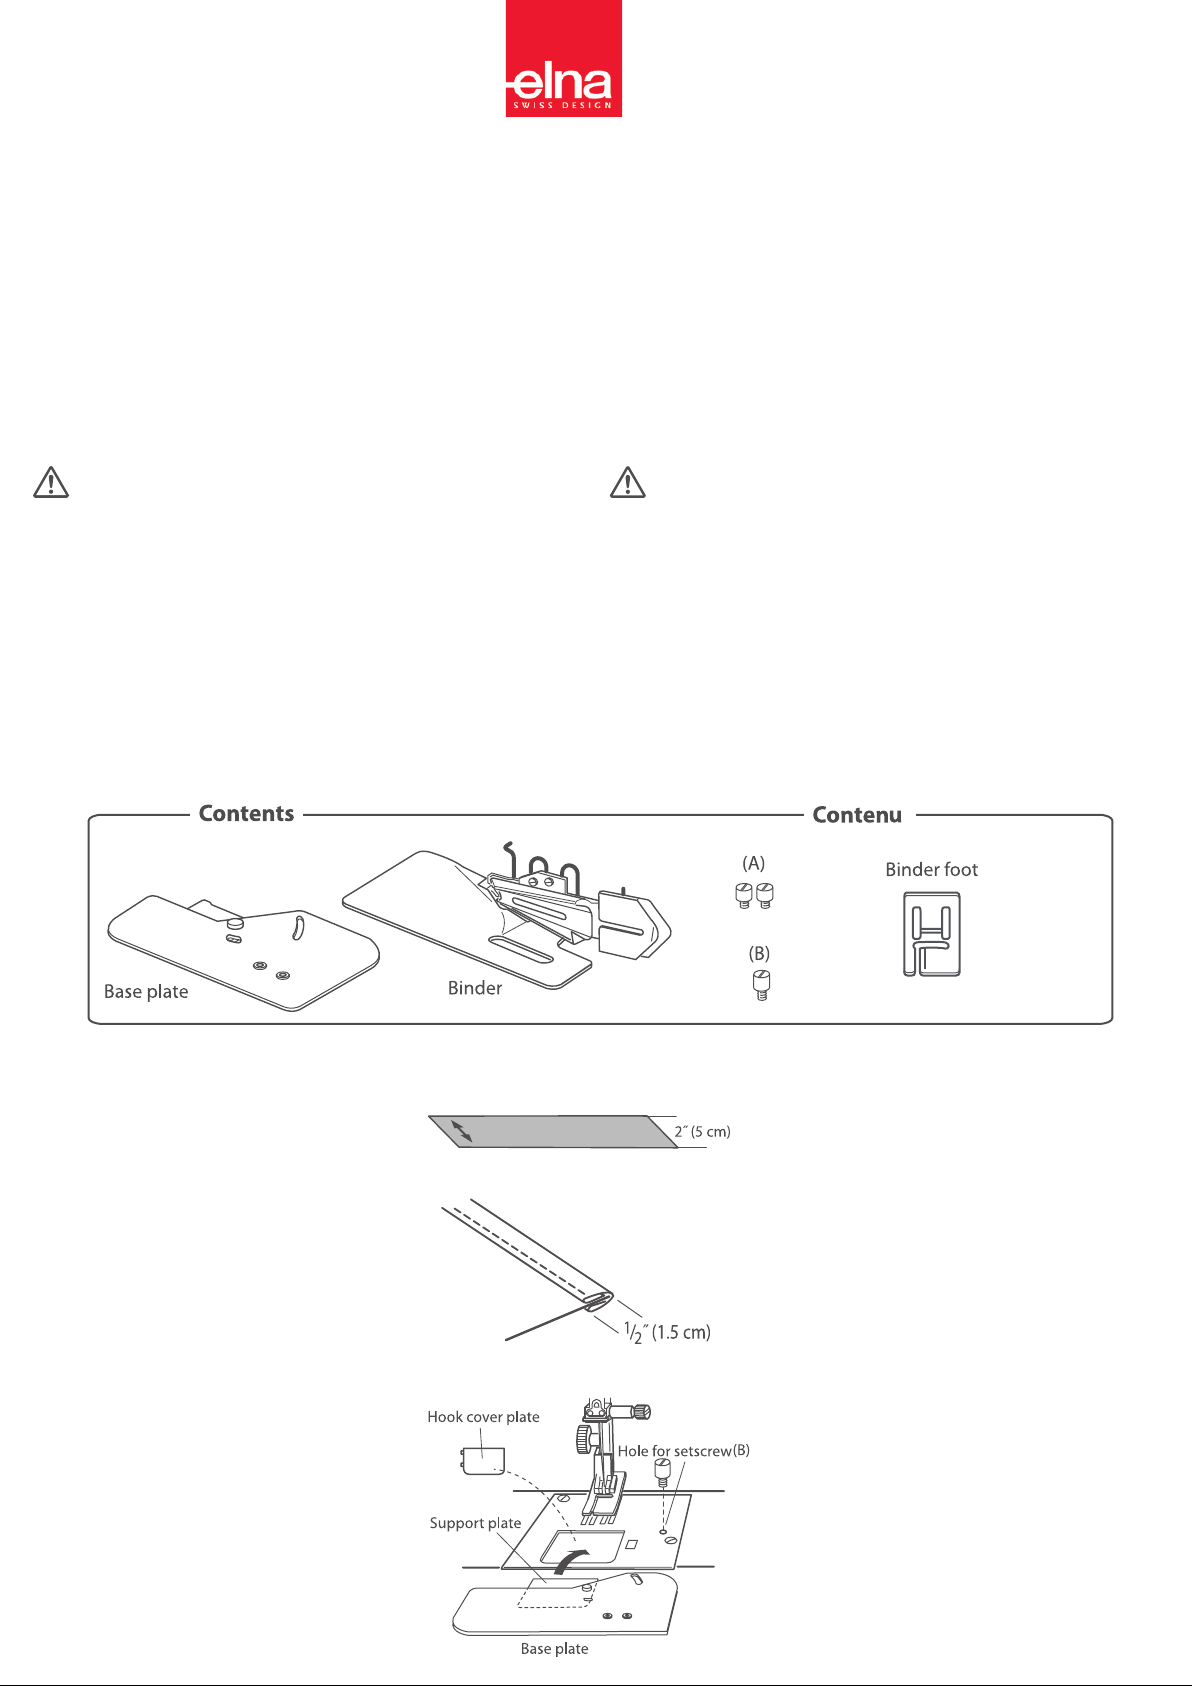
QUILT BINDER SET
for 9 mm stitch width sewing machines
ref: 202-101-200
Coupez une bande de tissu en biais de
5cm(2”) de largeur. La largeur finale de
ce biais sera d’environ 1,5cm (1/2”)
selon l’épaisseur du matelassage/quilt.
1. Préparation
Si vous utilisez un tissu plus épais,
coupez les bandes avec 2mm de moins
(1/8”) de largeur.
NOTE:
Placez le pied pour pose de biais ou
le dispositif de double entraînement si
votre modèle le possède. Enlevez le
couvercle du crochet et fixez la
plaque sur la plaque aiguille en
fonction des trous prévus pour les vis.
Fixez la vis B et serrez-la avec un
tournevis.
2. Placer la plaque de fixation
Attention
Ce dispositif convient à des biais très larges et
plie ces derniers à une largeur finale de 15 mm
(1/2”). Cet accessoire peut être utilisé avec le
double transport sur une machine à coudre avec
un mécanisme de double transport.
Référez-vous au manuel d’instruction de votre
machine à coudre pour toutes les informations
concernant le fixation et le changement d’un
accessoire.
Appuyez sur le bouton de verrouillage lorsque
vous remplacez le pied et fixez le dispositif.
Pour les modèles de machines sans bouton de
verrouillage, coupez le contact lorsque vous
retirez ou fixez un accessoire.
DISPOSITIF POUR POSE DE BIAIS
pour machine à coudre avec 9 mm
de largeur de couture Réf: 202-101-200
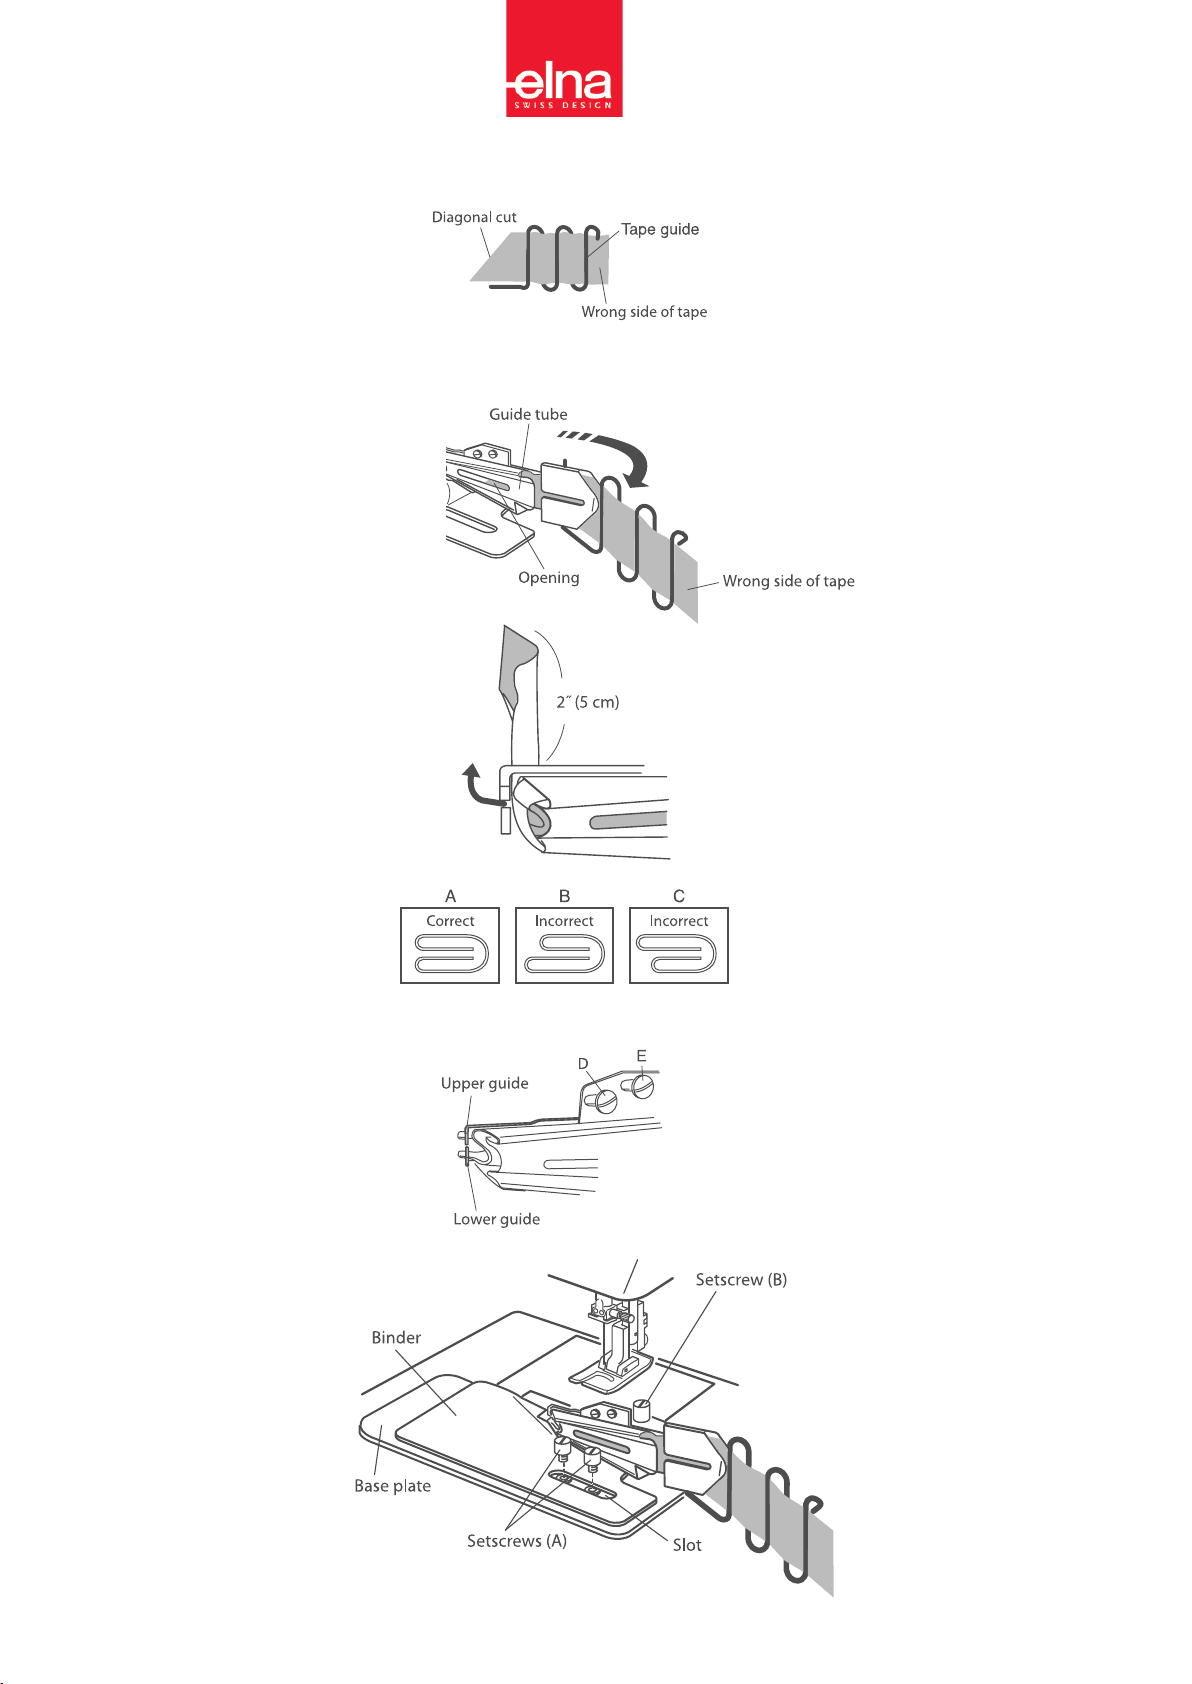
Cut a 2” (5 cm) wide strip of binding
fabric. The finished width of the
binding will be approximately 1/2” (1.5
cm) depending on quilt thickness.
1. Preparation
If using thicker fabric, cut the strips
1/8”(2 mm) narrower.
NOTE:
Attach the binder foot.
You may use the Dual Feed foot AD if
the dual feed mechanism is available
on your machine. Remove the hook
cover plate.
Attach the support plate to the
opening of the needle plate.
Attach the setscrew (B) and secure
tightly with a screwdriver.
2. Setting the Base Plate

3. Placer la bande de tissu
Ouvrez le guide biais et faites passer
ce dernier à l’intérieur après avoir
coupé en diagonale le début du biais
comme sur le schéma de gauche.
Insérez le biais avec l’envers en face de vous
au travers du guide biais.
Insérez le biais dans le tube et utilisez une
pince pour le glisser jusqu’à la fin du tube.
4. Fixer le dispositif
Faites sortir 5cm (2’’) de biais hors du tube et
pliez le biais à angle droit.
Les deux côtés du biais doivent être plié de
manière égale. Si ce n’est pas le cas,
corrigez la symétrie.
Déserrez la vis D pour ajuster la position du
guide supérieur.
Déserrez la vis E pour ajuster la position du
guide inférieur.
Ajuster la symétrie du biais:
Placez le dispositif sur la plaque de
fixation à l’aide des vis A dont les
trous se trouvent sur la plaque.
3. Loading the Tape
Open the tape guide in the
direction of arrow and trim the end
of the tape diagonally as shown:
Insert the tape with its wrong side facing
you, through the tape guide back and
forth.
Insert the tape into the guide tube, and
use tweezers to slide it toward the
muzzle of the tube.
Pull 2” (5 cm) of the tape out of the
muzzle of the tube, and fold the
tape at a right angle.
Both edges of the tape should be folded
evenly as shown in Fig. A.
If not, correct the evenness of the folded
edge.
Adjusting evenness of the tape:
Loosen the adjusting screw D to
adjust the positon of the upper guide.
Loosen the adjusting screw E to
adjust the positon of the lower guide.
4. Attaching the Binder
Place the binder on the
base plate matching the
screw holes with the slot in
the binder and slightly
tighten the setscrews (A)

5. Ajuster la position du dispositif
Alignez le tissu plié au bord gauche de
l’ouverture du pied en déplaçant la plaque
de fixation du dispositif à gauche ou à
droite.
Quand c’est aligné, serrez les deux vis A
avec le tournevis de votre machine.
Sélectionnez le point droit et placez l’aiguille en
position 2.0 (7.0 pour le double transport).
Cousez le biais pré-plié sur 1 cm (3/8’’) avec des
points droits.
Arrêtez la machine avec l’aiguille en position basse,
plantée dans le tissu. Levez le pied-de-biche et
insérez le bord du quilt/matelassage dans le biais
plié juste devant l’aiguille. Baissez le pied-de-biche
et recommencez à coudre doucement.
Setscrews (A)
Left inside edge
Pour ajuster la direction de couture, déserrez la
vis B, tournez la plaque de fixation pour l’aligner
à la courbe du biais et resserez la vis B avec le
tournevis.
NOTES:
Align the folded tape
with the left inside
edge of the foot.
6. Coudre
Faites quelques essais sur des chutes de tissus
avant de coudre votre quilt/matelassage. Ne tirez
pas sur le biais ou sur le tissu pendant la couture.
NOTE:
Réglage de la machine avec pied pour pose de biais:
Point droit
Position de l’aiguille: 2.0
Pied du dispositif pour pose de biais.
Align the folded tape
with the left inside
edge of the foot.
With Upper Feed device:
Straight stitch
Needle drop position: 7.0
Upper Feed foot AD
Left inside edge
5. Adjusting the Binder Position
Align the folded tape with the left inside edge of
the foot by sliding the binder to the left or right.
Tighten the 2 setscrews (A) with the
screwdriver of your sewing machine.
To adjust sewing direction, loosen the
setscrew (B). Turn the base plate to align
the direction of the tape with the curve of
the fabric. Tighten the setscrew (B) with
the screwdriver.
NOTES:
Select the straight stitch and set the needle drop
position at 2.0 (7.0 for the Dual Feed foot).
Sew the folded binding about 3/8” (1 cm) with
straight stitch (center). Stop the machine with
needle down into the fabric. Raise the presser
foot and insert the edge of the quilt into the fold
and up to the needle. Lower the presser foot and
start sewing slowly.
6. Sewing
Sew on test fabric before sewing
the actual quilt. Do not pull the
tape or fabric while sewing.
NOTES:
With Binder Foot machine Settings:
Straight stitch
Needle drop position: 2.0
Binder foot
Réglage de la machine
avec double transport:
Point droit
Position de l’aiguille: 7.0
Pied double transport AD.
This manual suits for next models
2
Other ELNA Sewing Machine Accessories manuals

ELNA
ELNA 495-526-20 User manual

ELNA
ELNA 202-235-008 User manual

ELNA
ELNA 202-248-004 User manual

ELNA
ELNA 202-099-204 User manual

ELNA
ELNA 202-239-002 User manual

ELNA
ELNA 202-142-007 User manual

ELNA
ELNA 202-103-202 User manual

ELNA
ELNA 580+ User manual

ELNA
ELNA 202-096-201 User manual

ELNA
ELNA 202-156-004 User manual

ELNA
ELNA 202-238-001 User manual

ELNA
ELNA 202-098-203 User manual

ELNA
ELNA 200-050-104 User manual

ELNA
ELNA 202-420-002 User manual

ELNA
ELNA 202-084-206 User manual

ELNA
ELNA 611-511-001 User manual

ELNA
ELNA 202-249-005 User manual

ELNA
ELNA 202-091-206 User manual

ELNA
ELNA 202-237-000 User manual

ELNA
ELNA 202-488-008 User manual