Frama Matrix F12 User manual


Frama Matrix F12
2
Operating manual for
Frama Matrix
All rights reserved. Frama Group.

Frama Matrix F12
3
Dear Customer,
Thank you for choosing the innovative, forward-looking Frama Matrix F12 franking solution which meets
all standards and therefore guarantees long-term protection of your investment. The information below in
this operating manual is intended to assist you in installing and operating your Frama Matrix F12 franking
system. It also shows how you can easily make settings yourself. We have summarised the most impor-
tant points briefly here for you.
The most important points at a glance:
INSPECTION/AUTOCONNECT 17
LOADING POSTAGE CREDIT 15
INSERTING/CHANGING INK JET CASSETTE 25
CHANGING FRANKING DATE (PRINT DATE) 31
DISPLAY MESSAGES AND TECHNICAL DATA 42
You can get quick competent support from our Help Line 01992 451125
The right to make changes in these instructions is reserved. Frama AG also reserves the right to change and/or modify parts of these
instructions and/or the product at any time without notice. The postage rates indicated and other information with time-limited
validity are provided solely as examples and make no claim to currency.
.

Frama Matrix F12
4
Safety information and warnings
Thank you for deciding to purchase the innovative Frama Matrix F12 franking system.
The information below in this operating manual is intended to assist you in installing and operating your Frama Matrix
F12 franking system. It also shows how you can easily make settings yourself.
This franking system meets current safety requirements. Incorrect use can, however, lead to injury and damage. With
this in mind, please read this guide before you start using your Frama Matrix F12 franking system. This will help you to
avoid injury and prevent damage to your franking system. Keep this guide in a safe place and pass it on to the new
user should you dispose of the machine.
Symbols used
This operating manual uses the following symbols:
Danger
This symbol indicates dangers and safety hazards which can cause injury when using, operating
and servicing the franking system.
Information
This symbol is intended to draw your attention to guidance and instructions you should be aware
of which can prevent the risk of damage to the franking system, the items to be posted or the
immediate surroundings when handling the franking system.
Tip
Hints and tips of interest for the efficient use of the franking system.

Frama Matrix F12
5
Table of contents
SAFETY INFORMATION AND WARNINGS ......................................................................................4
SYMBOLS USED ........................................................................................................................................................ 4
TABLE OF CONTENTS ..................................................................................................................5
1.1. SAFETY INSTRUCTIONS/NOTES ON USE.............................................................................................................. 7
1.2. USE AS INTENDED/NOTES ON PRINT QUALITY .................................................................................................... 8
1.3. REQUIREMENTS FOR THE NETWORK ENVIRONMENT/INFORMATION SECURITY .................................................. 8
1.4. RECYCLING AND DISPOSAL ............................................................................................................................... 9
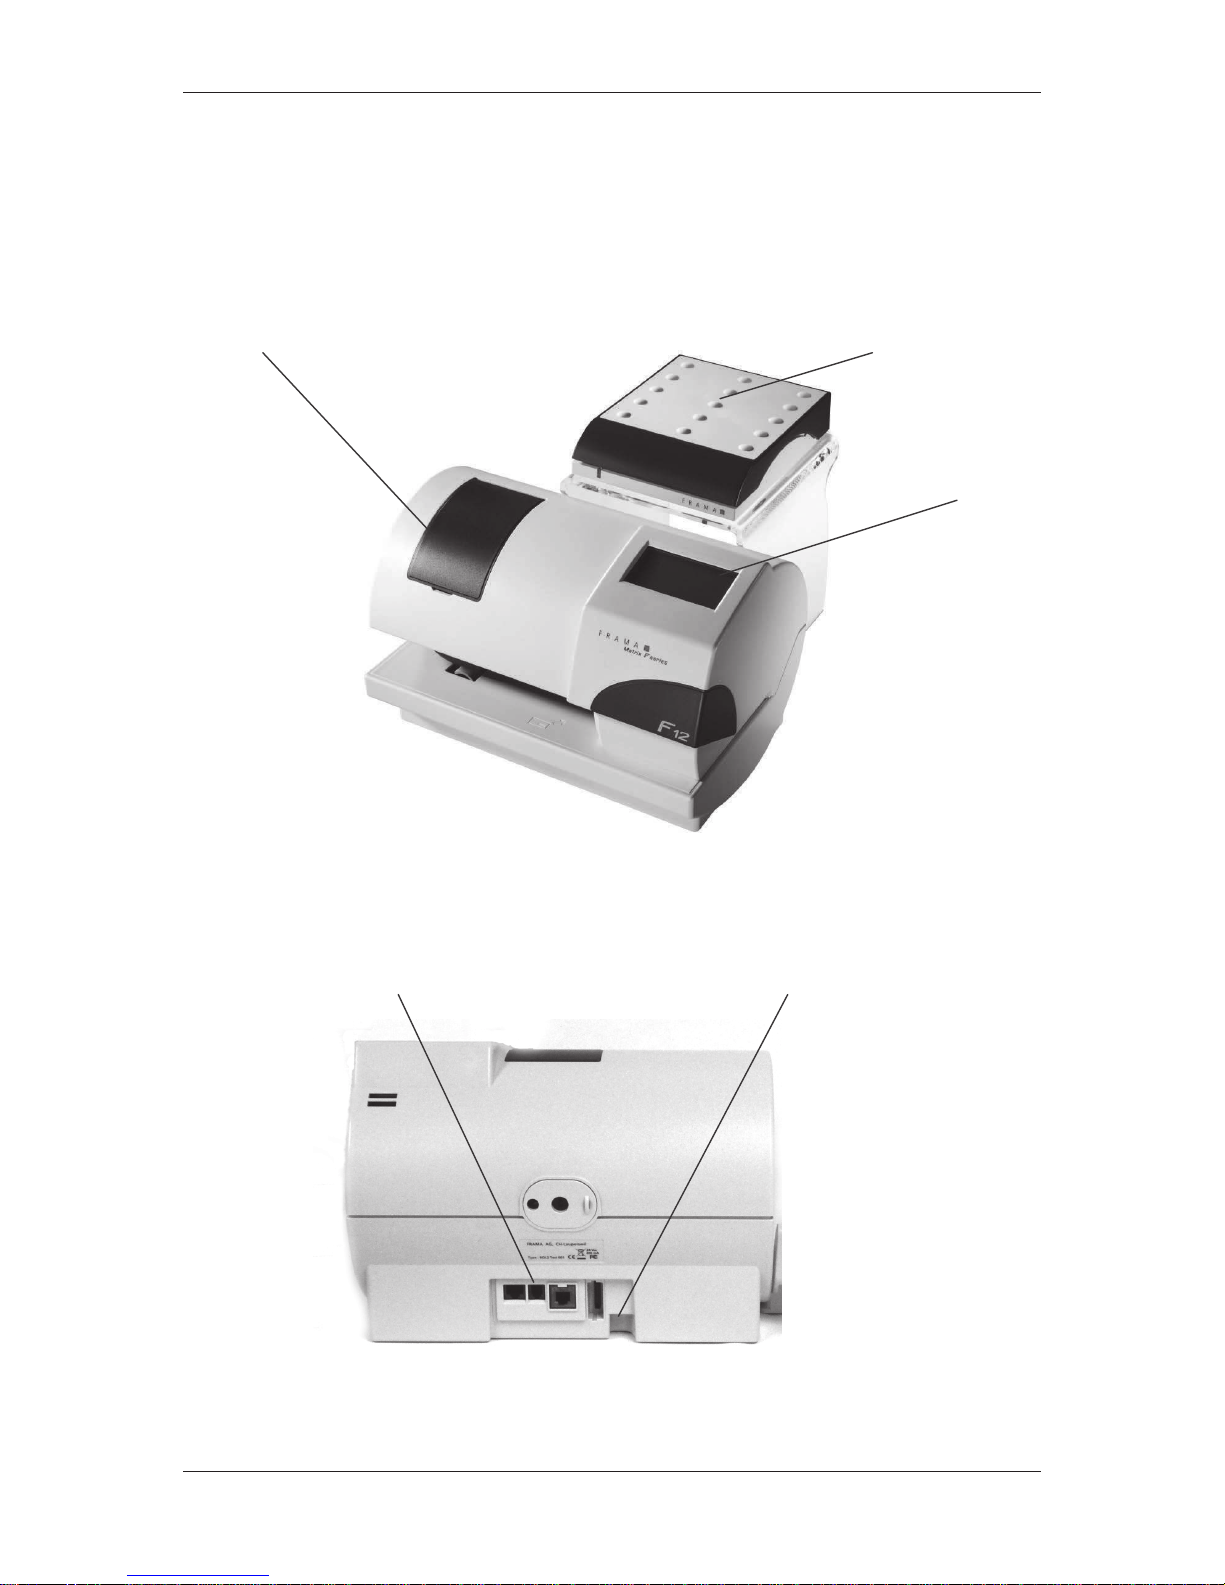
1.5. THE FRAMA MATRIX MACHINE ....................................................................................................................... 10
1.6. BASIC SCREEN LAYOUT ................................................................................................................................... 11
2. INSTALLATION ...................................................................................................................... 11
2.1. GENERAL NOTES AND SAFETY INFORMATION.................................................................................................. 12
2.2. MAKING CONNECTIONS.................................................................................................................................. 12
2.3. CONNECTING TO THE MAINS ELECTRIC SUPPLY .............................................................................................. 13
2.4. FIRST USE......................................................................................................................................................... 13
2.5. FRAMAONLINE2 INSTALLATION ....................................................................................................................... 14
2.6. INSTALLING THE INK JET CASSETTE.................................................................................................................. 14
2.7. LOADING CREDIT FROM FRAMAONLINE2 ........................................................................................................ 14
3. FRAMAONLINE2 ................................................................................................................... 15
3.1. GENERAL NOTES.............................................................................................................................................. 15
3.2. LOADING POSTAGE CREDIT ............................................................................................................................. 15
3.3. INSPECTION/AUTOCONNECT ........................................................................................................................... 17
4. OPERATION .......................................................................................................................... 18
4.1. SWITCHING ON AND OFF ................................................................................................................................ 18
4.2. ACCOUNTS ..................................................................................................................................................... 19
4.3. DETERMINING POSTAGE VALUE....................................................................................................................... 21
4.4. FRANKING ....................................................................................................................................................... 24
4.5. FITTING THE INK JET CASSETTE ........................................................................................................................ 25
5. MAIN MENU......................................................................................................................... 28
5.1. OVERVIEW....................................................................................................................................................... 28
5.2. LOGO .............................................................................................................................................................. 28
5.3. DEVICES .......................................................................................................................................................... 30
5.4. PRINT DATE ..................................................................................................................................................... 31
5.5. INFO PRINT ...................................................................................................................................................... 32
5.6. PRINTER SETTINGS ........................................................................................................................................... 33
6. COUNTER READINGS ............................................................................................................ 35
7. ADMIN MODE (SETTINGS) ..................................................................................................... 35
7.1. SETUP 1 MENU (CC AND ADMIN) .................................................................................................................... 35
7.2. SETUP 2 MENU ................................................................................................................................................ 36
7.3. SETUP 3 MENU ................................................................................................................................................ 36
7.4. SETUP 4 MENU ................................................................................................................................................ 37
8. ADMIN MODE ...................................................................................................................... 38
8.1. MAIN MENU.................................................................................................................................................... 38
8.2. COUNTER READINGS ....................................................................................................................................... 39
8.3. SETUP 1 ........................................................................................................................................................... 39

Frama Matrix F12
6
9. FRAMAONLINE2 ................................................................................................................... 40
9.1. LOADING POSTAGE CREDIT ............................................................................................................................. 40
9.2. INSPECTION ..................................................................................................................................................... 40
9.3. UNINSTALL ...................................................................................................................................................... 40
9.4. CONNECTION .................................................................................................................................................. 40
9.5. LAST REPORT ................................................................................................................................................... 41
9.6. PRINT REPORT.................................................................................................................................................. 41
9.7. SMARTSHOP.................................................................................................................................................... 41
10. TROUBLESHOOTING/ERROR MESSAGES................................................................................ 42
10.1. FRAMAONLINE2 ............................................................................................................................................ 42
10.2. SCALES MESSAGES (ONLY IF SCALES ARE CONNECTED)................................................................................ 43
10.3. FRAMA MATRIX F12 , FRANKING VALUE/CREDIT ........................................................................................... 44
10.4. PRINTER MESSAGES....................................................................................................................................... 45
11. TECHNICAL DATA............................................................................................................... 46
11.1. GENERAL ....................................................................................................................................................... 46
11.2. ENVELOPE/ENVELOPE FLAP DIMENSIONS........................................................................................................ 46
11.3. POWER SUPPLY RATING................................................................................................................................. 47
11.4. DIMENSIONS AND WEIGHT............................................................................................................................ 47
11.5. ACCESSORIES ................................................................................................................................................ 47
11.6. STORAGE AND OPERATING CONDITIONS....................................................................................................... 48
12. EC-DECLARATION OF CONFORMITY ....................................................................................49
13. INDEX ................................................................................................................................ 50

Frama Matrix F12
7
1. SYSTEM PRESENTATION
1.1. Safety instructions/Notes on use
Danger
1. Use this franking system indoors and for franking post and franking labels only. Any other use,
modification or change to the franking system is not permissible and may be dangerous. The
manufacturer accepts no liability for damage caused by use contrary to the intended use or
incorrect operation.
2. Check the franking system for external damage before setting it up. You may be putting your
life at risk by using a damaged machine.
3. A damaged connecting lead may only be replaced by a lead of the same type.
4. A current overload protector must always be fitted in buildings in which the franking system is
plugged into the mains network.
5. Check the cable and plug before installing the system. Have any damage repaired by a specialist
electrician only.
6. Only connect the plug into a mains socket when the franking machine housing is closed.
7. Always run the mains cable away from the rear of the franking machine and make sure that no
risk exists of it being damaged or someone tripping over it.
8. Never pull the plug out of the socket by the mains cable.
9. Never reach into the printing unit. Your fingers could be injured if the franking machine is
switched on. Be careful if you are wearing long hair, a tie, etc.
10. Do not reach into rotating parts. There is a risk of injury.
11. Keep children away from the franking system.
12. Have your franking system repaired by a service technician from your local Frama sales and
service organisation only. Never open the franking system yourself under any circumstances.
Repairs carried out incorrectly can represent a significant hazard to the user.
1.1.1. Correct use
Danger
1. Use accessories intended for this system only. The use of accessories that are not approved, or
not authorised, can be detrimental to the service life of the franking system. At the same time,
a danger to the operator can be created.
2. Always keep your fingers and other parts of the body, ties, necklaces, scarves, open sleeves
and similar loose things away from the feed entry area and the rollers. There is a risk of injury
on rotating parts.
3. Do not clean the system with flammable fluids. There is a risk of explosion.
4. Disconnect the system from the mains before cleaning it. Clean the system with a damp cloth
only. Do not spray any liquids on or into the franking system. There is a risk of electric shock.
Lethal hazard.
5. Do not place any liquids, glasses, franking ink, etc. on the franking system.
1.1.2. Installation notes
Information
Your Frama Matrix F12 franking system was manufactured for use in normal conditions. Please re-
member: Today’s furniture is coated with a confusing variety of paints, lacquers and synthetic mate-
rials. In view of this, it is quite possible that some of these materials contain constituents which can
attack or soften the plastic feet of our equipment. The feet of our equipment, if affected by foreign
substances, can stain your furniture. Frama is unable to accept any liability in this respect for obvious
reasons. With this in mind, use a non-slip underlay.
Avoid exposing directly to sunlight.

Frama Matrix F12
8
1.2. Use as intended/Notes on print quality
The following notes are intended to support you in achieving a sharp, professional print with your Frama Matrix F12
franking system, so as not to jeopardise the delivery of your franked mail. As the user, you are responsible for the
legibility of your franking.
Information
1. Your franking machine must be properly registered with the Royal Mail before you use it for the
first time. Follow the instructions given by your local Frama Sales and Service organisation when
you do this.
2. Each franking mark may be used only once. The Royal Mail (Specific Country Post) regards
repeated use as a punishable offence and a violation of the general terms and conditions of
business.
3. Test franking marks or sample franking impressions are not regarded as valid by the Royal Mail
and items bearing them may not, therefore, be mailed.
4. The use of fibrous and other unsuitable envelopes can result in the marks blurring or smearing
marks and thus to the franking marks being illegible. In view of this, you are urgently advised
not to use envelopes of this kind. Do not use very absorbent or fibrous envelopes for this rea-
son. This could invalidate your franking.
5. The use of high gloss envelopes, which could offer insufficient contrast with the franking mark,
is not permitted.
6. Do not frank mail items thicker than 10 mm. You risk allowing the printing head to touch the
surface of the mail item and thus smearing the franked mark. You should therefore always use
Frama Matrix F12 franking labels for thick letters and packets.
7. Please make sure that no sharp objects, such as paper clips, are near the franking zone. Such
objects can damage the franking system.
8. Ink jet cassettes must be checked regularly to ensure high-quality printing. After a certain time
the printing head is sealed to prevent the individual nozzles from drying. Do not, therefore,
switch the franking system off immediately, but wait until the print head is sealed, or use the
Log off button.
9. Please run a print head test and clean the print head using the Nozzle Cleaning function (sec-
tion 5.6.2. Nozzle cleaning on page 33) should you have the impression that there are lines
missing from the franked mark.
1.3. Requirements for the network environment/information security
Information
1. The franking system is connected to the user's local area network by Ethernet and by the user's
internet access correspondingly provided to exchange data with the FramaOnline2 data centre.
2. Frama guarantees that no other data that are not relevant for the franking system from the
user's network will be used, transmitted or read.
3. The user must take measures to ensure the integrity and security of the network at all times
when operating the franking system on the company network.
4. The PC interface is not active.
5. Consult the IP Configuration Manual (www.frama.com download area for further informa-
tion on connecting the franking system.

Frama Matrix F12
9
1.4. Recycling and disposal
The WEEE Directive (Waste Electrical and Electronic Equipment; 2002/96/EC) was drawn up for the protec-
tion of human health and the environment to ensure that waste products are disposed of utilising the best
available reprocessing, recovery and technical recycling possibilities. Your product has been developed and
manufactured using top-quality materials and components which can be recycled and reprocessed.
Do not dispose of this product with household waste.
Please find out about local collection points for electrical and electronic waste products which are marked accord-
ingly.
You can hand over your old product to your specialised dealer/supplier when you purchase a replacement product.
The specialised dealer or supplier in Switzerland is obliged to take back used devices by the Swiss Ordinance on the
return, taking back and disposal of electrical and electronic appliances.

Frama Matrix F12
10
1.5. The Frama Matrix machine
The illustrations below show the principal components of the Matrix F12 franking system. Please familiar-
ise yourself with the location of the components.
Fig. Matrix F12 , front view:
Fig. Matrix F12, front view:
Touch screen
Ink system
Power supply unit connection
Connection panel
Scales (optional)

Frama Matrix F12
11
1.6. Basic screen layout
The Frama Matrix F12franking system uses a touch screen for operation and navigation through the
menus.
Tip
Detailed information concerning the tariff control system screens is available in section 4.3. Deter-
mining postage value on page 21.
All the functions that are not available are hidden as a rule. This means that there are differences in the
screens between the Admin mode and the Cost Centre mode. All inputs are made via the touch screen.
There are no other keys for operating the machine.
Fig.: One touch start menu layout
ESC key: Press here to
exit the display and return
to the previous display.
CCkey:This is for changing
the cost centre.
Global information field: Important data, such as the date,
franking value and variable values in the settings menu are
displayed.
ENTER key: This is for
acknowledging entries, such as
when entering the password.
"i" key: Press here to
fetch further fea-
tures/attributes for the respec-
tive display content.
OneTouch range. Display the product by simply pressing a
key. Changes to features/information field on being pressed:
Here you learn everything about the selected postal product.
Arrow key: Press this to
go to the next entry step or
display.
Letter symbol: This
appears when a franking
result acceptable to the
Royal Mail has been ob-
tained. It is shown inverted
when deviations from the
standard settings exist.
Setup key: This is for
shifting forwards to the set-
tings menu.
General notes
The following notes are intended to support you in achieving a sharp, professional postage mark with
your Frama Matrix F12 franking system.
Information
-Information: Do not frank mail items thicker than 10 mm. You risk allowing the printing head
to touch the surface of the mail item and thus smearing the franked mark. With this in mind,
always use original Frama Matrix F12 franking labels for thick mail items and small parcels.
-Please make sure that no sharp objects, such as paper clips, are near the franking zone.
-If you have the impression that lines are missing in the franked mark, please carry out a print-
ing head test.
-Do not use very absorbent or fibrous envelopes which could prevent a cleanly printed mark.
This could invalidate your franking.

Frama Matrix F12
12
It is easy enough to install the components yourself. Be sure to observe the safety instructions at all times.
There are four steps to installation:
1. Assembly of the individual components
2. Registering with the FramaOnline2 system
3. Configuring the printer settings
4. Loading postage credit
2.1. General notes and safety information
Select a position near a mains socket and an Ethernet connection for your Frama Matrix F12 franking
system. Avoid direct sunlight and severe vibration.
Draughts can affect the accuracy of the scales.
Your Frama Matrix F12 franking system was manufactured for use in normal conditions. Remember: To-
day’s furniture is coated with a confusing variety of paints, lacquers and synthetic materials. In view of
this, it is quite possible that some of these materials contain constituents which can attack or soften the
plastic feet of our equipment. The feet of our equipment, if affected by foreign substances, can stain your
furniture. Frama is unable to accept any liability in this respect for obvious reasons.
With this in mind, use a non-slip underlay.
2.2. Making connections
The illustration below shows the location of the interfaces and the plug for the plug-in power supply unit
on the rear of the Matrix F12 franking system's housing (connection panel).
Serial port
(RS232 – PC)
Scales port
Communications
module
Socket for PSU
2. Installation

Frama Matrix F12
13
2.2.1. Make communications connection (communications module)
The connection of the relevant cable differs depending on the communications module used.
Ethernet (green): Plug the network cable (RJ45) into this socket. Plug the network cable into your net-
work.
2.2.2. Connecting the scales (optional)
Plug the scales cable into the scales socket. Look in the operating manual for the scales if necessary.
2.3. Connecting to the mains electric supply
Danger
1. Check the franking system for external damage before setting it up. You may be putting your
life at risk by using a damaged machine.
2. Check the cable and plug before installing the system. Have any damage repaired by a specialist
electrician only. Do not use the system until the damage has been repaired.
3. A damaged connecting lead may only be replaced by a lead of the same type.
4. Only connect the plug into a mains socket when the franking machine housing is closed.
5. Always run the mains cable away from the rear of the franking system and make sure that no
risk exists of it being damaged or someone tripping over it.
6. Never pull the plug out of the socket by the mains cable.
Take the power supply unit.
Then connect the cable with the small right-angled round plug to the Frama Ma-
trix F12 (see photograph).
Make sure that the plug clicks into place properly. This will be the case when the
cable is flush against the housing.
Make sure that you have closed the top flap on the Frama Matrix F12. Check
whether the scales are free to move.
Information
Information: The switch-on routines may take some time. During this time, the Frama Matrix F12
franking system will not accept any input from you.
2.4. First use
Insert the power supply unit into a suitable mains socket. You will hear various sounds during the switch-
on routines. All the motors and sensors are being checked.
Information
Information: The switch-on routines may take some time. During this time, the Frama Matrix F12
franking system will not accept any input from you.
The franking system must now be installed (registered) with the FramaOnline2 data centre.

Frama Matrix F12
14
2.5. FramaOnline2 installation
Installation on the FramaOnline2 data centre establishes the full functionality of your franking system and
is indispensable for the correct operation of the system.
Information
Information: It may be necessary to configure your franking system to ensure that it connects
successfully with your network. Follow the instructions on page 40 to make the necessary settings.
Information
In any event, you will need your PIN for administration mode as well as your FramaOnline2 activa-
tion code, which was mailed to you under separate cover. You cannot activate your system for
FramaOnline2 operation without this number. The FramaOnline2 activation code is used solely for
activation. Protect your PINs from misuse by keeping them in a safe place. If you forget or mislay
your codes, they can be read out only in the Frama Central Workshop.
A note on installation appears once the system has been started successfully.
1. Acknowledge the note on installation.
2. Select FramaOnline2.
3. Enter the admin PIN. The default value for this PIN is 1234. Press the OK key.
4. Press the “i“ key at the top right of the screen.
5. Press the Spanner key at the top right of the screen.
6. Press the “arrow” at the top right of the screen.
7. Select FramaOnline2.
8. Press the Activation PIN key and enter the activation PIN.
9. Press “arrow” symbol) in the top right-hand corner. On the FramaOnline2 screen, select the In-
stallation key. Press the YES key to begin installation.
The franking system contacts FramaOnline2.
Once FramaOnline2 installation is complete, you will be prompted to install the ink jet cassette.
2.6. Installing the ink jet cassette
Follow the instructions on page 25 to install the ink jet cassette correctly.
2.7. Loading credit from FramaOnline2
You must load postage credit into the franking system before you can frank mail with your Frama Matrix
F12 franking system.
Follow the instructions on page 15. This concludes the installation.

Frama Matrix F12
15
3. FramaOnline2
3.1. General notes
FramaOnline2 will deal with preparing the postage rates, sending use data to the Royal Mail
and provides
a simple way of loading new postage credit onto your franking system.
Your franking system must set up a connection with the data centre to allow use of FramaOnline2. Refer
to section 9.4. Connection on page 40 for this.
Tip
It is only possible to call up postage and communicate with FramaOnline2 in Admin mode.
Tip: The Admin mode is password (PIN) protected. Keep your PIN in a safe place. The PIN can only
be reset in a chargeable call-out of a service technician to your premises or in the central work-
shop.
3.2. Loading postage credit
It is only possible to load postage credit in Admin mode. The Admin mode is password-protected. Switch
the device on or change to Select Cost Centre.
1. Press the Admin key in Selection mode.
2. Enter your PIN (default: 1234). Then press the ENTER key
to access Admin mode.
3. Press the “i“key.
4. Press the Spanner.
5. Press the arrow.

Frama Matrix F12
16
6. Select FramaOnline2.
7. Select Re-set.
8. Enter the desired credit amount without using a decimal
point. Please observe any provisions in your contract
with the Royal Mail.
Acknowledge this amount by pressing ENTER.
9. Your Frama F12 franking system establishes a link with
the FramaOnline2 data centre and keeps you informed
as to the progress of the connection.
Tip
The connection can last several minutes depending on the amount of data to be transferred (post-
age rates update, etc.).
The transaction data is displayed once the connection is completed.

Frama Matrix F12
17
3.3. Inspection/AutoConnect
Your Matrix franking system has an autoconnect function as a convenience. This is used to transmit the
counter readings, to check the postage rate tables and to synchronize data with the Royal Mail.
You may see the AutoConnect message while you are
changing the cost centre. You can also run this later if you
do not wish to make the connection now.
AutoConnect or delivery of the Mailmark™ data is executed
in accordance with your agreement with the Royal Mail. If
you see the AUTOCONNECT Inspection loading successful
message, the connection has been made and you can simply
carry on by touching the screen.
It is important that your franking system is permanently con-
nected through the network for the Inspection/AutoConnect
function.

Frama Matrix F12
18
4. Operation
4.1. Switching on and off
Always keep your machine connected to the mains.
4.1.1. Switching the machine on
Touching the dark, empty screen switches the machine on. The machine can also be turned on automati-
cally by plugging in the power supply unit.
4.1.2. Switching the machine off
On the Mode Selection screen shown below, press the Switch Off key.
Touch the screen to wake the machine up again.
Information
Always wait for two minutes between operating the franking system and disconnecting the plug.
This procedure ensures that the print head is properly sealed and cannot dry out.
4.1.3. Selecting a mode
After switching on, the operating mode selection screen ap-
pears.
CC mode: Select CC mode to frank mail items. Settings made
in CC mode will only ever apply to the cost centre currently
selected.
Admin mode: Select Admin mode to adjust global and
FramaOnline2 settings, to carry out inspections and to load
postage credit. Settings made in Admin mode always apply to all cost centres.

Frama Matrix F12
19
4.2. Accounts
4.2.1. General comments on cost centres
Your Frama Matrix F12 franking system is equipped with various counters which allow you to monitor
postage consumption and the number of mail items franked.
Each cost centre can be given its own name. You have 16 characters at your disposal. The cost centre
active at any time is shown in the top section of the display in the CC key. You may change to another
cost centre by pressing this key.
4.2.2. General comments on the display of cost centre data
The data for a cost centre is displayed as follows:
Reset Number / Value: Resettable counters for the cost
centre. Reset Value shows the postage used since the last
time this counter was reset. Reset Number shows the num-
ber of mail items franked since the last time this counter
was reset.
Reset Number / Value: Total counter readings for the cost
centre. (Number counter and franked value) since the cost
centre was set up.
Credit:
This is the postage still available in your franking system.
There are also system counters which show the total counters for all cost centres. These counters cannot
be reset.
4.2.3. Selecting a cost centre
You must enter a PIN for each cost centre before you can work with your franking system. Unless you
have defined new PINs, the PIN for Cost Centre 1 is 1, and for Cost Centre 2 is 2 and so on. This allows
the postage costs to be assigned automatically to the appropriate cost centre.
Press 1 and then the OK key to select Cost Centre 1, for instance. The cost centre name will then be dis-
played and you can now enter the PIN (1). Press OK. The franking screen will be opened and you can
frank mail. All franked items will be assigned to this cost centre in respect of value and number.
The Cost Centre function can be called up from any start menu again by pressing the CC key.

Frama Matrix F12
20
4.2.4. Changing the cost centre PIN
The cost centres are protected by a PIN by default. In the as-delivered state of the franking system, the PIN
is the same as the cost centre number. The PIN can have up to 8 digits.
Proceed as follows to change the PIN for the current cost centre:
Press the Change PIN key (in Setup 1).
Enter the old PIN. Press OK to confirm.
Enter the new PIN. Press OK to confirm.
Enter the new PIN again and confirm your input by pressing
OK.
You have access to all cost centres in Admin mode (see from page 38).
4.2.5. Changing the cost centre name
Your Frama Matrix F12 franking system offers you the option of assigning an individual name to each cost
centre. It is supplied by default to the Select Cost Centre screen and simplifies your work.
Press the Change PIN key (in Setup 1).
Select Change CC Name and enter the name of the cost centre using the text input screen.
4.2.6. Deleting counter readings of current cost centre
You can delete the counter readings for the current cost
centre in the Setup 1 menu.
Confirm deletion by pressing ENTER.
Table of contents
Other Frama Postal Equipment manuals

Frama
Frama Fx 5 Series User manual

Frama
Frama MATRIX F2 User manual

Frama
Frama EcoMail User manual

Frama
Frama MATRIX F22 User manual

Frama
Frama Access B300 User manual

Frama
Frama Access B400 User manual

Frama
Frama Matrix F32 User manual

Frama
Frama Fn 5 Series User manual

Frama
Frama Matrix F Series Instruction sheet

Frama
Frama Access B400 User manual

Frama
Frama Matrix F Series User manual

Frama
Frama Matrix F32 Manual

Frama
Frama Access B400 User manual

Frama
Frama MATRIX F22 Installation instructions

Frama
Frama Fs 3 Series User manual

Frama
Frama Fx 7 Series User manual

Frama
Frama Access B400 User manual

Frama
Frama Matrix F4 User manual

Frama
Frama Mailmax User manual