Hioki IM9202 User manual

IM9202
Instruction Manual
TEST FIXTURE
EN
Apr. 2020 Edition 1
IM9202A961-00 20-04H
Be sure to read this manual before using the instrument. p.3
When using the instrument for the
rst time Troubleshooting
Part Names and Functions p.6 Maintenance and Service p.25
Making Measurements p.8
HIOKI IM9202A961-00

HIOKI IM9202A961-00

1
Introduction
Introduction
Thank you for choosing the Hioki IM9202 Test Fixture. To ensure your ability to get the most out
of the device over the long term, please read this manual carefully and keep it available for future
reference.
The device is used by connecting to the impedance analyzer. Before using the impedance
analyzer, read the instruction manual of the impedance analyzer carefully.
Intended audience
This manual has been written for use by individuals who use the product or provide information
about how to use the product.
In explaining how to use the product, it assumes electrical knowledge (equivalent of the knowledge
possessed by a graduate of an electrical program at a technical high school).
Contents
Checking Package Contents p.2
Safety Information p.3
Operating Precautions p.4
Overview p.5
Part Names and Functions p.6
Making Measurements p.8
■Measurement Procedure p.8
■Inspecting the Device Before Use p.9
■Attaching the Test Head and the Adapter p.10
■Calibration p.11
■Attaching the Device p.14
■Electrical Length Correction p.15
■Short Correction p.16
■Open Correction p.19
■Starting Measurement p.22
Specications p.23
Maintenance and Service p.25
Warranty Certicate
IM9202A961-00
HIOKI IM9202A961-00

2
Checking Package Contents
When you open the package, carefully inspect the device to ensure that everything is in good
condition, and that no damage occurred during shipping. Carefully check the accessories. If
device seems to have been damaged or does not work as specied, contact your authorized Hioki
distributor or reseller.
Conrm that the following items are provided.
(1)
(4) (7)
(13)(3)
(11)(10)
(6)
(5)
(2)
(8)
(12)
(9)
IM9202 Test Fixture ........................................................................................................(1)
H-side lead component clip*...........................................................................................(2)
L-side lead component electrode (with clip)*..................................................................(3)
L-side SMD electrode.....................................................................................................(4)
SMD open correction jig ................................................................................................ (5)
Short plate ..................................................................................................................... (6)
Brush for cleaning...........................................................................................................(7)
Carrying case .................................................................................................................(8)
Instruction manual
* The H-side lead component clip and the L-side lead component electrode are installed on the device.
Options (sold separately)
The options listed below are available for the device. To purchase an option, please contact your authorized
Hioki distributor or reseller. Options are subject to change. Please check Hioki's website for the latest
information.
IM9906 Adapter (3.5 mm/7 mm).....................................................................................(9)
IM9905 Calibration Kit (LOAD).......................................................................................(10)
IM9905 Calibration Kit (OPEN).......................................................................................(11)
IM9905 Calibration Kit (SHORT)*...................................................................................(12)
Magnifying glass (IM9200 Test Fixture Stand accessory) ..............................................(13)
IM9200 Test Fixture Stand
Options (sold separately) can be stored inside (9) to (13) of the carrying case. Please store them after
removing the packed sponge at the time of unpacking.
* The IM9905 Calibration Kit (SHORT) can be stowed side by side with the short plate (6).
HIOKI IM9202A961-00

3
Safety Information
Safety Information
Carefully read the following safety notes before using the device
CAUTION
• Mishandling during use could damage to the device. Familiarize yourself with the
instructions and precautions in this manual before use the device.
• If you have not used electrical measuring instrument before, you should be supervised
by a technician who has experience in electrical measurement.
Notations
In this document, the severity levels of risk and hazard are classied as follows.
WARNING Indicates a potentially hazardous situation that may result in death of or serious
injury to the operator.
CAUTION Indicates a potentially hazardous situation that may result in minor or moderate
injury to the operator or damage to the device or malfunction.
IMPORTANT Indicates information or content that is particularly important from the standpoint
of operating or maintaining the device.
Indicates an action that must not be performed.
Indicates an action that must be performed.
Notations related to standards compliance
Indicates the Waste Electrical and Electronic Equipment Directive (WEEE Directive) in EU
member states.
Indicates that the product conforms to regulations required by the EU Directive.
Other notations
*Instructs the reader to see below for additional information.
(p. ) Indicates the page number to reference.
HIOKI IM9202A961-00

4
Operating Precautions
Observe the following precautionary information to ensure that the device can be used safely and
in a manner that allows it to perform as described in its specications.
Use of the device should conrm not only to its specications, but also to the specications of all
accessories, options and other equipment in use.
Installation Environment
WARNING
Installing the device in inappropriate locations could cause a malfunction of the
device, an accident. Avoid locations that are:
•Exposed to direct sunlight or high temperatures
•Exposed to corrosive or combustible gases
•Exposed to strong electromagnetic elds or electrostatic charges
•Near induction heating systems (such as high-frequency induction heating
systems and IH cooking equipment)
•Susceptible to vibration
•Exposed to water, oil, chemicals, or solvents
•Exposed to high humidity or condensation
•Exposed to high concentrations of dust particles
CAUTION
Do not place the device on an unstable or uneven surface. Doing so could cause the
device to fall or turn over, causing bodily injury or damage to the device.
Handling the Device
CAUTION
• The DUT could pop off the device and into the air while being connected. To prevent
injury, use gradual movements when handling clips and electrodes.
• To avoid damage to the device, avoid subjecting it to vibration or mechanical shock
during transportation and handling. Exercise particular care to avoid subjecting the
device to mechanical shock, for example by dropping.
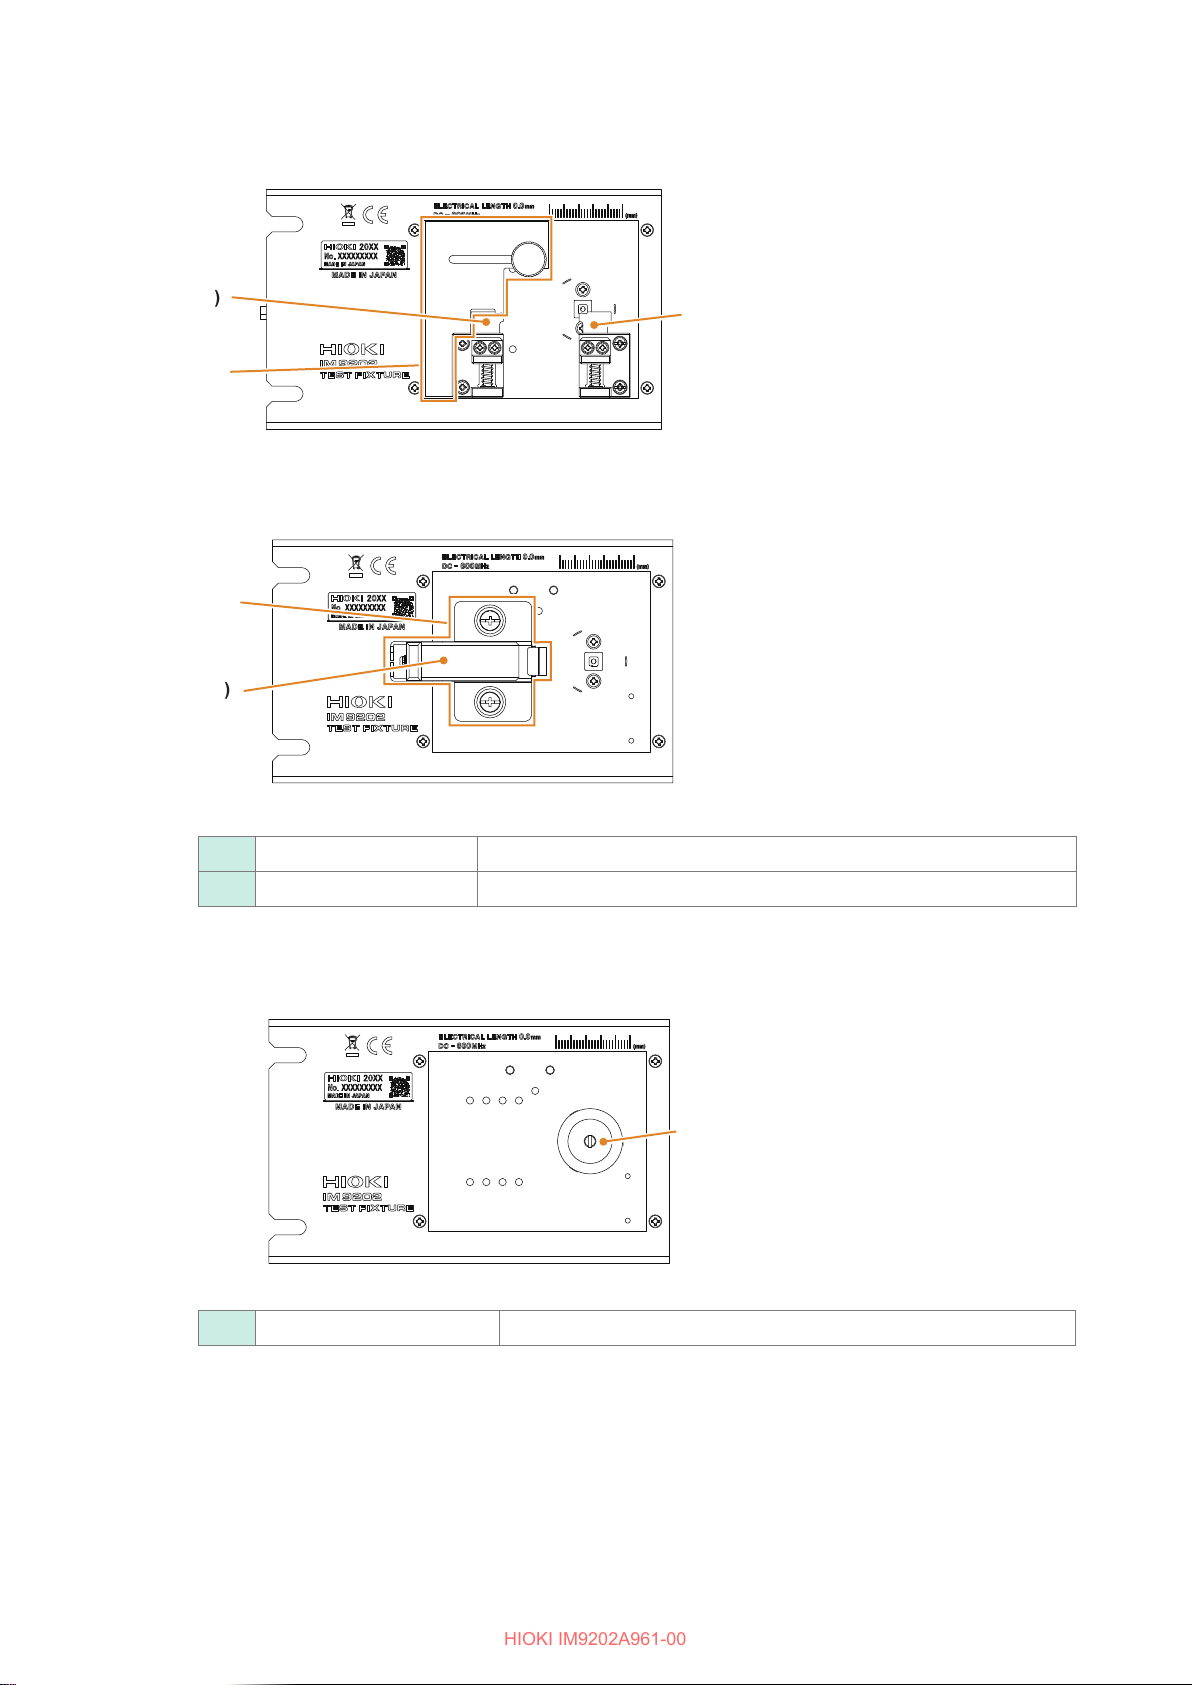
• To prevent device damage or an electric shock, use only the screws that are originally
installed for securing clips or the short plate in place. If you have lost any screws or
nd that any screws are damaged, please contact your authorized Hioki distributor or
reseller.
Measurements
CAUTION
• To avoid bodily injury or damage to the device, do not attempt to measure voltage
exceeding 42V.
• To avoid damage to the device, do not connect the charged capacitor to the device.
• Do not apply a voltage across the device’s measurement terminals while it is
connected to an impedance analyzer.
It may cause damage to the impedance analyzer.
IMPORTANT
The accuracy of measured values obtained using the device is not guaranteed. Measured values
should be treated as reference values.
Shipping Precautions
During shipment of the device, handle it carefully so that it is not damaged due to a vibration or
shock.
HIOKI IM9202A961-00

5
Overview
Overview
The device is the test xture to be used by connecting to the impedance analyzer of Hioki.
It performs two-terminal measurement of lead components and SMDs.
Measurable DUT size
Lead components
Axial
A
B
C
ALead interval
(Component body length)
1 mm to 25 mm
BLead length 2 mm to 10 mm
CHeight to lead*12.5 mm or shorter
Lead wire diameter 0.5 mm to 2 mm
Radial
D
E
DLead interval 2 mm to 26 mm
ELead length*12 mm or longer
Lead wire diameter 0.5 mm to 2 mm
SMD*2
H
F
G
FComponent length 1.6 mm to 23 mm
GComponent width 0.8 mm or longer
HComponent height 0.65 mm or longer
Supported SMD size: EIA0603 (JIS1608) or larger
*1: The component’s H-side lead must not make contact with the xture’s L-side electrode.
*2: The electrode on the bottom surface of the H side of the component must not make contact with the xture’s
L-side electrode.
HIOKI IM9202A961-00

6
Part Names and Functions
(2)
(1)
(3)
(4)
(5)
(10)
(7)
(8)
(12)
(9)
(8)
(11)
(6)
(1) Base plate The base plate is at the same potential as the L-side electrodes.
(2) H-side lead component
clip
Connect lead components to the H-side electrode by inserting the
lead wire here.
(3) H-side electrode Serves as the device’s measurement unit.
(4) IM9906 Adapter
(3.5 mm/7 mm)
This specially designed adapter is used to connect the device to the
impedance analyzer’s test head.
(5) Test head The test head comes with the impedance analyzer.
(6) IM9200 Test Fixture Stand
(option)
The exclusive stand for xing the test head of the impedance analyzer
and the device.
(7) Loupe The magnifying glass provided with the IM9200 Test Fixture Stand
(option). It is used by installing to the IM9200.
(8) Stand xing knob The knob xes the device to the IM9200 Test Fixture Stand.
(9) L-side lead component
clip
Connect lead components to the L-side electrode by inserting the lead
wire here.
(10) L-side lead component
electrode
Serves as the device’s measurement unit.
(11) Serial number The 9-digit serial number indicates the year (rst two digits) and the
month of manufacture (next two digits). Do not remove this sticker as
the number is important.
(12) Knob This knob is used to lock the L-side lead component electrode in
place.
HIOKI IM9202A961-00

7
Part Names and Functions
The electrode and the clips for measurement of lead components
(10)
(9) (2)
The electrode for measurement of SMDs
(13)
(14)
(13) L-side SMD electrode Used when measuring SMDs.
(14) Lever This lever causes the L-side SMD electrode to slide back and forth.
Short plate
(15)
(15) Short plate Used when performing short correction.
HIOKI IM9202A961-00

8
Making Measurements
Making Measurements
Measurement Procedure
You will need (besides the device and accessories):
• IM7580 series Impedance Analyzer ×1
• IM9200 Test Fixture Stand ×1
• IM9905 Calibration Kit ×1
• IM9906 Adapter ×1
• 3.5 mm connector torque wrench ×1 (not included with the device)
• Tweezers ×1 (This is not included with the device. Tweezers which are thinner than the DUT size,
clean, and not magnetized are recommended.)
1
Connect the test head to theConnect the test head to the
impedance analyzer.impedance analyzer.
Connect the cable of the test head to the impedance
analyzer.
See the instruction manual
of the impedance analyzer. Test head
2
Attach the test head and adapterAttach the test head and adapter
to the stand.to the stand.
Attach the test head and the IM9906 Adapter to the
IM9200 Test Fixture Stand.
IM9200
IM9906
(p.10)
3
Execute the calibration.Execute the calibration. Execute the open calibration, short calibration, and load
calibration.
(p.11)
4
Attach the device.Attach the device. Attach the device to the IM9200 Test Fixture Stand.
Device (IM9202)
(p.14)
5
Execute the correction.Execute the correction. Execute the electrical length correction, short correction,
and open correction.
(From p.15)
6
Start the measurement.Start the measurement. Connect the DUT to the measurement location and start
the measurement by using the impedance analyzer.
(p.22)
HIOKI IM9202A961-00

9
Making Measurements
Inspecting the Device Before Use
To ensure that the device is properly operating, conduct an inspection and check device operation
before using device to ensure that no damage has occurred during storage or transport. If there is
any damage to the device, contact your authorized Hioki distributor or reseller for repair.
It is recommend to inspect the device prior to use as described below.
Measure residual parameters with an impedance analyzer and verify that the measured values fall
within the allowable range.
See "Residual parameters (reference value)" (p.24)
Check items Remedy
Are the electrode or the short
plate worn?
If any of the following applies, send the device for repair:
• Residual parameters’ measured values diverge from the allowable
values.
• An electrode or the short plate exhibits wear.
Does either of the clips exhibit any
damage or unusual appearance?
If any of the following applies, send the device for repair:
• Either of the clips is cracked or worn.
• Either of the clips will not move.
• The clips are not able to accommodate a component.
Is the device damaged? Send the device for repair if it exhibits any deformation in shape or
other damage.
HIOKI IM9202A961-00

10
Making Measurements
Attaching the Test Head and the Adapter
Attach the test head and the IM9906 Adapter to the IM9200 Test Fixture Stand.
IMPORTANT
The impedance analyzer, test head, and measurement cable are adjusted together at the time
of shipment. Use the test head and measurement cable included along with the impedance
analyzer. Conrm that the serial number* of the impedance analyzer and test head is same.
* The 9-digit serial number indicates the year (rst two digits) and the month of manufacture (next
two digits). Do not remove this sticker as the number is important.
You will need:
• Test head ×1
• IM9200 Test Fixture Stand ×1
• IM9906 Adapter ×1
• 3.5 mm connector torque wrench ×1 (not included with the device)
Test head
IM9200
11
22
Metal ttings
1
Pull the metal ttings to the IM9200 Test Fixture
Stand side.
2
Place the test head on the stand and tighten the
knob.
IM9906
Notch
Measurement terminal
33
44
3
Place the notch of the IM9906 Adapter parallel to the
metal ttings, then install onto the measurement
terminal of the test head.
At this time it is stopped temporarily. Position the notch of the
IM9906 Adapter where the metal ttings can slide.
4
Fix the notch of the IM9906 Adapter by sliding the
metal ttings.
3.5 mm connector nut
55
5
Tighten the nut of the 3.5 mm connector by using a
torque wrench.
Recommended torque: 0.9 N·m
Tightening the nut until the handle of the wrench bends slightly
is sufcient. Do not over tighten.
HIOKI IM9202A961-00

11
Making Measurements
Calibration
Connect the three standard units, open, short, and load of the IM9905 Calibration Kit to the
reference surface (terminal) of the IM9906 Adapter one by one, and measure the respective
calibration data. This reference surface is referred to as the “calibration reference surface”. The
cause of errors between the impedance analyzer itself and the calibration reference surface is
eliminated.
The dened value differs according to the calibration kit to be used. For more information about how
to input dened values to the impedance analyzer, see the instruction manual of the impedance
analyzer and the Dened Value Setting Application Installation Procedure on the CD-R that came
with the IM9905.
CAUTION
While attaching and detaching the calibration kit, make sure that the internal conductor
of the calibration kit does not rotate. If the internal conductor rotates, it may cause
damage to the electrode.
When the calibration cannot be executed:
• Conrm that the calibration kit and the IM9906 Adapter are connected properly.
• Check that the DC measurement limit value of the impedance analyzer is appropriate.
• Connect the IM9906 adapter, calibration kit and the device with a 7 mm connector.
Recommended torque for the 7 mm connector is 1.35 N·m.
You will need:
IM9905 Calibration Kit (OPEN, SHORT, and LOAD) ×1 of each
1
Set the measurement conditions like frequency,
measurement signal level, and measurement speed
in the impedance analyzer.
2
Set the dened values of the calibration kit and offset
delay in the impedance analyzer.
The initial values of the impedance analyzer are set to the
values of the following table.
Dened values Offset delay
OPEN G: 0 S, Cp: 82 fF 0 s
SHORT Rs: 0 Ω, Ls: 0 H 0 s
LOAD Rs: 50 Ω, Ls: 0 H 0 s
To use the IM9905’s LOAD dened value, use the Dened
Value Setting Application that came with the IM9905 to
congure the impedance analyzer with the dened value.
HIOKI IM9202A961-00

12
Making Measurements
Nut
Screw thread
33
3
Raise the screw thread by turning the nut on the
IM9906 Adapter
Nut
55
Open
calibration kit
4
Place the open calibration kit on the reference
surface.
5
As shown in gure, connect by turning only the nut
of open calibration kit while pressing the convex
portion on the top part of the open calibration kit.
The convex part of the open calibration kit is connected with
the internal conductor. If the calibration kit is rotated without
pressing the convex part, the internal conductors of calibration
kit and adapter may graze each other, and the calibration kit
and adapter may get damaged.
6
Execute open calibration by using the impedance
analyzer.
22
11
33
44
Nut
Short
calibration kit
99
7
Remove the open calibration kit by turning the nut of
the open calibration kit.
8
Place the short calibration kit on the reference
surface.
9
As shown in gure, connect by turning only the nut
of short calibration kit while pressing the convex
portion on the top part of the short calibration kit.
The convex part of the short calibration kit is connected with
the internal conductor. If the calibration kit is rotated without
pressing the convex part, the internal conductors of calibration
kit and adapter may graze each other, and the calibration kit
and adapter may get damaged.
HIOKI IM9202A961-00

13
Making Measurements
10
Execute short calibration by using the impedance
analyzer.
22
11
33
44
Load
calibration kit
1313
Nut
11
Remove the short calibration kit by turning the nut of
the short calibration kit.
12
Place the load calibration kit on the reference surface.
13
As shown in gure, connect by turning only the nut
of load calibration kit while pressing the top part of
the load calibration kit.
If the top part of the load calibration kit is rotated, the internal
conductors of the calibration kit and adapter may graze each
other, and the calibration kit and adapter may get damaged.
14
Execute load calibration by using the impedance
analyzer.
22
11
33
44
15
Remove the load calibration kit by turning the nut of
the load calibration kit.
HIOKI IM9202A961-00

14
Making Measurements
Attaching the Device
Attach the device to the IM9200 Test Fixture Stand and adapter.
Nut
Screw thread
11
1
Lower the screw thread by turning the nut of the
IM9906 Adapter
22
22
33
2
Loosen the stand xing knob.
3
Place the device on the IM9200 Test Fixture Stand.
As shown in gure, slide the notch part.
44
55
55
4
Turn the nut of the IM9906 Adapter and connect to the
device.
5
Tighten the stand xing knob.
HIOKI IM9202A961-00

15
Making Measurements
Electrical Length Correction
The error, caused by the phase shift occurring between the calibration reference surface and the
measurement DUT's connection surface is compensated.
Set the electrical length correction to 0 mm in the impedance analyzer.
11
22
33
44
HIOKI IM9202A961-00

16
Making Measurements
Short Correction
Short correction is performed to eliminate the device’s residual short impedance. The short plate is
used.
CAUTION
To prevent damage to the screw in the center of the short plate, orient the screw
perpendicularly before insertion and tighten with an appropriate amount of force.
About short impedance
At high frequencies, a DUT’s structure and dimensions exert a signicant effect on impedance
values.
DUTs have a variety of shapes and dimensions, and it is not possible to precisely dene a short
impedance that will accommodate all of those possibilities. Although short correction is performed
to correct for the residual impedance of the test xture, the fact that short impedance is undened
means measured values will incorporate an error component.
There are two methods for performing short correction of the test xture.
• Using a short device with the same shape as the DUT
The value after short correction is the difference in impedance between the DUT and the short
device. The short device’s impedance will affect measured values.
• Using a xed reference without regard to the size of the DUT
The value after short correction is the sum of the DUT’s impedance and the impedance caused by
the effects of the xture’s electrodes. The impedance of the xture’s electrodes affects measured
values.
The device use a xed reference to perform short correction without regard to the size of the DUT.
Consequently, measured values include the impedance of part of the xture’s base plate and of
the L-side electrode. Since a deterioration in the xture’s residual impedance will affect measured
values, it is recommended to check the residual impedance on a daily basis.
You can also prepare your own short device with the same shape as the DUT you plan to measure
and use it to perform short compensation.
However, be sure to use the same correction method when comparing measured values.
IMPORTANT
Do not scratch the electrode and short plate of the device or touch them directly with your hand.
It may affect the measurement accuracy and reproducibility.
HIOKI IM9202A961-00

17
Making Measurements
You will need:
• Flat-head screwdriver ×1 (not included with the device)
• Short plate ×1
• Tweezers ×1 (This is not included with the device. Tweezers which are thinner than the DUT size,
clean, and not magnetized are recommended.)
1
Set the reference value of correction (COMPEN) in
the impedance analyzer.
By default, the impedance analyzer is congured using the
values shown in the following table. Use the device’s short
correction and open correction dened values shown in the
following table.
OPEN G: 0 S, Cp: 0 F
SHORT Rs: 0 Ω, Ls: 0 H
L-side SMD
electrode
Knob
Knob
Electrodes for SMD measurement
Base plate
H-side lead
component clip
Screws
Electrodes and clips for lead component
measurement
Knob
L-side lead
component
electrode
Base plate
2
(If electrodes and clips for lead component
measurement have been installed)
Remove the H-side lead component clip and L-side
lead component electrode from the base plate.
Using a screwdriver, remove the H-side lead component
clip. Turn the knob to remove the L-side lead component
electrode.
(If the SMD measurement electrodes have been
installed)
Remove the L-side SMD electrode from the base
plate.
Turn the knob and remove the L-side SMD electrode.
Screw
Short plate
3
Using a at-head screwdriver, install the short plate.
Tighten the short plate’s screw to the correct position. If the
screw catches partway, do not force it, but rather back it
out and then attempt to tighten it again after inserting it in a
perpendicular orientation.
Screw in correct position
Partially tightened screw
View from beside the plate
HIOKI IM9202A961-00

18
Making Measurements
4
Execute short correction by using the impedance
analyzer.
When the correction cannot be executed:
• Conrm that the IM9906 Adapter is connected
properly.
• Check that the DC measurement limit value of the
impedance analyzer is appropriate.
11
22
3344
55
66
5
Using a at-head screwdriver, remove the short
plate.
HIOKI IM9202A961-00
Table of contents
Other Hioki Test Equipment manuals

Hioki
Hioki 3255 User manual

Hioki
Hioki 3660 User manual

Hioki
Hioki MEMORY HiCORDER 8855 User manual

Hioki
Hioki 3030-10 User manual

Hioki
Hioki ST5680 User manual

Hioki
Hioki 3237 User manual

Hioki
Hioki 3415-01 User manual

Hioki
Hioki 3281 User manual

Hioki
Hioki BT3554-50 User manual

Hioki
Hioki IM9201 User manual

Hioki
Hioki 3636-20 User manual

Hioki
Hioki 3257-50 User manual

Hioki
Hioki MR8827 User manual

Hioki
Hioki ST5680 User manual

Hioki
Hioki 3504 User manual

Hioki
Hioki 3522-50 User manual

Hioki
Hioki FT6031-03 User manual

Hioki
Hioki FT6381 User manual

Hioki
Hioki MO HiTESTER 3452 User manual

Hioki
Hioki 3159 User manual