manuals.online logo
Brands
  1. Home
  2. •
  3. Brands
  4. •
  5. Saxby Lighting
  6. •
  7. Lighting Equipment
  8. •
  9. Saxby Lighting 108750 User manual

Saxby Lighting 108750 User manual

Battery Replacement
Live Voltages may be present in this unit even when turned off or when completely disconnected. We recommend cleaning with a soft dry cloth. Do not use
solvents or abrasive cleaners as these could damage the finish. For your safety, always switch off the power supply before cleaning.
www.saxbylighting.com
Instruction manual
108750
Sight 6-in-1
Care and Safety
Wiring
• This product is double insulated and must not be earthed. If there are any incoming earth cables, they must be joined together and well insulated with good
quality insulation tape. This is to ensure earth continuity throughout your property.
• Having correctly identified the wiring from your existing light fitting, connect to the quick fit connection block in the following way.
Check that...
• You have correctly identified the wires.
• The connections are tight.
• No loose strands have been left out of the connection block.
If after routine operation check, the lamp does not remain lit for the three hour period, a new battery pack may be required.
• Switch off the electricity at the mains, both switched and permanent supply.
• Allow batteries to fully discharge then reconnect to supply and allow to charge for 24 hours.
• Test again for 3 hours, if light does not remain lit change the battery pack as follows:
- Disconnect from the mains supply both permanent and switched supply.
- Undo the screw at the end of the product, open the rear casing by using the slotted screwdriver. Keep screws in safe place for refitting later.
- Unplug the battery lead from the lead coming from the PCBA. Remove any cable ties around the cables.
- Remove the battery pack and lift the battery pack out of the fitting. Waste electrical products should not be disposed of with household waste.
Please recycle where facilities exist. Check with your local authority or retailer for recycling advice.
- Replace the battery with a LiFePO4 3.2V 600mAh only. Use of a different type of battery will damage the product.
- Write current date on the new battery pack.
- Fit new battery pack in position. Refit the cable ties in position and then plug battery pack into the PCBA. Attention not to remove the cushion of stability
- Replacing the rear casing, then secure it with screws.
- Restore power and allow to charge for 24 hours.
- Perform full operation check and update test record.
PERMANENT LIVE
NEUTRAL BLUE(N)
BROWN(L)
LIGHT FITTING
SUPPLY
6-IN-1
Ceiling
mounted
Wall flag
mounted
Track
mounted
Wall
mounted
Suspended
mounted
Recessed
mounted
V1 20/09/2023
EU Manufacturer: Brilliant AG,
Brilliantstrasse 1, D-27442 Gnarrenburg
UK Manufacturer: BH17 7BY
•Default working mode:
maintained working mode
•If using non-maintained
working mode, keep "P1"
jump connected.
P1 P1
These products should not be fitted to PIR circuits or short duration
timed switches.
Install in accordance with the IEE Wiring regulations and current Building
Regulations.
This light fitting is double insulated and does
not require connection to an Earth circuit.
Plan the desired layout of these fittings carefully, ensuring the cables will reach the distances between fittings.
Avoid locating any cables in positions that would cause a hazard. Position cables away from areas where they may be
at risk from being cut, trapped or damaged
The mains supply cable must have a minimum cross section area of 1.0mm2.
This product is designed to be fitted into a suspended ceiling or wall mounted.
220-240V~, 50Hz
Supply
Voltage:
The light source of this luminaire is not replaceable; when the
light source reaches its end of life the whole luminaire shall
be replaced.
Conformity with all relevant EC Directive requirements.
The power supply is Double Insulated and does not require connection to an Earth circuit.
Waste electrical products should not be disposed of with household waste. Please recycle where facilities
exist. Check with your Local Authority or local store for recycling advice.
Any faulty, broken or damaged modules should be replaced immediately.
Waste electrical products should not be disposed of with household waste. Please
recycle where facilities exist. Check with your local authority or retailer for
recycling advice.
Do not use Megger or similar high voltage instruments. Due to the fact this
Emergency pack contains electronic components that maybe damaged by high test
voltages, they must be disconnected from the circuit before testing.
To prevent damage to the Emergency pack, do not mix with conventional magnetic
ballasts on the same electrical circuit.
Please read these instructions carefully before commencing any work
This unit must be fitted by a competent and qualified electrician.
Check the pack and make sure you have all the parts listed.
To prevent electrocution switch off at the mains supply before installing or
maintaining this fitting. Ensure other persons cannot restore the electrical
supply without your knowledge. If you are in any doubt, please consult a
qualified electrician.
This light fitting should be connected to a fused circuit.
If replacing an existing fitting, make a careful note of the connections.
This product is not suitable for dimming.
Bulb
Type:
3.5W LED (SMD), 6500K Lumens: 110Lm - 50Lm in EM mode
Duration: 3 hours (180 minutes)
Maximum Operatin Humidity: 10-70%
Change over Time: Approximately 1s
Battery Specification: LiFePO4 3.2V 600mAh
Battery Charge Time: 24 hours
Battery warranty: 5 years
Operating Temperature: 0ºC to 45ºC
Warning
Thank you for purchasing this light fitting. Please read the instructions carefully before use to ensure safe and satisfactory
operation of this product. Please retain these instructions for future reference.
Layout
Installation
Technical data
Conformity with all relevant UKCA Directive requirements.
Do not mount in hazardous locations, or near gas or electric heaters; Do not let
power cords touch hot surface; Do not use this equipment for other than intended
use.
Equipment should be mounted in locations and at heights where it will not be
subjected to tampering by unauthorized personnel.
The use of accessory equipment not recommend by the manufactuer may cause an
unsafe condition.
Allow battery to charge for 24 hours before first use.
Existing fittings must be completely removed before installation of a new product. Before removing the existing fitting, carefully note the position of each set of wires.
Note that the switch is turned off before installation.
After deciding the layout of the light fittings ensure that the cables are long enough to connect to desired positions.
Connect wires properly to the terminal at the bottom of the luminaire.
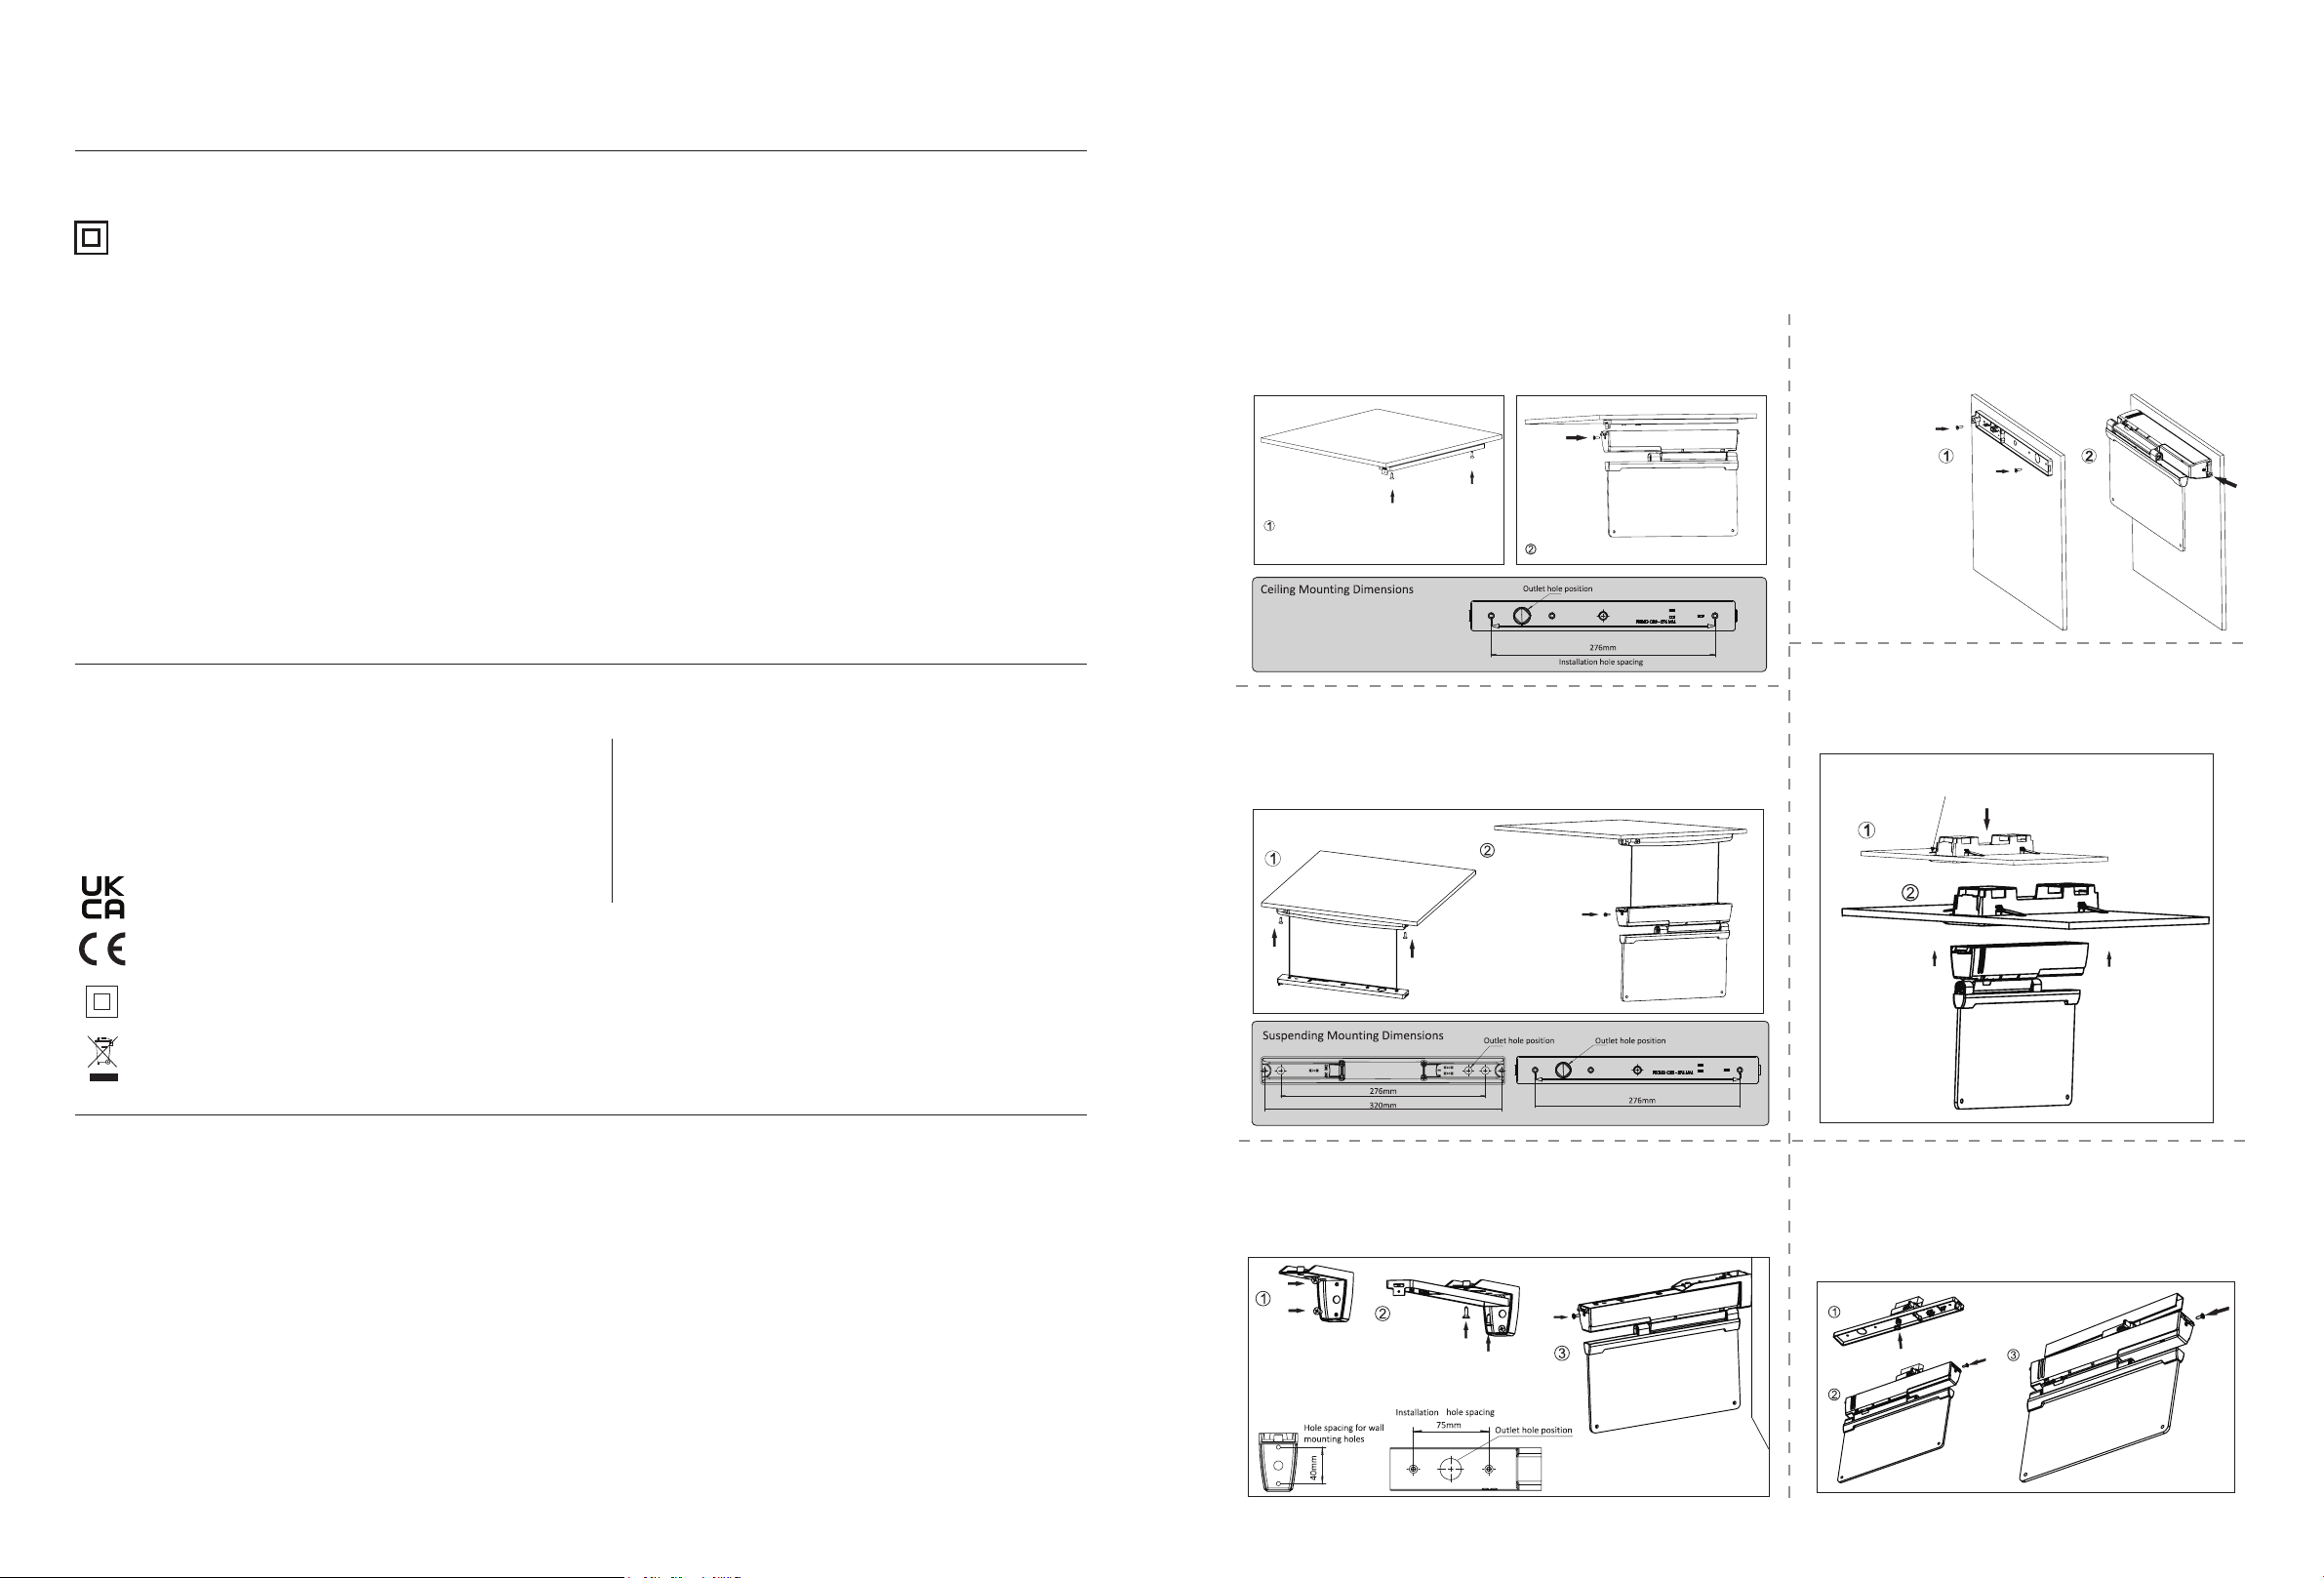
This product can has 6 mounted options in combination with the corresponding accessories: Ceiling mounted, Wall flag mounted, Track mounted,
Wall mounted, Suspended mounted and Recessed mounted. Choose your preferred location and follow the relevant instructions listed below and referring to
the corresponding drawings.
1. Ceiling Mounted
• Please install the bottom kit on to the ceiling.
• Click the luminaire main body into the bottom kit, then fasten the screw on the side.
3. Suspended Mounted
5. Wall Flag Mounted (purchase accessory 108752 separately)
• Use 2 steel cables to go through bottom kit and fix the cable on bottom kit, install
the suspending bracket on the ceiling.
• Click the luminaire main body into the bottom kit, then fasten the screw on the side.
• Install the flag mounting kit onto the side wall.
• Fix the bottom kit with the flag mounting kit with screws.
• Click the luminaire main body into the bottom kit, then fasten the screw on the side.
6. Track Mounted (purchase accessory 108753 separately)
• Fix the bottom part onto the track adaptor and wiring.
• After wiring, fix the lumianire main body into the bottom kit, then
fasten the screw on the side.
• Install the track adapter into the tracking system ( 3 phase).
2. Wall Mounted
• Please install the bottom kit on to the ceiling.
• Click the luminaire main body into the bottom kit, then fasten the
screw on the side.
4. Recessed Mounted (purchase accessory 108751 separately)
• Install the recessing mounting kit into the cutting hole properly.
• Connect the wire into the luminaire, and fix the luminaire into
recessing mounting kit.
Cut hole : 335 x 57mm
Minimum cavity depth : 52mm

Other Saxby Lighting Lighting Equipment manuals

Saxby Lighting Sight Twin Spot Manual

Saxby Lighting

Saxby Lighting Sight Twin Spot Manual

Saxby Lighting Aqualine Kit Manual

Saxby Lighting

Saxby Lighting Aqualine Kit Manual

Saxby Lighting 67360 User manual

Saxby Lighting

Saxby Lighting 67360 User manual

Saxby Lighting 13889 User manual

Saxby Lighting

Saxby Lighting 13889 User manual

Saxby Lighting 75930 User manual

Saxby Lighting

Saxby Lighting 75930 User manual

Saxby Lighting 101626 User manual

Saxby Lighting

Saxby Lighting 101626 User manual

Saxby Lighting OrionPRO LED IP20 User manual

Saxby Lighting

Saxby Lighting OrionPRO LED IP20 User manual

Saxby Lighting 98440 User manual

Saxby Lighting

Saxby Lighting 98440 User manual

Saxby Lighting E27 LED GLS Manual

Saxby Lighting

Saxby Lighting E27 LED GLS Manual

Saxby Lighting 103253 User manual

Saxby Lighting

Saxby Lighting 103253 User manual

Saxby Lighting Kios 2 User manual

Saxby Lighting

Saxby Lighting Kios 2 User manual

Saxby Lighting 81572 User manual

Saxby Lighting

Saxby Lighting 81572 User manual

Saxby Lighting 74824 Manual

Saxby Lighting

Saxby Lighting 74824 Manual

Saxby Lighting Lucca Wall User manual

Saxby Lighting

Saxby Lighting Lucca Wall User manual

Saxby Lighting Axial Rectangular User manual

Saxby Lighting

Saxby Lighting Axial Rectangular User manual

Saxby Lighting Odyssey Spike User manual

Saxby Lighting

Saxby Lighting Odyssey Spike User manual

Saxby Lighting 79192 User manual

Saxby Lighting

Saxby Lighting 79192 User manual

Saxby Lighting Varone 55702 Manual

Saxby Lighting

Saxby Lighting Varone 55702 Manual

Saxby Lighting Square Wall 39627 Manual

Saxby Lighting

Saxby Lighting Square Wall 39627 Manual

Saxby Lighting Severus CCT User manual

Saxby Lighting

Saxby Lighting Severus CCT User manual

Saxby Lighting 51994 Manual

Saxby Lighting

Saxby Lighting 51994 Manual

Saxby Lighting Albus CCT User manual

Saxby Lighting

Saxby Lighting Albus CCT User manual

Saxby Lighting 13929 User manual

Saxby Lighting

Saxby Lighting 13929 User manual

Saxby Lighting SMART IKON User manual

Saxby Lighting

Saxby Lighting SMART IKON User manual

Popular Lighting Equipment manuals by other brands

FLOS OK F4640019 Assembly

FLOS

FLOS OK F4640019 Assembly

Chauvet DJ Festoon String instructions

Chauvet DJ

Chauvet DJ Festoon String instructions

Aladdin AMS-FL50B1 product manual

Aladdin

Aladdin AMS-FL50B1 product manual

Triton Blue WALLY 12 user manual

Triton Blue

Triton Blue WALLY 12 user manual

Hypnocube HypnoSquare instructions

Hypnocube

Hypnocube HypnoSquare instructions

LITESHEET BriteCor AC BWB installation manual

LITESHEET

LITESHEET BriteCor AC BWB installation manual

Code 3 LED X 2100 Installation & operation manual

Code 3

Code 3 LED X 2100 Installation & operation manual

Cognex In-Sight 5000 Series manual

Cognex

Cognex In-Sight 5000 Series manual

Somogyi Elektronic home NGA 02 instruction manual

Somogyi Elektronic

Somogyi Elektronic home NGA 02 instruction manual

NEXTLED 3-IN-1 Quick Connect Light Kit Owner's instructions

NEXTLED

NEXTLED 3-IN-1 Quick Connect Light Kit Owner's instructions

Monzana GHAT05 instructions

Monzana

Monzana GHAT05 instructions

BenQ ScreenBar Halo user guide

BenQ

BenQ ScreenBar Halo user guide

GTD GTD-L1254P user manual

GTD

GTD GTD-L1254P user manual

HEITECH BIKE 180A manual

HEITECH

HEITECH BIKE 180A manual

LUG LUGCLASSIC SLIM LB LED Installation instruction

LUG

LUG LUGCLASSIC SLIM LB LED Installation instruction

Generac Power Systems CTF 10m owner's manual

Generac Power Systems

Generac Power Systems CTF 10m owner's manual

Quantum ELMRW LP220L SGL manual

Quantum

Quantum ELMRW LP220L SGL manual

German Light Product Mini Patend instruction manual

German Light Product

German Light Product Mini Patend instruction manual

manuals.online logo
manuals.online logoBrands
  • About & Mission
  • Contact us
  • Privacy Policy
  • Terms and Conditions

Copyright 2025 Manuals.Online. All Rights Reserved.