EnglishDeutsch
 logo
Brands
  1. Home
  2. •
  3. Brands
  4. •
  5. Saxby Lighting
  6. •
  7. Lighting Equipment
  8. •
  9. Saxby Lighting 73796 User manual

Saxby Lighting 73796 User manual

Other Saxby Lighting Lighting Equipment manuals

Saxby Lighting 75930 User manual

Saxby Lighting

Saxby Lighting 75930 User manual

Saxby Lighting 13889 User manual

Saxby Lighting

Saxby Lighting 13889 User manual

Saxby Lighting Lucca Mini User manual

Saxby Lighting

Saxby Lighting Lucca Mini User manual

Saxby Lighting 73721 Manual

Saxby Lighting

Saxby Lighting 73721 Manual

Saxby Lighting Sight 3 in 1 Manual

Saxby Lighting

Saxby Lighting Sight 3 in 1 Manual

Saxby Lighting IkonPRO CCT User manual

Saxby Lighting

Saxby Lighting IkonPRO CCT User manual

Saxby Lighting 67360 User manual

Saxby Lighting

Saxby Lighting 67360 User manual

Saxby Lighting RULAR CCT User manual

Saxby Lighting

Saxby Lighting RULAR CCT User manual

Saxby Lighting 14008 User manual

Saxby Lighting

Saxby Lighting 14008 User manual

Saxby Lighting 43810 Manual

Saxby Lighting

Saxby Lighting 43810 Manual

Saxby Lighting OrionSMART User manual

Saxby Lighting

Saxby Lighting OrionSMART User manual

Saxby Lighting 46393 Manual

Saxby Lighting

Saxby Lighting 46393 Manual

Saxby Lighting Pillo Plus CCT User manual

Saxby Lighting

Saxby Lighting Pillo Plus CCT User manual

Saxby Lighting Sight Twin Spot Manual

Saxby Lighting

Saxby Lighting Sight Twin Spot Manual

Saxby Lighting 75272 Manual

Saxby Lighting

Saxby Lighting 75272 Manual

Saxby Lighting 79192 User manual

Saxby Lighting

Saxby Lighting 79192 User manual

Saxby Lighting 73347 User manual

Saxby Lighting

Saxby Lighting 73347 User manual

Saxby Lighting Lucca Wall User manual

Saxby Lighting

Saxby Lighting Lucca Wall User manual

Saxby Lighting Albus CCT User manual

Saxby Lighting

Saxby Lighting Albus CCT User manual

Saxby Lighting 13801 User manual

Saxby Lighting

Saxby Lighting 13801 User manual

Saxby Lighting Odyssey Spike Manual

Saxby Lighting

Saxby Lighting Odyssey Spike Manual

Saxby Lighting Reeve 2 Manual

Saxby Lighting

Saxby Lighting Reeve 2 Manual

Saxby Lighting 73666 Manual

Saxby Lighting

Saxby Lighting 73666 Manual

Saxby Lighting 51994 Manual

Saxby Lighting

Saxby Lighting 51994 Manual

Popular Lighting Equipment manuals by other brands

Brizo 8SP-MU-4 manual

Brizo

Brizo 8SP-MU-4 manual

LUCE&LIGHT BROM 1.0 installation instructions

LUCE&LIGHT

LUCE&LIGHT BROM 1.0 installation instructions

IKEA BJÖRKSPIREA manual

IKEA

IKEA BJÖRKSPIREA manual

Laserworld Evolution Series ES-400RGB manual

Laserworld

Laserworld Evolution Series ES-400RGB manual

EuroLite LED B-40 user manual

EuroLite

EuroLite LED B-40 user manual

Qazqa Suplux SL 3 Black 103062 instruction manual

Qazqa

Qazqa Suplux SL 3 Black 103062 instruction manual

Commercial Electric 54568141 Use and care guide

Commercial Electric

Commercial Electric 54568141 Use and care guide

CREE LIGHTING 304 Series installation instructions

CREE LIGHTING

CREE LIGHTING 304 Series installation instructions

Goobay 49867 user manual

Goobay

Goobay 49867 user manual

ECOMAN ITALIA LED T8 instruction manual

ECOMAN ITALIA

ECOMAN ITALIA LED T8 instruction manual

Alkalite Krypton KT-81 user manual

Alkalite

Alkalite Krypton KT-81 user manual

Clas Ohlson GU10 manual

Clas Ohlson

Clas Ohlson GU10 manual

DTS DELTA 10 F user manual

DTS

DTS DELTA 10 F user manual

ring Solar Steplight manual

ring

ring Solar Steplight manual

One Stop Gardens 57696 Owner's manual & safety instructions

One Stop Gardens

One Stop Gardens 57696 Owner's manual & safety instructions

SIREM Swimeo A2 instructions

SIREM

SIREM Swimeo A2 instructions

Silvair MESH-CEDRP quick start guide

Silvair

Silvair MESH-CEDRP quick start guide

S&P PCRL80 manual

S&P

S&P PCRL80 manual

https://manuals.online logo
https://manuals.online logoBrands
  • About & Mission
  • Contact us
  • Privacy Policy
  • Terms and Conditions

Copyright 2026 Manuals.Online. All Rights Reserved.

www.saxbylighting.com
Instruction manual
73796
Slight Box
Care and Safety
Technical data
220-240 V~, 50 Hz
Supply
Voltage:
Bulb
Type: 1.5W LED (SMD), 6500K
This is a Class 1 product and must be earthed.
Waste electrical products should not be disposed of with household waste. Please recycle where facilities
exist. Check with your Local Authority or local store for recycling advice.
V4 21/03/2022
EU Manufacturer: Brilliant AG,
Brilliantstrasse 1, D-27442 Gnarrenburg
UK Manufacturer: BH17 7BY
Battery Replacement
• Switch off the electricity at the mains, both switched and permanent supply.
• Allow batteries to fully discharge then reconnect to supply and allow to charge for 24 hours.
• Test again for 3 hours, if light does not remain lit change the battery pack as follows:
If after routine operation check, the lamp does not remain lit or the three hour period, a new battery pack may be required.
- Undo the two screws at the end of the unit, remove the end
plate, slide off the cover and set aside.
- Unplug the battery lead from the lead coming from the PCB.
Remove any cable ties around the cables.
- Lift the unit off the wall, and undo the two screws on the rear
holding the battery in place. Remove the battery pack. Waste
electrical products should not be disposed of with household
waste. Please recycle where facilities exist. Check with your
local authority or retailer for recycling advice.
- Replace the battery with a 3.6V 900mAh Ni-Cd only. Use
of a different type of battery will damage the product.
- Write current date on the new battery pack.
- Fit the new battery pack in position and re-secure using the
screws set aside earlier. Refit the cable ties in position and then
plug battery pack into the PCB.
- Refit the unit on the wall.
- Perform full operation check and update test record.
- Slide in the shade. Refit end panel and screws.
- Restore power and allow to charge for 24 hours.
Live Voltages may be present in this unit even when turned off or when completely disconnected.
We recommend cleaning with a soft dry cloth. Do not use solvents or abrasive cleaners as these could damage the finish.
For your safety, always switch off the power supply before cleaning.
This bulb is protected by a shade. This part must be replaced immediately should the shade become
cracked or damaged. This fitting must not be used without the shade in place.
Replace Cracked Shade
The light source of this luminaire is not replaceable; when the
light source reaches its end of life the whole luminaire shall
be replaced.
Duration: 3 hours (180 minutes)
Operating Temperature: -5 ºC to 50 ºC
Maximum Operatin Humidity: 10-90%
Change over Time: Approximately 1s
Battery Specification: 3.6V 900mAh Ni-Cd
Battery Charge Time: 24 hours
Battery warranty: 2 years
This product is not suitable for dimming.
Conformity with all relevant EC Directive requirements.
Conformity with all relevant UKCA Directive requirements.
Warning
Thank you for purchasing this light fitting. Please read the instructions carefully before use to ensure safe and satisfactory
operation of this product. Please retain these instructions for future reference.
These products should not be fitted to PIR circuits or short duration timed switches.
Install in accordance with the IEE Wiring regulations and current Building Regulations.
This is a Class 1 product and must be earthed.
Any faulty, broken or damaged modules should be replaced immediately.
Waste electrical products should not be disposed of with household waste. Please recycle where facilities exist. Check with
your local authority or retailer for recycling advice.
Do not use Megger or similar high voltage instruments. Due to the fact this Emergency pack contains electronic
components that maybe damaged by high test voltages, they must be disconnected from the circuit before testing.
To prevent damage to the Emergency pack, do not mix with conventional magnetic ballasts on the same electrical circuit.
Please read these instructions carefully before commencing any work
This unit must be fitted by a competent and qualified electrician.
Check the pack and make sure you have all the parts listed.
To prevent electrocution switch off at the mains supply before installing or maintaining this fitting. Ensure other persons
cannot restore the electrical supply without your knowledge.
This light fitting should be connected to a fused circuit.
If replacing an existing fitting, make a careful note of the connections.
Plan the desired layout of these fittings carefully, ensuring the cables will reach the distances between each light fitting.
Avoid locating any cables in positions that would cause a hazard. Position cables away from areas where they may be
at risk from being cut, trapped or damaged
Cables in walls must be protected using the suitable conduit or plastic trunking.
The mains supply cable must have a minimum cross section area of 1.0mm2.
Layout
Existing fittings must be completely removed before installation of a new product. Before removing the existing fitting, carefully
note the position of each set of wires.
Note that the switch is turned off before installation.
After deciding the layout of the light fittings ensure that the cables are long enough to connect to desired positions.
• Undo the screws at the right hand end of the fitting and lift cover off and set aside.
• Pull the cable through the cable entry hole and wire as detailed Wiring Diagram.
Installation
• Using the unit as a template mark the position of the fixing holes. Take care to avoid damaging any concealed wiring and pipes.
The correct fixings should be used, depending upon the surface to be mounted.
• Remove the plastic plug from one of the cable entry holes.
• Slide out the front panel.
Wiring
Having correctly identified the wiring from your existing light fitting, Pull the wire through hole and connect to the connetion
block inside the product in the following way:
Check that...
• You have correctly identified the wires.
• The connections are tight.
• No loose strands have been left out of the connection block.
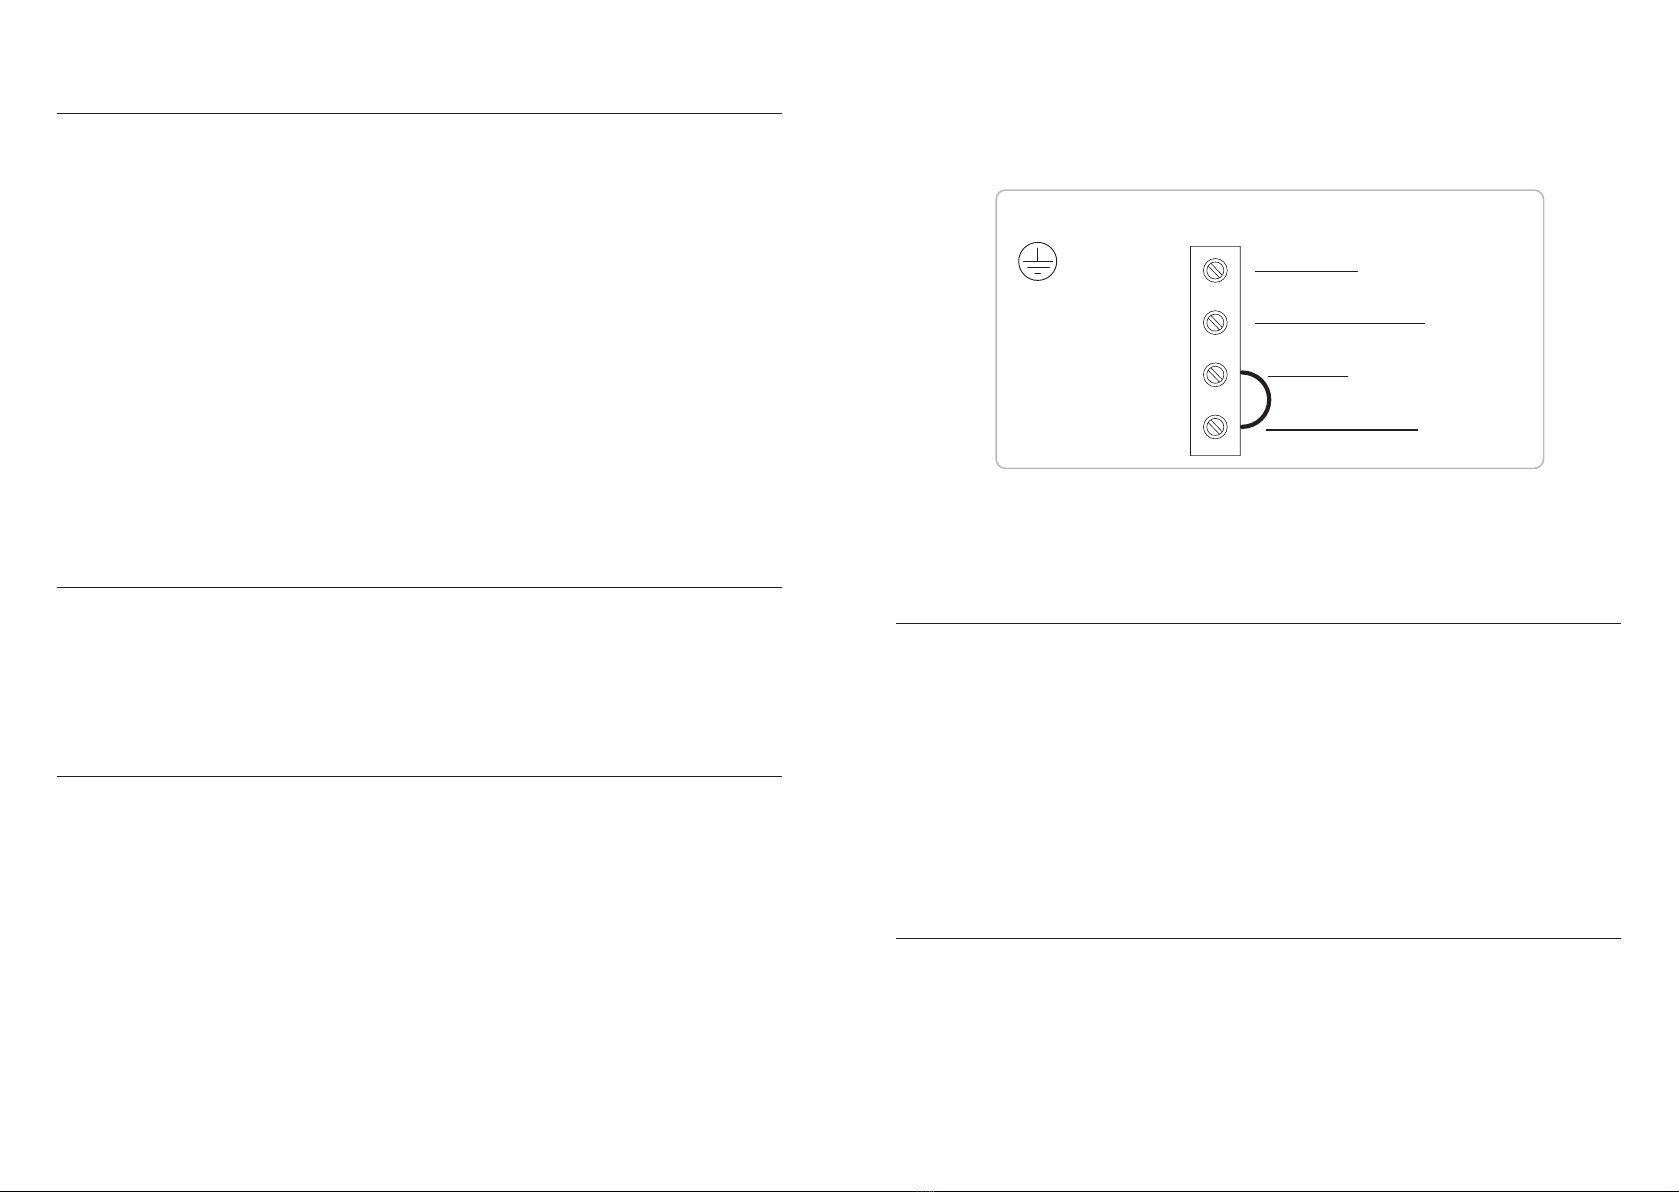
Maintained Wiring:
PERMANENT LIVE (L1)
NEUTRAL
EARTH (GREEN/YELLOW)
SWITCHED LIVE (L2)
NEUTRAL TERMINAL
LIVE TERMINAL
EARTH TERMINAL
SUPPLYLIGHT FITTING
• This unit works in maintained mode. the lamp can be switched separately on or off. The unit will charge automatically. The
lamp remains on when the supply is interrupted.
• Remove the link from between the terminals marked "SW" and connect cables to and from switch.
• Replace fuse or circuit breaker and switch on. Ensure that the source is mains (220-240V~ 50Hz).
• Verify that the LED is illuminated; this confirms that the batteries are charging.
• Charge the battery for at least 24 hours before first use.
• If the LED is not illuminated the there may be A.C. supply, the battery has not been connected properly or the internal circuit
may have failed.
• The battery should be re-charged and checked every three months.
• The battery should be discharged and the duration of the lamp in emergency mode checked every six months.
• This product comes with 3 different arrow slides. Slide in chosen slide. Refit end panel and screws.
• Replace fuse or circuit breaker and switch on. Your light is now ready for use.
Commissioning
Operation