manuals.online logo
Brands
  1. Home
  2. •
  3. Brands
  4. •
  5. Steelcase
  6. •
  7. Indoor Furnishing
  8. •
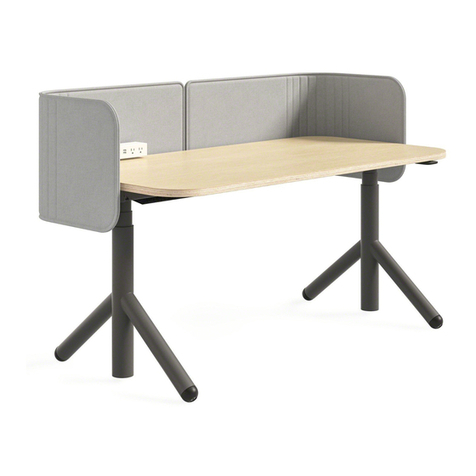
  9. Steelcase Manifesto Airtouch Height Adjustable Desk User manual

Steelcase Manifesto Airtouch Height Adjustable Desk User manual

Manifesto - Airtouch Height Adjustable Desk
April 2012 Page 1 of 10
Hardware Bag Hardware Bag
Power Adjustment Tool packed with an
Airtouch unit
Manifesto - Airtouch Height Adjustable Desk
April 2012 Page 2 of 10
Adjusting Airtouch Power
1a. Install users computer and other worktools.
Important: If the users equipment is not available,
adjust the power to the mid point.
1b. Determine if more or less power is required:
tRelease the brake handle and adjust worksurface to its maximum height
(fully extended).
tIf the worksurface feels heavy (difficult to raise), more mechanism power is
required.
tIf the worksurface moves upward and is difficult to lower, less mechanism
power is required.
1c. Adjust the mechanism’s power as required.
For large (coarse) adjustments, a cordless drill should be used by revers-
ing a screwdriver bit holder and using the 1/4” hex drive to adjust the
mechanism.
1d. Turn the adjustment in the proper direction (clockwise for more output force
and counterclockwise for less output force) between 10 to 20 turns and
recheck the balance of the worksurface (step 3b), repeat as necessary.
1e. After properly adjusting the power setting, reinstall the power adjustment tool
into the holding clips, located beneath the worksurface mounting plate.
Note: The power adjustment system incorporates a clutch that will provide a ‘click-
ing’ noise when the mechanism has been adjusted to its minimum or maximum
setting.
Coarse Adjustment Fine Adjustment
Manifesto - Airtouch Height Adjustable Desk
April 2012 Page 3 of 10
Airtouch Assembly
CAUTION
Fully extend the unit before removing the phillips
drive fasteners that attach the base and worksur-
face to the mechanism. Failure to do so could acti-
vate the mechanism and result in personal injury.
CAUTION
Fully extend the unit before assembling. Failure to
do so could activate the mechanism and result in
personal injury.
1. Remove the two (2) #10 shipping screws and discard. Squeeze the
release handle to allow the unit to extend.
Note: Unit will extend quickly, at a controlled
rate of speed. Use a #3 phillips drive bit to
remove five (5) 1/4-20 x 1” pan head screws
(3a). Remove top plate (3b).
Note: Do not discard screws.
Thismechanismisoptimizedtosupport
25poundswitha maximum limitof
40pounds.Thisunitwillautomatically
lowerwhenan excessive loadisplaced
ontheworksurface.
939500181revA
Airtouch
PrintedinUSA
tm
Thismechanismisoptimizedtosupport
25poundswithamaximum limitof
40pounds.Thisunitwillautomatically
lowerwhen an excessiveload isplaced
ontheworksurface.
939500181revA
Airtouch
PrintedinUSA
tm
Thismechanismisoptimizedtosupport
25poundswitha maximum limit of
40pounds.T hisunitwillautomatically
lowerwhenanexcessiveloadisplaced
onthe worksurface.
939500181revA
Airtouch
PrintedinUSA
tm
1 2
3a
3b
#10 SHIPPING
SCREWS
TOP PLATE
Manifesto - Airtouch Height Adjustable Desk
April 2012 Page 4 of 10
Airtouch Assembly
4. Install glides, 4 places. Screw glides all the way in.
CAUTION
Be careful not to cross-thread glides upon
installation.
5. With the column standing upright, place the base
over the column and through the opening in the
base.
Carefully move it to the bottom of the column.
Note: The two (2) channels are located at
the rear of the unit and the single channel is
located at the front of the unit.
6. Lay unit down on clean surface as shown.
7. Attach the column to the bottom of the base us-
ing eleven (11) 1/4-20 x 1” flat head countersunk
screws provided in the hardware package.
Note: Ensure the base is completely flat to
confirm stability during used.
4X
4
Thismechanismisoptimizedto support
25poundswithamaximumlimitof
40pounds.Thisunitwillautomatically
lowerwhenanexcessiveloadisplaced
ontheworksurface.
939500181revA
Airtouch
PrintedinUSA
tm
Thismechanismisoptimizedtosupport
25poundswithamaximumlimitof
40pounds.Thisunitwillautomatically
lowerwhenanexcessiveloadisplaced
ontheworksurface.
939500181revA
Airtouch
PrintedinUSA
tm
5
Thismechanismisoptimizedtosupport
25poundswithamaximumlimit of
40pounds.Thisunitwillautomatically
lowerwhenanexcessiveloadisplaced
ontheworksurface.
939500181revA
Airtouch
PrintedinUSA
tm
939500181revA
PrintedinUSA
Thismechanismisoptimizedtosupport
25poundswithamaximumlimitof
40pounds.Thisunitwillautomatically
lowerwhenanexcessiveloadisplaced
ontheworksurface.
939500181revA
Airtouch
PrintedinUSA
tm
6
Thismechanismisoptimizedtosupport
25poundswithamaximumlimitof
40pounds.Thisunitwillautomatically
lowerwhenanexcessiveloadisplaced
ontheworksurface.
939500181revA
Airtouch
PrintedinUSA
tm
7
NOTE: These two (2)
screws go into tapped
holes in the steel
reinforcing plates. To
avoid stripping, install
with not more than 10
in-lb of torque.
Manifesto - Airtouch Height Adjustable Desk
April 2012 Page 5 of 10
Airtouch Assembly
8. Install trim ring.
9. Install top cap by sliding down column and snap-
ping into place.
Thismechanismisoptimizedtosupport
25poundswithamaximumlimitof
40pounds.Thisunitwillautomatically
lowerwhenanexcessiveloadisplaced
ontheworksurface.
939500181revA
Airtouch
PrintedinUSA
tm
Thismechanismisoptimizedtosupport
25poundswithamaximumlimitof
40pounds.Thisunitwillautomatically
lowerwhenanexcessiveloadisplaced
ontheworksurface.
939500181revA
Airtouch
PrintedinUSA
tm
8 9
Manifesto - Airtouch Height Adjustable Desk
April 2012 Page 6 of 10
Thismechanismisoptimizedtosupport
25poundswithamaximumlimitof
40pounds.Thisunitwillautomatically
lowerwhenanexcessiveloadisplaced
ontheworksurface.
939500181revA
Airtouch
PrintedinUSA
tm
10 11
Airtouch Assembly
10. Remove plate from worksurface. Do not discard
screws.
11. Begin re-installing the top plate by sliding the brake
cable into the slot on the top plate then lower-
ing the top plate onto the top of the column and
attach the top plate using five (5) 1/4-20 x 1” pan
head screws.
Manifesto - Airtouch Height Adjustable Desk
April 2012 Page 7 of 10
12 13
Airtouch Assembly
12. Place the Column Assembly onto the Worksurface.
13. Push it into the Waterline Slot (at the side with
screw holes)
Thismechanismisoptimizedtosupport
25poundswithamaximumlimitof
40pounds.Thisunit willautomatically
lowerwhenanexcessiveloadisplaced
ontheworksurface.
939500181revA
Airtouch
PrintedinUSA
tm
Thismechanismisoptimizedtosupport
25pounds withamaximumlimitof
40pounds.Thisunit willautomatically
lowerwhenanexcessiveloadisplaced
ontheworksurface.
939500181revA
Airtouch
PrintedinUSA
tm
Manifesto - Airtouch Height Adjustable Desk
April 2012 Page 8 of 10
14 15
Airtouch Assembly
14. Screw the plate to the worksurface.
15. Route the cable and screw the handle. Fix the
cable clips.
Note: Ensure the cable is routed properly
without kinks to prevent the failure of mecha-
nism.
Thismechanismisoptimizedtosupport
25poundswith amaximumlimitof
40pounds.Thisunit willautomatically
lowerwhenanexcessiveloadisplaced
ontheworksurface.
939500181revA
Airtouch
PrintedinUSA
tm
Thismechanismisoptimizedtosupport
25pounds withamaximumlimit of
40pounds.Thisunitwillautomatically
lowerwhenanexcessiveloadisplaced
ontheworksurface.
939500181revA
Airtouch
PrintedinUSA
tm
Manifesto - Airtouch Height Adjustable Desk
April 2012 Page 9 of 10
Installing and Removing Handle from Cable
1. Slide the cable between the tubing on the keyboard mechanism
and the bottom side of monitor top. Insert the cable through the
hole in the outer handle housing.
2. Slide the cylindrical tip of the cable through the hole in the
handle and twist the handle into the correct position.
1 2
Manifesto - Airtouch Height Adjustable Desk
April 2012 Page 10 of 10
Installing and Removing Handle from Cable
3. Place the handle, with cable attached,
into the outer handle housing as shown.
4. Secure the cable to the outer handle
housing by pushing the cable to the left
until the cable snaps securely into place.
3 4

Other Steelcase Indoor Furnishing manuals
Steelcase Moby2 User manual

Steelcase

Steelcase Moby2 User manual

Steelcase Arbor User manual

Steelcase

Steelcase Arbor User manual

Steelcase Reply User manual

Steelcase

Steelcase Reply User manual

Steelcase Migration SE Desk User manual

Steelcase

Steelcase Migration SE Desk User manual

Steelcase Cavatina Operating instructions

Steelcase

Steelcase Cavatina Operating instructions

Steelcase Series 1 User manual

Steelcase

Steelcase Series 1 User manual

Steelcase 42-DH-DA Firmware update

Steelcase

Steelcase 42-DH-DA Firmware update

Steelcase c:scape User manual

Steelcase

Steelcase c:scape User manual

Steelcase 464 Leap User manual

Steelcase

Steelcase 464 Leap User manual

Steelcase Share It Collaborative 4 FH Firmware update

Steelcase

Steelcase Share It Collaborative 4 FH Firmware update

Steelcase Series 1 User manual

Steelcase

Steelcase Series 1 User manual

Steelcase Player 475 Firmware update

Steelcase

Steelcase Player 475 Firmware update

Steelcase Share It Collaborative 5 FH Firmware update

Steelcase

Steelcase Share It Collaborative 5 FH Firmware update

Steelcase Cobi 434 Parts list manual

Steelcase

Steelcase Cobi 434 Parts list manual

Steelcase Protege 433 Firmware update

Steelcase

Steelcase Protege 433 Firmware update

Steelcase FrameOne Plus User manual

Steelcase

Steelcase FrameOne Plus User manual

Steelcase migration User manual

Steelcase

Steelcase migration User manual

Steelcase Ellipse User manual

Steelcase

Steelcase Ellipse User manual

Steelcase IMPACT Firmware update

Steelcase

Steelcase IMPACT Firmware update

Steelcase Player 475 Firmware update

Steelcase

Steelcase Player 475 Firmware update

Steelcase Ottima Portico Desk User manual

Steelcase

Steelcase Ottima Portico Desk User manual

Steelcase Player 475 User manual

Steelcase

Steelcase Player 475 User manual

Steelcase DOUBLE PEDESTAL DESK Firmware update

Steelcase

Steelcase DOUBLE PEDESTAL DESK Firmware update

Steelcase Share It Series Firmware update

Steelcase

Steelcase Share It Series Firmware update

Popular Indoor Furnishing manuals by other brands

Scancom IDdesign 1053425 Assembly instruction

Scancom

Scancom IDdesign 1053425 Assembly instruction

John Lewis Marlow Toddler Bed instruction manual

John Lewis

John Lewis Marlow Toddler Bed instruction manual

BUT KIAMA manual

BUT

BUT KIAMA manual

Union Home BEDFORD TALL BOY BDM00040 manual

Union Home

Union Home BEDFORD TALL BOY BDM00040 manual

Furniture Solutions 15MIS03.P instruction manual

Furniture Solutions

Furniture Solutions 15MIS03.P instruction manual

NEY Hettich MultiTech technical information

NEY

NEY Hettich MultiTech technical information

Article TAIGA Assembly instructions

Article

Article TAIGA Assembly instructions

Mainstays GSB332199-2 manual

Mainstays

Mainstays GSB332199-2 manual

BluDot Open Plan Assembly note

BluDot

BluDot Open Plan Assembly note

OVA COFFEE TABLE Assembly manual

OVA

OVA COFFEE TABLE Assembly manual

OSP Home Furnishings GLENVIEW GNV26 Assembly instructions

OSP Home Furnishings

OSP Home Furnishings GLENVIEW GNV26 Assembly instructions

Flexsteel home W1047-860 manual

Flexsteel home

Flexsteel home W1047-860 manual

Bouclair 9397631 Assembly instructions

Bouclair

Bouclair 9397631 Assembly instructions

Walker Edison TW60SQ Assembly instructions

Walker Edison

Walker Edison TW60SQ Assembly instructions

Habitat Palma 821681 manual

Habitat

Habitat Palma 821681 manual

Songmics LLR03 manual

Songmics

Songmics LLR03 manual

BROSA Hans Narrow Bookcase Assembly guide

BROSA

BROSA Hans Narrow Bookcase Assembly guide

SitOnit Seating Mobile Pedestal Assembly instructions

SitOnit Seating

SitOnit Seating Mobile Pedestal Assembly instructions

manuals.online logo
manuals.online logoBrands
  • About & Mission
  • Contact us
  • Privacy Policy
  • Terms and Conditions

Copyright 2025 Manuals.Online. All Rights Reserved.