Xtool D1 Pro User manual

1
xTool D1 Pro xTool D1 Pro
xTool D1 Pro 20W
e xTool D1 Pro 20W (FIG. 1) represents a dramatic improvement in the elements that dene a state-of-the-art diode laser engraver/cutter.
Having sold more than 50,000 xTool D1 units, this next generation machine incorporates both the features that were lacking in the previous
model, and critical improvements that make it the new standard for the category. xTool has the distinction of being an industry leader in
machine design and attention to user feedback.
e D1 Pro series is available with either a 5W, 10W, or 20W laser module. e 20W module is the most powerful laser on the market, and
provides record-breaking machine specications that rival those of a CO2 laser!
xTool is the rst to use color to distinguish their machines. Users have the option of selecting from the standard metal gray or the new golden
red. While the color of the machine has no aect on its performance, the red frame serves to make an aesthetic statement that laser engraving
ts in a studio as well as in a workshop.
FIG. 1. e xTool D1 Pro with a 20W laser module is the most powerful diode laser device of its kind. Courtesy: xTool
Construction
e xTool D1 Pro, as well as its predecessor, the xTool D1, provides
one of the only complete laser engraving/cutting workow compo-
nent packages. xTool sells the laser engraver, the honeycomb work-
ing panel, the enclosure, additional risers, the air assist set, and the
extension kit. In addition, it is the rst to oer a spare parts kit, as
well as an Extra Care warranty option. e only missing item is a
camera, which users may nd unnecessary, and is not supported by
the native software.
e 20W laser is composed of four 5W lasers precision-aligned to
produce a laser spot size of 0.08mm x 0.10mm. e concentrated
laser beam is capable of cutting 10mm basswood, or 8mm black
acrylic in a single pass, with an engraving/cutting accuracy to within
0.004”.
xTool rates the laser as “the most powerful diode laser module in
the world.” It has the potential to increase working rates two-fold
or more, with an engraving speed of up to 10,000mm/min. All of
this power equates to using signicantly more robust materials that
can produce stronger and more durable products, such as furniture.
All of the structural components are made of sturdy materials, preci-
sion manufactured to withstand the rigors of daily use (FIG. 2). e
unit includes a full one-year warranty.
FIG. 2. e locking
mechanism on the left side
of the laser module secures
the position of the unit
on the z-axis. e lever is
an improvement over the
original design first shipped
with the D1.

2
xTool D1 Pro
Assembly
ere is a certain degree of elegance and sophistication that users en-
counter when opening the xTool D1 Pro box (FIG. 3). is experi-
ence is typical of the high degree of excellence that xTool instills in
its products, and strives to provide in its user experience. Users are
immediately presented with two slender packages. e rst is a vari-
ety pack of materials that can be used to become familiar with the en-
graving and cutting capabilities of the machine. xTool provides more
than 100 laserable materials in their on-line store, and herein oers a
set of samples. e second is a set of publications, one for assembly,
one for operation, and one showing examples of what the laser de-
vice is capable of producing (“Magical ings Made by xTool”). e
manuals are attractively designed and printed, with clearly illustrated
step-by-step instructions (FIG. 4).
FIG. 3. e first things that the user sees when opening the box are a
thank you card (already removed), along with a material pack and the
documentation necessary for assembly and operation.
FIG. 4 . In an age when it is easier and far cheaper to provide manuals as
PDFs, xTool has provided beautifully printed collateral materials.
Removing the rst layer of rigid foam packing reveals the parts that
will ultimately t together easily and with precision. e t and n-
ish of the metal frame and other structural materials is impressive,
and reects meticulous engineering and attention to detail. e as-
sembly process is clearly illustrated, and can be completed, in most
circumstances, in well under an hour.
Certain design and engineering details make the assembly process
easier:
• A nicely designed toolkit is provided along with color-coded
screws (FIG. 5). In addition to visually showing the screws in the
manual, the use of color paint further simplies identication, and
the application of the paint helps to secure the screws in place. e
screwdriver comes with a machined shaft that has an Allen wrench
tip on one end and a Philips head on the other. ese small details
make the assembly process faster and easier.
FIG. 5. Rather than provide screws loosely mixed in plastic bags, xTool
provides all of the fasteners and tools in a convenient toolkit that can
remain readily accessible.
• e timing belts have been pre-installed, and are enclosed in their
frame components to shield them from smoke, dirt, and air-borne
contaminants. Over time the belts will stretch and will require
tightening to ensure that the stepper motors move the laser mod-
ule smoothly, quietly, and accurately. A set-screw mechanism at the
ends of each belt makes the adjustment process simple and easy.
Care should be taken to ensure that the belts are not over-tightened,
which can cause distortions of the engraved or cut workpieces.
• e Quick Start Guide, in full-color, is highly visual, with each
machine part clearly labeled (FIG. 6). e assembly process is clearly
illustrated, with a minimum of text, and enlarged images of assem-
bly areas of particular importance.
• Each part ts precisely, is easily identied, and quickly secured in
place.

3
xTool D1 Pro xTool D1 Pro
FIG. 6 parts list. All of the parts are clearly displayed and identified.
FIG. 7. e release lever on the right
side of the laser module is used to set
the position of the laser height (z-axis)
for cutting, using the increments in-
scribed in white on on the upper edge.
Laser Module Placement
e laser module, in addition to the laser itself, contains a low-power,
yet highly-visible red light crosshairs, that is used to set the starting
point for the laser operation (FIG. 8). e crosshairs are oset exactly
16mm from the actual laser point. e crosshairs are used not only
to indicate the starting position, but also to visually frame the actual
work area, so that the user can conrm the boundary, or frame, in
which the laser activity will be conned. When the laser is red it
moves 16mm to the left to compensate for the framing displacement.
Safety
FIG. 8 crosshair-fitting-material_480x480. e red crosshairs simplify
the placement of the laser head with brightly illuminated reference lines.
e D1 Pro incorporates new safety features that detect ames and
smoke, and sense frame tilt using the built-in gyroscope. Any devi-
ation from the normal operation of the machine will instantly turn
o the laser and sound an alarm. e need for safe operation and
vigilant observation cannot be stated strongly enough since re is an
ever-present danger.
Users also need to be aware of the potential dangers associated with
processing certain materials, such as those containing PVC (Polyvi-
nyl Chloride) and vinyl. If such materials are exposed to a laser they
can release toxic chlorine gas, which is very harmful to humans, and
corrosive to machine parts and the laser itself. e use of such mate-
rials voids the machine warranty.
Included with the laser engraver is a pair of laser safety goggles, which
Focus
Focusing is accomplished using the focus lever that has been shown
to accurately and quickly set the focal distance between the laser
module and the workpiece. e focus lever is built-into the right side
of the laser module, and held in place magnetically. It is activated by
swinging it out and letting it drop so that its tip protrudes down-
ward. e laser module is moved along its z-axis until the tip of the
lever touches the workpiece, and is then locked in position. e laser
is now set to engrave in focus.
If the laser will be used for cutting, the focus should be set to fall at
the base of the workpiece. e reticle engraved in the right side of the
laser module is set to correspond to the thickness of the workpiece
(FIG. 7). e scale setting 3 relates to a workpiece thickness of 6mm,
the setting 4 is equal to 8mm, and the setting of 5 conforms to a
thickness of 10mm. According to the xTool D1 Pro 20W manual:
“To cut thicker materials, you can adjust the position of the rear
plate on the laser module, based on the scale with which the focal
length setting bar is aligned, to ensure better cutting performance.”

4
xTool D1 Pro
are essential to protect the user’s eyes as they monitor the progress of
the laser beam (FIG. 9). e wrap-around goggles, which are pro-
vided with a sturdy zippered carry case, and a cleaning cloth, can
be worn directly, or can t over prescription eyeglasses. xTool sells
additional googles which will be necessary if the user has visitors in
the area when the laser is engaged.
Connections
e D1 Pro supports the full set of connection options: USB, WiFi,
and TF card. Using WiFi and the digital storage card the user need
not be tethered to a desktop host computer, providing the option to
move the engraver to a remote site, or to a workpiece that is immove-
able, such as a large table or bench.
Software
e D1 Pro supports several le formats, including NC, BMP, JPG,
PNG, DXF and others, meaning that it can process designs from a
broad range of sources.
Included with the engraver is the free XCS (xTool Creative Space)
software, which provides a range of easy-to-use functions for pro-
cessing les created in design applications, as well as creating origi-
nal constructs (FIG. 10). e software is particularly good at helping
new users achieve success quickly. Using the USB connection it nds
FIG. 9. Goggles must be worn at all times that the laser is in use.
the connected D1 Pro easily, and determines if a rmware update is
necessary. If it is, the user sets the download switch on the D1 Pro
motherboard and clicks the download button. In seconds the new
rmware is installed, a process that we have found to be much more
challenging on competing laser engravers.
FIG. 10. e XCS user interface has been designed for ease-of-use, with features that help the user get correct and consistent results.

5
xTool D1 Pro xTool D1 Pro
Settings for power and speed, the critical numbers that often vex us-
ers, are set automatically if the user chooses to use materials that have
been tested by xTool engineers, such as 3mm Basswood Plywood,
as shown under the Material eld in FIG. 10. e user can easily
choose to Score, Engrave, or Cut whatever is on the workspace, and
the associated machine settings will change accordingly. is is a sig-
nicant advantage over competing machines.
e optional LightBurn software (https://lightburnsoftware.com/),
available for a free 30-day trial, or at a cost of $60 for permanent use,
provides extensive capabilities, and enables the D1 Pro to realize all
of its potential. LightBurn, available for Mac, PC and Linux, also
supports many more le formats than XCS.
Laser Positioning
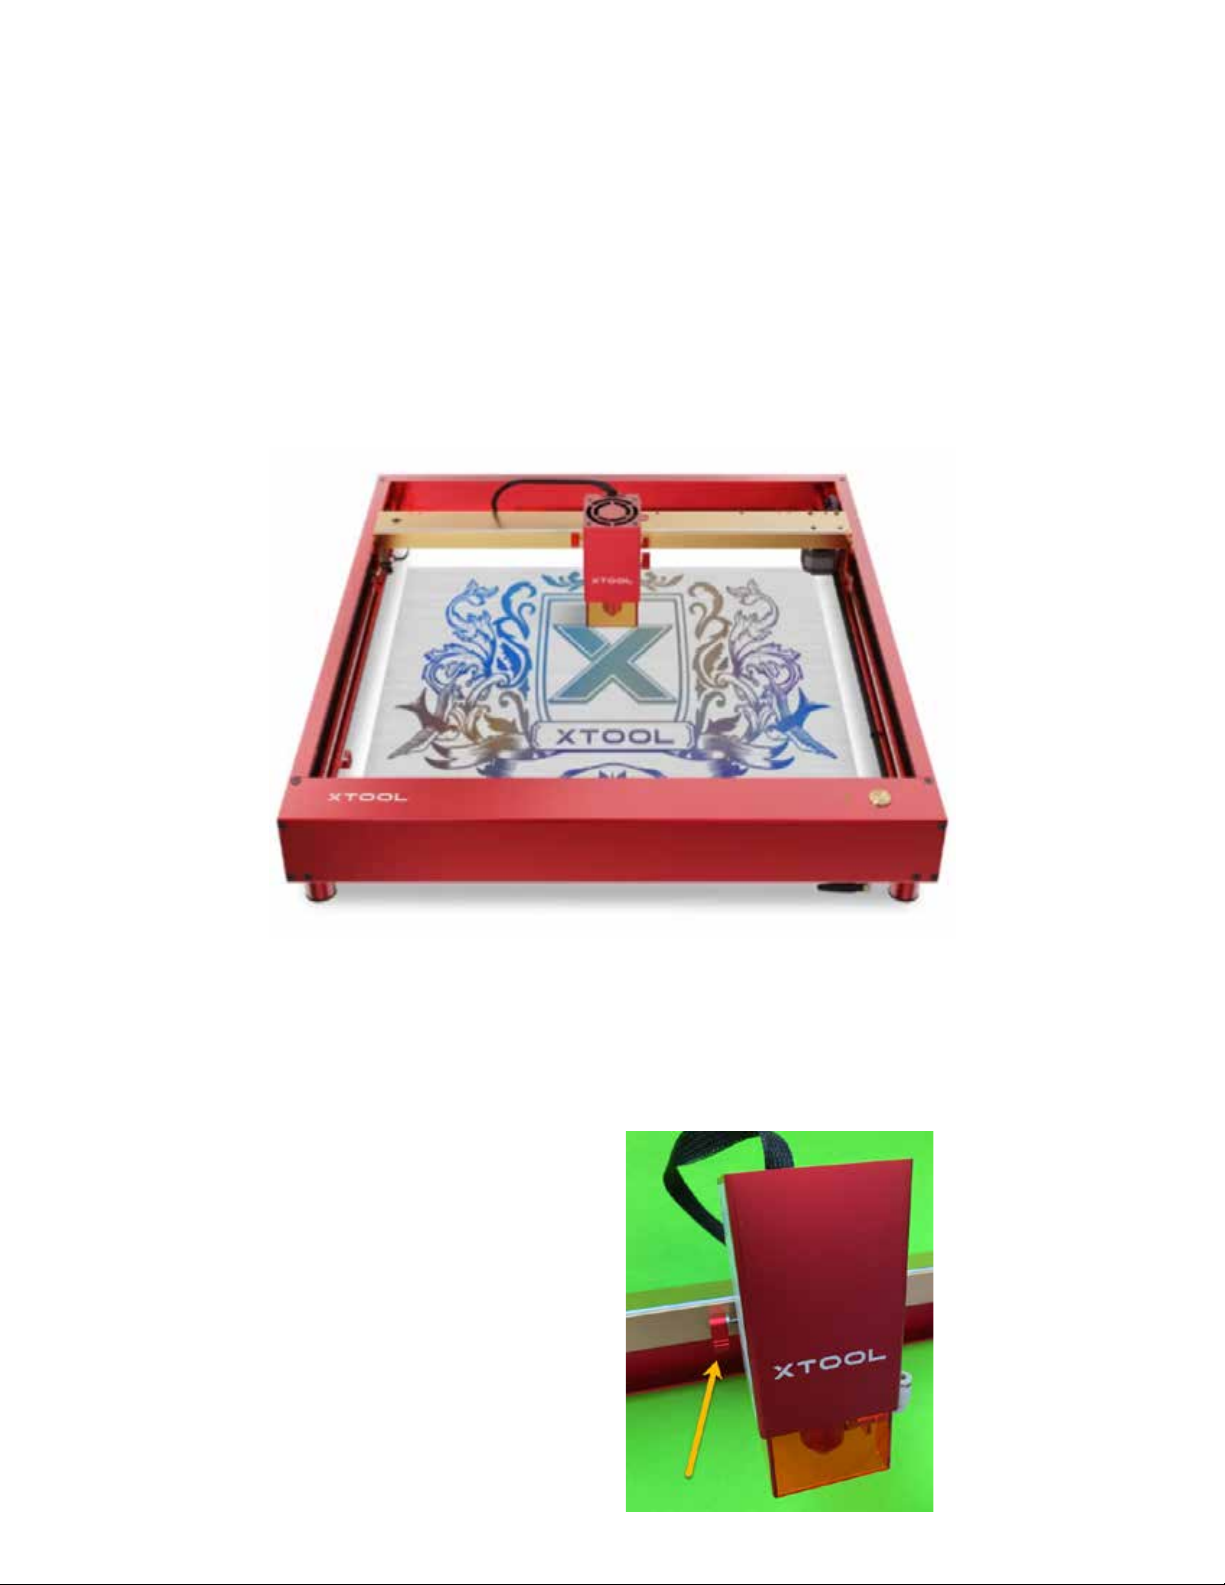
e D1 Pro now includes limit switches that contain the movement
of the laser module within the frame (FIG. 11). is not only stops
the module from hitting the frame rails, but provides more user con-
trol over workpiece placement. Should the laser head reach one of
the frame boundaries it will stop and the limit switch will signal an
alarm. In addition, and perhaps most importantly, the limit switches
enable the use of absolute coordinates, and setting the home posi-
tion, wherein the user can use a laser bed grid system to accurately
line-up workpieces.
e engraving area is 430mm x 390mm (17” x 15.4”), slightly small-
er than that of the original D1 due to the increased size of the 20W
laser module.
FIG. 11. xTool uses an advanced design, long-lasting electronic limit
switch, which is superior to a mechanical roller lever arm.
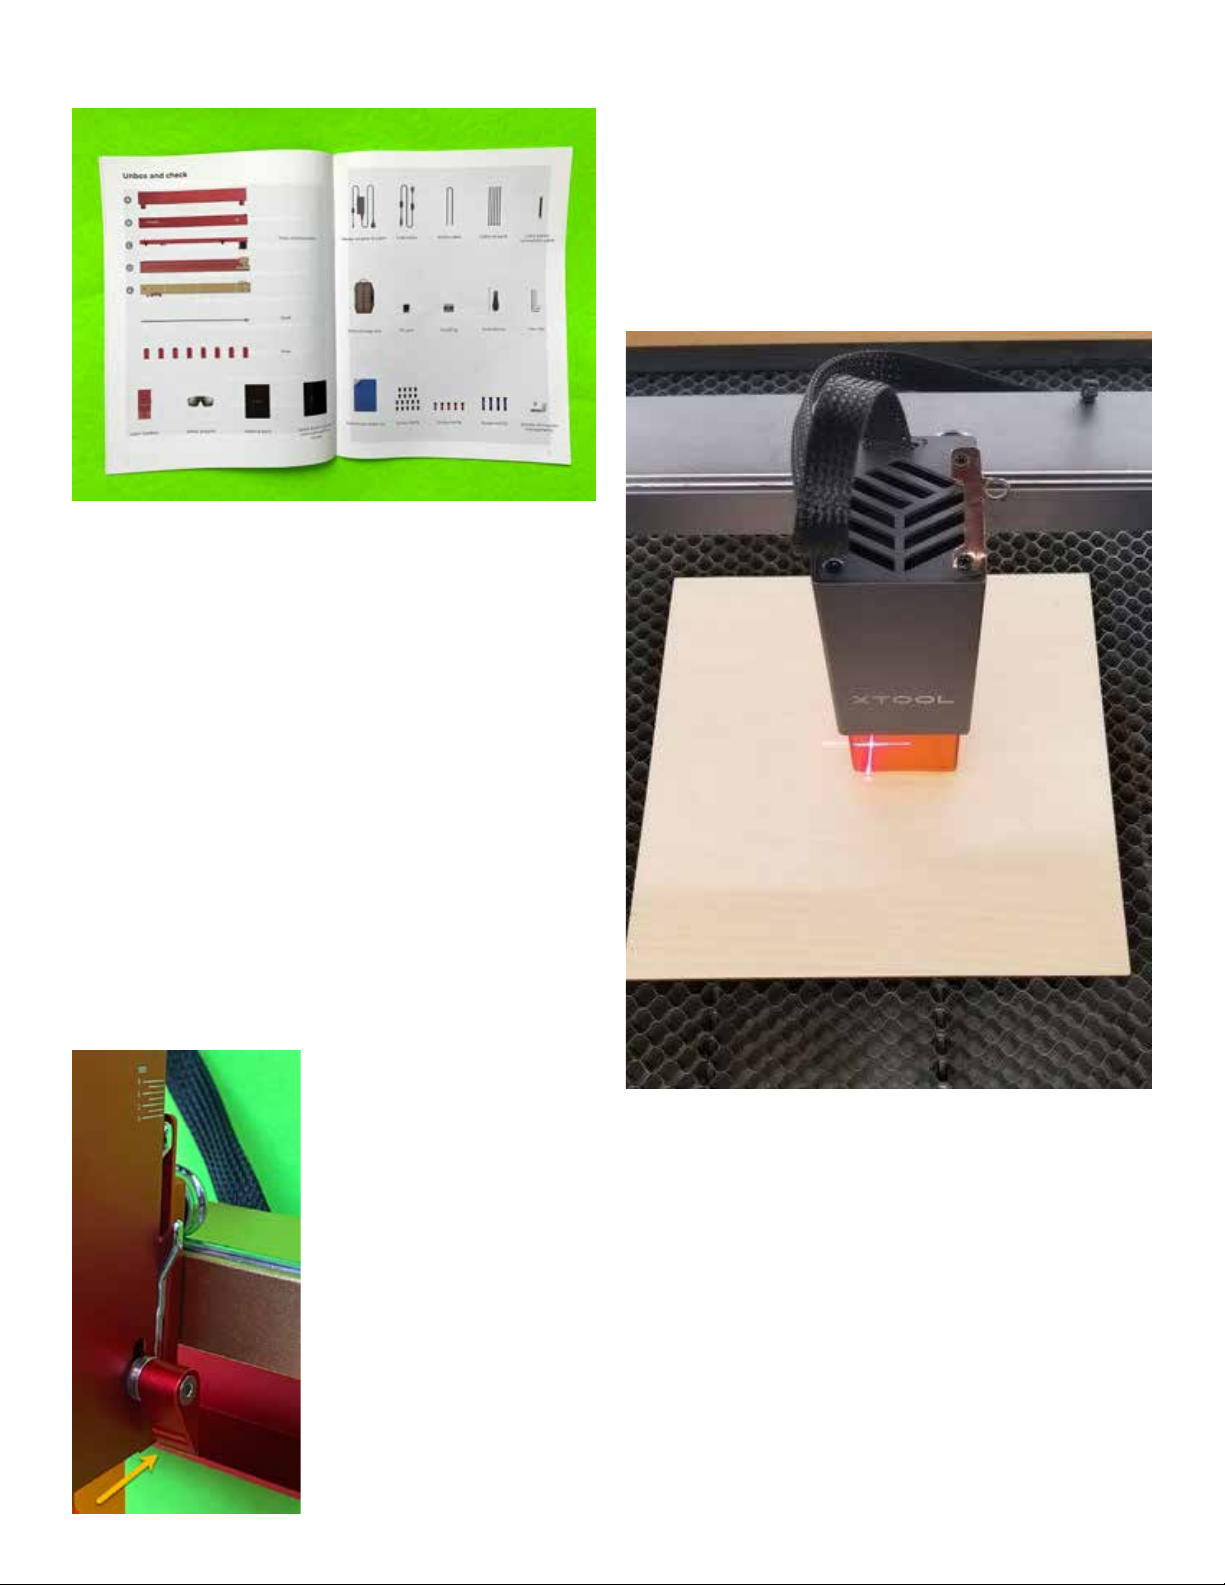
Air Assist
e laser head is now manufactured to be “air assist ready” (FIG.
12). In recognition of the fact that air assist is an essential feature for
laser cutting, providing cleaner nished material surfaces, and not
just an optional add-on, the laser head has been engineered with a
built-in nozzle adaptable to a provided air intake connector. e user
need only connect plastic air feed tubing and a pump. xTool sells an
optional Air Assist Set that provides all of the parts necessary for in-
stallation, although third-party solutions can also be used. e xTool
air pump is distinguished by its quiet operation, which is a signicant
advantage, considering potentially long processing times.
FIG. 12. e supplied air intake connector screws directly into a thread-
ed opening in the laser nozzle.
Air assist not only provides a cleaner cut, but enables deeper and fast-
er cutting. Another advantage of air assist is to protect the surface of
the laser lens and the light shield, blowing away smoke and air-borne
debris. A cleaner lens performs more eciently and extends the life
of the laser head, and a cleaner light shield makes it easier to see the
laser activity.
Rotary
e optional RA2 Pro Rotary Attachment, considered the most ver-
satile rotary device of its kind, enables engraving on a wide variety of
cylindrical and round objects of various circumferences and lengths
(FIG. 13). e unique design provides unprecedented exibility in
grasping and holding objects, with friction or clamp-style jaws, for
precision engraving.

6
xTool D1 Pro
Included with the D1 Pro are a set of eight threaded risers, each
45mm, that can be used to adjust the distance between the laser head
and the workpiece. e risers work to accommodate thick workpieces
as well as objects (drinking glasses, mugs, etc.) held on the rotary
device.
xTool Enclosure
xTool makes the most reasonably-priced engraver enclosure on
the market, complete with exhaust fan and light-shielding viewing
window (FIG. 14). e unit, which is foldable for easy storage, is
composed of light-weight re-retardant materials which provide pro-
tection from smoke, air-borne contaminants, and noise. e unit
components t together with hook-and-loop connectors, making as-
sembly and break-down quick and easy.
FIG. 13. e xTool RA2 Pro Rotary Attachment provides unsurpassed
precision in holding and turning objects in precise synchronization with
the movement of the D1 Pro laser module. Courtesy: xTool
FIG. 14. e xTool enclosure completely surrounds the footprint of the
D1 Pro, confining the intensity of the laser light, as well as smoke, and
airborne contaminants. Courtesy: xTool
Maintenance
Relatively little maintenance is required, and consists of regularly
applying the supplied grease to the slide bars every two weeks to two
months, depending on usage. e user should ensure that the optical
shaft is clean of dirt before applying a thin, uniform layer of grease.
xTool uses high-quality components, and the steel rollers, bearings,
and shafts are rated as lasting three times longer than competitors.
Regular cleaning of the laser lens and surrounding light shield should
be performed when a visual inspection warrants it. xTool provides
clear instructions at https://tinyurl.com/yu8jv3ud.
Further Reading
In-depth coverage of the entire laser engraving and cutting process
is available in the new book, Focusing on Laser Engraving and
Decorating:Affordable, Versatile, and Creative Marking, Engraving
and Cutting (https://tinyurl.com/2j2kmyc4) sold exclusively on
Amazon.com.
Other manuals for D1 Pro
3
Other Xtool Diagnostic Equipment manuals

Xtool
Xtool H6PRO User manual

Xtool
Xtool H6 Elite Smart User manual

Xtool
Xtool D9 Pro User manual

Xtool
Xtool N9EV User manual

Xtool
Xtool PS70 Pro User manual

Xtool
Xtool X100PAD Elite User manual

Xtool
Xtool Anyscan A30 User manual

Xtool
Xtool H6PRO User manual

Xtool
Xtool PS80 User manual

Xtool
Xtool PS70PRO User manual