Xtool H6PRO User manual

Shenzhen Xtooltech Intelligent Co., LTD
USER MANUAL
H6 Pro Smart Diagnostic System
V6.5


I
Please read this user manual carefully before using the H6 Pro Smart Diagnostics System. When reading the
manual, please pay attention to the words “Note” or “Caution” and read them carefully for appropriate operation.
TRADEMARKS
is a registered trademark of Shenzhen Xtooltech Intelligent CO., LTD. In countries where the
trademarks, service marks, domain names, logos, and the name of the company are not registered, Xtool
claims that it still reserves the ownership of the unregistered trademarks, service marks, domain names, logos,
and the company name. All other marks for the other products and the company’s name mentioned in the
manual still belong to the original registered company.
You may not use the trademarks, service marks, domain names, logo, and company name of Xtool or other
companies mentioned without written permission from the trademark holder.
Xtool reserves the right to the final interpretation of this manual content.
COPYRIGHT
Without the written consent of Shenzhen Xtooltech Intelligent Co., Ltd., any company or individual shall not
copy or backup this operation manual in any form (electronic, mechanical, photocopying, recording, or other
forms).
DECLARATION
This manual is designed for the usage of the H6 PRO Smart Diagnostics System and provides operating
instructions and product descriptions for users of the H6 PRO Smart Diagnostics System.
No part of this manual can be reproduced, stored in a retrieval system, or transmitted, in any form or by any
means (electronic, mechanical, photocopying, recording, or otherwise), without the prior written permission of
Xtool.
Use the device only as described in this manual. Xtool is not responsible for any consequences of violating the
laws and regulations caused by using the product or its data information
Xtool shall not be liable for any incidental or consequential damages or for any economic consequential
damages arising from the accidents of individual users and the third parties, misuse or abuse of the device,
unauthorized change or repair of the device, or the failure made by the user not to use the product according
to the manual.
All information, specifications, and illustrations in this manual are based on the latest configurations and
functions available at the time of printing. Xtool reserves the right to make changes at any time without notice.
OPERATION INSTRUCTIONS
For safe operation, please follow the instructions below:

II
⚫Keep the device away from heat or fumes when you are using it.
⚫If the vehicle battery contains acid, please keep your hands and skin or fire sources away from the battery
during testing.
⚫The exhaust gas of the vehicle contains harmful chemicals, please ensure adequate ventilation.
⚫Do not touch the cooling system components or exhaust manifolds when the engine is running due to the
high temperatures reached.
⚫Make sure the car is securely parked, Neutral is selected or the selector is at P or N position to prevent
the vehicle from moving when the engine starts.
⚫Make sure the (DLC) diagnostic link connector is functioning properly before starting the test to avoid
damage to the Diagnostic Tablet.
⚫Do not switch off the power or unplug the connectors during testing, otherwise, you may damage the ECU
and/or the Diagnostic Tablet.
CAUTIONS!
⚫Avoid shaking or dismantling the unit as it may damage the internal components.
⚫Do not use hard or sharp objects to touch the LCD screen;
⚫Do not use excessive force;
⚫Do not expose the screen to strong sunlight for a long period.
⚫Please keep it away from water, moisture, high temperature, or very low temperature.
⚫If necessary, calibrate the screen before testing to ensure the accuracy of LCD performance.
⚫Keep the main unit away from strong magnetic fields.
⚫Please keep your device always connected to the Internet. When the device is off the Internet for 30 days,
The diagnosis APP may be locked and you need to synchronize data with the Internet to activate it.
AFTERSALES-SERVICES
[email protected] (for Europe, North America and Latin America )
Tel: +86 755 21670995 | +86 755 86267858 (China)
Monday through Friday
09:00~18:30(UTC/GMT+08:00)
Official Website: www.xtooltech.com | www2.xtooltech.com (alternate site)
Please provide your device serial number, VIN code, vehicle model, software version, and other details when
seeking technical support. If there are screenshots or videos, it will better help us locate your problem.

III
Content
TRADEMARKS ................................................................................................................................................. I
COPYRIGHT ..................................................................................................................................................... I
DECLARATION................................................................................................................................................. I
OPERATION INSTRUCTIONS.......................................................................................................................... I
CAUTIONS!...................................................................................................................................................... II
AFTERSALES-SERVICES............................................................................................................................... II
1GENERAL INTRODUCTION..................................................................................................................... 5
1.1. Tablet Overview ............................................................................................................................ 5
Front View of Tablet...........................................................................................................................................5
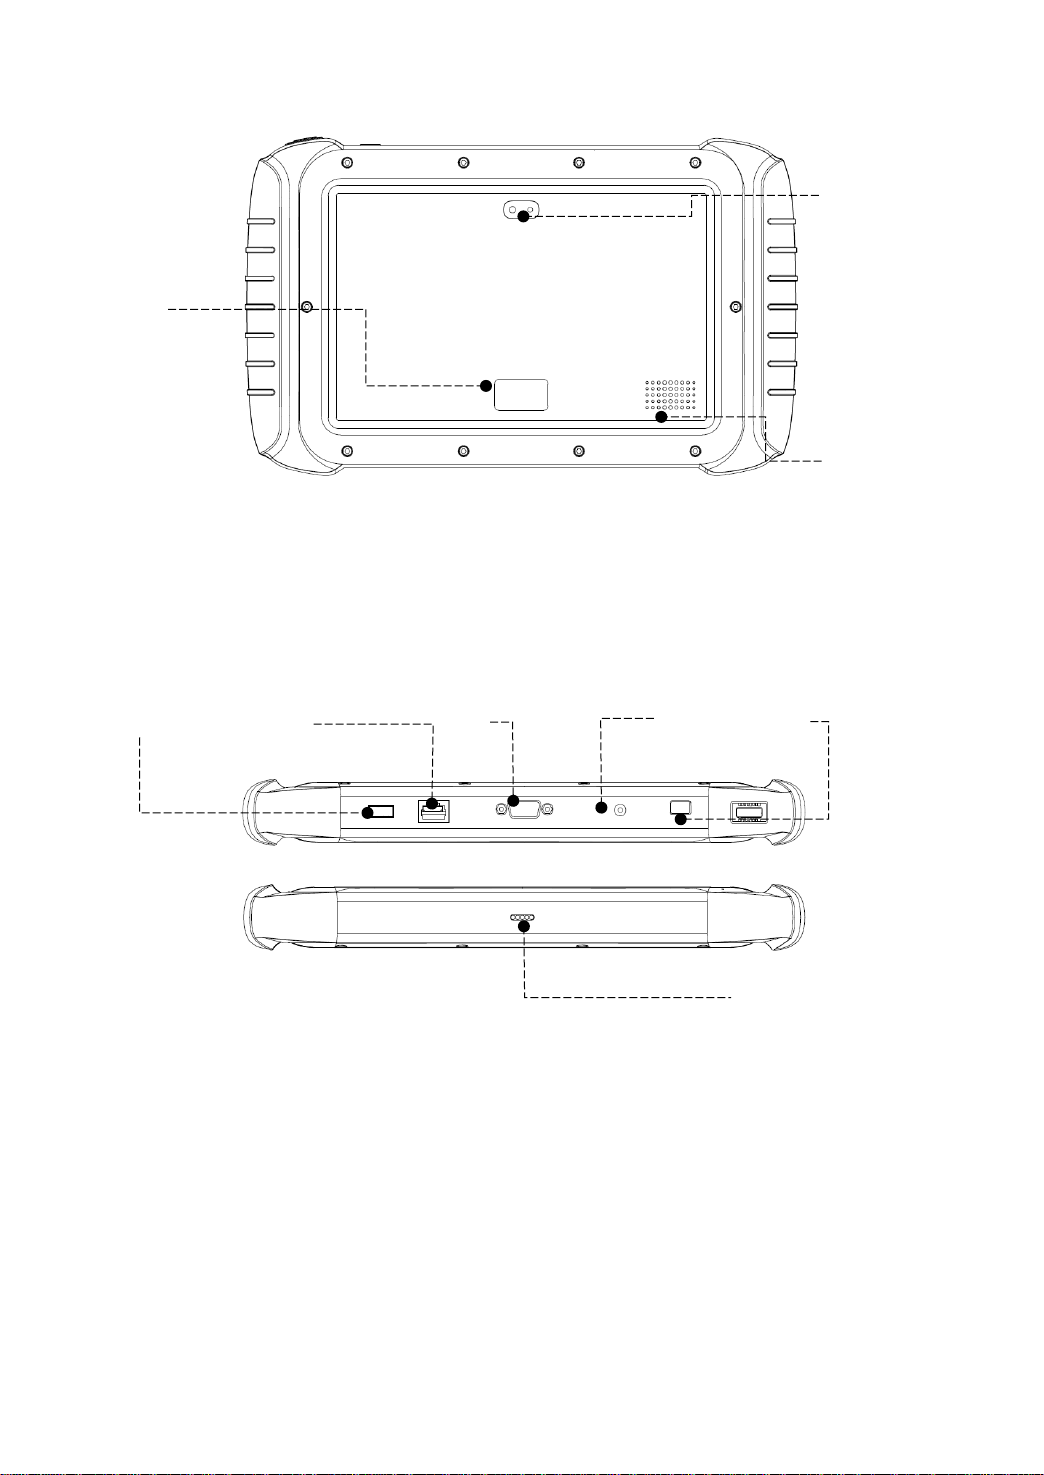
Back View of Tablet...........................................................................................................................................6
Host Ports...............................................................................................................................................................6
1.2. VCI box........................................................................................................................................... 7
Front/Back View..................................................................................................................................................7
Top/Bottom View.................................................................................................................................................7
1.3. Technical Specifications.............................................................................................................. 8
1.4. Packing Kit .........................................................................................................错误!未定义书签。
2GETTING STARTED................................................................................................................................. 8
2.1. Activation....................................................................................................................................... 8
2.2. Main Interface...............................................................................................................................10
Operation System.............................................................................................................................................10
Main Menu...........................................................................................................................................................11
Function Buttons...............................................................................................................................................12
Navigation Buttons...........................................................................................................................................13
Notification Bar...................................................................................................................................................13
2.3. Factory Reset...............................................................................................................................14
3UPDATE & DELETE................................................................................................................................17
3.1. Update software...........................................................................................................................17
3.2. Delete Software............................................................................................................................18
4DIAGNOSIS .............................................................................................................................................19
4.1. Vehicle Connection......................................................................................................................19
4.2. Vehicle Selection .........................................................................................................................20
4.3. Diagnostics Functions.................................................................................................................24
4.4. ECU Coding & Programming......................................................................................................32
5SPECIAL FUNCTIONS ............................................................................................................................33
5.1. OIL RESET....................................................................................................................................34
5.2. EPB ...............................................................................................................................................35
5.3. SAS ...............................................................................................................................................36
5.4. DPF................................................................................................................................................38
5.5. BMS RESET..................................................................................................................................41
5.6. THROTTLE....................................................................................................................................43
5.7. INJECTOR CODING .....................................................................................................................43

IV
5.8. GEARBOX MATCH.......................................................................................................................45
5.9. GEAR LEARNING.........................................................................................................................46
6REPORT...................................................................................................................................................47
6.1. Report ...........................................................................................................................................47
6.2. Replay...........................................................................................................................................49
6.3. File Manager.................................................................................................................................50
7SETTINGS................................................................................................................................................51
7.1. Languages....................................................................................................................................51
7.2. Units..............................................................................................................................................52
7.3. Bluetooth......................................................................................................................................54
7.4. My Workshop Info........................................................................................................................54
7.5. VCI Information ............................................................................................................................55
7.6. About ............................................................................................................................................55
8REMOTE ASSISTANCE ..........................................................................................................................56
9FAQ..........................................................................................................................................................57
Q1: Failed to generate diagnosis report.................................................................................................57
Q2: How to print diagnosis report...........................................................................................................58
Q3: Failed to extract files.........................................................................................................................58
Q4: Mailbox supported.............................................................................................................................58
Q5: Why can’t I receive the email after sharing the diagnostic report? ..............................................59
Q6: How to make an appointment for remote support..........................................................................59
Q7: How to generate and upload diagnostic log files ...........................................................................59
Q8: How to switch languages..................................................................................................................59
Q9: Failed to diagnose vehicle................................................................................................................59
Q10: Failed to activate or register...........................................................................................................59
Q11: Failed to turn on when charging....................................................................................................60
Q12: Failed to open the diagnosis app...................................................................................................60
Q13: Failed to enter Vehicle menu..........................................................................................................60
10 WARRANTY & SERVICES ..................................................................................................................61
SHENZHEN XTOOLTECH INTELLIGENT CO., LTD .....................................................................................62

5
1 GENERAL INTRODUCTION
The H6 PRO Smart Diagnostics System is an advanced scanning tool based on the Android operating system.
It supports multi-language switching and is suitable for different countries and regions.
The advantage of this scanner is not only its comprehensive functions, including complete system diagnosis,
and full OBDⅡfunctions, but various reset functions can also achieve a faster and more accurate diagnosis.
The H6 PRO Smart Diagnostics System mainly includes:
⚫Car Diagnostics Tablet
⚫Wireless Diagnostics Module
⚫Main test cable
⚫Connectors
⚫Power adapter
Before performing the diagnosis program, please make sure that the VCI box is successfully connected to your
vehicle, and connect the VCI box with Bluetooth on the tablet.
Some old cars with non-OBD2 standard protocol need to be connected with our VCI box through specific pin
connectors.
Using the wrong connector may cause your car to be unrecognized by the diagnostic tool.
Please confirm the OBD connector specifications configured on your car before connecting.
1.1.TABLET OVERVIEW
The main unit of the H6 PRO Smart Diagnostics System is the tablet. It allows you to operate all diagnosis
functions, and it can also work as a normal Android tablet.
FRONT VIEW OF TABLET
Figure 1-1 Sample of Tablet Front View
The front of the tablet is mainly a touchable display screen, you can use your fingers to operate on the screen
to finish most of the diagnosis process.

6
BACK VIEW OF TABLET
Figure 1-2 Sample of Tablet Back View
①Camera: Used for taking pictures.
②Nameplate: Show the basic information about the tablet such as product name and serial number, etc.
③Loudspeaker: It supports external sound playback.
HOST PORTS
Figure 1-3 Sample of Tablet Host Ports
①DOIP port: Supports ECU programming for vehicles with DOIP protocol
②USB 3.0 port: Used for data transfer for tablet & PC communication, and data transfer with VCI box
when working.
③VGA port: A reserved interface can be used for charging.
④DC charging port: Charging port, connected to the power adapter to charge the device.
⑤Power button: Long press to turn the device on/off, short press to switch the device into sleep mode.
Hold for about 20 seconds to force shut down the device.
⑥Wireless charging port: Can be used with a wireless charging base for charging
③
①
②
①
②
③
④
⑤
⑥

7
1.2.VCI BOX
To communicate with the vehicle via OBD, H6 PRO also comes up with a wireless diagnostics module, also
known as the VCI box. The tablet needs a Bluetooth connection with the VCI box to get access to all software.
Although some functions (like EEPROM Adapter) will not need you to communicate to the vehicle, please power
up the VCI box using a 12V power adapter to get access to the software.
FRONT/BACK VIEW
Front Back
Figure 1-4 Sample of VCI Box, screen 1
①Display Screen: Show status of the VCI box-like battery voltage, Bluetooth connection, and car
communication status.
②Nameplate: Show basic information about the VCI box, like the serial number.
Make sure that you’re using the VCI box that is paired with the tablet, or it will not communicate. The serial number
of the VCI box must be the same as the serial number of the tablet.
TOP/BOTTOM VIEW
Top Bottom
Figure 1-5 Sample of VCI Box, screen 2
①
②
①
②

8
①DB15 Port: Used to connect the VCI box to the OBDII port on the vehicle.
②USB-B Port: Used to connect the VCI box to the tablet using USB-B to USB3.0 cable
1.3.TECHNICAL SPECIFICATIONS
Table 1-1 Specification
Item
Description
Processor
Quad-core processor 1.8GHz
Ram
2G
Rom
128G
Display
10.1-inch capacitive, 1024×768 resolution
Connectivity
USB
Wi-Fi
Bluetooth
Camera
8-megapixel autofocus rear camera with flash
Sensor
Gravity sensor
Audio Input/ Audio Output
Microphone/ Loudspeaker
Ports
USB3.0
DC charging port
VGA port
Battery
13000mAh 3.7V lithium polymer battery
Input Voltage
12V DC
Operating Temperature
-10~50℃
Relative Humidity
< 90%
Dimensions
315.07×218.35×34.61 mm
2 GETTING STARTED
2.1. ACTIVATION
After first-time users press and hold the power button to turn on the system, the system will automatically enter
the guide process and request to select the language for the operating system.

9
Figure 2-1 Sample of Selection Languages
After setting the system language, you will enter the activation page, as shown in the figure below. You can
also click the "Trial" button in the upper right corner to try it out before activation.
Figure 2-2 Sample of Activation (Screen 1)
Click Start Activate to enter the activation page, as shown below:

10
Figure 2-3 Sample of Activation (Screen 2)
A pop-up window showing Activation Success indicates that you have completed the first boot setup, click
OK to enter the diagnostic system and start using the device.
Figure 2-4 Sample of Activation (Screen 3)
2.2.MAIN INTERFACE
OPERATION SYSTEM
The picture below (Fig 2-5) is the home screen of the operating system of the device. You can also return to
this interface at any time by clicking the home button on the bottom navigation bar.
Figure 2-5 Sample of OS Main page

11
The app icons are as follows:
Table 2-1
Items
Descriptions
Browser
Gallery
Application Menu
ES File Explorer
Android Settings
H6 Pro Smart Diagnostics System
a) Browser: Click on the browser icon to enter the browser to view the official website of Xtool or search for
other information.
b) Gallery: Click the Gallery icon to enter the album and you can quickly view the pictures or screenshots
stored on the device. You can select the picture you need, click the share button on the upper right, and
send the picture to your mobile phone or PC via Bluetooth or USB connection
c) Application Menu: Show all the apps that you have installed into the device, also allows you to manage
them.
d) ES File Explorer: You can manage APP, music, files, pictures, etc. in the device in this function, and you
can also use Local/Home/Cleaner to clean up files.
e) Android Settings: This allows you to check and change the settings of the Android system, including network,
battery status, language, device info, and factory reset.
f) H6 Pro Smart Diagnostics System: This app provides full system diagnostic functions and also offers a
range of specialist maintenance services.
It will be referred to as the “H6 Pro Smart Diagnostics System App” later in this manual.
MAIN MENU
Every time start the tablet, you will automatically enter the H6 PRO Smart Diagnostics System app with the
following main screen. Tap on the diagnosis application button on the menu, the main menu will be shown as
below:

12
Figure 2-7 Sample of APP Main Page
This main menu contains Function Buttons and Navigation Buttons. The touch screen navigation is made up
of several menus, and you can quickly access functions by clicking on the icons. A detailed description of the
menu structure can be found in the next section Function Buttons.
FUNCTION BUTTONS
The following table briefly describes each function button.
Table 2-2
Icon
Description
Auto Scan for vehicle
Includes various special functions for vehicles
Enter vehicle diagnosis menu
Enter TeamViewer for remote support
Update the software through the Internet
Select the language and unit shown in the app, and check the Bluetooth
status, device info, and workshop info
View more functions like the endoscope

13
Check the diagnosis report that is recorded on your device, print it as PDF
files, or share it with other devices
NAVIGATION BUTTONS
Instructions for operating the navigation bar buttons at the bottom of the screen, as described in the table below:
Table 2-2
Items
Descriptions
Press for screenshot
Decrease volume
Back to the previous interface
Shows recently used applications
Back to the main interface of the Android system
Increase volume
Showing the Bluetooth states
Click this button to return to the diagnostic vehicle interface
Press for screen recording
NOTIFICATION BAR
Slide down to open the notification bar. You can adjust the brightness of the screen when you need it, and you
can also connect Wi-Fi and so on.

14
Figure 2-8 Sample of NOTIFICATION BAR
2.3. FACTORY RESET
After using the device for the first time or resetting the factory settings to the device, the system will
automatically enter the Activation Guide program.
This page allows you to set the language of the device operating system
Figure 2-9 Sample of How to Select Languages
After selecting the system language, click Next to enter the Wi-Fi connection page, as shown below:

15
Figure 2-10 Sample of Selecting Wi-Fi
Select a network to connect to on the Wi-Fi connection page.
After a successful network connection, the automatic system will jump to Factory mode to download the
software:
Figure 2-11 Sample of Factory Mode
Once the software has been downloaded, the tablet will automatically reboot and request the system language
selection again.

16
Figure 2-12 Sample of Selecting Languages
After setting the system language, you will enter the activation page, as shown in the figure below. You can
also click the "Trial" button in the upper right corner to try it out before activation.
Figure 2-13 Sample of Activation, Screen 1
Click Start Activate to enter the activation page, as shown below:

17
Figure 2-14 Sample of Activation, Screen 2
A pop-up window showing Activation Success indicates that you have completed the first boot setup, click
OK to enter the diagnostic system and start using the device.
Figure 2-15 Sample of Activation, Screen 3
If you meet problems like “Registration failed”, please check your network or contact Xtool aftersales services:
supporting@xtooltech.com
3 UPDATE &DELETE
3.1. UPDATE SOFTWARE
After activating the device, please update the software in "Update" first. The device will pull all currently
supported software packages from our servers, and you can download them as needed. To access the update
application, open the diagnosis application and click UPGRADE, and it will show as below:

18
Figure 3-1 Sample of How to Update Vehicle Software
H6 PRO Smart Diagnostics System has a three-year free subscription when activated. When you click “update”
and it shows “your device is now out of subscription”, please contact your dealer.
3.2. DELETE SOFTWARE
Long-press the unwanted software until it has been selected, then click the Delete button
shown on the upper part of the screen. And you can select and delete multiple software at
once.
Figure 3-2 Sample of How to Delete Vehicle Software
Other manuals for H6PRO
2
Table of contents
Other Xtool Diagnostic Equipment manuals

Xtool
Xtool H6 Elite Smart User manual

Xtool
Xtool D9 Pro User manual

Xtool
Xtool H6 EB User manual

Xtool
Xtool AutoProPad Basic User manual

Xtool
Xtool PS2 User manual

Xtool
Xtool X100PAD Elite User manual

Xtool
Xtool IP608 User manual

Xtool
Xtool N9EV User manual

Xtool
Xtool PS701 Pro User manual

Xtool
Xtool KC501 User manual