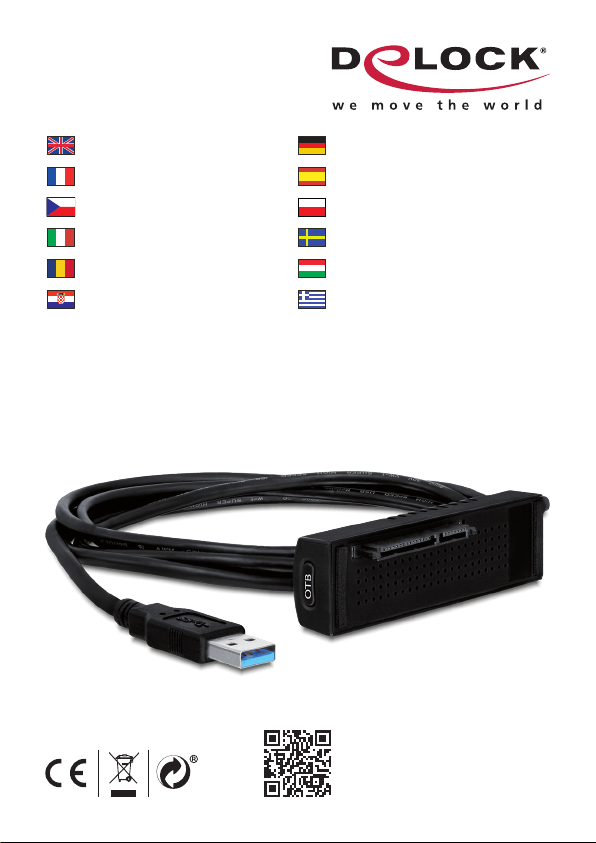
DeLOCK SuperSpeed 61858 User manual

SuperSpeed USB 5 Gbps Docking
Station for 1 x 2.5″ / 3.5″ SATA HDD /
SSD
Product-No:61858
User manual no:61858-a
www.delock.com
User manual
Mode d’emploi
Uživatelská příručka
Manuale utente
Manual de utilizare
Korisnički priručnik
Bedienungsanleitung
Manual del usuario
Instrukcja obsługi
Bruksanvisning
Használati utasítás
Εγχειρίδιο χρήστη

-2-
English
Installation

-3-
English
Description
This HDD docking station enables an external connection of a 2.5″ or 3.5″ SATA
HDD via a USB interface. The docking cable can also be connected to your hard
drive without using the holder. You can protect the hard disk on the PCB side
and avoid a possible short circuit by inserting the included cover plates into the
mounting holes of your 2.5″ or 3.5″ HDD. Furthermore you can connect a Blu-
ray or DVD drive to the docking connector and connect it to your system. With
the One-Touch Backup function you can easily synchronize the data on your hard
disk by just one push of a button.
Specication
• Connectors:
1 x SuperSpeed USB 5 Gbps (USB 3.2 Gen 1) Type-A male
1 x SATA 6 Gb/s 22 pin receptacle
1 x DC jack
• Function key: 1 x backup button
• For hard drives, SSD
• For optical drive drive when using the docking cable
• Data transfer rate up to 5 Gbps
• With backup function
• LED indicator
• Plug & Play
System requirements
• Windows Vista/7/7-64/8.1/8.1-64/10/10-64/11
• PC or laptop with a free USB Type-A port
Package content
• Docking cable
• HDD holder
• 3.5″ cover plate, 2.5″ cover plate
• External power supply 12 V / 2 A
• Backup software
• User manual
Safety instructions
• Protect the product against moisture
• Protect the product against direct sunlight
• Avoid anti-static electricity when using the HDD
• Pay attention that the HDD can be hot when it is connected to the device.

-4-
English
Hardware Installation
Note: If you use a new hard drive, please make sure that it is already formatted.
1. Connect your SATA drive to the docking cable.
2. Connect the power supply to the docking cable.
3. Now connect the power supply to the power outlet.
4. Mount the cover plate onto your SATA hard drive and put it into the holder.
Driver Installation
1. Switch on your computer.
2. Connect the USB connector of the docking cable to an available USB port.
3. There is no driver required, so the device is ready to be used.
OTB Backup Software Installation
1. Switch on your computer.
2. Insert the backup software CD into your drive.
3. Open Windows Explorer, select: CD-drive\OneTouchBackup_ASMedia\
Setup.exe.
4. Read the license agreement and conrm it by "I accept the terms in the
license agreement" and click on "Next".
5. Click on "Next", click on "Install".
6. Click on "Finish".
7. The software is now installed.
8. After you have done all the setting on the software, you can press the
backup button now. A window will appear and the synchronization of the data
will start.
Support Delock
If you have further questions, please contact our customer support
You can nd current product information on our homepage: www.delock.com
Final clause
Information and data contained in this manual are subject to change without
notice in advance. Errors and misprints excepted.
Copyright
No part of this user manual may be reproduced, or transmitted for any purpose,
regardless in which way or by any means, electronically or mechanically, without
explicit written approval of Delock.
Edition: 02/2022

-5-
Deutsch
Systemvoraussetzungen
• Windows Vista/7/7-64/8.1/8.1-64/10/10-64/11
• PC oder Notebook mit einem freien USB Typ-A Port
Sicherheitshinweise
• Produkt vor Feuchtigkeit schützen
• Produkt vor direkter Sonneneinstrahlung schützen
• Vermeiden Sie antistatische Auadung beim Benutzen der Festplatte
• Achten Sie darauf, dass die Festplatte am Gerät sehr heiß sein könnte.
Hardwareinstallation
Hinweis: Bei einer neuen Festplatte stellen Sie bitte sicher, dass diese vorher
formatiert wurde.
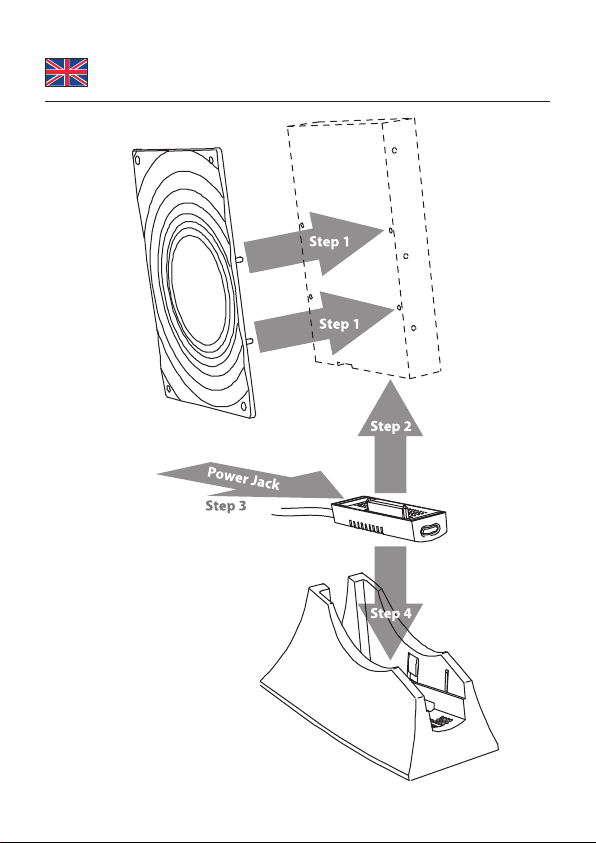
1. Schließen Sie Ihr SATA Laufwerk an das Dockingkabel an.
2. Schließen Sie das Netzteil an das Dockingkabel an.
3. Danach stecken Sie das Netzteil in Ihre Steckdose.
4. Nach Belieben können Sie nun die SATA Festplatte, zusammen mit der
montierten Abdeckplatte, in die Halterung einstecken.
Treiberinstallation
1. Schalten Sie den Computer ein.
2. Schließen Sie das USB Dockingkabel an einen freien USB Port an.
3. Es werden keine Treiber benötigt, somit können Sie das Gerät sofort
verwenden.
OTB Backup Softwareinstallation
1. Schalten Sie den Computer ein.
2. Legen Sie die Backup Software CD in Ihr Laufwerk.
3. Önen Sie mit dem Explorer folgendes Programm: CD-Laufwerk\
OneTouchBackup_ASMedia\Setup.exe.
4. Lesen Sie die Lizenzbedingungen und bestätigen diese mit "Ja ich akzeptiere
die Bedingungen der Lizenzvereinbarungen" und dann auf "Weiter".
5. Klicken Sie auf "Weiter" danach auf "Installieren".
6. Klicken Sie auf "Fertig stellen".
7. Die Software ist nun installiert.
8. Nach der Softwarekonguration, können Sie den Backup Knopf drücken.
Danach erscheint das Fenster zum Datenabgleich und der Backup Prozess
startet.

-6-
Français
Conguration système requise
• Windows Vista/7/7-64/8.1/8.1-64/10/10-64/11
• PC ou portable avec un port USB Type-A disponible
Instructions de sécurité
• Protéger le produit contre l’humidité
• Protéger le produit contre la lumière directe du soleil
• Eviter l'électricité statique lorsque vous utilisez le DD.
• Faites attention car le disque dur devient brûlant lorsqu’il est connecté à
l’appareil.
Installation matérielle
Remarque: Si vous utilisez un disque dur neuf, veuillez vous assurer qu’il a déjà
été formaté.
1. Connectez votre lecteur SATA au câble d’accueil.
2. Connectez l’alimentation au câble d’accueil.
3. Branchez à présent l'alimentation sur le secteur.
4. Montez la plaque de couverture sur votre disque dur SATA et mettez-le dans
le support.
Installation du pilote
1. Allumez votre ordinateur.
2. Branchez le connecteur USB du câble d’accueil sur un port USB disponible.
3. Aucun lecteur n'est requis, l'appareil est donc prêt à fonctionner.
Installation du logiciel de sauvegarde via une touche (OTB)
1. Allumez votre ordinateur.
2. Insérez le CD du logiciel de sauvegarde dans votre lecteur.
3. Ouvrez l'Explorateur Windows, sélectionnez : CD-drive\OneTouchBackup_
ASMedia\Setup.exe.
4. Lisez l'accord de licence, conrmez par "J'accepte les termes de l'accord de
licence" et cliquez sur "Continuer".
5. Cliquez sur "Suivant" et cliquez sur "Installation".
6. Cliquez sur "Terminer".
7. Le logiciel est maintenant installé.
8. Après avoir ni de congurer le logiciel, vous pouvez appuyer sur le bouton
de sauvegarde. Une fenêtre s'achera et la synchronisation des données
commencera.

-7-
Español
Requisitos del sistema
• Windows Vista/7/7-64/8.1/8.1-64/10/10-64/11
• PC o equipo portátil con un puerto USB Tipo-A disponible
Instrucciones de seguridad
• Proteja el producto contra el polvo
• Proteja el producto contra la luz solar directa
• Evite la electricidad estática cuando utilice el disco duro
• Preste atención, ya que la unidad de disco duro puede calentarse cuando esté
conectada al dispositivo.
Hardware Instalación
Nota: si utiliza una unidad de disco duro nueva, asegúrese de que ya tiene
formato.
1. Conecte la unidad SATA al cable de conexión.
2. Conecte la fuente de alimentación al cable de conexión.
3. Ahora conecte el adaptador de alimentación a la toma de corriente.
4. Monte la tapa en la unidad de disco duro SATA y colóquela en el soporte.
Instalación del controlador
1. Encienda su PC.
2. Enchufe el conector USB del cable de conexión a un puerto USB disponible.
3. No se necesita controlador, por lo que el dispositivo está listo para utilizarse.
Instalación del software de copia de seguridad OTB
1. Encienda su PC.
2. Inserte el CD-ROM de software de copia de seguridad en la unidad.
3. Abra el Explorador de Windows y seleccione Unidad_de_CD\
OneTouchBackup_ASMedia\Setup.exe.
4. Lea el contrato de licencia y confírmelo seleccionando la opción "Acepto los
términos del Contrato de licencia"; a continuación, haga clic en "Siguiente".
5. Haga clic en "Siguiente". Haga clic en "Instalar".
6. Haga clic en "Finalizar".
7. El software se instalará a continuación.
8. Una vez realizada toda la conguración del software, puede presionar el
botón de copia de seguridad. Aparecerá una ventana y la sincronización de
los datos se iniciará.

-8-
České
Systémové požadavky
• Windows Vista/7/7-64/8.1/8.1-64/10/10-64/11
• PC nebo notebook s volným USB Typ-A portem
Bezpečnostní pokyny
• Chraňte produkt před vlhkostí
• Chraňte produkt před přímým slunečním světlem
• Při manipulaci s HDD se vyhněte antistatické elektřině
• Dbejte na to, že když je HDD připojen k zařízení, může být horký.
Instalace hardware
Poznámka: Při použití nového disku se ujistěte, zda je již formátován.
1. Připojte SATA disk k dokovacímu kabelu.
2. Připojte napájecí zdroj k dokovacímu kabelu.
3. Nyní zastrčte napájecí zdroj do zásuvky.
4. Připevněte na disk kryt a vložte jej do držáku.
Instalace ovladače
1. Zapněte počítač.
2. Připojte USB konektor dokovacího kabelu k volnému USB portu počítače.
3. Nejsou potřeba žádné ovladače, zařízení je připraveno k použití.
Instalace zálohovacího software OTB Backup
1. Zapněte počítač.
2. Vložte zálohovací software na CD do mechaniky.
3. Spusťte prohlížeč, zvolte: CD-mechanika\OneTouchBackup_ASMedia\
Setup.exe.
4. Přečtěte si licenční ujednání a potvrďte je pomocí "I accept the terms in the
license agreement" (Souhlasím s licenčním ujednáním) a klikněte na "Next"
(Pokračovat).
5. Klikněte na "Next" (Pokračovat). Zvolte "Install" (Instalovat).
6. Klikněte na "Finish" (Ukončit).
7. Software je nyní nainstalován.
8. Poté, co jste udělali všechna nastavení software, můžete nyní stisknout
tlačítko zálohování. Objeví se okno Windows a začne synchronizace dat.

-9-
Polsku
Wymagania systemowe
• Windows Vista/7/7-64/8.1/8.1-64/10/10-64/11
• Komputer osobisty lub laptop z wolnym portem USB Typ-A
Instrukcje bezpieczeństwa
• Produkt należy zabezpieczyć przed wilgocią
• Produkt należy zabezpieczyć przed bezpośrednim światłem słonecznym
• Podczas używania dysku twardego należy unikać elektryczności statycznej
• Podczas podłączania do urządzenia należy pamiętać, że dysk twardy może być
gorący.
Instalacja sprzętu
Uwaga: Jeśli używany jest nowy dysk twardy należy sprawdzić, czy jest już
sformatowany.
1. Podłącz napęd SATA do kabla dokowania.
2. Podłącz zasilacz do kabla dokowania.
3. Podłączyć teraz zasilacz do gniazda zasilania.
4. Zamontuj płytę pokrywy w dysku twardym SATA i załóż ją na uchwyt.
Instalacja sterownika
1. Wyłącz komputer.
2. Podłącz złącze USB kabla dokowania do wolnego portu USB.
3. Nie jest wymagany sterownik, dlatego urządzenie jest gotowe do użycia.
Instalacja oprogramowania OTB Backup
1. Wyłącz komputer.
2. Włóż do napędu nośnik CD z oprogramowaniem do tworzenia kopii
zapasowych.
3. Otwórz Eksplorator Windows, wybierz: CD-drive\OneTouchBackup_
ASMedia\Setup.exe.
4. Przeczytaj umowę licencyjną i potwierdź jej akceptację poprzez "I accept
the terms in the license agreement" (Akceptuję warunki umowy licencyjnej) i
kliknij "Next" (Dalej).
5. Kliknij "Dalej". Kliknij "Zainstaluj".
6. Kliknij "Zakończ".
7. Następuje instalacja oprogramowania.
8. Po dokonaniu ustawień w oprogramowaniu możesz nacisnąć przycisk
tworzenia kopii zapasowych. Nastąpi wyświetlenie odpowiedniego okna i
rozpocznie się synchronizacja danych.

-10-
Italiano
Requisiti di sistema
• Windows Vista/7/7-64/8.1/8.1-64/10/10-64/11
• PC o laptop con porta USB Tipo-A libera
Istruzioni per la sicurezza
• Proteggere il prodotto dall'umidità
• Proteggere il prodotto dalla luce solare diretta
• Evitare l'elettricità anti-statica quando si utilizza l'HDD
• Attenzione: l'HDD può essere caldo quando è collegato al dispositivo.
Installazione dell'hardware
Nota: Se si utilizza un nuovo disco rigido, si prega di assicurarsi che sia già
formattato.
1. Collegare il disco SATA al cavo docking.
2. Collegare il cavo di alimentazione al cavo docking.
3. Ora collegare l'alimentatore alla presa di corrente.
4. Posizionare la piastra di copertura sul disco rigido SATA e inserirla nel
supporto.
Installazione del driver
1. Accendere il computer.
2. Collegare il connettore USB del cavo docking a una porta USB disponibile.
3. Non è necessario alcun driver, il dispositivo è pronto per l'uso.
Software di Installazione Backup OTB
1. Accendere il computer.
2. Inserire il CD del software di backup nell'unità.
3. Aprire Esplora risorse e selezionare unità CD\OneTouchBackup_ASMedia\
Setup.exe.
4. Leggere il contratto di licenza e confermarlo con "Accetto i termini del
contratto di licenza" e fare clic su "Avanti".
5. Fare clic su "Avanti", poi fare clic su "Installa".
6. Fare clic su "Fine".
7. Il software ora è stato installato.
8. Dopo aver selezionato tutte le impostazioni del software, è possibile premere
il pulsante esegui backup ora. Si visualizzerà una nestra e inizierà la
sincronizzazione dei dati.

-11-
Svenska
Systemkrav
• Windows Vista/7/7-64/8.1/8.1-64/10/10-64/11
• Dator eller bärbar dator med en ledig USB Typ-A-port
Säkerhetsinstruktioner
• Skydda produkten mot fukt
• Skydda produkten mot direkt solljus
• Undvik antistatisk elektricitet när du använder hårddisken.
• Tänk på att hårddisken kan bli het när den är ansluten till enheten.
Hårdvaruinstallation
Obs! Om du använder en ny hårddisk, se till att den redan är formaterad.
1. Anslut din SATA-enhet till dockningskabeln.
2. Anslut strömförsörjningen till dockningskabeln.
3. Anslut därefter strömkällan till eluttaget.
4. Montera täckplåten på din SATA-hårddisk och för in den i hållaren.
Installation av drivrutiner
1. Slå på datorn.
2. Anslut USB-kontakten på dockningskabeln till en tillgänglig USB-port.
3. Ingen drivrutin krävs, enheten är klar att användas.
Programinstallation av OTB Backup
1. Slå på datorn.
2. Sätt in CD-skivan med programvaran för säkerhetskopiering i din enhet.
3. Öppna Windows utforskaren och välj: CD-enhet\OneTouchBackup_ASMedia\
Setup.exe.
4. Läs licensavtalet och bekräfta genom att klicka på "I accept the terms in
the license agreement" (Jag accepterar villkoren i licensavtalet) och sedan
"Next" (Nästa).
5. Klicka på "Next" (Nästa). Klicka på "Install" (Installera).
6. Klicka på "Finish" (Avsluta).
7. Programvaran är nu installerad.
8. När du har kongurerat programvaran kan du trycka på knappen för
säkerhetskopiering. Ett fönster visas och synkroniseringen av data startas.

-12-
Română
Cerinte de sistem
• Windows Vista/7/7-64/8.1/8.1-64/10/10-64/11
• PC sau laptop cu un port USB Tip-A liber
Instrucţiuni de siguranţă
• Protejaţi produsul împotriva umidităţii
• Protejaţi produsul împotriva luminii directe a soarelui
• Evitați electricitatea antistatică atunci când utilizați HDD-ul
• Atenţie: hard diskul se poate încălzi atunci când este conectat la dispozitiv.
Instalarea componentelor hardware
Notă: Dacă utilizați o unitate de disc nouă, asigurați-vă că este deja formatată.
1. Conectați unitatea SATA la cablul de andocare.
2. Conectați sursa de alimentare la cablul de andocare.
3. Acum conectați sursa de alimentare la priză.
4. Montați placa de acoperire pe unitatea hard disk SATA și puneți-o în suport.
Instalarea driverului
1. Porniţi computerul.
2. Conectați conectorul USB al cablului de andocare la un port USB disponibil.
3. Nu sunt necesare drivere, astfel că dispozitivul este pregătit pentru utilizare.
Instalarea software-ului de rezervă OTB
1. Porniţi computerul.
2. Introduceți CD-ul cu software-ul de rezervă în unitate.
3. Deschideţi Windows Explorer, selectaţi: CD-drive\OneTouchBackup_
ASMedia\Setup.exe.
4. Citiţi acest acord de licenţiere şi conrmaţi selectând "Accept termenii
acordului de licenţiere" şi apoi făcând clic pe "Următorul".
5. Faceți clic pe "Next" (Următorul), faceți clic pe "Install" (Instalare).
6. Faceți clic pe "Finish" (Terminare).
7. Software-ul este acum instalat.
8. După ce ați făcut toate setările software-ului, puteți apăsa acum butonul de
rezervă. Va apărea o fereastră și va începe sincronizarea datelor.

-13-
Magyar
Rendszerkövetelmények
• Windows Vista/7/7-64/8.1/8.1-64/10/10-64/11
• PC vagy notebook számítógép szabad USB A-típusú-csatlakozóval
Biztonsági óvintézkedések
• Óvja a terméket a nedvességtől.
• Óvja a terméket a közvetlen napsugárzástól.
• Kerülje az antisztatikus elektromosságot a HDD használatakor
• Óvatosan járjon el, mivel a HDD működés közben felforrósodhat.
Hardvertelepítés
Megjegyzés: Ha új merevlemezt használ, győződjön meg arról, hogy már
formázva van.
1. Csatlakoztassa a SATA meghajtót a dokkoló kábelhez.
2. Csatlakoztassa a tápegységet a dokkoló kábelhez.
3. Most csatlakoztass az áramforrást a fali csatlakozóaljzathoz.
4. Helyezze a fedőlemezt a SATA merevlemezre, majd tegye a tartóba.
Illesztőprogram telepítése
1. Kapcsolja be a számítógépet.
2. Csatlakoztassa a dokkoló kábel USB-dugóját a számítógép egyik szabad
USB-aljzatához.
3. Nincs szükség illesztőprogramra, a készülék használatra kész.
OTB biztonsági mentési szoftver telepítése
1. Kapcsolja be a számítógépet.
2. Helyezze a biztonsági mentéshez való szoftvert tartalmazó CD-t a
meghajtóba.
3. Nyissa meg a Windows Intézőt és jelölje ki a következőt: CD-meghajtó\
OneTouchBackup_ASMedia\Setup.exe.
4. Olvassa el a Licencszerződést, fogadja el az "I accept the terms in the
license agreement" (Elfogadom a licencszerződés feltételeit) gombra
kattintással, majd kattintson a "Next" (Tovább) gombra.
5. Kattintson a "Next" (Tovább) gombra. Kattintson az "Install" (Telepítés)
gombra.
6. Kattintson a "Finish" (Befejezés) gombra.
7. Megtörténik a szoftver telepítése.
8. Ha a szoftver összes beállításával elkészült, akkor megnyomhatja
a biztonsági mentés gombot. Megjelenik egy ablak, és elindul az
adatszinkronizálás.

-14-
Hrvatski
Preduvjeti sustava
• Windows Vista/7/7-64/8.1/8.1-64/10/10-64/11
• Osobno ili prijenosno računalo sa slobodnim USB Tipa-A priključkom
Sigurnosne upute
• Zaštitite proizvod od vlage
• Zaštitite proizvod od izravne sunčeve svjetlosti
• Izbjegavajte statički elektricitet kada koristite HDD pogon
• Ne zaboravite da HDD može biti vruć kada je spojen na uređaj.
Ugradnja hardvera
Napomena: Ako koristite novi tvrdi disk, pazite da bude formatiran.
1. Spojite SATA pogon na priključni kabel.
2. Priključite električno napajanje na priključni kabel.
3. Zatim priključite izvor za napajanje u mrežnu utičnicu.
4. Montirajte pokrivnu ploču na SATA tvrdi disk i stavite ga u držač.
Instalacija upravljačkog programa
1. Uključite vaše računalo.
2. USB priključak priključnog kabela spojite na dostupni USB priključak.
3. Nije potreban upravljački program i uređaj se odmah može koristiti.
Instalacija OTB softvera za arhiviranje
1. Uključite vaše računalo.
2. Stavite CD sa softverom za arhiviranje u pogon.
3. Otvorite Windows Explorer i odaberite: CD-pogon\OneTouchBackup_
ASMedia\Setup.exe.
4. Pročitajte sporazum o licenci i potvrdite ga na "I accept the terms in the
license agreement" (Prihvaćam uvjete ugovora o licenci) i kliknite na "Next"
(Dalje).
5. Kliknite "Next" (Dalje). Kliknite "Install" (Instaliraj).
6. Kliknite na "Finish" (Završi).
7. Softvera je sada instaliran.
8. Kada završite sva podešavanja softvera, možete odmah pritisnuti gumb za
arhiviranje. Pojavit će se prozor i započet će sinkronizacija podatka.

-15-
ελληνικά
Απαιτήσεις συστήματος
• Windows Vista/7/7-64/8.1/8.1-64/10/10-64/11
• Η/Υ ή φορητός υπολογιστής με διαθέσιμη θύρα USB τύπου-A
Οδηγίες ασφάλειας
• Προστατεύστε το προϊόν από την υγρασία
• Προστατεύστε το προϊόν από την άμεση ηλιακή ακτινοβολία
• Αποφύγετε τον αντιστατικό ηλεκτρισμό κατά τη χρήση της HDD
• Προσέχετε καθώς η HDD μπορεί να καίει όταν είναι συνδεδεμένη με τη συσκευή.
Εγκατάσταση υλικού
Σημείωση: Εάν χρησιμοποιείτε έναν καινούργιο σκληρό δίσκο, βεβαιωθείτε ότι
έχει γίνει ήδη η διαμόρφωσή του.
1. Συνδέστε το δίσκο SATA σας στο καλώδιο αγκύρωσης.
2. Συνδέστε την τροφοδοσία ρεύματος στο καλώδιο αγκύρωσης.
3. Συνδέστε τώρα την παροχή ρεύματος στην ηλεκτρική πρίζα.
4. Στερεώστε το κάλυμμα πάνω στο σκληρό δίσκο SATA σας και τοποθετήστε
τον στη βάση στήριξης.
Εγκατάσταση προγράμματος οδήγησης
1. Ενεργοποιήστε τον υπολογιστή σας.
2. Συνδέστε το σύνδεσμο USB του καλωδίου αγκύρωσης σε μια διαθέσιμη
υποδοχή USB.
3. Δεν απαιτείται πρόγραμμα οδήγησης, οπότε η συσκευή είναι έτοιμη για
χρήση.
Εγκατάσταση λογισμικού δημιουργίας αντιγράφων ασφαλείας OTB
1. Ενεργοποιήστε τον υπολογιστή σας.
2. Εισάγετε το CD του λογισμικού δημιουργίας αντιγράφων ασφαλείας μέσα στο
δίσκο.
3. Ανοίξτε την Εξερεύνηση των Windows, επιλέξτε: CD-drive\OneTouchBackup_
ASMedia\Setup.exe.
4. Διαβάστε τη σύμβαση άδειας χρήσης και αποδεχτείτε την επιλέγοντας "I
accept the terms in the license agreement" (Αποδέχομαι τους όρους της
σύμβασης άδειας χρήσης) και, στη συνέχεια, επιλέγοντας "Next" (Επόμενο).
5. Κάντε κλικ στην επιλογή "Next" (Επόμενο). Κάντε κλικ στην επιλογή "Install"
(Εγκατάσταση).
6. Κάντε κλικ στην επιλογή "Τέλος".
7. Το λογισμικό έχει τώρα εγκατασταθεί.
8. Αφού έχετε ολοκληρώσει όλες τις ρυθμίσεις λογισμικού, μπορείτε τώρα να
πατήσετε το κουμπί δημιουργίας αντιγράφων ασφαλείας. Θα εμφανιστεί ένα
παράθυρο και θα ξεκινήσει ο συγχρονισμός των δεδομένων.

Declaration of conformity
Products with a CE symbol fulll the EMC directive (2014/30/EU), the
ErP directive (2009/125/EC), LVD directive (2014/35/EU) and RoHS directive
(2011/65/EU+2015/863+2017/2102), which were released by the EU-comission.
The declaration of conformity can be downloaded here:
https://www.delock.de/produkte/G_61858/merkmale.html
WEEE-notice
The WEEE (Waste Electrical and Electronic Equipment)-directive, which became
eective as European law on February 13th 2003, resulted in an all out change
in the disposal of disused electro devices. The primarily purpose of this directive
is the avoidance of electrical waste (WEEE) and at the same time the support of
recycling and other forms of recycling in order to reduce waste. The WEEE-logo
on the device and the package indicates that the device should not be disposed
in the normal household garbage. You are responsible for taking the disused
electrical and electronical devices to a respective collecting point. A separated
collection and reasonable recycling of your electrical waste helps handling the
natural resources more economical. Furthermore recycling of electrical waste is
a contribution to keep the environment and thus also the health of men. Further
information about disposal of electrical and electronical waste, recycling and
the collection points are available in local organizations, waste management
enterprises, in specialized trade and the producer of the device.
EU Import: Tragant Handels- und Beteiligungs GmbH
Beeskowdamm 13/15, 14167 Berlin, Germany
Table of contents
Languages:
Other DeLOCK Docking Station manuals

DeLOCK
DeLOCK 87865 User manual

DeLOCK
DeLOCK 63205 User manual

DeLOCK
DeLOCK SuperSpeed 87728 User manual

DeLOCK
DeLOCK 87772 User manual

DeLOCK
DeLOCK 87721 User manual

DeLOCK
DeLOCK 63958 User manual

DeLOCK
DeLOCK 87895 User manual

DeLOCK
DeLOCK 64098 User manual

DeLOCK
DeLOCK 88050 User manual

DeLOCK
DeLOCK 63992 User manual

DeLOCK
DeLOCK 62661 User manual

DeLOCK
DeLOCK 87297 User manual

DeLOCK
DeLOCK 87731 User manual

DeLOCK
DeLOCK 64177 User manual

DeLOCK
DeLOCK 63957 User manual

DeLOCK
DeLOCK Thunderbolt 3 User manual

DeLOCK
DeLOCK 64000 User manual

DeLOCK
DeLOCK 64178 User manual

DeLOCK
DeLOCK 87742 User manual

DeLOCK
DeLOCK 87743 User manual