TROUBLESHOOTING
REPLACEMENT PART NUMBERS
Titan 3 Five Star Prophy Angle Cartridge Lubricated ........................................... 258948
(Includes cartridge and bronze bushing with O-ring)
Transmission Gear Assembly Lubricated.............................................................. 259008
Prophy Angle End Caps (Package of 2) Lubricated .............................................. 265805
Screw-to-Button Adapter ....................................................................................... 258950
Angle Disconnect Wrench..................................................................................... 203048
O-Rings (Package of 3) ........................................................................................ 258951
DentaLube II ......................................................................................................... 262539
Titan 3 Motor-to-Angle Adapter ............................................................................. 264073
Titan T Motor-to-Angle Adapter ............................................................................. 263970
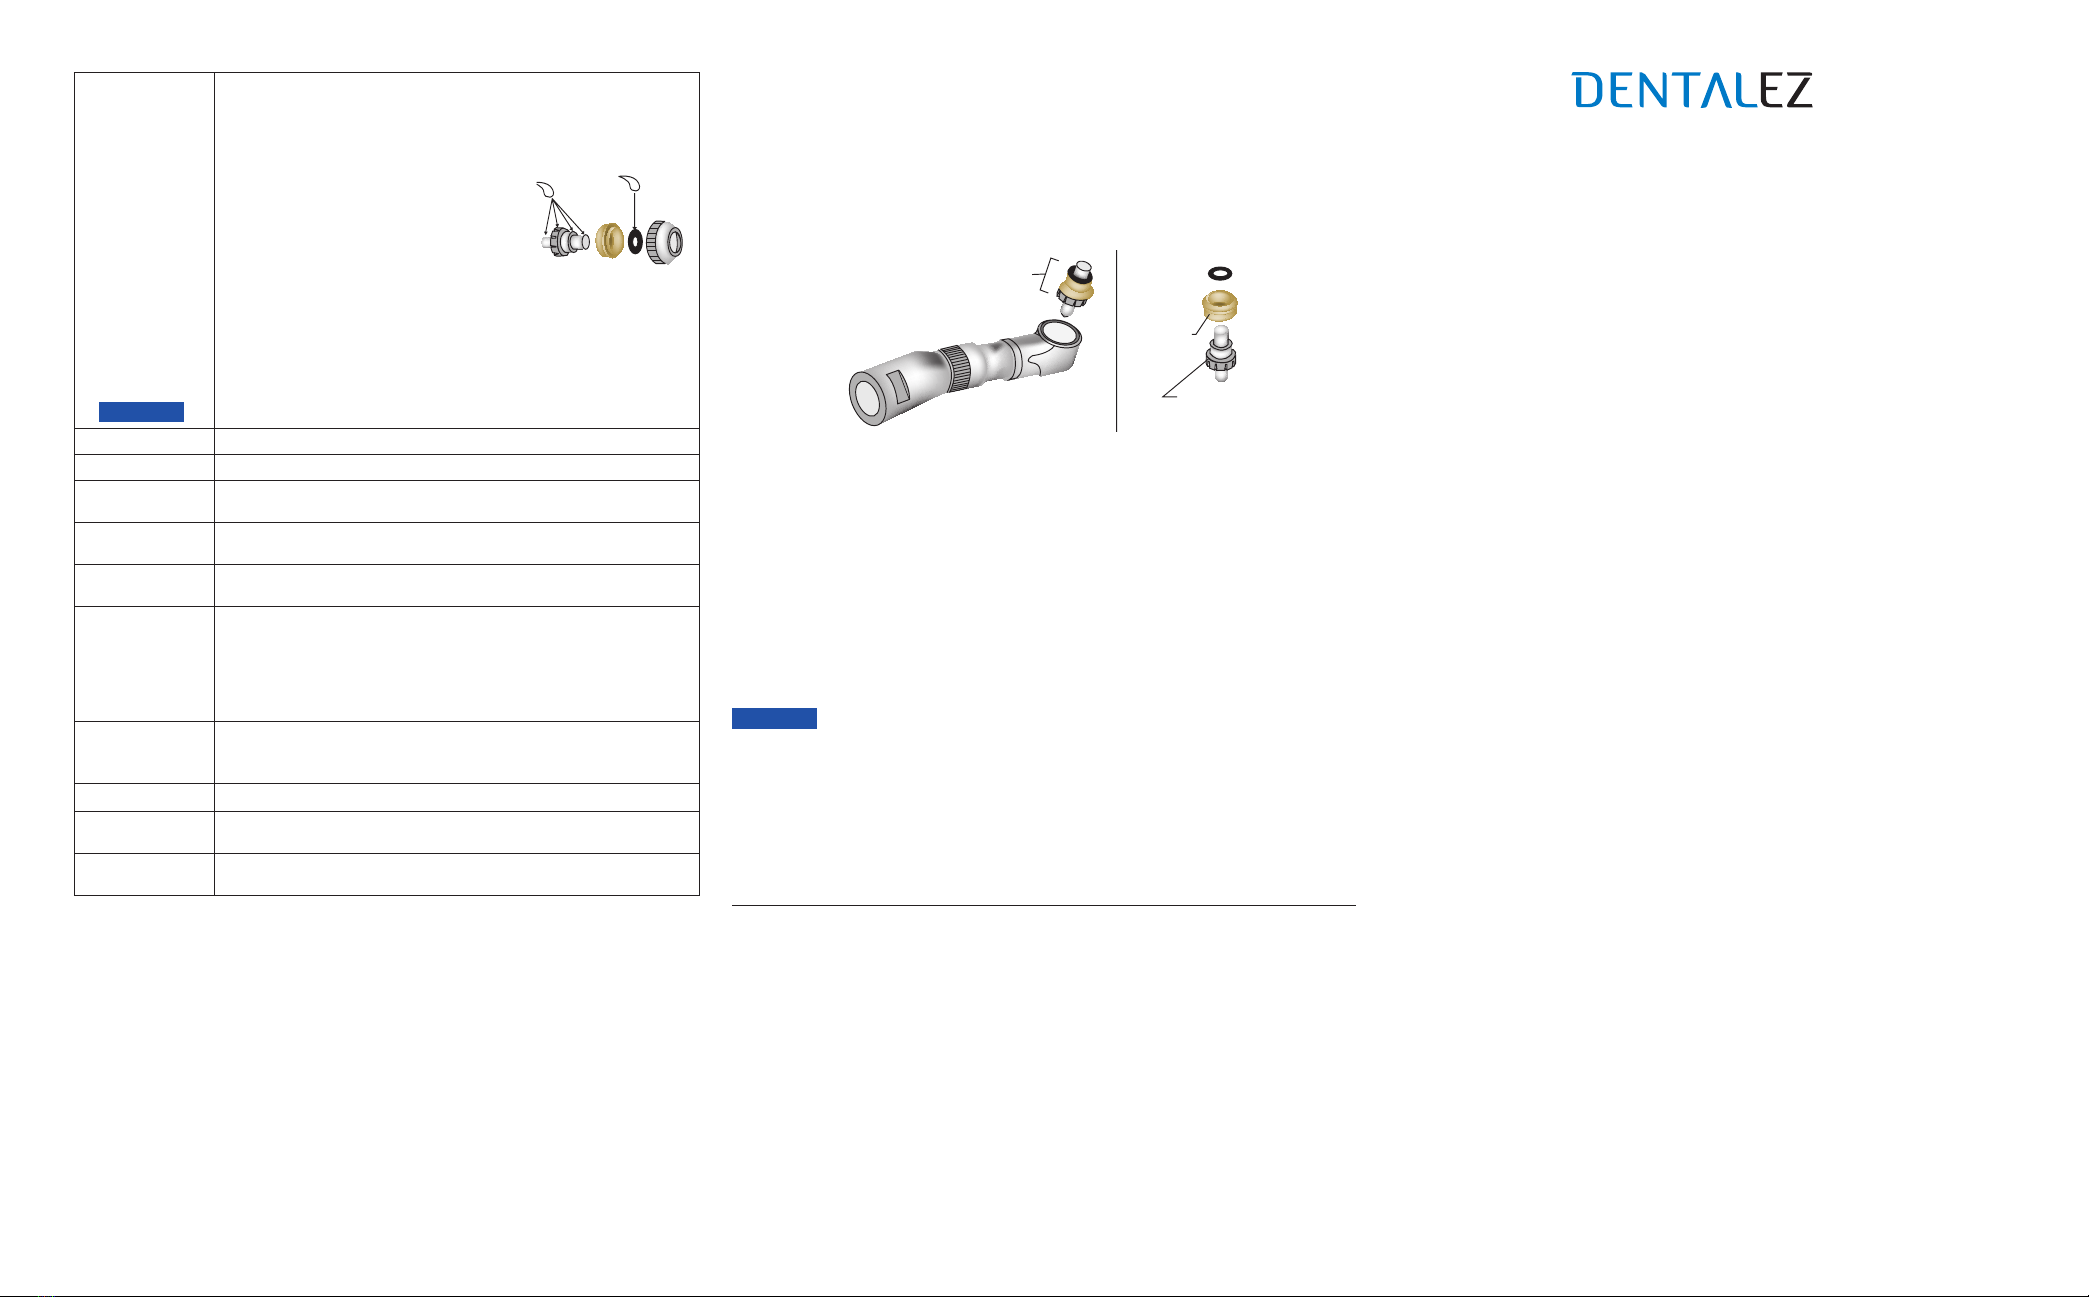
CARTRIDGE REPLACEMENT
CARTRIDGE
GEAR
ASSEMBLY
BRONZE
BUSHING
1. Remove the end cap using the plastic wrench to turn it clockwise. (See illustration
under Cleaning and Lubricating.)
Note: Do not use pliers on the bronze bushing.
2. Pull bronze bushing to remove cartridge from prophy head as shown below in (FIG.
10). If cartridge is not removable by hand, thread a prophy cup or a screw-to-button
adapter in the cartridge and tug on it.
3. Separate gear assembly from the bronze bushing by pulling apart as shown above.
4. If gears are worn, replace cartridge, Star Part #258948. If not, simply wipe clean
with a lint free cloth.
5. Wipe the inside of the housing with a lint free cloth or cotton swab, barely
dampened with solvent.
Note: Do not immerse head in solvent.
6. Guide the shaft of the gear assembly through the center of the bronze bushing.
Install the assembled cartridge into the angle housing.
7. Position end cap and turn counterclockwise. Hand tighten to secure. Use wrench to
fully seat – 30° maximum.
Do not overtighten as poor performance and damage to angle may result.
PROBLEM: LOW POWER
Cause: Air leak at motor
Correction: Replace gasket;
refer to Titan Motor Instruction Manual.
Cause: Debris build-up
Correction: Refer to Cleaning and Lubricating section.
Cause: Faulty angle
Correction: Replace cartridge.
Note: If a problem persists, contact dealer for further assistance;
or, contact Star technical service at: 1-866-DTE-INFO (1-866-383-4636)
ALWAYS INSIST ON STAR PARTS FOR BEST PERFORMANCE.
DESCRIPTION ITEM NUMBER
NOTICE
NOTICE
CLEANING
MANUAL
CONTINUED:
7. When prophy paste is consistently found in the cartridge, install a new
bronze bushing, or a new cartridge, Star Part #258948, which includes
the bronze bushing. Replacing the bronze bushing renews the seal and
protects the gear and bearing from abrasive paste.
8. Wipe the inside of the housing with a lint-free cloth or cotton swab.
Note: Do not immerse head in solvent.
9. After cleaning, apply one drop of DentaLube II,
Star Part #262539, to the inside
diameter of the O-ring and to the gear as
shown. (See FIG. 9)
10. To reassemble, insert gear assembly into bronze bushing and guide
shaft through the hole in O-ring. Install cartridge into prophy head
angle.
11. Turn end cap counterclockwise and hand tighten to secure. Use
wrench to fully seat – 30° rotation maximum.
Do not overtighten as poor performance and damage to angle may result
LUBRICATION: Lubricate - See ‘Lubrication’ instruction section.
DISINFECTION: Use steam sterilization exclusively for complete sterility as outlined below.
MAINTENANCE: Angle should be routinely maintained, checked for corrosion, worn parts,
etc. and should be replaced on an as needed basis.
INSPECTION &
FUNCTION TESTING:
See Installation, Operating Recommendations, and/or Troubleshooting
sections of this manual.
PACKAGING: Single: A standard sterilization packaging material must be used. Ensure
that the pack is large enough to contain the item without stressing the seals.
WRAPPED
INSTRUMENT
STERILIZATION:
Gravity Type Autoclave: Pre-Vacuum
Autoclave:
• Minimum of 15 minutes at 132° C • Minimum of 4
minutes at 132° C
• Minimum of 30 minutes at 121° C
Do not exceed 135° C
DRYING: Dry the prophy angle for 30 minutes minimum using the sterilization dry
cycle and allow the prophy angle to cool to room temperature in bag prior to
use. If moisture is present, increase your sterilizer dry cycle appropriately.
STORAGE: Store in bag after sterilization until ready to use.
ADDITIONAL
INFORMATION:
Do not exceed the sterilizer manufacturer’s guidelines for load capacity. Use
only paper or paper/plastic bags.
MANUFACTURER
CONTACT:
See first or last panels of this manual.
FIG. 9 FIG. 10
LIMITED WARRANTY
O-Rings and Seals are specifically excluded from this warranty.
DENTALEZ warrants the Titan Lubricated Five Star Prophy Angle to be free of defects in material and
workmanship, under normal usage, under the following terms:
Star Products: Warranty Period*:
Lubricated Five Star Prophy Angle 3 Months from date of purchase
Please note the following additional terms of our warranty and return policy:
• Warranty covers manufacturing defects only and does not cover defects resulting from abuse,
accidents, misuse, improper handling, cleaning, care or maintenance or the failure to follow or
observe our operating/use, maintenance and/or installation instructions. Damage resulting from
the use of chemicals, cleaners, disinfectants or sterilization is not covered under this warranty
nor is normal wear and tear. Failure to use authorized parts or an authorized repair facility voids
this warranty.
• Liability is limited to repair or replacement of the defective part(s) or products at our sole discretion.
All other liabilities, in particular liability for damages, including, without limitation, special, exemplary,
consequential or incidental damages are excluded
• THIS WARRANTY IS IN LIEU OF ALL OTHER WARRANTIES, EXPRESSED OR IMPLIED,
INCLUDING ANY IMPLIED WARRANTIES OF MERCHANTABILITY OR FITNESS FOR A
PARTICULAR PURPOSE. NO EMPLOYEE, REPRESENTATIVE OR DEALER IS AUTHORIZED
TO CHANGE THIS WARRANTY IN ANY WAY OR TO GRANT ANY OTHER WARRANTY.
*Provided conditions in warranty are met.
WARRANTY REGISTRATION
Please visit the website below to register your Star product.This will ensure proper registration and prompt
and accurate service should any of your purchases need evaluation or repair during the warranty period.
Star Products: WWW.DENTALEZ.com/warranty
FOR NEW PRODUCTS, MANUALS AND TECHNICAL INFORMATION, CALL
1-866-DTE-INFO OR VISIT OUR WEB SITE @ WWW.DENTALEZ.COM
IMPORTANT NOTICE ABOUT RETURNING PRODUCT TO DENTALEZ INC.
Anyone wishing to return any DENTALEZ Inc. product to a DENTALEZ facility MUST obtain the proper
RETURN AUTHORIZATION NUMBER from the Customer Service Department. The RA Number must
appear clearly marked on both the outside and inside of the returned product carton. When calling for
a return authorization number you will be asked to provide the following information:
To Obtain A
Return Authorization
Number Call
1-866-DTE-INFO
1. Product Name, Model Number or Part Number
2. Serial Number of Product
3. Dealer Return Purchase Order Number
4. Reason For Return
5. Copy of Invoice Showing Purchase
Items will be evaluated. Return Authorization Number is not a guarantee for credit. Your cooperation
with this procedure will help us expedite processing of any returns.


