ELRO AG400011 User manual


A
B
C
AG400011
HOME ALARM – Quick Start Guide
Congratulations on your purchase of the ELRO AG400011 Home Alarm system. You have just
purchased one of the most advanced and feature-rich wireless security systems on the market
today.
This quick start guide describes how to install your security system (alarm panel, remote,
door/window contact, PIR motion sensor, and RFID Alarm Tags). For a full explanation of all the
functions of the system, you can consult the full manual at www.elro.eu.
ALARM PANEL OVERVIEW
A. Touch keypad D. RFID sensor area
G. Battery cover
B. Microphone E. GSM status led
H. Wall mounting bracket
C. Siren F. Speaker
1. Remove the battery cover of the alarm panel.
2. Insert a SIM card into the slot and connect the Li-ion cell 2000mAh 3.7V and the 9V power
adapter.
Note: The SIM card must be unlocked before use. You can use a mobile phone to cancel the
input of a PIN code or PUK code.
3. Wait until the GSM status LED blinks slowly (once every 3 seconds) indicating that the SIM
card is ready for use.
1. Install batteries in the included accessories.
2. Open the PIR motion sensor’s rear cover and insert the 3 included AA batteries. (Figure A)
3. Twist open the battery cover of the remote control using a coin and insert the coin cell
battery inside. (Figure B). Replace the cover and press any key to ensure the red LED on the
remote lights up.
4. Open the door/window contact battery cover and insert the 3 included AAA batteries.
(Figure C)
1. Make a new contact in your phone’s address book for the alarm panel (for instance called
‘Home Alarm’), and input the number of the SIM card that you placed in the alarm panel.
2. To program your phone number in the alarm panel, follow these steps:
(example: 1234 + 66 + + 09 5555 1212 + )
Step 1 – Power on and SIM Card Installation
Step 3 – Setting up the GSM host number
Step 2 – Insert the batteries
66
Owner’s
Phone number
1234
AG4000 Alarm panel
AG40TA13
Alarm Tags
AG40PR11A
PIR Motion sensor
AG40MA11A
door/window
contact
AG40RE11
Remote

3. You will receive an SMS message saying the phone number was set successfully.
4. Your alarm panel can now be controlled from your phone via app and SMS (Step 9).
1. The alarm panel’s built-in microphone can record your message.
On the alarm panel enter the following:
2. When the record button flashes green, speak into the alarm panel’s microphone to
record a brief alarm message. The maximum length of the message is 10 seconds.
3. When the light stops flashing, the panel will play back the alert message.
Note: Included accessories are pre-binded with the alarm panel at
the factory and ready for use.
1. Test the communication link by pressing disarm on the
remote
2. The red indicator on the remote should light up, and the alarm
panel should sound a long beep.
1. RFID tags can be used to disarm the system.
2. Arm the system using the remote control, ensure that the
ARM icon lights up.
3. Hold the RFID tag near the panel in front of the small hand icon
after arming the system.
4. You should hear a long beep and the disarm indicator should
light up.
5. Several RFID tags can be added and each can have a different number.
1. Put the alarm panel in test mode by inputting:
The disarmed icon will flash when in this mode.
2. Press and release the tamper switch inside the PIR motion sensor (pictured on the right) until
the alarm panel makes a chime sound.
3. Place the rear cover back on the PIR motion sensor.
1. Leave the system in test mode.
2. Press and release the tamper switch on the back of the
sensor until the alarm panel makes a chime sound.
With the "ELRO Home Alarm" app you can remotely access the ELRO
Home alarm system from your smartphone. You can easily disarm and
(partially) arm your alarm system, and receive alert messages on your
smartphone when emergencies occur.
1. On the Google Play Store or Apple App Store, search for “ELRO Home Alarm” and install the
app.
2. Add a new system and choose a name, then enter the phone number belonging to the SIM
card you have inserted into the alarm panel.
3. Select the newly created system from the home screen (Image D below)
4. Then click on the status button to request the current status of the system. (Image E below)
5. A pop-up will appear asking to send an SMS to request the current system status. Select ok.
(Image F below)
6. An SMS with the system status will be sent to your phone. (Image G below)
Step 7 – Testing the PIR motion sensor (SP831)
Step 9 – Smartphone app Setup
Step 4 – Record an alert voice message
Step 5 – Test the remote control (SR401 )
Step 6 – Test the RFID key tag
Step 8 – Test the door / window contact (SM831)
1234
1234
03
Important: If the siren goes off at any point during the setup, press
the Disarm button on the remote to immediately turn off the siren
Important: Make sure you’re installing the app on the same phone you used in Step 2.

D
E
F
G
1. In the app go to settings, then select alerts.
2. Select the type of notification number you want to add, then click one of the fields saying
‘add phone number’ to add a number.
3. In the field that pops up you can type the phone number you want to add, and by clicking the
picture with a plus in the middle you can also add a picture for
that number.
Note: Adding a contact into the SMS list will also enable that
contact to have limited access of the GSM panel using the App.
They can Arm/Partial Arm/Disarm the system but do not have
access to other settings.
1. To customize RFID tag names, go to settings in the app, then select tags.
2. Select the tag that you wish to customize.
3. Input a name for the tag in the field that pops up. By clicking the picture above the text
field, you can also assign a picture to this tag.
4. An SMS will be sent to notify you when the name has been successfully changed.
5. In the settings menu of the app, select zones to rename security accessories
6. Rename the zones to indicate the device location and purpose, for example “Main door”.
7. If the change is successful, the user will receive an SMS confirmation.
We STRONGLY advise changing the default system PIN code to prevent any unauthorized
access to your alarm panel.
1. To do so, on the alarm panel enter:
2. After hearing the beep, enter a new 4-digit PIN code +
3. To make sure the new PIN code has been changed, try to arm the system.
Step 10 – Adding numbers for Alarm notification
Step 11 – Customize RFID and Zone names
Step 12 – Change Default PIN code
1234
06
****
****

4. The system should arm successfully using the new PIN code.
Perform a quick test after the system has been set up and configured.
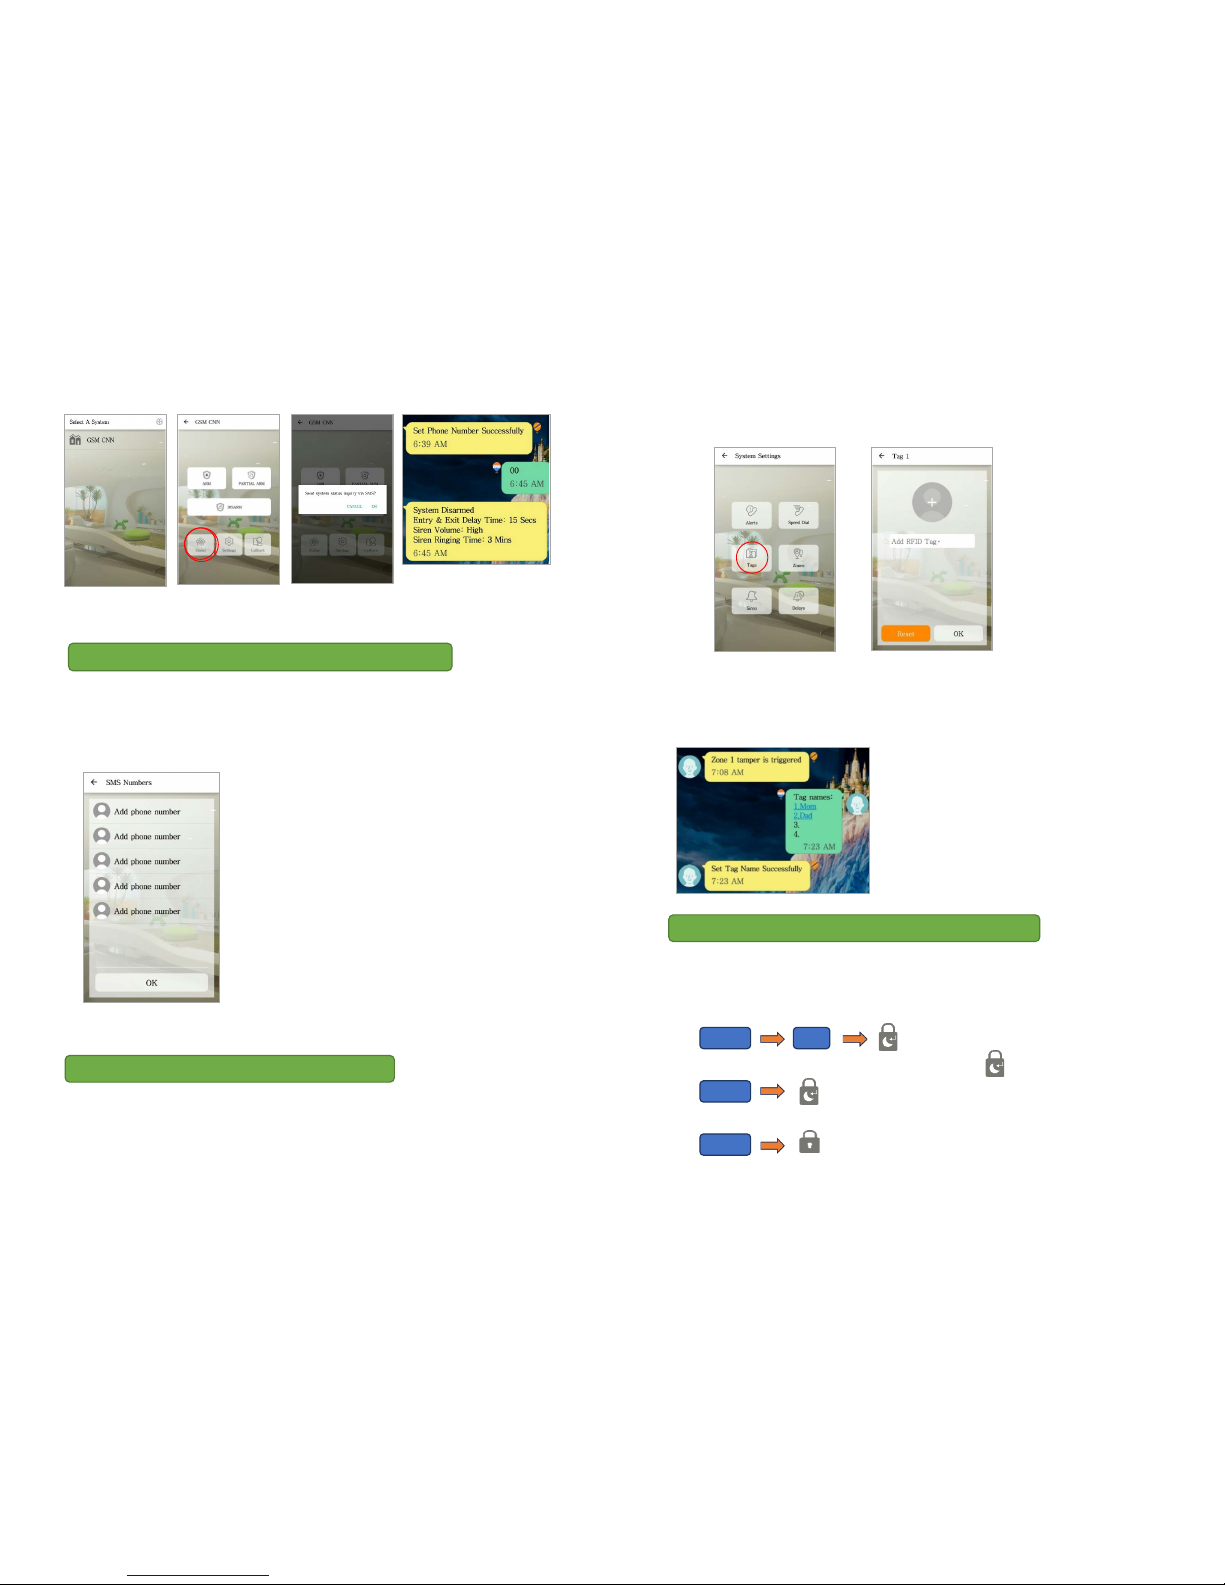
1. First disarm the system using the app
2. Re-arm the system using the app
3. Trigger an alarm using the PIR and door/window detector.
4. Use the remote control to turn off the alarm once it has been triggered.
5. Check the notifications to ensure that they are correct.
Note: To conserve its battery life, the PIR Motion sensor can be triggered only once every 2
minutes.
Daily operations from alarm panel:
Function Button Icon Remark Action
Arm Activates the alarm for monitoring. Enter (PIN code) +
Disarm Deactivates the alarm. Enter (PIN code ) +
Alarm Panel
Selecting a suitable location:
Mount the alarm panel close to the door which you normally use to enter/exit your house.
Note that the alarm panel requires a power outlet to function properly.
Ensure the location selected has good GSM
reception. You can do this by cross checking the
signal bar on your phone at that location.
The panel must not be located or operated in
conjunction with any other nearby transmitter or
antenna.
1. Remove the back panel mounting bracket of the alarm panel and mount the bracket on the
wall using wall anchors and screws.
2. Once secured, ensure the power is connected and reattach the alarm panel to the secured
mounting bracket.
Door/Window contact
If possible, locate sensors within 100 ft. (30m) of the panel. While a transmitter may have a range
of 350 ft. (106 m) or more out in the open, the environment at the installation site can have a
significant effect on transmitter range
1. Mount the sensor on the door frame and the
magnet on the door. If the sensor is used on
double doors, mount the sensor on the least-
used door and the magnet on the most-used
door.
2. Place sensors at least (1.5 m) above the floor to
ensure the best transmission range.
3. Make sure the alignment arrow on the magnet
points to the alignment mark on the sensor.
4. Avoid mounting sensors in areas where they
will be exposed to moisture or high
temperatures.
5. Use spacers (not included) to keep sensors and
magnets away from metal or metallic surfaces
such as foil wallpaper.
PIR Motion Sensor
The recommended position for a PIR Detector is in the corner of a room mounted at a height
between 1.8 and 2m. At this height, the detector will have a range of up to 10m with a field of view
of 110°(see figure below). Keep sensors within 30 m (100 ft) of the alarm panel.
Step 13 – Final test before mounting the system
Step 14 – Mounting the system
91
3
5
7
Corner mounted

Drill for corner monuting
Drill for flat wall monuting
1. Fix the motion sensor to the wall by using the
adhesive tape provided.
2. If you need to drill it on the wall, remove the rear
cover and drill through the rear cover. Drill guides
are provide for flat mount or corner mount (see
below)
3. Once the back cover is secured reattach the main body of the sensor to the back cover.
Home is not a place, it’s a feeling
We hope you’ll enjoy your purchase and the safety and comfort that comes with your ELRO
Alarm System. We pay close attention to the quality of our products. In addition, we find an
easy installation and user convenience very important. We are aware that there will always be
things we can improve. You can tell us better than anyone what we can improve. Therefore,
we would love to hear about your product experience, from installation to daily use of your
alarm system. Please visit www.elro.eu and give your opinion on our ELRO Alarm Systems.
Your feedback is very welcome. On our website, you’ll also find an overview of compatible
accessories and other ELRO security and comfort products that ensure an easier and safer way
of living.
We wish you a safe & happy home,
Ad Daamen,
CEO, ELRO Europe
Other ELRO Security System manuals

ELRO
ELRO AG400011 User manual

ELRO
ELRO PK4910 User manual

ELRO
ELRO HIS20S Installation instructions

ELRO
ELRO DVR158S User manual

ELRO
ELRO AS80SR11B User manual

ELRO
ELRO CS87T User manual

ELRO
ELRO DVR154S User manual

ELRO
ELRO DWH SERIES Instruction Manual

ELRO
ELRO AG40SR11A User manual

ELRO
ELRO EL431DVR User manual

ELRO
ELRO Pro Alarm System AP5500 User manual

ELRO
ELRO CZ60RIP11S Service manual

ELRO
ELRO DWH SERIES Service manual

ELRO
ELRO AS90S User manual

ELRO
ELRO FR350111R User manual

ELRO
ELRO AG40SR11B Reference manual

ELRO
ELRO C901 User manual

ELRO
ELRO AS800011 User manual

ELRO
ELRO AS80SR11A User manual

ELRO
ELRO AS90SRB User manual