EUFAB 16420 User manual

1
DE Parkplatzsperre, abklappbar
Art.-Nr. 16420
DE GB FR NL IT
1. Bestimmungsgemäßer Gebrauch
2. Lieferumfang
3. Spezikationen
4. Sicherheitshinweise
5. Bedienungsanleitung
6. Gebrauch
7.Wartung und Pege
8. Hinweise zum Umweltschutz
8.Wartung und Pege
9. Kontaktinformationen
Dieses Produkt ist vorgesehen für das Sperren von Parkplätzen undVerkehrswegen gegen unbefugte Benutzung auf ausschließlich privatem Gelände. Das Produkt ist nicht
vorgesehen für den Einsatz auf öentlichenVerkehrsächen und nicht im Geltungsbereich straßenverkehrsrechtlicher Bestimmungen.
Die Parkplatzsperre kann nur auf festen, massiven Untergründen (Betonplatten, Asphalt) befestigt werden. Pastersteine, Rasensteine oder ähnliches sind ungeeignet.
Dieses Gerät ist nicht dafür bestimmt, durch Kinder und Personen mit eingeschränkten geistigen Fähigkeiten oder ohne Erfahrung und/oder mangels Wissen benutzt zu
werden. Kinder sind von dem Gerät fernzuhalten.
Das Gerät ist nicht für den gewerblichen Einsatz bestimmt.
Zum bestimmungsgemäßem Gebrauch gehört auch die Beachtung aller Informationen in dieser Anleitung, insbesondere die Beachtung der Sicherheitshinweise. Jede
andere Verwendung gilt als nicht bestimmungsgemäß und kann zu Sach- oder Personenschäden führen. Die EAL GmbH übernimmt keine Haftung für Schäden, die durch
nicht bestimmungsgemäßen Gebrauch entstehen.
• Halten Sie Kinder fern und lassen Sie Kinder dieses Gerät nicht bedienen!
• Benutzen Sie dieses Produkt nur für die dafür vorgesehene Verwendung!
• Manipulieren oder zerlegen Sie das Gerät nicht!
• Verwenden Sie zu Ihrer eigenen Sicherheit ausschließlich Zubehör oder Ersatzteile, die in der Anleitung angegeben sind, oder derenVerwendung durch den Hersteller
empfohlen wird!
• Wählen Sie einen Aufstellort für die Parkplatzsperre, an dem sie im abgeklappten Zustand ach auf dem Boden auiegt, damit Sie schadensfrei darüber hinweg fahren
können.Vermeiden Sie Kuppen oder Senken oder die Nähe davon.
• Bevor Sie das erstemal mit Ihrem Fahrzeug über die abgeklappte Parklatzsperre fahren, holen Sie sich eine zweite Person zur Hilfe, die Sie einweist und Sie warnt, falls
die Gefahr einer Kollision besteht.
• KlappenSie die Parkplatzsperreimmererstganzab, sodaß sieachaufdem Boden liegt, bevorSiemitIhremFahrzeug über die ParkplatzsperreaufIhrenParkplatzfahren.
• Die EAL GmbH übernimmt keine Haftung für Reifenschäden, die durch das Überfahren der Parkplatzsperre entstanden sind.
Übersicht
1. Bestimmungsgemäßer Gebrauch
4. Sicherheitshinweise
2. Lieferumfang
3. Spezikationen
WARNUNG
Lesen Sie die Bedienungsanleitung vor Inbetriebnahme sorgfältig durch und beachten Sie alle Sicherheitshinweise!
Nichtbeachtung kann zu Personenschäden, Schäden am Gerät oder Ihrem Eigentum führen!
Bewahren Sie die Originalverpackung, den Kaufbeleg sowie diese Anleitung zum späteren Nachschlagen auf! Bei der Weitergabe
des Produkts geben Sie auch diese Anleitung weiter.
Prüfen Sie vor Inbetriebnahme den Inhalt der Verpackung auf Unversehrtheit und Vollständigkeit!
Position Stückzahl Bezeichnung
1 1x Stütze Innenteil
2 1x Stütze Außenteil
3 2x Reektorstreifen
4 1x Rohrbügel
Position Stückzahl Bezeichnung
5 3x Befestigungsschuh
6 1x Stütze aus 1 und 2
7 1x Bügelschloß
8 6x Schraube 6 x 90
Breite: 75,5 cm
Höhe, aufgestellt: 40 cm
Überfahrhöhe: 7 cm
Material: Stahlrohr, verzinkt
Gewicht: 5,200 kg
Position Stückzahl Bezeichnung
9 6x Dübel Ø 8 mm
10 6x Mutter M6, selbstsichernd
11 6x Schraube M6 x 16
5. Bedienungsanleitung

2
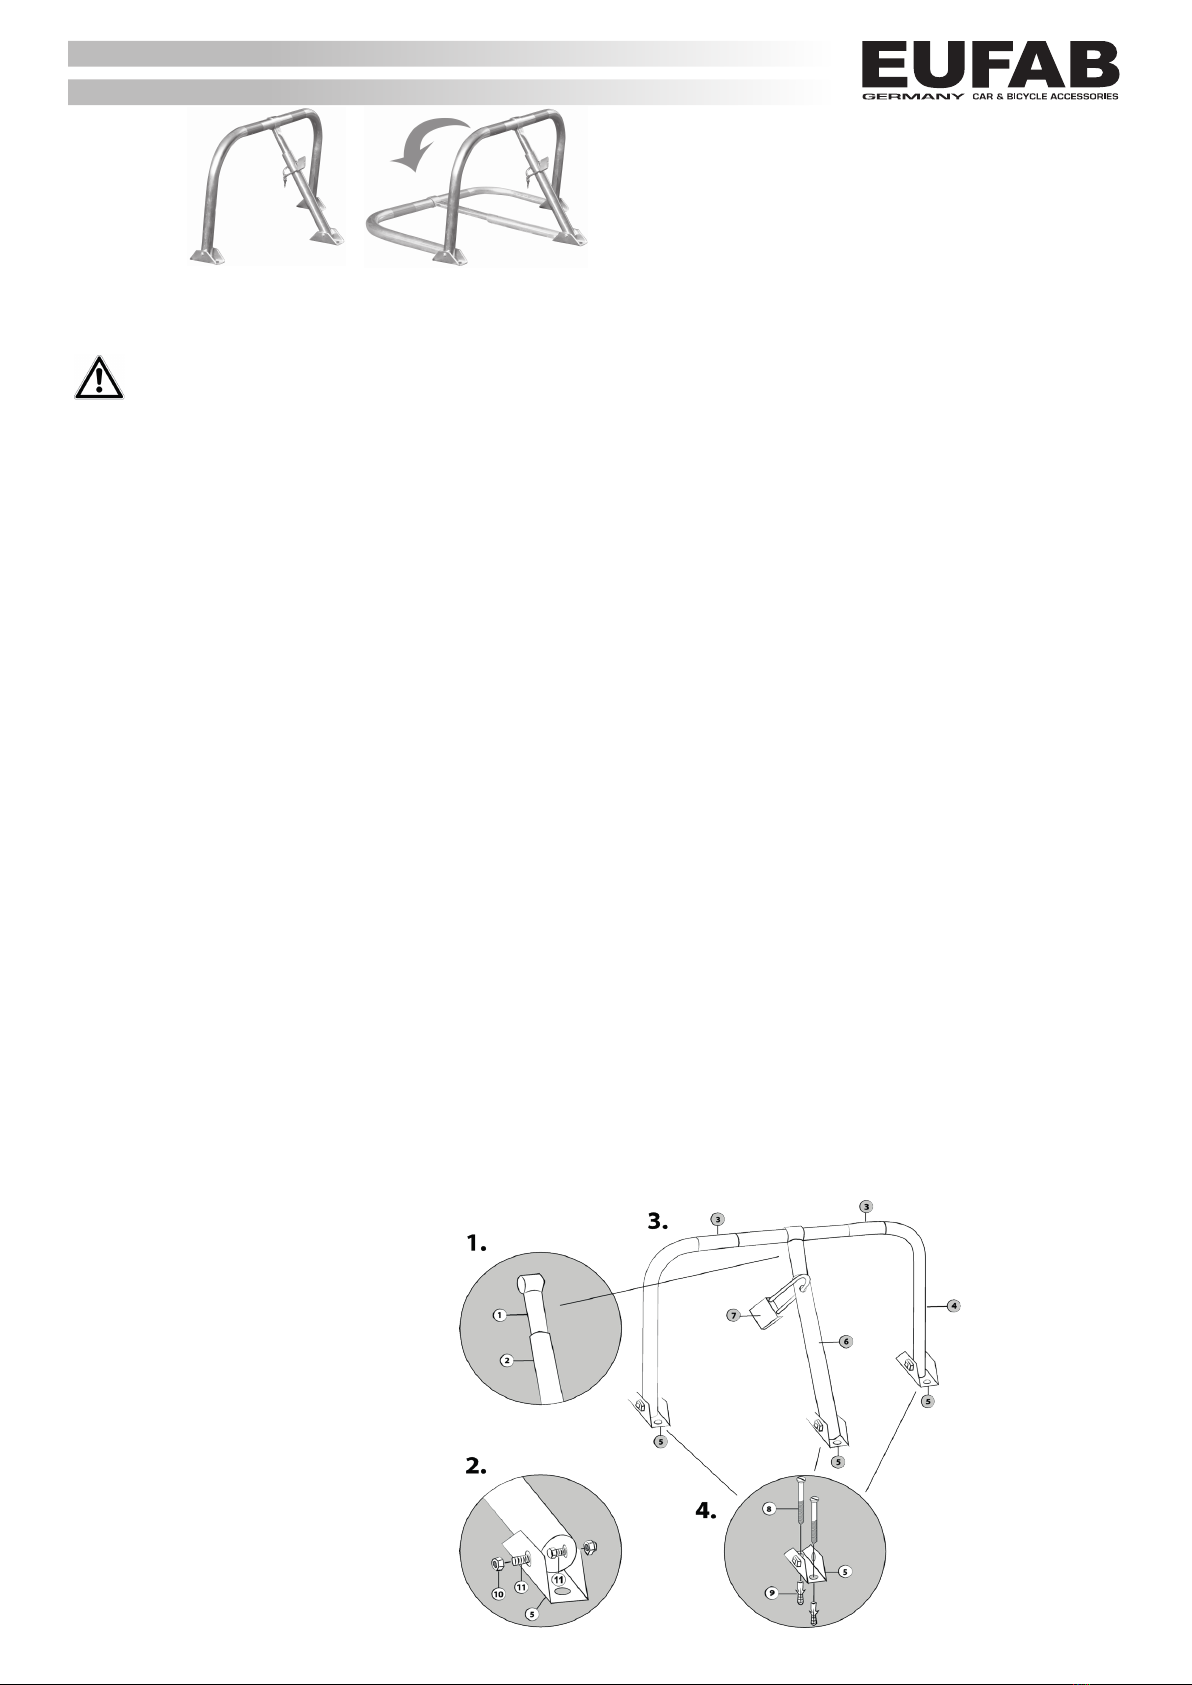
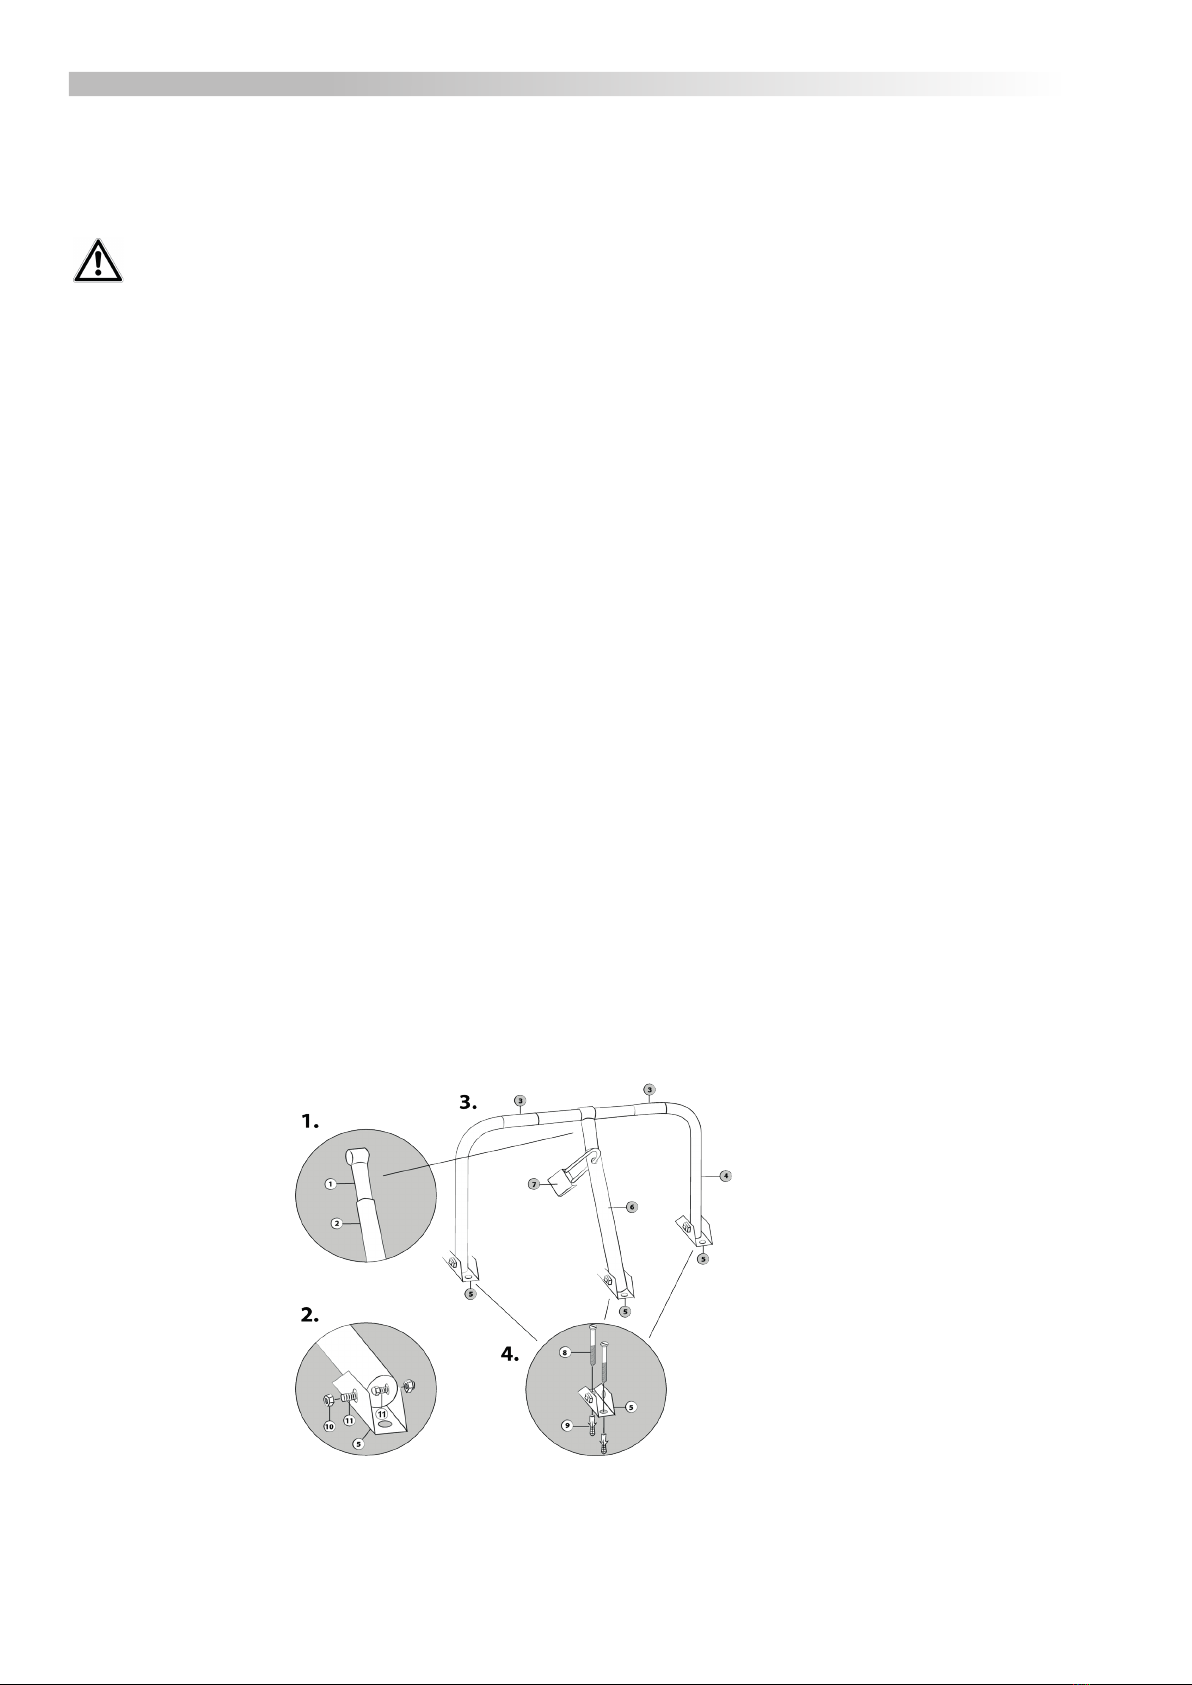
Schritt1: Montage der Stütze
Stecken Sie das Innenteil (1) in das Außenteil (2) der Stütze. Schieben Sie die beiden Rohre in die Position, bei der die Bohrungen des Innen- und des Außenteils übereinander
liegen. Önen Sie das Bügelschloß. Stecken Sie das oene Ende des Schlosses durch die Bohrungen und verschließen Sie das Schloß wieder. Dies ist jetzt das Bauteil (6),
Stütze. Schieben Sie die Stütze (6) mit dem kurzen Querrohr auf den Rohrbügel (4).
Schritt 2: Montage der Befestigungsschuhe
Legen Sie je ein Rohrende in einen Befestigungsschuh (5), siehe Skizze. Bringen Sie die Bohrungen der Rohrenden und der Befestigungsschuhe zur Deckung. Stecken Sie an
jedem Rohrende zwei Schrauben M6 x 16 (11) von innen nach außen durch die
Bohrungen. Setzen Sie die selbstsichernden Muttern M6 (11) auf die Schraubenenden. ACHTUNG: Dabei muß der Kragen der Mutter oben sein. Ziehen Sie die Muttern nur
so fest an, daß sich die Befestigungsschuhe auf den Rohrenden noch leicht drehen lassen.
Schritt 3: Anzeichnen der Befestigungspunkte
Klappen Sie die Parkplatzsperren an ihrem Aufstellort auf. Richten Sie die Stütze (6) so aus das der Bügel (4) senkrecht steht. Zeichnen Sie durch die Bohrungen der Befesti-
gungsschuhe (5) die Punkte an, wo später die Löcher für die Dübel gebohrt werden sollen.
Schritt 4: Montage der Parkplatzsperre auf dem Parkplatz
Bohren Sie an den angezeichneten Punkten Löcher mit 8 mm Durchmesser und ca. 90 mm tief. Stecken Sie die Dübel (9) in die Bohrlöcher. Setzen Sie die Parkplatzsperre mit
den Befestigungsschuhen auf die Bohrlöcher. Stecken Sie die Schrauben 6 x 90 (8) durch die Bohrungen der Befestigungsschuhe in die Bohrlöcher. Schlagen Sie vorsichtig
mit einem leichten Hammer die Schrauben einige Zentimeter in die Bohrlöcher. Ziehen Sie die Schrauben jetzt fest an.
Bringen Sie zum Schluß die beiden Reektorstreifen (3) am oberenTeil des Bügels an, siehe Skizze.
Abklappen der Parkplatzsperre
Aufstellen der Parkplatzsperre
7. Wartung und Pege
8. Hinweise zum Umweltschutz
Zuerst Önen Sie das Schloß (7). Entfernen Sie das Schloß. Klappen Sie den Bügel (4) nach unten (von der Stütze (6) weg) bis er ach auf dem Boden liegt.
Klappen Sie den Bügel (4) hoch, bis er senkrecht steht und die Bohrungen des Innen- (1) und des Außenteils (2) der (6) Stütze übereinanderliegen. Önen Sie das Schloß (7).
Stecken Sie das freie Ende des Schlosses durch die Bohrungen der Stütze (6).Verriegeln Sie das Schloß. Ihr Parkplatz ist jetzt vor unbefugter Benutzung geschützt.
Die Parkplatzsperre selbst ist bei bestimmungsmäßigen Gebrauch wartungsfrei. Das Schloß schmieren Sie regelmäßig mit einem harzfreien Kriechöl (z. B. WD40).
Bitte entsorgen Sie dieses Gerät über dieWertstotonne oder die öentlichen/kommunalen Sammelstellen.
Die Materialien sind recycelbar. Durch Recycling, stoicheVerwertung oder andere Formen derWiederverwendung von Altgeräten leisten Sie einen wichtigen Beitrag zum
Schutz unserer Umwelt!
Montage
6. Gebrauch
Stellen Sie sicher, daß die Parkplatzsperre ganz abgeklappt ist und sie ach auf dem Boden liegt, bevor Sie mit Ihrem Fahrzeug über die
Parkplatzsperre auf Ihren Parkplatz fahren.
Bevor Sie das erstemal mit Ihrem Fahrzeug über die abgeklappte Parklatzsperre fahren, holen Sie sich eine zweite Person zur Hilfe, die Sie
einweist und Sie warnt, falls die Gefahr einer Kollision besteht.
9. Kontaktinformationen
EAL GmbH
Otto-Hausmann-Ring 107
42115Wuppertal, Deutschland
+49(0)202 42 92 83 0
+49 (0) 202 42 92 83 – 160
info@eal-vertrieb.com
www.eal-vertrieb.com
GB PARKING SPACE saver, folding
Art. No.16420
1. Proper use of the product
2. Scope of delivery
3. Specications
4. Safety precautions
5. Operating instructions
6. Use
7. Maintenance and care
8. Notes regarding environmental protection
9. Contact information
This product is designed to block parking spaces and trac routes to prevent unauthorised use on private property only. This product is not designed for use on public routes
and may not be used in areas covered by the road trac regulations.
The parking space saver can only be mounted to rm, solid surfaces (concrete panels, asphalt). Paving slabs, cellular paving blocks or similar are not suitable.
This device is not designed to be used by children and people with limited mental capacities or those without experience and/or knowledge. Keep children away from the
device.
The device is not designated for commercial use.
Use according to the intended purpose also includes the observance of all information in these operating instructions, particularly the observance of the safety notes. Any
other utilisation is considered to be contrary to the intended purpose and may lead to material damages or personal injuries. EAL GmbH assumes no liability for damage
resulting from improper use.
Overview
1. Proper use of the product
WARNING
Read the operating instructions through carefully prior to initial use and observe all of the safety notes!
Not observing such may lead to personal injury, damages to the device or your property!
Store the original packaging, the receipt and these instructions so that they may be consulted at a later date!When passing on the
product, please include these operating instructions as well.
Please check the contents of package for integrity and completeness prior to use!

3
• Keep children away and do not allow children to operate this device!
• Only use this product as intended!
• Do not manipulate or disassemble the device!
• For your own safety, only use accessories and spare parts that are stated in these instructions or that are recommended by the manufacturer!
• Select a position for the parking space saver in which you are able to drive over the top of it, without damaging your vehicle, when the device is folded down to the
ground. Avoid crests or drops or the vicinity of such.
• Before you drive your vehicle over the folded parking space saver for the rst time, have a second person as your assistant, who will guide you and warn you if there is
a risk of collision.
• Always fold the parking space saver down fully so that it is at on the ground before driving your vehicle over the saver onto your parking space.
• EAL GmbH accepts no liability for tyre damages caused by driving over the parking space saver.
4. Safety precautions
2. Scope of delivery
3. Specications
Position Number of items Description
1 1x Support inner tube
2 1x Support outer tube
3 2x Reector strips
4 1x U-shaped bar
Width: 75.5 cm
Height when raised: 40 cm
Height when at: 7 cm
Material: Steel piping, galvanised
Weight: 5,200 kg
Position Number of items Description
5 3x Mounting bracket
6 1x Support made up of 1 and 2
7 1x Padlock
8 6x Screws 6 x 90
Position Number of items Description
9 6x Dowels Ø 8 mm
10 6x Nut M6, self-tapping
11 6x Screws M6 x 16
5. Operating instructions
9. Contact information
Step 1: Assembling the support
Insert the inner tube (1) into the outer tube (2) of the support. Slide both tubes to a position in which the drilled holes of the inner and outer tubes are positioned over one
another. Open up the padlock. Insert the open end of the lock through the drilled holes and close the lock again.This has formed the support (6) element. Slide the support
(6) with the short transverse tube onto the U-shaped bar (4).
Step 2: Attaching the mounting brackets
Place each end of the bar into a mounting bracket (5), see sketch. Make sure that the drilled holes of the pipe ends and the mounting brackets match up. At each end of the
bar, insert two screws M6 x 16 (11) from the inside to the outside through the drilled holes. Fit the self-tapping nuts M6 (11) to the ends of the screws. CAUTION:The collar
of the nut must face upwards. Only tighten the nuts suciently to enable the mounting bracket to rotate slightly on the bar ends.
Step 3: Marking the attachment points
Unfold the parking space saver at the intended location. Raise the support (6) in such a way that the bar is (4) vertical. Use the holes drilled in the mounting brackets (5) to
mark the positions for the dowel holes you will subsequently make.
Step 4: Installing the parking space saver in the parking space
Drills holes with a 8 mm diameter, approximately 90 mm deep, at the marked positions. Insert the dowels (9) into the drilled holes. Place the parking space saver, with
mounting brackets, in position on top of the drilled holes. Insert the screws 6 x 90 (8) through the holes of the mounting brackets into the drilled holes. Use a lightweight
hammer to gently knock the screws a few centimetres into the drilled holes. Now tighten the screws.
When you are nished, apply the two reector strips (3) to the upper section of the bar, see sketch.
Installation
Folding down the parking space saver
First open the padlock (7). Remove the padlock. Fold the bar (4) down (away from the support (6)) until it lies at on the ground.
6. Use
Make sure that the parking space saver is folded down fully and is at on the ground before you drive your vehicle onto your parking space.
Setting up the parking space saver
Fold the bar (4) up until it is vertical and the drilled holes of the inner (1) and outer tubes (2) of the support (6) line up. Open the padlock (7). Insert the open end of the
padlock through the holes in the support (6). Lock the padlock.Your parking space is now protected to prevent unauthorise access.
Before you drive your vehicle over the folded parking space saver for the rst time, have a second person as your assistant, who will guide you
and warn you if there is a risk of collision.

4
7. Maintenance and care
8. Notes regarding environmental protection
The parking space saver is maintenance-free when used in accordance with the intended purpose. Regularly lubricate the lock with a resin-free penetrating oil (e.g.WD40).
Please dispose of this device via the recycling bin or the public/municipal collection points.
The materials can be recycled. You make an important contribution to protecting our environment by recycling, material utilisation or other forms of reusing waste equip-
ment!
9. Contact information
EAL GmbH
Otto-Hausmann-Ring 107
42115Wuppertal, Germany
+49(0)202 42 92 83 0
+49 (0) 202 42 92 83 – 160
info@eal-vertrieb.com
www.eal-vertrieb.com
FR BARRIÈRE DE PARKING, rabattable
Réf. 16420
1. Utilisation conforme à l’emploi prévu
2. Etendue de la livraison
3. Spécications
4. Consignes de sécurité
5. Instructions d’utilisation
6. Utilisation
7. Entretien et maintenance
8. Consignes relatives à la protection de l’environnement
9. Informations de contact
Ce produit est conçu pour réserver des places de stationnement et des voies de circulation et les protéger contre une utilisation non autorisée sur des aires exclusivement
privées. Le produit n’est pas conçu pour une utilisation sur des zones destinées à la circulation publique et n’entre pas dans le champ d’application des dispositions relatives
au droit de la circulation.
La barrière de parking ne peut être xée que sur un sol ferme et massif (dalles en béton, asphalte). Les pavés, bordures en béton ou zones similaires ne sont pas appropriés.
Cet appareil n’est pas conçu pour être utilisé par des enfants et des personnes ayant des capacités mentales limitées, n’ayant pas l’expérience requise et/ou ayant un manque
de connaissances. Les enfants doivent être tenus éloignés de l’appareil.
L’appareil n’est pas conçu pour une utilisation professionnelle.
Le respect de toutes les informations gurant dans ce mode d’emploi, notamment le respect des consignes de sécurité, fait également partie intégrante de l’utilisation con-
forme à l’emploi prévu. Toute autre utilisation est considérée comme non conforme à l’emploi prévu et peut entraîner des dommages matériels ou corporels. La société EAL
GmbH décline toute responsabilité en cas de dommages découlant d’un usage non conforme à l’emploi prévu.
Sommaire
1. Utilisation conforme à l’emploi prévu
AVERTISSEMENT
Avant la mise en service, lisez attentivement le mode d’emploi et observez toutes les consignes de sécurité !
Un non-respect peut avoir pour conséquence des dommages corporels, un endommagement de l’appareil ou de votre véhicule !
Conservez l’emballage original, le ticket de caisse et ce mode d’emploi pour une consultation ultérieure ! Si vous transmettez le
produit, transmettez également ce mode d’emploi.
Avant la mise en service, vériez l’intégralité et le parfait état du contenu de l’emballage !
• Tenez les enfants éloignés et ne les laissez pas se servir de cet appareil !
• Utilisez ce produit uniquement pour l’usage prévu !
• Ne traquez pas et ne démontez pas l’appareil !
• Pour votre propre sécurité, utilisez exclusivement des accessoires et des pièces de rechange qui sont indiquées dans le mode d’emploi ou dont l’utilisation est recom-
mandée par le fabricant !
• Choisissez un emplacement sur lequel la barrière de parking repose à plat au sol lorsqu’elle est rabattue an que vous puissez circuler au-dessus sans l’endommager.
Evitez des plots ou des inclinaisons ou la proximité de plots ou d’inclinaisons.
• Avant de circuler pour la première fois avec votre véhicule sur la barrière de parking rabattable, faites-vous assister par une deuxième personne qui vous guidera et vous
avertira en cas de risque de collision.
• Rabattez la barrière de parking toujours complètement de façon à ce qu’elle repose à plat au sol avant de circuler sur celle-ci sur votre place de stationnement avec
votre véhicule.
• La société EAL GmbH décline toute responsabilité en cas de dommages de pneus causés par le franchissement de la barrière de parking.
4. Consignes de sécurité
2. Etendue de la livraison
3. Spécications
Position Quantité Dénomination
1 1x Support pièce intérieure
2 1x Support pièce extérieure
3 2x Bande rééchissante
4 1x Arceau tubulaire
5 3x Sabot de xation
Largeur : 75,5 cm
Hauteur, monté : 40 cm
Hauteur de dépassement : 7 cm
Matériau : tube d’acier, zingué
Poids : 5,200 kg
Position Quantité Dénomination
6 1x Support de 1 et 2
7 1x Cadenas
8 6x Boulon 6 x 90
9 6x Cheville Ø 8 mm
10 6x Ecrou M6, autobloquant
11 6x Boulon M6 x 16

5
9. Informations de contact
5. Instructions d’utilisation
Etape 1 : Montage des supports
Emboîtez la pièce intérieure (1) dans la pièce extérieure (2) du support. Enfoncez les deux tubes dans la position dans laquelle les trous des pièces inférieure et extérieure
sont superposés. Ouvrez le cadenas. Insérez l’extrémité ouverte du cadenas dans les trous et refermez le cadenas. Ceci constitue le support (6). Enfoncez le support (6) avec le
tube transversal court sur l’arceau tubulaire (4).
Etape 2 : Montage des sabots de xation
Posez chaque extrémité de tube dans un sabot de xation (5), voir schéma. Faites coïncider les trous des extrémités des tubes et des sabots de xation. Insérez, à chaque ext-
rémité de tube, deux boulons M6 x 16 (11) dans les trous de l’intérieur vers l’extérieur. Posez les écrous autobloquants M6 (11) sur les extrémités des boulons. ATTENTION : le
collet des écrous doit alors se trouver en haut. Ne serrez les écrous que de façon à ce que les sabots de xation sur les extrémités des tubes puissent encore légèrement tourner.
Etape 3 : Marquage des points de xation
Ouvrez les barrières de parking à l’emplacement prévu. Alignez le support (6) de telle manière à ce que l’arceau (4) soit à la verticale. Marquez, par les trous des sabots de
xation (5), les points où les trous pour les chevilles doivent être percés ultérieurement.
Etape 4 : Montage de la barrière de parking sur la place de stationnement
Percez, sur les points marqués, des trous d’un diamètre de 8 mm et d’une profondeur d’environ 90 mm. Insérez les chevilles (9) dans les trous de perçage. Posez la barrière
de parking avec les sabots de xation sur les trous de perçage. Insérez les boulons 6 x 90 (8) dans les trous de perçage à travers les trous des sabots de xation. Enfoncez avec
précaution les boulons de quelques centimètres dans les trous de perçage au moyen d’un marteau léger. Ensuite, serrez les boulons à fond.
Placez enn les deux bandes rééchissantes (3) sur la partie supérieure de l’arceau, voir schéma.
Rabattement de la barrière de parking
Ouvrez d’abord le cadenas (7). Enlevez le cadenas. Rabattez l’arceau (4) vers le bas (en s’éloignant du support (6)) jusqu’à ce qu’il soit posé à plat au sol.
Montage
6. Utilisation
Assurez-vousquelabarrièredeparking est entièrement rabattue et qu’ellereposeàplatausol avantdecirculer avecvotrevéhiculesur celle-ci
sur votre place de stationnement.
Installation de la barrière de parking
7. Entretien et maintenance
8. Consignes relatives à la protection de l’environnement
Relevez l’arceau (4) jusqu’à ce qu’il soit à la verticale et que les trous de la pièce intérieure (1) et de la pièce extérieure (2) du support (6) soient superposés. Ouvrez le cadenas
(7). Insérez l’extrémité libre du cadenas dans les trous du support (6).Verrouillez le cadenas. A présent, votre place de stationnement est protégée contre une utilisation non
autorisée.
La barrière de parking, en elle-même, est sans entretien si elle est utilisée de façon conforme à l’emploi prévu. Le cadenas doit être lubrié régulièrement avec une huile
dégrippante sans résine (par ex.WD40).
Eliminez cet appareil dans le conteneur de matières recyclables ou auprès d’un centre de collecte public/communal.
Les matériaux sont recyclables. Par le recyclage, la récupération des matières ou d’autres formes de réutilisation d’anciens appareils, vous contribuez activement à la protec-
tion de notre environnement !
Avant de circuler pour la première fois avec votre véhicule sur la barrière de parking rabattue, faites-vous assister par une deuxième personne
qui vous guidera et vous avertira en cas de risque de collision.
9. Informations de contact
EAL GmbH
Otto-Hausmann-Ring 107
42115Wuppertal, Allemagne
+49(0)202 42 92 83 0
+49 (0) 202 42 92 83 – 160
info@eal-vertrieb.com
www.eal-vertrieb.com

6
• Houd dit product buiten het bereik van kinderen en laat ze het product niet bedienen!
• Gebruik dit product uitsluitend voor het beoogde doel!
• Manipuleer of demonteer het product niet!
• Gebruik voor uw eigen veiligheid uitsluitend toebehoren of reserveonderdelen die in de gebruiksaanwijzing staan vermeld of waarvan het gebruik door de fabrikant
wordt aanbevolen!
• Kies een geschikte locatie voor de parkeerbeugel, waar deze in neergeklapte toestand plat op de grond ligt, zodat u er zonder schade overheen kunt rijden. Vermijd
hellingen of dalen, of plaatsen in de buurt daarvan.
• Vraag een tweede persoon te hulp om aanwijzingen te geven en u te waarschuwen voor een aanrijding als u voor het eerst met de auto over de neergeklapte parke-
erbeugel rijdt.
• Klap de parkeerbeugel altijd volledig neer zodat hij plat op de grond ligt voordat u met uw voertuig over de parkeerbeugel op uw parkeerplaats rijdt.
• EAL GmbH aanvaardt geen aansprakelijkheid voor schade aan de banden veroorzaakt door het rijden over de parkeerbeugel.
4. Veiligheidsinstructies
3. Specicaties
Breedte: 75,5 cm
Hoogte, opgesteld: 40 cm
Overrijhoogte: 7 cm
Materiaal: Stalen buis, verzinkt
Gewicht: 5,200 kg
NL PARKEERBEUGEL, neerklapbaar
Art.nr. 16420
1. Reglementair gebruik
2. Leveringsomvang
3. Specicaties
4.Veiligheidsinstructies
5. Gebruiksaanwijzing
6. Gebruik
7. Onderhoud en verzorging
8. Informatie over de bescherming van het milieu
9. Contactinformatie
Dit product is bedoeld voor het afsluiten van parkeerplaatsen en verkeerswegen tegen onbevoegd gebruik op uitsluitend particulier terrein. Het product is niet bedoeld voor
gebruik op de openbare weg en op terreinen waarop de verkeerswetgeving van toepassing is.
De parkeerbeugel kan uitsluitend op een stevige, solide ondergrond (betonplaten, asfalt) worden gemonteerd. Straatstenen, tuintegels en dergelijke zijn niet geschikt.
Dit apparaat mag niet worden gebruikt door kinderen, personen met beperkte geestelijke vaardigheden of zonder ervaring en/of gebrek aan kennis. Kinderen moeten uit de
buurt van het apparaat worden gehouden.
Het apparaat is niet bedoeld voor bedrijfsmatig gebruik.
Tot het reglementairgebruik behoort ook de inachtneming van alle informatie in deze handleiding, vooral de inachtneming van de veiligheidsvoorschriften. Elk ander gebru-
ikgeldt als niet-reglementairenkan materiëleschade of persoonlijk letsel veroorzaken.EALGmbH is niet aansprakelijkvoorschadealsgevolgvanniet-reglementairgebruik.
Overzicht
1. Reglementair gebruik
2. Leveringsomvang
Positie Aantal Aanduiding
1 1x Steun binnendeel
2 1x Steun buitendeel
3 2x Reecterende strips
4 1x Buisbeugel
Positie Aantal Aanduiding
9 6x Plug Ø 8 mm
10 6x Moer M6, zelfborgend
11 6x Schroef M6 x 16
Positie Aantal Aanduiding
5 3x Montagevoet
6 1x Steundeel 1 en 2
7 1x Beugelslot
8 6x Schroef 6 x 90
WAARSCHUWING
Lees voorafgaand aan de ingebruikname de gebruiksaanwijzing aandachtig door en neem alle veiligheidsvoorschriften in acht!
Het niet naleven ervan kan letsel, schade aan het product of uw eigendom veroorzaken!
Bewaar de oorspronkelijke verpakking, het aankoopbewijs en de gebruiksaanwijzing om deze later te kunnen raadplegen! Geef bij
doorgeven van het apparaat eveneens deze handleiding door.
Controleer de inhoud van de verpakking eerst op beschadigingen en volledigheid voordat u het product gaat gebruiken!
Stap 1: De steun monteren
Steek het binnendeel (1) in het buitendeel (2) van de steun. Schuif de twee buizen zodanig in elkaar dat de gaten van het binnen- en buitendeel op elkaar liggen. Open het
beugelslot. Steek het open uiteinde van het slot door de gaten en sluit het slot weer. Dit vormt nu de steun (6). Schuif de steun (6) met de korte dwarsbuis op de buisbeugel (4).
Stap 2: De montagevoeten aanbrengen
Steek beide uiteinden van de buis in een montagevoet (5), zie tekening. Plaats de bevestigingsgaten van de buiseinden op de gaten van de montagevoeten. Steek bij elk
buisuiteinde twee bouten M6 x 16 (11) van binnen naar buiten door de gaten. Plaats de zelfborgende moeren M6 (11) op de bouten.
LET OP: Daarbij moet de kraag van de moer aan de bovenkant liggen. Draai de moeren vast, zodanig dat de montagevoeten aan de buisuiteinden nog gemakkelijk kunnen
draaien.
Montage
5. Gebruiksaanwijzing

7
9. Contactinformatie
Stap 3: De bevestigingspunten aftekenen
Klap de parkeerbeugel open op de installatieplaats. Positioneer de steun (6) zodanig dat de beugel (4) loodrecht staat.Teken door de gaten van de montagevoeten (5) de
punten af waar later de gaten voor de pluggen geboord moeten worden.
Stap 4: De parkeerbeugel op de parkeerplaats monteren
Boor gatenopdeafgetekendepuntenmeteendiametervan8mmenongeveer90mmdiep. Steek de pluggen (9) in deboorgaten. Plaatsdeparkeerbeugelmetdemontage-
voeten op de boorgaten. Steek de schroeven 6 x 90 (8) door de gaten van de montagevoeten in de boorgaten. Sla de schroeven voorzichtig met een hamer enige centimeters
in de boorgaten. Draai de schroeven nu stevig vast.
Monteer tot slot de beide reecterende strips (3) op de bovenkant van de beugel, zie tekening.
De parkeerbeugel neerklappen
De parkeerbeugel oprichten
7. Onderhoud en verzorging
8. Informatie over de bescherming van het milieu
Open eerst het slot (7).Verwijder het slot. Klap de beugel (4) neer (weg van de steun (6)) totdat hij plat op de grond ligt.
Klap de beugel (4) omhoog totdat hij verticaal staat en de gaten van het binnen- (1) en buitendeel (2) van de (6) steun boven elkaar liggen. Open het slot (7). Steek het
uiteinde van het slot door de openingen van de steun (6).Vergrendel het slot. Uw parkeerplaats is nu beveiligd tegen onbevoegd gebruik.
Bij reglementair gebruik is de parkeerbeugel onderhoudsvrij. Smeer het slot regelmatig met harsvrije kruipolie (zoals WD40).
Lever dit product aan het einde van de levensduur in bij een daarvoor bestemde, gemeentelijke inzamelplaats.
De materialen kunnen worden gerecycled. Door recycling of andere vormen van hergebruik van oude producten levert u een belangrijke bijdrage aan de bescherming van
ons milieu!
6. Gebruik
Zorg ervoor dat de parkeerbeugel volledig is neergeklapt en plat op de grond ligt voordat u met uw voertuig over de parkeerbeugel op uw
parkeerplaats rijdt.
Vraag een tweede persoon te hulp om aanwijzingen te geven en u te waarschuwen voor een aanrijding als u voor het eerst met de auto over
de neergeklapte parkeerbeugel rijdt.
9. Contactinformatie
EAL GmbH
Otto-Hausmann-Ring 107
42115Wuppertal, Duitsland
+49(0)202 42 92 83 0
+49 (0) 202 42 92 83 – 160
info@eal-vertrieb.com
www.eal-vertrieb.com
IT DISSUASORE DI PARCHEGGIO reclinabile
Cod. art. 16420
1. Uso previsto
2.Volume di consegna
3. Speciche
4. Avvertenze di sicurezza
5. Istruzioni per l‘uso
6. Utilizzo
7. Manutenzione e pulizia
8. Avvertenze sulla tutela ambientale
9. Come contattarci
Panoramica
AVVERTENZA
Leggere attentamente le istruzioni per l‘uso prima della messa in funzione e osservare tutte le avvertenze di sicurezza!
La mancata osservanza di queste istruzioni può provocare lesioni personali, danni al prodotto o alla vostra proprietà!
Conservare la confezione originale, la prova d‘acquisto e queste istruzioni come riferimento futuro! In caso di cessione del prodotto,
consegnare anche le presenti istruzioni.
Vericare l‘integrità e la completezza del contenuto della confezione prima della messa in funzione!
Il presente prodotto è concepito per proteggere dall‘utilizzo non autorizzato le aree di parcheggio e le zone di traco nelle aree private. Il prodotto non è previsto per essere
utilizzato nelle aree di traco pubbliche né entro l‘ambito di validità delle disposizioni previste dal codice della strada.
Il dissuasore di parcheggio deve essere ssato esclusivamente su superci solide e robuste (piastre in cemento, asfalto). Il selciato, il prato in pietra e simili non sono adatti.
Questodispositivononè destinatoall‘uso dapartedibambini e persone con capacità mentalilimitateosenzaesperienzae/o con conoscenzeinsucienti.Tenereildispositivo
lontano dalla portata dei bambini.
Questo dispositivo non è destinato all‘impiego industriale.
Dell’uso appropriato fa parte anche il rispetto di tutte le informazioni fornite in queste istruzioni, soprattutto delle avvertenze sulla sicurezza. Ogni altro utilizzo viene consi-
derato improprio e può causare danni a persone o cose. EAL GmbH non risponde dei danni derivanti da un uso improprio.
1. Uso previsto
2. Volume di consegna
Posizione Quantità Denominazione
1 1x Sostegno, elemento interno
2 1x Sostegno, elemento esterno
3 2x Strisce catarifrangenti
4 1x Staa tubolare
Posizione Quantità Denominazione
5 3x Piede di ssaggio
6 1x Sostegno 1 + 2
7 1x Lucchetto
8 6x Vite 6 x 90
Posizione Quantità Denominazione
9 6x Tassello Ø 8 mm
10 6x Dado autobloccante M6
11 6x Vite M6 x 16
3. Speciche
Larghezza: 75,5 cm
Altezza, sollevato: 40 cm
Altezza di passaggio: 7 cm
Materiale: tubo in acciaio zincato
Peso: 5,200 kg

8
• Tenere il dispositivo lontano dalla portata dei bambini e vietare loro l‘utilizzo!
• Utilizzare questo prodotto solo per lo scopo previsto!
• Non manomettere né smontare il prodotto!
• Per la propria sicurezza, utilizzare solo gli accessori e i pezzi di ricambio indicati nelle istruzioni o consigliati dal produttore!
• Scegliere un luogo d‘installazione adatto in modo tale che il dissuasore di parcheggio, in posizione ribaltata, sia appoggiato sul pavimento perfettamente in piano
anché possa essere attraversato senza causare danni. Evitare dossi naturali o avvallamenti o i punti vicini ad essi.
• Prima di passare per la prima volta con il proprio veicolo sopra il dissuasore di parcheggio ribaltato, farsi aiutare da un‘altra persona che possa fare da guida e avvisare
nel caso in cui vi sia il pericolo di una collisione.
• Prima di passare sopra il dissuasore per parcheggiare, reclinarlo sempre completamente sul pavimento appoggiandolo in piano.
• EAL GmbH non risponde per eventuali danni ai pneumatici provocati dall‘attraversamento del dissuasore di parcheggio.
4. Avvertenze di sicurezza
5. Istruzioni per l‘uso
Passaggio 1: montaggio del sostegno
Introdurre la parte interna (1) del sostegno nella parte esterna (2). Spingere entrambi i tubi no a quando i fori delle due parti non combaciano tra di loro. Aprire il lucchetto.
Inserire l‘estremità aperta del lucchetto nei fori e richiudere il lucchetto. L‘elemento (6), il sostegno, è ora al completo. Spingere il sostegno (6) con il tubo trasversale corto sulla
staa (4).
Passaggio 2: montaggio dei piedi di ssaggio
Posizionare le due estremità del tubo in ciascun piede di ssaggio (5), vedi schizzo. Portare i fori delle estremità del tubo e i fori dei piedi di ssaggio in corrispondenza tra
di loro. Passare su ciascuna estremità del tubo due viti M6 x 16 (11) attraverso i fori, dall‘interno all‘esterno. Applicare i dadi autobloccanti M6 (11) alle estremità delle viti.
ATTENZIONE: il collarino dei dadi deve essere rivolto verso l‘alto. Stringere i dadi no al punto in cui è ancora possibile ruotare leggermente i piedi di ssaggio alle estremità
del tubo.
Passaggio 3: tracciatura dei punti di ssaggio
Sollevare i dissuasori di parcheggio sul luogo d‘installazione. Orientare il sostegno (6) in modo tale che la staa (4) sia posizionata in verticale. Tracciare attraverso i fori dei
piedi di ssaggio (5) i punti in cui praticare poi i buchi per i tasselli.
Passaggio 4: montaggio del dissuasore nel parcheggio
Praticare nei punti tracciati buchi di 8 mm di diametro e ca. 90 mm di profondità. Inserire i tasselli (9) nei buchi. Posizionare il dissuasore di parcheggio insieme ai piedi di
ssaggio sui buchi. Inserire le viti 6 x 90 (8) nei buchi attraverso i fori dei piedi di ssaggio. Spingere le viti delicatamente per alcuni centimetri nei buchi servendosi di un
martello leggero. Stringere adesso le viti.
Applicare inne entrambe le strisce catarifrangenti (3) sulla parte superiore della staa, vedi schizzo. Monteer tot slot de beide reecterende strips (3) op de bovenkant van
de beugel, zie tekening.
Montaggio
Ripiegamento del dissuasore di parcheggio
Aprire prima il lucchetto (7). Rimuovere il lucchetto. Ripiegare la staa (4) verso il basso (allontanandola dal sostegno (6)) no a quando non si appoggia in piano sul pavimento.
6. Utilizzo
Prima di passare sopra il dissuasore per parcheggiare, accertarsi che il dissuasore sia completamente reclinato e sia appoggiato in piano sul
pavimento.
Sollevamento del dissuasore di parcheggio
Sollevare la staa (4) no a portarla in posizione verticale e no a far combaciare i fori della parte interna (1) ed esterna (2) del sostegno (6). Aprire il lucchetto (7). Introdurre
l‘estremità libera del lucchetto nei fori del sostegno (6). Bloccare il lucchetto. A questo punto, il parcheggio è protetto dall‘utilizzo non autorizzato.
7. Manutenzione e pulizia
8. Avvertenze sulla tutela ambientale
Il dissuasore di parcheggio, se utilizzato in maniera appropriata, non richiede manutenzione. Il lucchetto si deve lubricare regolarmente con un olio penetrante non resinoso
(ad es.WD40).
Smaltire questo prodotto gettandolo nel bidone per il riciclo o consegnandolo ai punti di raccolta pubblici/comunali.
Imaterialisonoriciclabili.Conilriciclo, il recuperodelmaterialee altreformedi riutilizzodiprodottiusatisifornisceuncontributoimportanteperla protezionedell‘ambiente!
Prima di passare per la prima volta con il proprio veicolo sopra il dissuasore di parcheggio ribaltato, farsi aiutare da un‘altra persona che possa
fare da guida e avvisare nel caso in cui vi sia il pericolo di una collisione.
9. Come contattarci
EAL GmbH
Otto-Hausmann-Ring 107
42115Wuppertal, Germania
+49(0)202 42 92 83 0
+49 (0) 202 42 92 83 – 160
info@eal-vertrieb.com
www.eal-vertrieb.com © EAL GmbH, 116420, 10. 2018
Table of contents
Languages:
Other EUFAB Automobile Accessories manuals

EUFAB
EUFAB 13459 User manual

EUFAB
EUFAB QUICK FIT PRO User manual

EUFAB
EUFAB FINCH 3 User manual

EUFAB
EUFAB BIKE FOUR User manual

EUFAB
EUFAB AMBER IV User manual

EUFAB
EUFAB AMBER IV User manual

EUFAB
EUFAB 11243 User manual

EUFAB
EUFAB 16564 User manual

EUFAB
EUFAB POKER-F User manual

EUFAB
EUFAB 11571 User manual
Popular Automobile Accessories manuals by other brands

Whelen Engineering Company
Whelen Engineering Company SL6 manual

Recon
Recon 264342 Series installation guide

Cradlepoint
Cradlepoint COR IBR900 Series quick start guide

Flaircomm Technologies
Flaircomm Technologies BC9000 user manual

Erickson
Erickson 07495 Assembly manual

Dunlop
Dunlop L.312.C.M installation manual