Evolis Tattoo User manual

Tattoo Card Printer
User’s Guide
Tattoo User’s Guide Part Number : A5205 Rev. 1.1
© December 2002 Evolis Card Printer

2
Trademarks
Evolis Tattoo is a registered trademark of Evolis Card Printer.
Microsoft is a U.S. registered trademark of Microsoft Corporation.
Windows is a trademark of Microsoft Corporation.
Copyright Information
© 2002 Evolis Card Printer
All rights reserved.
Notice of Royalty
The user is obliged to observe the regulations relative to royalties applicable in his country. No part
of this manual may be photocopied, translated, reproduced or transmitted for whatever purpose
or by any means, electronic or mechanical, without the express and written permission of the Evolis
Card Printer Company.
All information contained in this document is subject to changes without prior notification.
Evolis Card Printer cannot be held responsible for possible errors contained in this manual, nor inci-
dental or consequential damage connected with the supply or use of this manual.

3
DECLARATION OF CONFORMITY
FOR SAFETY AND EMC
Manufacturer’s name : EVOLIS
Manufacturer’s address : 29, rue de la Fontaine
Z.I. Angers Beaucouzé
49070 BEAUCOUZE – France
Product’s name : TATTOO Printer
I, the undersigned,
Serge Olivier, Technical Manager
Declare to have obtained the presumption of the material referred to here above, used and
installed according to the manual, and according to the requirements expressed in the
Directives 73/23/CEE and 86/336/CEE, and modified by 92/31/CEE et 93/68/CEE through the
application of the following norms:
EN 60950 : January 1993 + A1 / A2 / A3 / A4
EN 55022 : 1998 Class B
EN 55024 : 1998
EN 61000-3-2 : 1995
EN 61000-3-3 : 1995
Beaucouzé, October 10th, 2002
Supplementary Information:
This equipment has been tested and found to comply with the limits for a Class B digital device, pursuant to
Part 15 of the FCC Rules. These limits are designed to provide reasonable protection against harmful
interference when the equipment is operated in a commercial environment. This equipment generates, uses,
and can radiate radio frequency energy and, if not installed and used in accordance with the instruction
manual, may cause harmful interference in which case the user will be required to correct the interference at
his own expense.

Table of contents
Chapter I –Setting Up Page 5
Introduction Page 5
1. Unpacking my printer Page 5
2. Description of the printer and its functions Page 6
3. Installing my printer Page 7
a. Installation of the interface and the supply cable Page 7
b. Installation of the ribbon Page 8
c. Loading the cards Page 9
Chapter II –Printing Page 11
1. Installing my printer driver Page 11
2. Configuring the printing settings Page 13
3. My first cards Page 15
Chapter III –Cleaning Page 18
1. Cleaning of the inside of the printer Page 18
2. Cleaning of the print head Page 20
3. Maintenance of the cleaning roller Page 21
Chapter IV –Assistance Page 22
1. Printer Control Panel Page 22
2. Troubleshooting Page 23
3. Customer Assistance Page 26
Chapter V –Specifications Page 27
Chapter VI –Evolis Warranty Page 28
1. Extent of the warranty Page 28
2. After sales service in the warranty period Page 29
3. After sales service outside the warranty period Page 29
Chapter VII –Supplies Page 30
Appendix A –Magnetic Encoding Page 31
4

Introduction
We congratulate you on having made the Tattoo printer your choice !
The Tattoo printer is the ideal solution for all your printing of plastic cards in fields as extensive and
varied as management of visitors, business cards, loyalty cards, time attendance, members, etc.
This product, comes with a wide range of assistance services, from the Evolis company and its
partners, specially selected to help you in an efficient and professional manner.
1. Unpacking my printer
Verify whether the following parts have been supplied with your printer :
Power supply and power supply cable
Printer interface cable
Operator’s Service Book
CD with Drivers & Documentation
Cleaning Case
5
1.
Chapter 1
IMPORTANT !
The printer must be placed on a level surface, in a dust free
environment. It is essential to be able to access the printer from all
sides for its installation.
Setting up

Description of the printer : Functions
AThermal Transfer Print Head For printing cards.
BMedia Thermal Transfer Monochrome Ribbon.
CControl Panel Shows the printer activity.
DPush Button Shows the printer activity (power ON/OFF)
ECleaning Roller Removes any dust before printing the cards.
FCover Lever Allows the printer cover to be opened.
GCard Feeder Holds the cards to be printed.
HElectrical connector For connecting the printer to the power supply.
IUSB Port (optional) Enables data to be received and sent from and to the
computer.
JParallel Port Enables data to be received and sent from and to the
computer.
KSerial Port (optional) Enables data to be received and sent from and to the
computer.
Printer control Panel
There is a Control Panel on the front part of the printer.
Four warning lights are associated with symbols showing the activity during printing.
These lights show :
6
2. Description of the printer and its functions
Push
button
Ribbon
end
No
card
Magnetic
encoding
alert
Cleaning
signal

3. Installing my printer
a) Installation of the interface and supply cables:
7
IMPORTANT !
To disconnect this product, pull the plug out of the socket, which
should remain easily accessible.
This product must be connected to an electrical installation correct-
ly protected and equipped with a protective earth.
Only use the printer power supply provided by Evolis.
1. Connect the supplied interface cable to your printer as shown while slightly lifting this side of
the printer up to get a better reach.
2. Connect the other end of the cable to the appropriate port of your computer.
3. Connect the power cable to the supply then plug in the power cable connector to the printer.
Then connect the end of the power cable to an earthed mains power point.

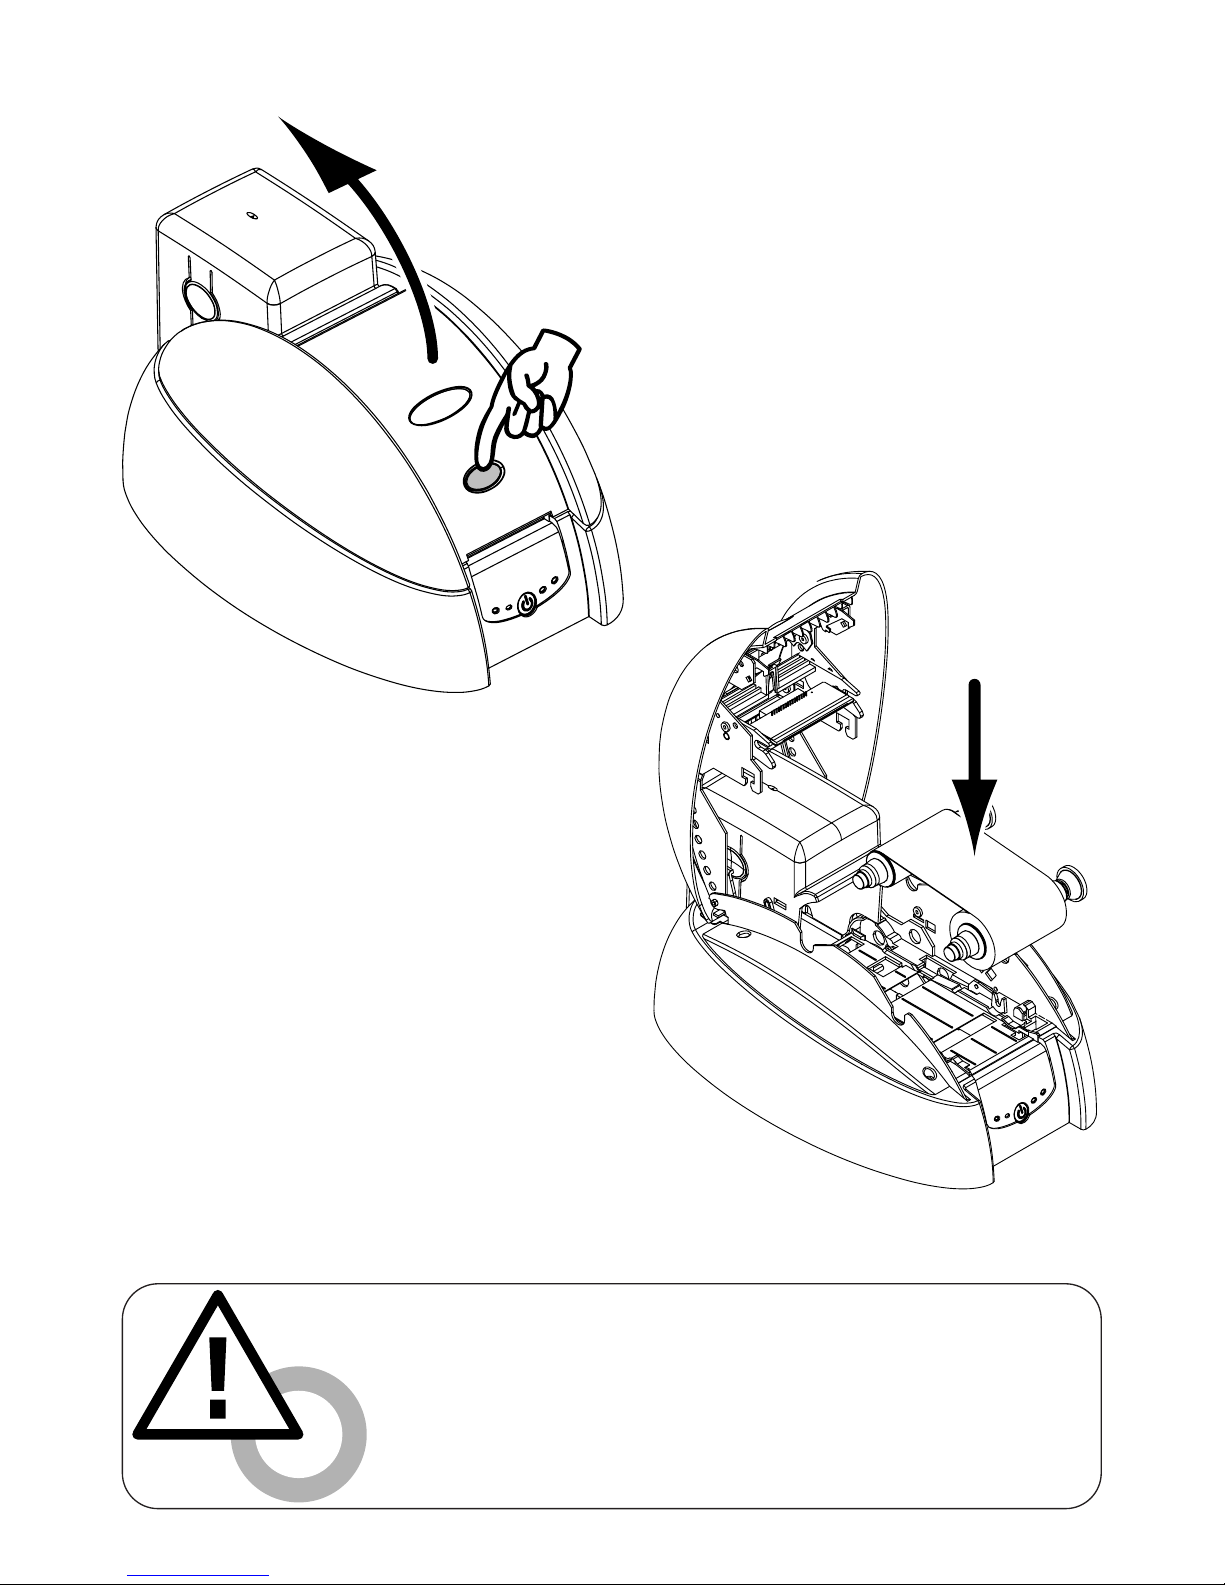
b) Installation of the ribbon
WARNING
The ribbon must be correctly installed for the printer to function.
Only use Evolis printer ribbons. Evolis accepts no responsibility if the
printer is damaged following the use of an unapproved ribbon.
1. Open the printer cover by pressing on the
opening lever, then pivoting it.
2. Install the ribbon in the printer as shown.
3. Close the printer cover.
8

9
c) Loading the cards
The Tattoo printer works in three different modes for card loading which are selectable through
the printer driver in the «Main »tab :
•Feeder The cards are taken automatically from the feeder.
•Manual feed The cards are manually inserted one by one by the operator in the feeding mouth
at the front of the printer.
•Auto select The cards are taken either from the feeder or manually inserted in the feeding
mouth whichever card the printer senses first.
TO LOAD THE CARDS FROM THE FEEDER :
1. Remove the Card Feeder from the printer as shown.
2. Press down the spring system inside
the feeder and insert 100 cards as
shown (100 cards max. 0.76mm-
30mil).
3. Replace the feeder in the printer.

10
IMPORTANT !
Advice about selecting cards :
• Only use the types of card appearing in the Specifications page of
this manual
• Do not touch the printable surface of the cards ; the print quality
depends upon this
• Do not use damaged or folded cards or ones with an embossed
texture.
• Always store the blank cards in a clean, dust free location
Card thickness :
•The Evolis printer accepts cards from 0.25mm (10mil) to 0.76mm
(30mil) thick without any adjustment.
1. Insert a card in the feeding mouth. The card will be automatically
taken out.
TO LOAD A CARD MANUALLY FROM THE FEEDING MOUTH :

1. Installing my printer driver
Before using your Tatto printer, you must install its printer driver.
Reminder : Evolis Tattoo driver and printers operate under Windows 95/98/2000, Me, NT 4.0 and Xp.
For the users operating under Windows :
1. Start Windows, ensuring that no other Windows application is running.
2. Place the CD in the CD Rom drive of your computer. The program runs automatically.
3. Click on the option Drivers Installation from the menu. The installation of the driver runs
automatically.
However, if the installation program does not run automatically, proceed as follows :
1. Start Windows, ensuring that no other application is running.
2. Insert the CD in the CD ROM drive
3. Click on Start in the Windows, select Settings then Printers.
4. Double-click on the Add Printer icon.
5. Click on Next until the list of makers is displayed.
6. Click on Have Disk then on Install from…
Select the drive letter corresponding to your CD ROM drive
Click on Browse.
7. In the tree diagram of the CD ROM drive, double-click on the Drivers directory
8. Double-click on the directory corresponding to your Windows environment.
9. Select the file “evolis.inf ”.
10. Click on OK. The name of the printer manager appears.
11. Continue the installation by following the instructions displayed on the screen.
Note that when installing the printer driver manually as described above, the "Dialog with Printer"
feature in the Tools tab is disable.
The installation of a printer driver under NT and 2000 may be subject to authorisation by the
administrator as a function of "login system"
11
2.
Chapter 2
NOTE !
The CD includes a utility which automates the installation of the printer
driver. This utility installs the driver that is suitable for your configuration.
Printing

For the users operating under Windows with a USB interface :
1. Install the printer driver by following the instructions given in the previous section «For the
users operating under Windows ».
2. Install the USB driver :
–Check that the Tattoo printer is powered ON.
–Connect the USB interface cable to your computer then to the appropriate printer port.
–The «Add New Hardware Wizard »window is displayed. Then click on the «Next »
button.
–Click on the option which invites you to search the best driver for your peripheral and
then click on the «Next »button.
–Select the «CD-ROM Drive »option and click on the «Next »button.
–Click on the «Next »button. The USB driver is now installed.
–Follow the instructions displayed on the screen.
3. Set the printer port of your computer :
–After having reboot your computer, click on «Start »and in «Parameters »select
«Printers ».
–In the «Printers »window, select the «Evolis Tattoo »icon.
–In the «File »menu, select «Properties ».
–Click on the «Details »tab and select USB printer port in the list.
–Click on OK to close this window. The configuration is now finished.
12
IMPORTANT !
If your printer will be connected via a parallel interface cable, the
driver installation is finished.
If your printer will be connected via a USB interface cable, refer to
the next section «For the users operating under Windows with a
USB interface »for the instructions to be followed.

2. Configuring the printing settings
Your printer has numerous setting functions in the print manager.
These printing settings are accessible :
•from Start in the Windows bar, Settings then Printers
1. Select Evolis Tattoo
2. In File, in the bar of the Windows window menus, select Properties (for Windows
95/98/2000) or Default Document (for Windows NT 4.0).
•From your Windows software.
In File, from the menu bar of your application, select Print or Printing Configuration.
Note that the procedures vary according to the type of software used and the Operating System.
Default Evolis Tattoo printer
To select the Tattoo printer as the default, proceed as follows :
1. Click on Start, in the Windows bar, select Settings then Printers.
2. Click on the Tattoo Printer icon then point to File in the menu bar.
3. Select Set as Default and close the window.
Evolis Tattoo Properties
Different dialog boxes allow you :
•to carry out adjustments such as orientation and print quality.
•to manage the different printing and use modes of the appropriate ribbons.
•to select the printer port.
•to activate the various printer control and maintenance functions.
13
IMPORTANT !
Before using the printer, check that it is selected as the default
printer.

14
"Tools" Dialog Box
This dialog box allows support and 1st level main-
tenance for your printer. We recommend that you
print a "Test Card" at the first use and keep it.
This card records the information likely to be
required at the time of an after sales service call.
Note : The «Dialog with Printer »feature is
enable only if the printer driver has been
installed via the Setup program.
On line help
A help file guides you in the use of each of the print management settings according to the various
printing modes and criteria entered. In order to familiarize yourself with these various settings, we
recommend that you consult this help before making any changes.
"Main" Dialog Box
This dialog box enables the selection of :
1. the color of the ribbon
2. the orientation of the printing (Portrait
or Landscape)
3. the number of copies of the card
4. the printing effect (B & W or grayscale)
5. the printing sensibility
6. the printing quality

15
"General" Dialog Box
This dialog box is a Windows information window. It enables a test page to be printed for the sole
purpose of checking the communication between the computer and the printer.
"Details" Dialog Box
This dialog box is a Windows control window enabling the printer port to be selected and to check
the use of the appropriate printer driver. The displayed settings must only be changed by an expe-
rienced person.
"Color Management" Dialog Box
This dialog box enables the printing to be associated with a defined colour management profile.
3. My first cards
A large number of Windows applications allow document printing (Word –Access –Excel, for
example). In order to familiarize you with the page setup of a card and the printer settings for it,
we offer you the following example.
Under Microsoft®Word
After having previously registered the Tattoo
printer as the default
1. Run Word and in File click on Page Setup.
2. The dialog box offers :
•"Paper Format " select Card
•"Orientation" select Landscape

3. The "Margins" dialog box offers
"printing margins" •Select 0 cm
Your Word window should now appear like this :
You are ready to personalize your card by introdu-
cing the various composition elements :
•Logo and Illustration
•Identity photo
•Permanent texts and Variables (Identity)
•Etc..
Example :
Note that this example does not claim to
introduce the operator to the Word
application. Its only objective is to establish a
relationship between the graphics of a card
and the Tattoo Printer management settings
necessary for printing it.
16

Tattoo Card Printer Driver Settings
To access the settings from the
Word window :
1. In the menu bar point to
File and select "Print"
2. The dialog box shows you
that the Evolis printer is
selected. Then click on
Properties.
3. The dialog box of the
Evolis Tattoo driver opens.
Do not forget to refer to
the help for each dialogue
box
The print settings for this graphic example are :
1. "Main" Dialog Box select :
•Monochrome Black ribbon
•Treatment : Grayscale
•Landscape orientation
•Copy (number)
2. Click on Apply, if you change a setting, then on OK to successively close each dialog box.
3. On returning to the main window click on OK to start printing.
17

Protect the validity of your Guarantee!
Not observing the cleaning procedures contained in this chapter can invalidate your printer and for
print head guarantees. The Evolis company accepts no responsibility if the printer is used in an
unauthorised cleaning condition.
The following cleaning articles are available from Evolis :
❖
Pre-saturated cleaning cards with 99% isopropyl alcohol for cleaning the inside of the printer
❖Cleaning swabs with 99% isopropyl alcohol base for cleaning the print head
❖Pre-saturated cleaning cloths for cleaning the cleaning roller
1. Cleaning of the inside of the printer
The Tattoo printer is fitted with cleaning alert which is
activated every 500 cards that has been inserted.
The warning light switches on as follows :
If you do not clean the printer when the light has
switched ON, is starts flashing when another 100 cards
have been inserted as follows :
When the light starts flashing, the warranty of the print
head will be void, unless cleaning has been done before.
This simple cleaning system requires the use of specially pre-saturated cleaning cards specially
designed for the printer. A cleaning kit with samples of these cards is delivered with your package.
Repeatedly running the card through inside the printer cleans the card transport rollers, the dust
removing roller and the print head.
18
3.
Chapter 3
IMPORTANT !
The printer will continue to function even though the automatic
cleaning alarm is activated.
Cleaning
Status after 500 inserted cards
Status after 600 inserted cards

1. Remove the ribbon from the printer. Then close cover.
19
WARNING !
After a cleaning cycle, wait 2 minutes for the cleaning fluid to
evaporate completely before using the printer.
NOTE !
It is also possible to start an automatic cleaning sequence without
waiting for the printer light signal. This is done by pressing on the
Control Panel push button for a few seconds. In this case, first repeat
operations 1, 2 and 3 quoted above.
To carry out cleaning of the inside of the printer :
2. Press the Push Button
from the printer
Control Panel.
3. Open pouch and remove the
cleaning card. Insert Cleaning
Card in the printer Card
Feeder as shown. The
cleaning starts.

2. Cleaning of the print head
20
WARNING !
The print head is a fragile component of your printer. To avoid
damaging it, never put the print head in contact with pointed
and/or metal objects. Also avoid touching the print head surface
with the fingers. Changed print quality or even permanent
degradation of the print head could result.
WARNING !
After a cleaning cycle, wait 2 minutes for the cleaning fluid to
evaporate completely before using the printer.
The print head is cleaned during the automatic cleaning of your printer (see previous section).
However, in order to preserve the original print quality and to reduce problems caused by an excess
of ink on the print head surface, it is recommended that you clean it regularly (about every
500 cards) using the swab supplied with your printer.
To carry out print head cleaning :
1. Open the printer cover and locate the print head.
2. Take the swab from the Cleaning Case supplied with your printer.
3. Gently rub the swab from left to right on the
print head for a few seconds.
Other manuals for Tattoo
1
Table of contents
Other Evolis Printer manuals

Evolis
Evolis Securion User manual

Evolis
Evolis BadgePass NXT5000 User manual

Evolis
Evolis Primacy User manual

Evolis
Evolis Pebble User manual

Evolis
Evolis The Tattoo Rewrite User manual

Evolis
Evolis Securion User manual

Evolis
Evolis Primacy 2 SE User manual

Evolis
Evolis Dualys User manual

Evolis
Evolis New Pebble User manual

Evolis
Evolis PRIMACY 2 User manual

Evolis
Evolis Elypso User manual

Evolis
Evolis Pebble User manual

Evolis
Evolis Dualys 3 User manual

Evolis
Evolis Dualys User manual

Evolis
Evolis Avansia User manual

Evolis
Evolis Dualys User manual

Evolis
Evolis QUANTUM User manual

Evolis
Evolis Tattoo Operator's manual

Evolis
Evolis AGILIA User manual

Evolis
Evolis TattooRW User manual