Nuna Pipa User manual

and PIPAFIX™ base instruction manual
ECE R44
group 0+
PIPAFIX™ base
sold separately

Thanks for
choosing Nuna!
Nuna designs distinctive, smart and exciting
products.
Enjoy your Nuna PIPA!

21
Illustrations
3
12
1
3
2
7 3
74
6
5
9
8
3
7
12
3
2
2
1
3
3
1
A
I
R
B
A
G

43
Illustrations
10
12
11
13
14
1
2
15
16
17

2
1
65
18
19 20
3
1
2
Illustrations
7
3

1
2
3
1
2
1
1
2
7
3
73
87
Illustrations
21
22 24
23 25 28
26 29
27

109
30
31
32
Illustrations
33
34
35
36
37
38
39

1211
Illustrations
41
42
40

14
EN
13
Contents
Illustrations 1-11
English (EN)
Safety and warnings 15-22
Shoulder harness position 23
Contents of the box 23
Shoulder harness straps height
and handle adjustment 24-25
Installation 25-28
Installation without base 25
Installation with base 26
Securing child 28
Detach canopy and seat pad 29
Cleaning and maintenance 29-30
Warranty and service 30-31
Where to find Nuna products 32
Vehicle fitting information 33-57
French (FR) 59
Dutch (NL) 81
German (DE) 103
Italian (IT) 125
Spanish (ES) 147

1615
EN
EN
Safety and
recommendations
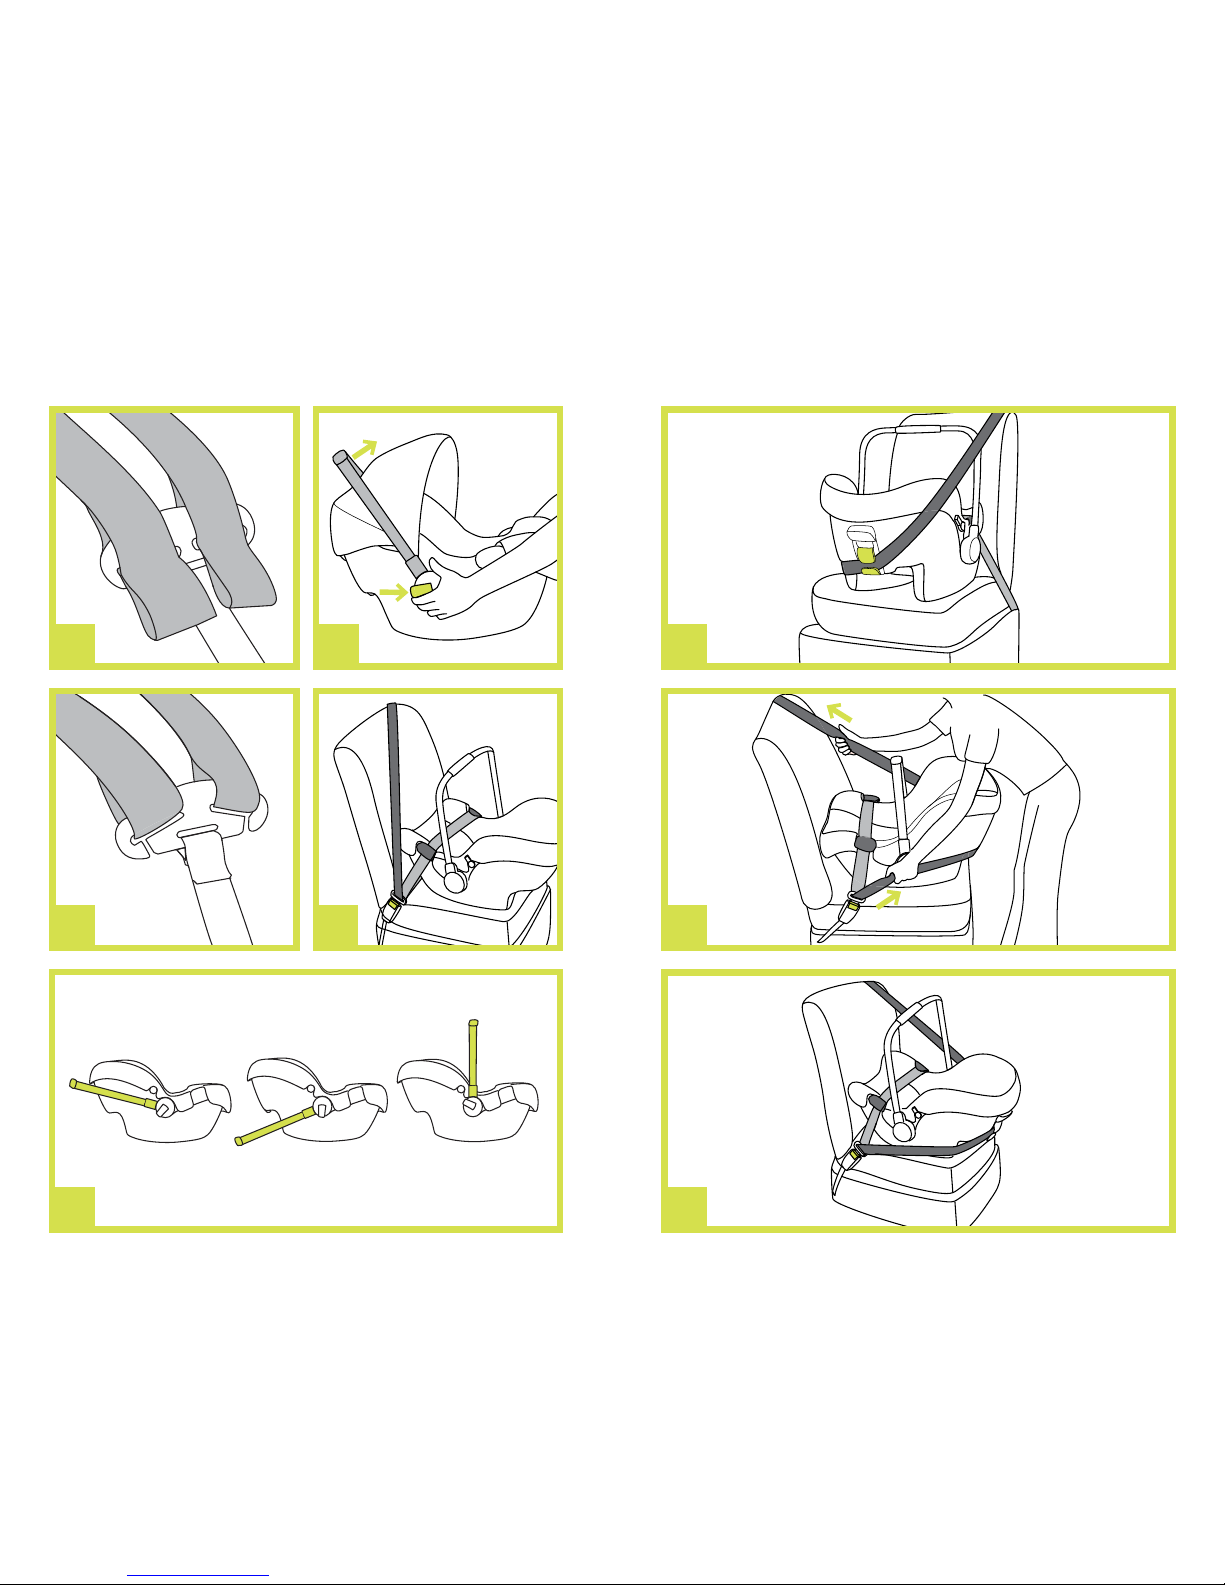
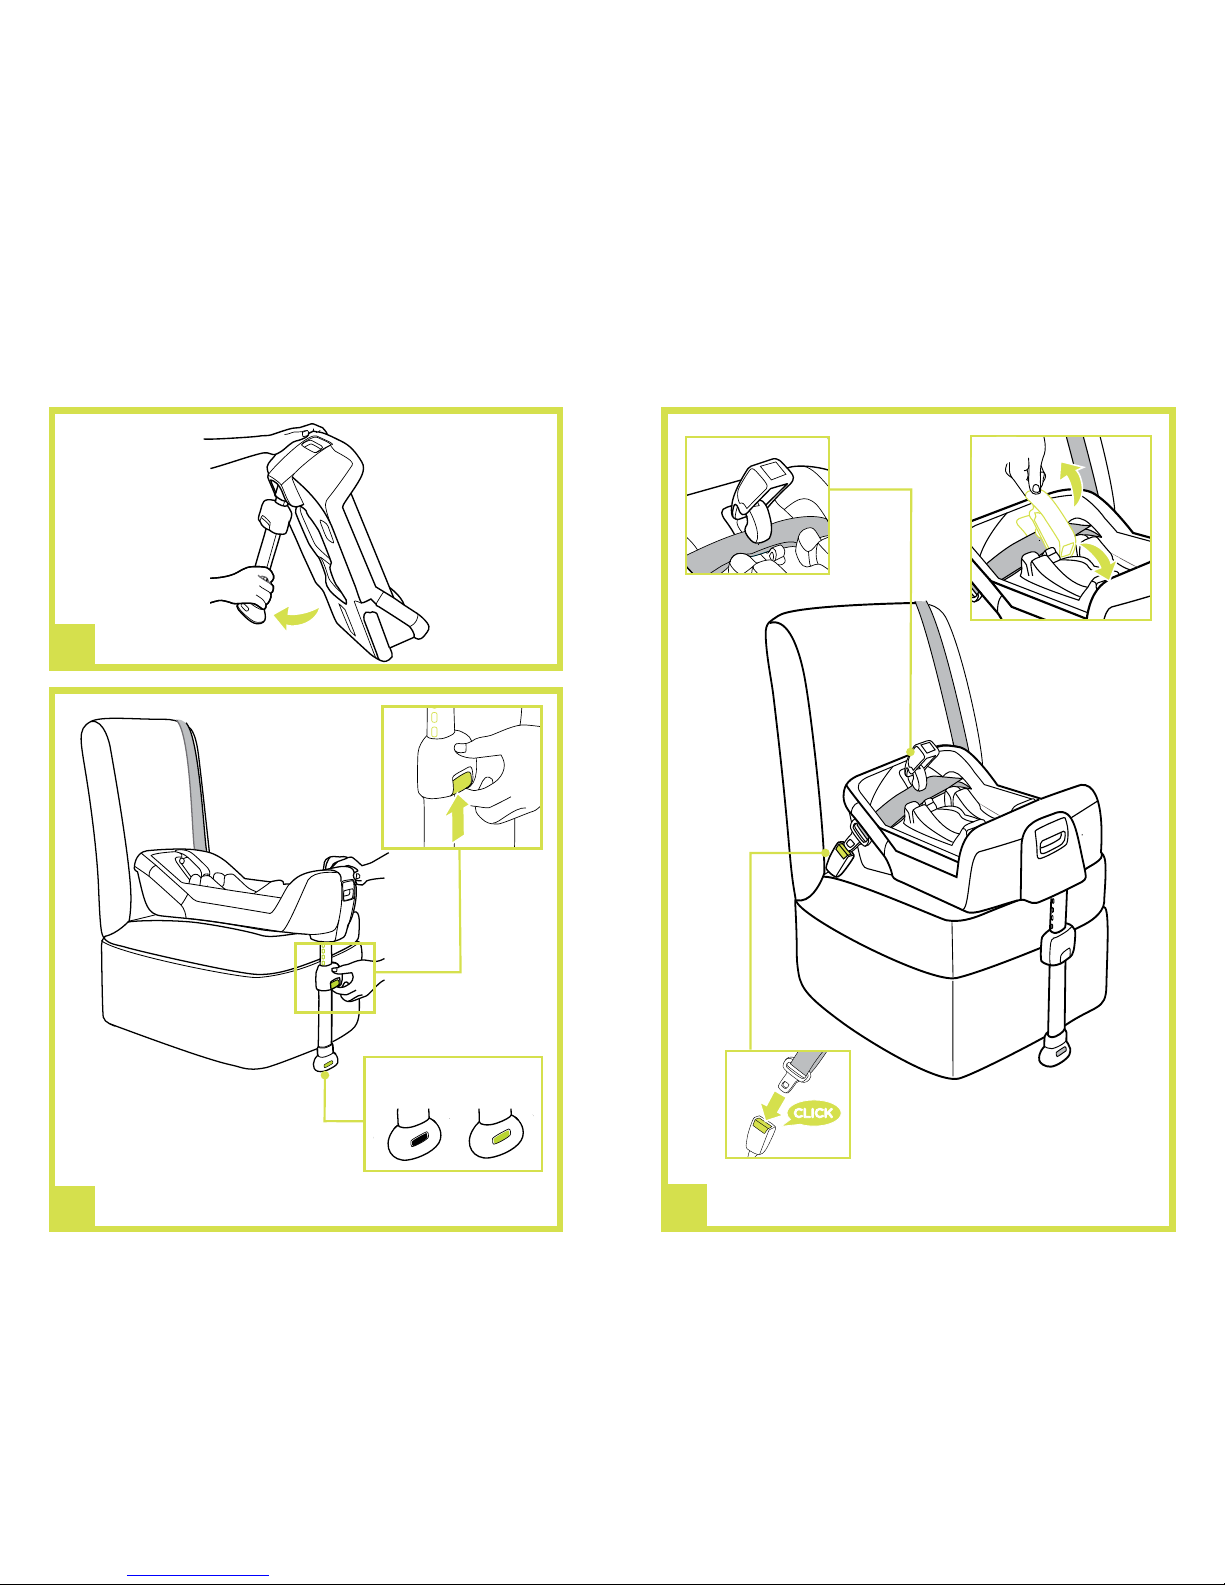
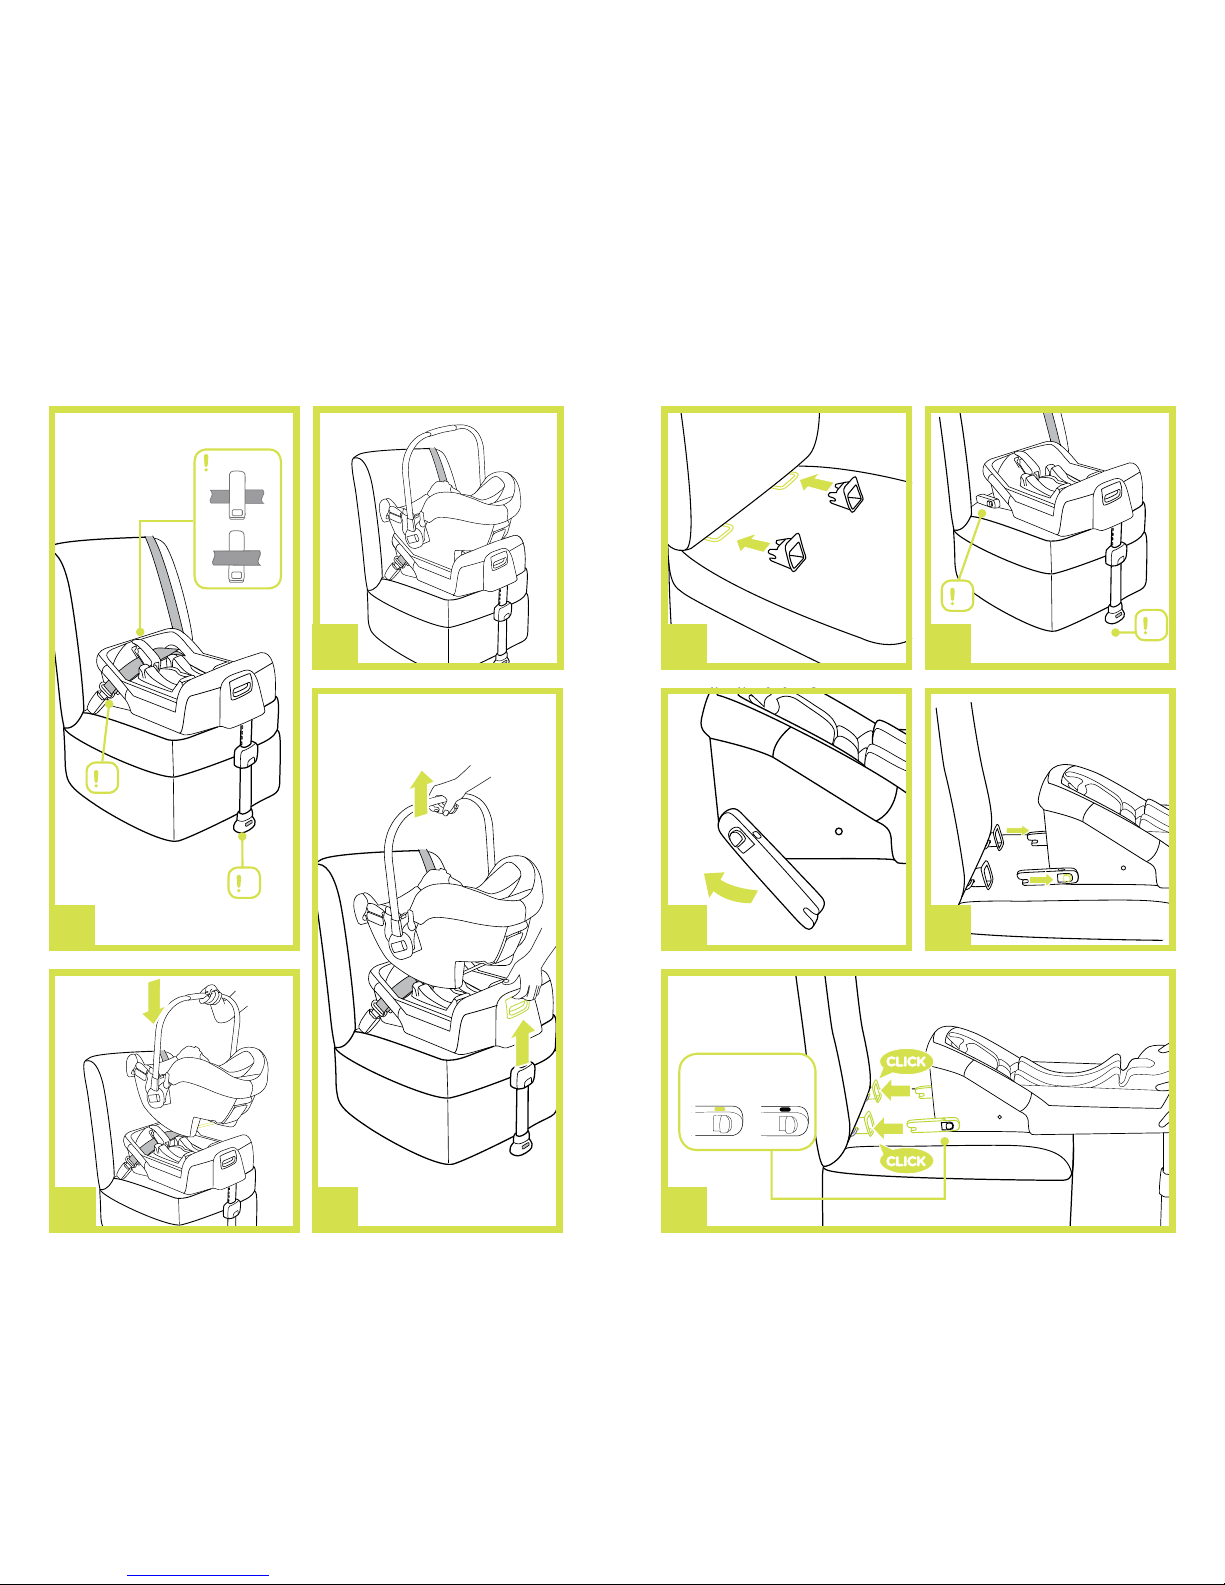
Please take note of the following before using the Pipa
infant car seat and base.
Make sure that your vehicle is equipped with 3-point retractable
safety-belt. Seat belts may be different in design and length
according to maker, manufacturing date, and type of the vehicle.
The infant car seat with base is a “Semi Universal ISOFIX Class
C and D Child Restraint” and should be fitted using at 3 point
adult seat belt approved to ECE R16 or the ISOFIX connections.
Please refer to the Vehicle fitting information at the back of this
manual.
If you have any questions or comments regarding the Pipa
Infant Car Seat, we will be glad to hear them through our web
site nuna.eu
For use
without base
2 A correct fit is likely if the vehicle manufacturer has declared
in the vehicle handbook that the vehicle is capable of
accepting a ‘Universal’ child restraint for this age group.
3 This Infant Car Seat child restraint has been classified as
‘Universal’ under more stringent conditions than those which
applied to earlier designs which do not carry this notice.
4 Seat positions in other cars may also be suitable to accept
the child restraint. If in doubt, consult either the child
restraint manufacturer or the retailer.
IMPORTANT! RETAIN FOR
FUTURE REFERENCE. READ
CAREFULLY.
Read these instructions carefully before use and keep
them for future reference. Your child’s safety may be
affected if you do not follow these instructions.
This product is suitable for use with children weighing
under 13 kg (approximately 1.5 years old or under). Please
carefully read this manual and follow each step to ensure a
comfortable ride and best protection for your child.
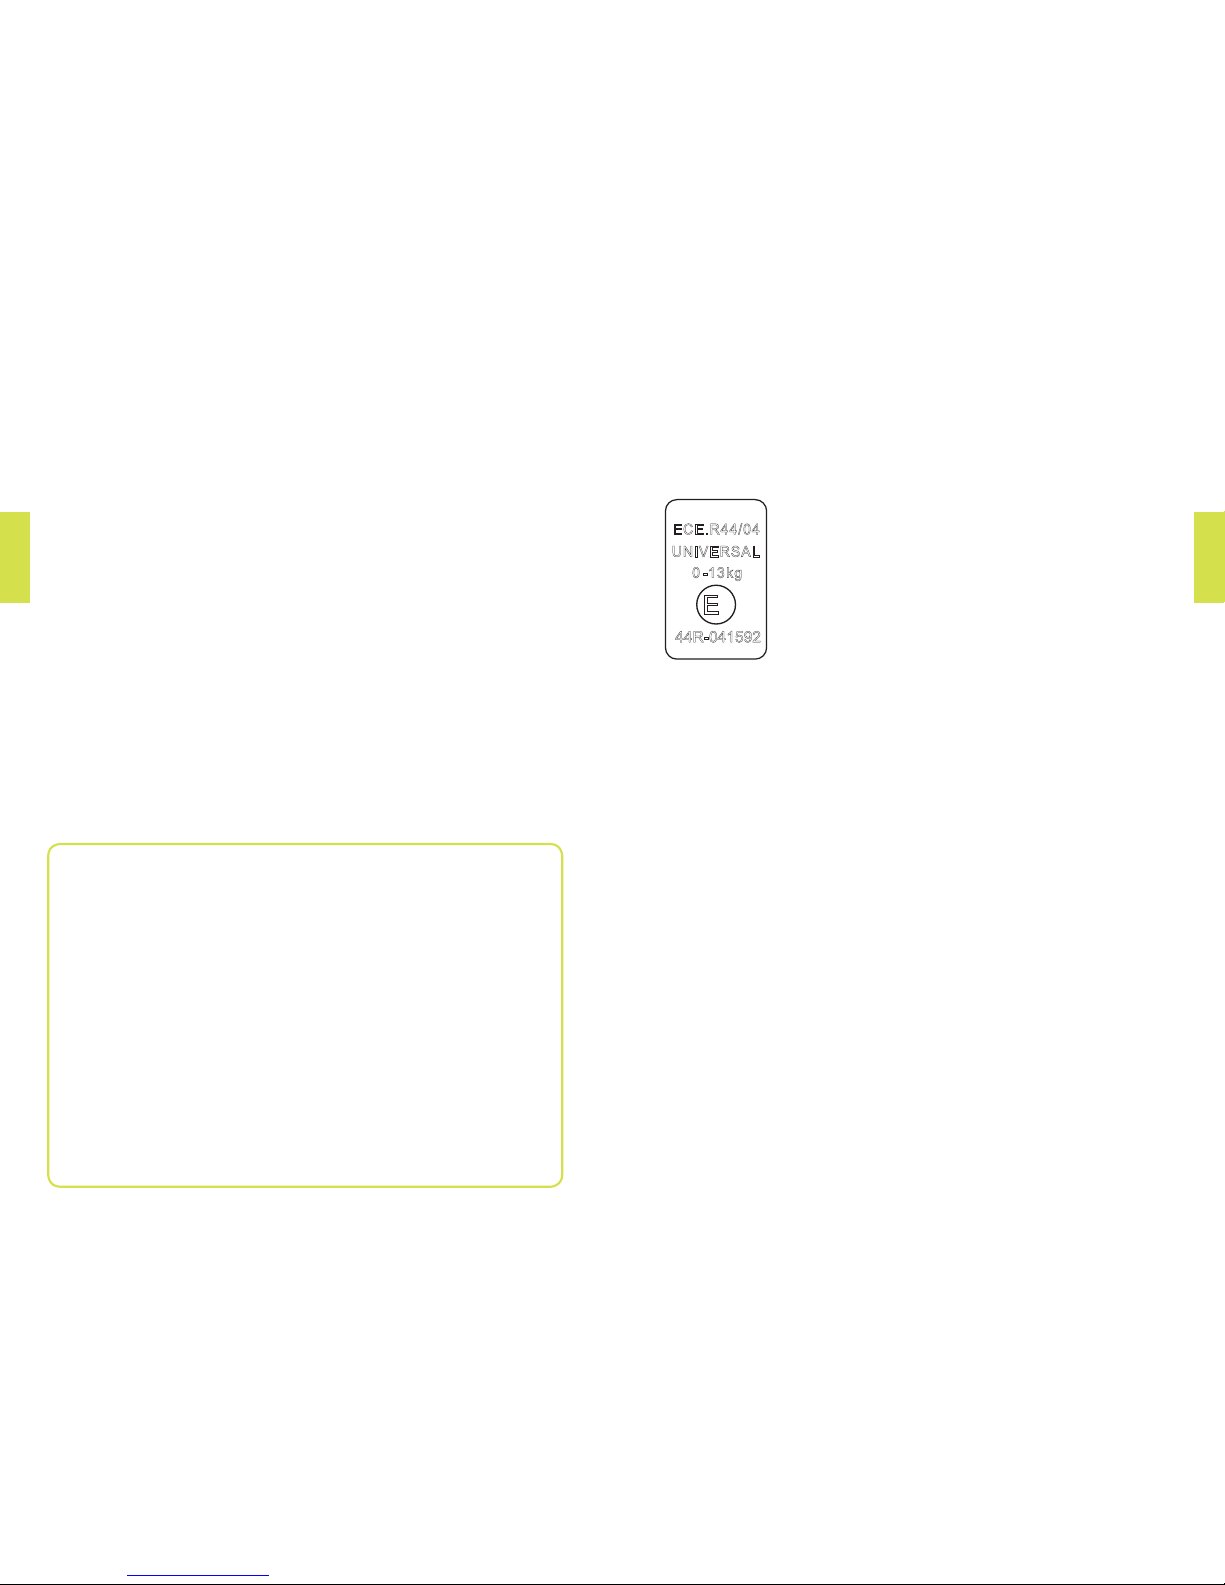
1. This infant car seat is a ‘Universal’ child
restraint. It is approved to European
Regulation No. 44, 04 series of amendments,
for general use in vehicles and it will fit most,
but not all, car seats.
ECE.R44/04
0 -13kg
UNIVERSAL
E
11
44R-041592

1817
EN
EN
For use
with base
For Installation with 3-point-belt
It will fit vehicles fitted with 3-point retractor safety-belts. It is
approved to Regulation No. 44, 04 series of amendments for
general use in vehicles fitted with 3-point-belt. Seat positions in
other cars may also be suitable to accept this child restraint. If
in doubt, consult either the child restraint manufacturer or the
retailer.
For Installation with ISOFIX System
This is an ISOFIX CHILD RESTRAINT SYSTEM. It is approved
to Regulation No. 44, 04 series of amendments for general use
in vehicles fitted with ISOFIX anchorages systems.
It will fit vehicles with positions approved as ISOFIX positions
(as detailed in the vehicle handbook), depending on the
category of the child seat and of the fixture.
The ISOFIX size class for which this device is intended is C
and D.
Parts list
1
2
3
48
11
12
13
567
10
9
1 Seat Pad
2 Side Guides
3 Infant Insert
4 Adjustment Webbing
5 Adjustment Button
6 Safety Buckle
7 Shoulder Harness Straps
8 Canopy Mount
9 Canopy
10 Handle
11 Handle Button
12 Rear Guide
13 Stroller Release Handle
14 ISOFIX Connector
15 Shell Indicator
16 ISOFIX Guides
17 Load Leg
18 Load Leg Indicator
19 Load Leg Adjust Button
20 Car Seat Release Button
21 Lock-off
The Infant Car Seat with Base is a "Semi
Universal ISOFIX Class C and D Child Restraint"
and should be fitted using at 3 point adult
seat belt approved to ECE R16 or the ISOFIX
connections. Please refer to the Vehicle Fitting
Information at the back of this manual.
21
14
15
17 18
19
20
16
SEMI-
ECE.R44/04
XXXXXX
0-
UNIVERSAL

2019
EN
EN
Warnings
NO Infant car seat can guarantee full protection
from injury in an accident. However, proper use of
this Infant car seat will reduce the risk of serious
injury or death to your child.
This Infant car seat is designed ONLY for child
weighing under 13kg.
DO NOT use or install this Infant car seat until
you read and understand the instructions in this
manual and in your vehicle owner’s manual.
DO NOT install this car seat without following the
instructions in this manual or you may put your
child in serious risk of injury or death.
NEVER leave your child unattended with this
Infant car seat.
DO NOT make any modification to this Infant car
seat or use it along with component parts from
other manufacturers.
DO NOT use this Infant car seat if it has damaged
or missing parts.
DO NOT have your child in large/oversized
clothes because this may prevent your child
from being properly and securely fastened by
the shoulder harness straps and the harnesses
between thighs.
DO NOT leave this Infant car seat or other items
unbelted or unsecured in your vehicle because
unsecured Infant car seat can be thrown around
and may injure occupants in a sharp turn, sudden
stop, or collision.
DO NOT place rear-facing car seat on front seat
with air bag. Death or serious injury may occur.
Please reference vehicle owner’s manual for more
information.
NEVER use a second-hand Infant car seat or an
infant car seat whose history you do not know
because they may have structural damage that
endangers your child’s safety.
NEVER use ropes or any other substitutes to
secure car seat in vehicle or to secure child into
car seat. Only use vehicle belt to secure car seat
in vehicle.
DO NOT use this Infant car seat without the soft
goods.
The soft goods should not be replaced with
any besides the ones recommended by the
manufacturer. The soft goods constitute an
integral part of the Infant car seat performance.
DO NOT put anything other than the
recommended inner cushions in this Infant car
seat.
Be sure that the car seat is installed in such a way
that no part of it interferes with movable seats or
in the operation of vehicle doors.
DO NOT continue to use this car seat after it has
suffered any type of crash, even a minor one.
Replace immediately as there may be invisible,
structural damage from the crash.
Remove this infant car seat and base from the
vehicle seat when it is not in regular use.
Consult the distributor for issues concerning
maintenance, repair and part replacement.

2221
EN
EN
To avoid the risk of falling out, always secure the
child using the safety harness when the child is
placed in car seat, even when the car seat is not
in the vehicle.
Before carrying the infant car seat by hand,
ensure that the child is fastened with the safety
harness, and that the handle is correctly locked in
a vertical position.
To avoid serious injury or death, NEVER place
infant car on elevated surface seat with child in it.
The parts of this car seat should not be lubricated
in any way.
Always secure child in car seat, even on short
trips, as this is when most accidents occur.
DO NOT use this car seat for more than 5 years
after the purchase date as parts may degrade
over time, or from exposure to sunlight, and may
not perform adequately in a crash.
Please keep this car seat away from sunlight,
otherwise it may be too hot for child’s skin.
Always touch test seat before placing child in it.
Frequently check the ISOFIX guides for dirt
and clean them if necessary. Reliability can be
effected by ingress of dirt, dust, food particles etc.
DO NOT place any objects in the load leg area in
front of your base.
Correct Installation is only permitted by use of
a 3 point adult seat belt or by use of the ISOFIX
connectors. Combined use of seat belt and
ISOFIX is not permitted.
Installation
concerns
DO NOT install this infant car seat on vehicle
seats with Lap Belts without the Base (1)
This infant car seat is suitable for vehicle seats
with a 3-point Retractor Safety Belt ( with or
without base) only. And ISOFIX anchor points with
the Base. (2)
DO NOT install this Infant car seat on vehicle
seats that face sideways (3) or rearward (3)
with respect to the moving direction of the
vehicle.
DO NOT place rear-facing car seat on front seat
with air bag. Death or serious injury may occur.
(3) Please reference vehicle owner's manual for
more information.
It is recommended to install this Infant car seat on
the rear vehicle seat. (3)
DO NOT install this Infant car seat on vehicle
seats unstable during installation.

2423
EN
EN
Shoulder harness
position
Check that Shoulder Harness Straps are set at the proper
height. Please choose the proper pair of shoulder harness
slots according to the child's height.
Shoulder Harness Straps must go into the harness slots
nearest to your childs shoulders (4), but not above the
shoulder line. (5)
If the Shoulder Harness Straps are not at proper height, the
child might be ejected the infant car seat if there is a crash.
Contents
of the box
PIPAFIX base
Tools Needed: None
Shoulder harness
straps height
adjustment
Use extreme care in threading the Shoulder Harness Straps
according to the figure. If the Shoulder Harness Straps are not
secure, they will not protect your baby.
The ends of the Shoulder Harness Straps must hang in front of
the junction plate.
Ensure that the shoulder harness straps are not twisted before
reassembling the ends onto the junction plate.
1 Press the adjustment button at the front of the seat and pull
on the shoulder harnesses to loosen them. (6)
2 At the back of the seat, take the harness ends off the metal
junction plate. (7)
3 Pull the harnesses through the slots in the seat. Insert them
into the appropriate set of slots. (8)
4 Reassemble the harness ends onto the junction plate. (9)
The ends of the Shoulder Harness Straps have two loops.
For a smaller baby, use the upper shoulder harness loops.
(10)
For a larger baby, use the end shoulder harness loops. (11)

2625
EN
EN
Handle
adjustment
1 The handle of the infant car seat can be adjusted to 3
positions.
Baby chair position. (12) -1
Rocking position. (12) -2
Position for car, hand or stroller transportation. (12) -3
2 To adjust the handle positon, squeeze handle buttons on
both sides to release it. (13) -1
3 Rotate handle until it clicks into any of the 3 positions. (13) -2
Installation
without base
1 Place the infant car seat onto the vehicle seat where you
wish to put it. Pull the vehicle safety belt out and lock it into
the vehicle buckle, sliding the vehicle lap belt into the side
guides of the infant car seat. (14)
2 Slide diagonal belt into the rear guide. (15)
3 Pull the vehicle shoulder belt to fasten the infant car seat
tightly and securely. (16)
4 Level line on carrier must be level to the ground when the car
seat is installed. (30)
Tension the vehicle safety belt as much as possible,
checking that it is not loose or twisted.
After installing the infant car seat, always check that the
vehicle belts are routed correctly and securely fastened
into the vehicle buckle. (17)
Installation
with base
This base is only to be used with certain infant car seats.
A proper installation can be done either with the 3-point-belt
or ISOFIX system.
A simultaneous use of both systems is not permitted.
Installation with 3-point-belt
1 Unfold the load leg from storage compartment. (18)
2 After placing the base on the vehicle seat, squeeze load leg
adjust button to extend the load leg to floor (19) -1, the
load leg indicator shows green means it is installed
correctly, red means it is installed incorrectly. (19) -2
The load leg has 24 positions. When the load leg
indicator shows red this means the load leg is in the
wrong position.
Make sure the load leg is secure by pressing down on
the front of the base.
3Open the lock-off and route the vehicle safety belt through
the belt path (20) -1, and lock it into the buckle (20) -2,
close the lock-off. (20) -3
4 Tighten the vehicle safety belt as much as possible while
pushing down on the base, and check it is not loose or twisted.
Check that the safety belt does not move by pulling
and pushing hard on base. If belt loosens or
lengthens, repeat procedure.
The installed base is shown as Fig. (21)
Please ensure that there is no gap between the seat and the
bottom of the base.

2827
EN
EN
The safety belt must go under the lock-off, not over the
lock-off. (21) -1
The safety belt must be locked into the buckle. (21) -2
The load leg must be installed correctly with green
indicator. (21) -3
5 Push the car seat down into the base (22), if the car
seat is secure, the car seat indicator shows green.
Pull up on the car seat to be sure it is securely latched
into the base.
6 To release the car seat, pull the car seat up while squeezing
the car eat release button. (24)
Installation with ISOFIX System
1 Unfold the load leg from storage compartment. (18)
2 Fit the ISOFIX guides with the ISOFIX anchor points. (25)
The ISOFIX guides can protect the surface of the vehicle
seat from being torn. They can also guide the ISOFIX
connectors.
3 Rotate the ISOFIX connectors 180 degrees until they are
pointing in the direction of the ISOFIX guides. (26)
4 Line up the ISOFIX connectors with the ISOFIX guides, and
then click both ISOFIX connectors into the ISOFIX anchor
points. (27)
Make sure that both ISOFIX connectors are securely
attached to their ISOFIX anchor points. There should
be two audible clicks and the colors of the indicators
on the both ISOFIX connectors should be completely
green. (27) -1
Check to make sure the base is securely installed by
pulling on the both ISOFIX connectors.
5 Please refer to step 2 in section 'a. Installation with
3-point-belt' for adjustment of load leg.
The completely assembled base is shown as (28)
The ISOFIX connectors must be attached and locked
onto the ISOFIX anchor points. (28) -1
The load leg must be installed correctly with green
indicator. (28) -2
6 Please refer to step 5, 6 in section 'a. Installation with
3-point-belt' to use the infant car seat.
7 To remove the base, pull the base backwards while pressing
the buttons on the ISOFIX connectors. (29)
Securing
child
Foam inside infant insert is present to ensure that harness
fits child properly. Infant insert must be used for children 0-6
months.
After the child is placed into the seat, check whether the
Shoulder Harness Straps are at proper height.
1 While pressing the adjustment button located at the front of
the infant car seat, pull completely the two Shoulder Harness
Straps of the infant car seat. (30)
2 Unlock the buckle of the harnesses by pressing the red
button. (31)
3 Place the child into the infant car seat and lock the buckle.
(32)Please refer to. (33)
4 Tighten the shoulder harness straps by pulling the
adjustment webbing. (34)
Make sure the space between the child and the Shoulder
Harness Straps is about the thickness of one hand.

3029
EN
EN
Canopy
1 Unzip the zipper behind the front canopy bow. (35)
2 Pull the canopy out of the compartment. (36)
3 Attach the magnets on each corner to the front of the car
seat. (37)
Detach canopy
and seat pad
1 To disassemble the canopy, press the button in the canopy
mount and pull the canopy bow out. (38)
2 Pull the fastening pieces underneath the edge of the seat
out. (39)
3 Pull the harness out of the metal junction plate. (7)
4 Remove the seat pad from the adjustment button as shown
in. (40)
5 Remove the seat pad from the Stroller release button as
shown in. (41)
Cleaning and
maintenance
After child is older than 6 months, please remove the foam
from the infant insert and store it somewhere your child
cannot access it.
Please wash the soft goods with cold water under 30°C.
Do not iron the soft goods.
Do not bleach or dry clean the soft goods.
Do not use undiluted neutral detergent, gasoline or other
organic solvent to wash the infant car seat and base. It may
cause damage to the product.
Use only mild detergent, water and a soft cloth to clean the
car seat shell, handle and harness straps and base.
Do not twist the soft goods to dry with great force. It may
leave the soft goods with wrinkles.
Please hang dry the soft goods in the shade.
Please remove the infant car seat and base from the vehicle
seat if not in use for a long period of time. Put the infant car
seat and base in a cool, dry place and somewhere your child
can not access it.
Warranty
and service
The Nuna car seat and base is covered by a one-year warranty.
If this product shows a defect during the warranty period,
please contact your retailer. If the retailer is unable to help you,
they will make contact with the local Nuna distributor.
Please be aware that the model number and serial number
located on the bottom of the base of the product will be
required in the event of a warranty claim.

3231
EN
EN
To register your product, please go to our website at nuna.eu
Terms of warranty
The warranty takes effect at the date of purchase of the product
and is valid for one year. The warranty provides you with a right of
repair but not a product exchange or return. The warranty will not
be extended even if some repairs have been made. Nuna has the
right to improve the design of the product without any obligation to
update the products manufactured previously.
The warranty will not apply in the following circumstances:
• If you can not provide the sales receipt or proof of purchase
of the product.
• If the defect results from normal wear.
• If the defect results from an accident.
• If the defect results from a failure to follow the instructions
of assembly, use, care, and maintenance provided in the
instruction manual.
• If the defect results from overloading (maximum weight =
13 kg).
• If repairs have been carried out by a third party.
• If the defect results from the use of accessories others than
Nuna.
Where to find Nuna
products?
If you are looking for Nuna retailers in your area, please consult
our website: nuna.eu
Contact
We always look forward to improving our products and
developing new ideas, so please feel free to contact us
to submit any comments or questions regarding the Nuna
products.
nuna.eu
Nuna International BV.
De Beeke 8, 5469 DW, ERP
The Netherlands
Thanks for
choosing Nuna!

Vehicle Fitting
Information
The infant car seat with base are classified for “Semi-universal”
use. They are suitable for fixing into the seat positions of the most
cars. The letters on the diagram to the below correspond with the
vehicle fitting positions listed in the following pages.
Seat positions in other cars may also be suitable to accept the
child restraint. If in doubt, consult either the child restraint
manufacturer or the retailer.
ALWAYS give priority to the rear seats of your vehicle.
DO NOT fit your child restraint onto a vehicle seat fitted with an
airbag, unless it can be deactivated.
If your child restraint can be fitted, it is marked with V.
If your child restraint cannot be fitted, it is marked with X.
If your vehicle is not listed in this manual or it is not marked with
either a V or X then please refer to your vehicle’s handbook or
contact the manufacturer for further information.
2
2
1
3
3
1
A
I
R
B
A
G
Installation with 3-point-belt
3433
EN
EN
Alpha Romeo
147 (2001 - 2009)
159 Saloon (2006 - 2011)
Brera (2006 - 2011)
GT (2004 - 2011)
Guilietta (2010 - 2012)
Mito (2009 - 2011)
Aston martin
Cygnet (2010 - 2011)
Audi
A1 (2011 - 2012)
A1 Sportback (2012)
A3 (2002)
A3 S3 (2006 - 2011)
A4 (2005 - 2008)
A4 Allroad (2009 - 2011)
A4 Avant (2008 - 2011)
A5 (2007 - 2011)
V
X
V
V
V
X
V
X
V
X
V
X
V
V
V
V
V
V
V
X
X
V
V
V
V
V
V
V
V
V
V
V
V
V
X
X
V
V
V
V
V
V
V
V
V
21 3

3635
EN
EN
V
V
V
V
X
V
V
V
V
V
V
V
X
X
X
V
V
X
X
V
V
V
V
V
X
V
V
V
V
V
V
V
V
V
V
V
V
V
V
V
V
V
V
V
V
V
V
V
X
V
V
V
V
V
V
V
V
V
V
V
V
V
V
V
V
V
V
V
V
V
V
V
Cadillac
BLS Saloon (2006 - 2011)
Chevrolet
Aveo 3dr (2008 - 2011)
Aveo 5dr (2008 - 2011)
Captiva (2011 - 2012)
Captiva (2006 - 2011)
Cruze (2008 - 2011)
Orlando (2010 - 20121
Spark (2009 - 2011)
Chrysler
Voyager (2001 - 2008)
300 C (2010 - 2012)
300 C (2004 - 2010)
Delta (2012)
Ypsilon (2012)
Citroen
Berlingo (2009- 2012)
Berlingo (1998 - 2009)
C-Crosser (2007 - 2012)
C-Zero (2011 - 2012)
C1 (2005 - 2011)
C2 (2003 - 2009)
C3 (2009 - 2012)
C3 (2002 - 2009)
C3 Picasso (2009 - 2011)
C3 Pluriel (2003 - 2010)
C4 (2010 - 2012)
C4 (2004 - 2010)
A5 Sportback (2009 - 2011)
A5 S5 (2007 - 2011)
A6 (2004 - 2011)
A6 S6 (2006 - 2011)
A7 Sportback (2011 - 2012)
A8 (2003 - 2011)
A8 S8 (2006 - 2011)
Q5 (2009 - 2012)
Q7 (2006 - 2011)
TT (1999 - 2006)
Bentley
Please refer to the manufacturer
for further information
BMW
1 Series (2004 - 2011)
1 Series F20 (2011)
3 Series (2004 - 2011)
3 Series F30 (2011)
3 Series M3 (2007 - 2011)
5 Series M5 (2005 - 2011)
5 Series Saloon (2003 - 2010)
6 Series (2004 - 2011)
6 Series M6 (2005 - 2010)
7 Series (2008 - 2011)
X3 (2004 - 2011)
X3 F25 (2011 - 2012)
X5 (2007 - 2011)
X6 (2010 - 2011)
X
V
V
V
V
V
V
V
X
V
V
V
V
V
V
V
V
V
V
V
V
V
V
V
V
V
V
V
V
V
V
V
V
V
X
V
V
V
V
V
V
V
V
V
V
V
V
V
V
V
V
V
V
V
V
V
V
V
V
V
X
V
V
V
V
V
V
V
V
V
V
V
V
V
V
V
V
V
21 3 21 3
Other manuals for Pipa
8
This manual suits for next models
1
Table of contents
Languages:
Other Nuna Car Seat manuals