EnglishDeutsch
 logo
Brands
  1. Home
  2. •
  3. Brands
  4. •
  5. Saxby Lighting
  6. •
  7. Lighting Equipment
  8. •
  9. Saxby Lighting 75922 Manual

Saxby Lighting 75922 Manual

This manual suits for next models

2

Other Saxby Lighting Lighting Equipment manuals

Saxby Lighting Sight Twin Spot Manual

Saxby Lighting

Saxby Lighting Sight Twin Spot Manual

Saxby Lighting Sight 3 in 1 Manual

Saxby Lighting

Saxby Lighting Sight 3 in 1 Manual

Saxby Lighting 75145 Manual

Saxby Lighting

Saxby Lighting 75145 Manual

Saxby Lighting Sight ECO User manual

Saxby Lighting

Saxby Lighting Sight ECO User manual

Saxby Lighting 48700 Manual

Saxby Lighting

Saxby Lighting 48700 Manual

Saxby Lighting 99562 User manual

Saxby Lighting

Saxby Lighting 99562 User manual

Saxby Lighting 43810 Manual

Saxby Lighting

Saxby Lighting 43810 Manual

Saxby Lighting Surge PIR User manual

Saxby Lighting

Saxby Lighting Surge PIR User manual

Saxby Lighting EL-20079 Manual

Saxby Lighting

Saxby Lighting EL-20079 Manual

Saxby Lighting SMART IKON User manual

Saxby Lighting

Saxby Lighting SMART IKON User manual

Saxby Lighting ALBA SOLAR POST PIR User manual

Saxby Lighting

Saxby Lighting ALBA SOLAR POST PIR User manual

Saxby Lighting 67360 User manual

Saxby Lighting

Saxby Lighting 67360 User manual

Saxby Lighting Tango User manual

Saxby Lighting

Saxby Lighting Tango User manual

Saxby Lighting Lucca Mini User manual

Saxby Lighting

Saxby Lighting Lucca Mini User manual

Saxby Lighting HeroPro CCT Emergency User manual

Saxby Lighting

Saxby Lighting HeroPro CCT Emergency User manual

Saxby Lighting Regen Manual

Saxby Lighting

Saxby Lighting Regen Manual

Saxby Lighting 98440 User manual

Saxby Lighting

Saxby Lighting 98440 User manual

Saxby Lighting Flexline Kit Manual

Saxby Lighting

Saxby Lighting Flexline Kit Manual

Saxby Lighting Lucca Wall 67176 Manual

Saxby Lighting

Saxby Lighting Lucca Wall 67176 Manual

Saxby Lighting Sight Plus Manual

Saxby Lighting

Saxby Lighting Sight Plus Manual

Saxby Lighting 14008 User manual

Saxby Lighting

Saxby Lighting 14008 User manual

Saxby Lighting 10430 Manual

Saxby Lighting

Saxby Lighting 10430 Manual

Saxby Lighting 73347 User manual

Saxby Lighting

Saxby Lighting 73347 User manual

Saxby Lighting IkonPRO RGB LED Kit User manual

Saxby Lighting

Saxby Lighting IkonPRO RGB LED Kit User manual

Popular Lighting Equipment manuals by other brands

Brizo 8SP-MU-4 manual

Brizo

Brizo 8SP-MU-4 manual

LUCE&LIGHT BROM 1.0 installation instructions

LUCE&LIGHT

LUCE&LIGHT BROM 1.0 installation instructions

IKEA BJÖRKSPIREA manual

IKEA

IKEA BJÖRKSPIREA manual

Laserworld Evolution Series ES-400RGB manual

Laserworld

Laserworld Evolution Series ES-400RGB manual

EuroLite LED B-40 user manual

EuroLite

EuroLite LED B-40 user manual

Qazqa Suplux SL 3 Black 103062 instruction manual

Qazqa

Qazqa Suplux SL 3 Black 103062 instruction manual

Commercial Electric 54568141 Use and care guide

Commercial Electric

Commercial Electric 54568141 Use and care guide

CREE LIGHTING 304 Series installation instructions

CREE LIGHTING

CREE LIGHTING 304 Series installation instructions

Goobay 49867 user manual

Goobay

Goobay 49867 user manual

ECOMAN ITALIA LED T8 instruction manual

ECOMAN ITALIA

ECOMAN ITALIA LED T8 instruction manual

Alkalite Krypton KT-81 user manual

Alkalite

Alkalite Krypton KT-81 user manual

Clas Ohlson GU10 manual

Clas Ohlson

Clas Ohlson GU10 manual

DTS DELTA 10 F user manual

DTS

DTS DELTA 10 F user manual

ring Solar Steplight manual

ring

ring Solar Steplight manual

One Stop Gardens 57696 Owner's manual & safety instructions

One Stop Gardens

One Stop Gardens 57696 Owner's manual & safety instructions

SIREM Swimeo A2 instructions

SIREM

SIREM Swimeo A2 instructions

Silvair MESH-CEDRP quick start guide

Silvair

Silvair MESH-CEDRP quick start guide

S&P PCRL80 manual

S&P

S&P PCRL80 manual

https://manuals.online logo
https://manuals.online logoBrands
  • About & Mission
  • Contact us
  • Privacy Policy
  • Terms and Conditions

Copyright 2026 Manuals.Online. All Rights Reserved.

• This system contains non-replaceable parts and cannot be serviced. If damage occurs the part should
be scrapped.
Instruction leaflet
Sleek CCT LED Undercabinet
75922, 75923, 75924
www.saxbylighting.com
Under no circumstances must the connecting lead be modified for use as a power lead. This would make the
exposed input socket live. For your safety, always switch off the supply before cleaning.
Waste electrical products should not be disposed of with household waste. Please recycle where
facilities
exist. Check with your Local Authority or retailer for recycling advice.
Recycling advice
Safety information
Saxby Lighting. BH23 3PE
• Always switch off or disconnect from the mains when cleaning the product.
• We recommend cleaning with a soft dry cloth. Never use scourers, abrasives or chemical cleaners.
• Do not allow moisture to come into contact with electric parts.
Fitting/replacing bulbs
Iss.4 3/01/2019
• Clip the product(s) into the brackets.
• Plug in the mains cable to the end of the product.
• Ensure that the cables are routed to avoid accidents
or damage occurring. We recommend that cables are
secured to a mounting surface after installation.
• If a connector end is not being used remember to
replace the covering cap. This is important to prevent
accidental electric shock.
• Kelvin memory: First choose the color
temperature you want, and keep to light up the
lamp ≥10s,and Turn off the lamp and keep switched
off ≥30s, the integrated memory function will
remember the last colour selected.
When you turn on the lamp next time,the color
temperature will keep the same as the last time
you choose.
• Re-set function: If you connect several lamps
together,and the color temperature of them are
different,then you can use re-set function.
Quickly turn ON /OFF general power switch for 5
circles(1 circle means on and off) ,all lamps will return
to 3000K together.
• This product is colour changing and can be either warm
white (3000K), cool white (4000K) and daylight
white (5000K).
Turning the switch ON/OFF quickly (within 3 seconds) to
choose your preferred colour, the step is: on(3000K)--
off--on(4000K mix)--off--on(5000K).
Commissioning
Care & Cleaning
WWW.saxbylighting.com Saxby lighting. BH23 3PE
Thank you for purchasing this light fitting. Please read the instructions carefully before use to ensure safe and
satisfactory operation of this product. Please retain these instructions for future reference.
Warning
This product is Double Insulated and does
not require connection to an Earth circuit.
Please read these instructions carefully before
commencing any work.
This unit must be fitted by a competent and qualified
electrician.
Install in accordance with IEE Wiring regulations and
current Building Regulations.
To prevent electrocution switch off at mains supply
before installing or maintaining this fitting. Ensure
other persons cannot restore the electrical supply.
This system contains non-replaceable parts and
cannot be serviced. If damage occurs the part should
be scrapped.
Waste electrical products should not be disposed of
with household waste. Please recycle where facilities
exist. Check with your local authority or retailer for
recycling advice.
When wiring to a fused outlet all connections and
conductors must be doubled insulated.
Specification
Voltage: 240V ~ 50Hz
Lamp: 75922: 5W LED Module (500 lm)
75923: 8W LED Module (800 lm)
75924: 13W LED Module (1300 lm)
IP rating: 20
Layout
• This product is designed for use under kitchen
cupboards, bookshelves, cabinets etc. Suitable for
indoor use only. Not suitable for bathrooms.
• The chosen location should allow for the product
to be securely mounted and safely connected to
the mains supply (240V wall socket or fused outlet
socket).
• Avoid locating any cables in positions that would
cause a hazard. Position cables away from areas
where they may be at risk from being cut, trapped or
damaged.
• A plug and cable (ref 75921) are available for
purchase separately and can power max. 8 x sleek
products at one time.
Existing fittings must be completely removed before
installation of a new product. Before removing the
existing fitting, carefully note the position of each set
of wires.
• After deciding on the layout of your choice,
determine the positions of the fixing brackets.
• Using the desired brackets, fit the brackets into
position using the supplied fixings.
• Wire as detailed below.
• This product can be linked together by using the
supplied connector.
This unit is double insulated and must not be
earthed.
• A plug and cable (ref 75921) are available for
purchase separately. Once purchased, simply
plug-in to an outlet socket. Should the fuse require
replacement, it must be replaced with a fuse rated at
3 amp and approved to BS1362.
• If the mains plug is unsuitable for the socket outlet
or is removed for any other reason, then the cut off
plug should be disposed of safely to prevent the
hazard of electric shock.
• There is a danger of electric shock if the cut off plug
is inserted into any 13 amp socket outlet.
• To directly wire the power lead to a fused outlet
socket, remove the plug and connect the Brown wire
to the terminal marked L. The Blue wire must be
connected to the terminal marked N. Use a 3 Amp
Fuse approved to BS1362.
• The wires in the mains lead on this appliance are
coloured in accordance with the following code:
Blue – Neutral
Brown – Live
• Use a 3 Amp Fuse approved to BS1362.
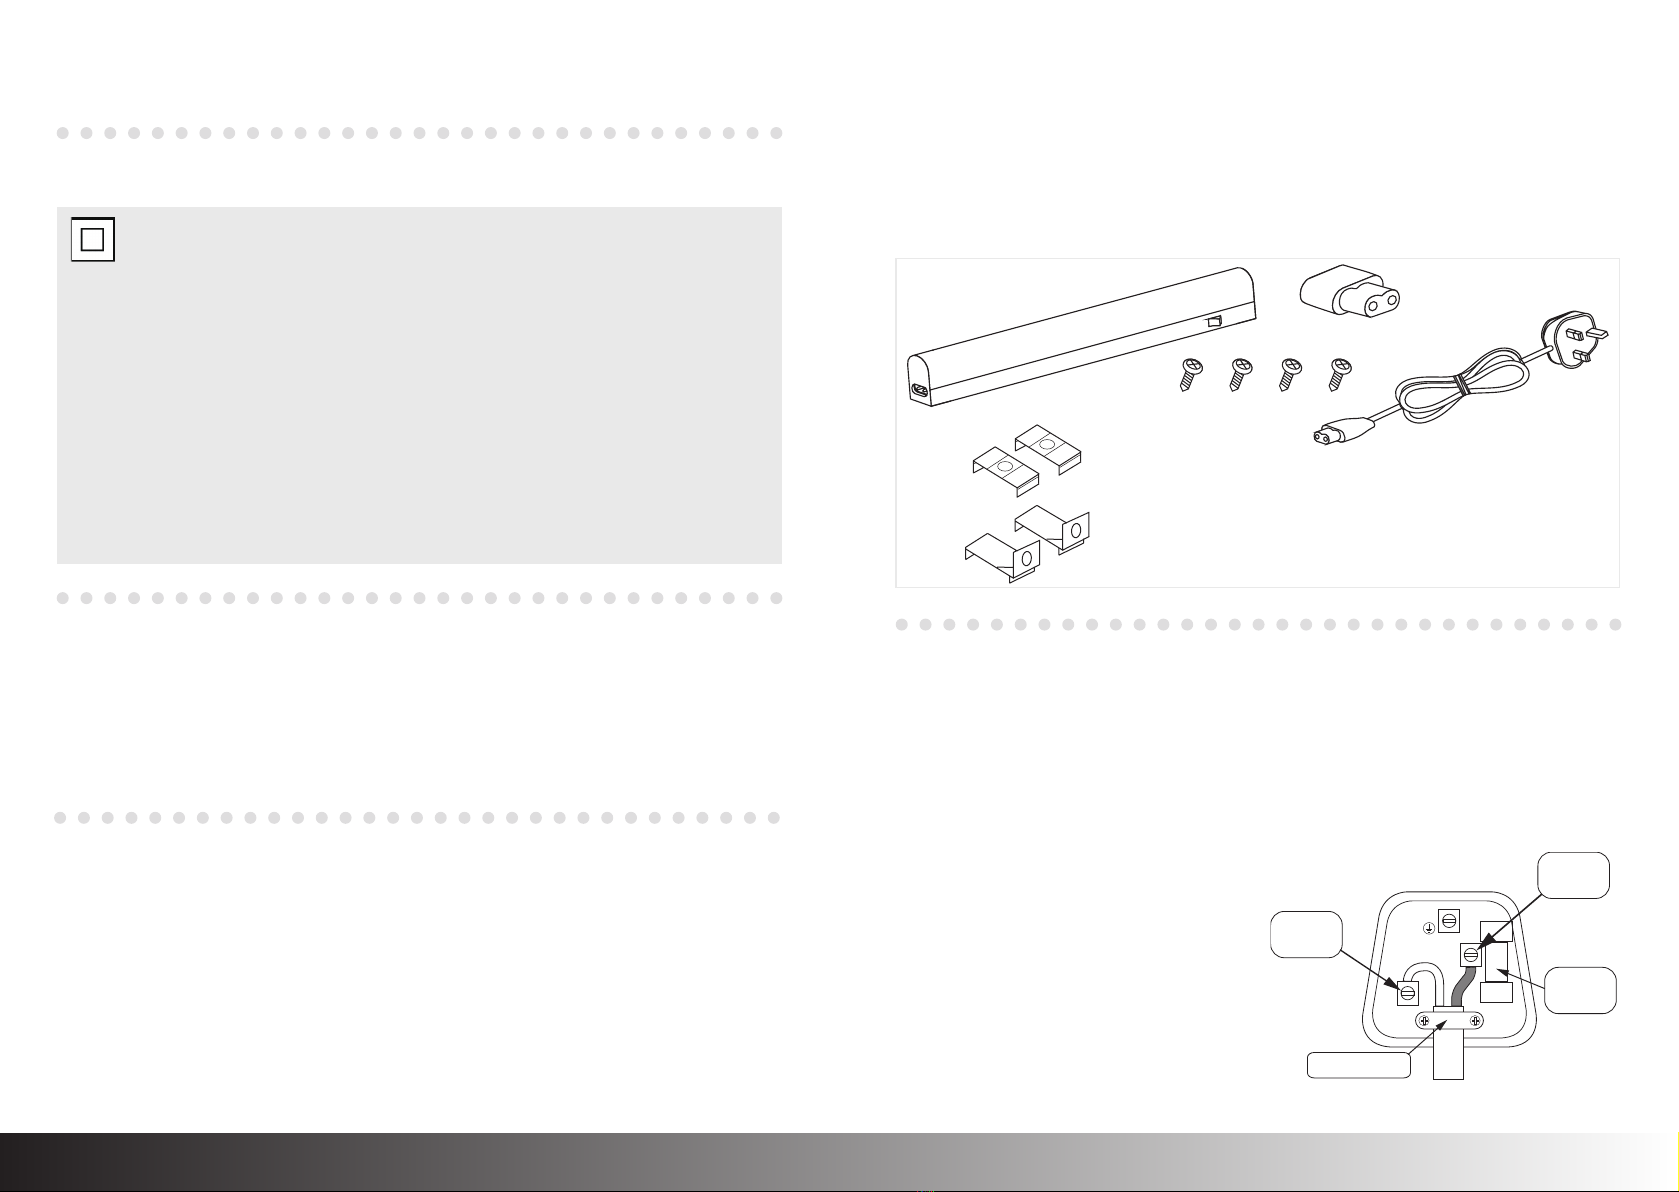
Installation
Wiring
Bracket for
underside of cabinets
Bracket for
wall fixing
Linking Connector
E
L
N
Fuse
3 Amps
Cord Clamp
BLUE
Neutral
BROWN
Live
75921 - plug & cable available
for purchase separately