EnglishDeutsch
 logo
Brands
  1. Home
  2. •
  3. Brands
  4. •
  5. Saxby Lighting
  6. •
  7. Lighting Equipment
  8. •
  9. Saxby Lighting 99562 User manual

Saxby Lighting 99562 User manual

This manual suits for next models

3

Other Saxby Lighting Lighting Equipment manuals

Saxby Lighting 108750 User manual

Saxby Lighting

Saxby Lighting 108750 User manual

Saxby Lighting 78965 User manual

Saxby Lighting

Saxby Lighting 78965 User manual

Saxby Lighting Louvre Photocell User manual

Saxby Lighting

Saxby Lighting Louvre Photocell User manual

Saxby Lighting Lucca Wall 67176 Manual

Saxby Lighting

Saxby Lighting Lucca Wall 67176 Manual

Saxby Lighting 43810 Manual

Saxby Lighting

Saxby Lighting 43810 Manual

Saxby Lighting RULAR CCT User manual

Saxby Lighting

Saxby Lighting RULAR CCT User manual

Saxby Lighting Surge PIR User manual

Saxby Lighting

Saxby Lighting Surge PIR User manual

Saxby Lighting 73666 Manual

Saxby Lighting

Saxby Lighting 73666 Manual

Saxby Lighting shieldLED 400 Manual

Saxby Lighting

Saxby Lighting shieldLED 400 Manual

Saxby Lighting Seina 78637 User manual

Saxby Lighting

Saxby Lighting Seina 78637 User manual

Saxby Lighting SMART IKON User manual

Saxby Lighting

Saxby Lighting SMART IKON User manual

Saxby Lighting Odyssey Spike Manual

Saxby Lighting

Saxby Lighting Odyssey Spike Manual

Saxby Lighting Icarus Twin Wall EL-40054 Manual

Saxby Lighting

Saxby Lighting Icarus Twin Wall EL-40054 Manual

Saxby Lighting Lucca Mini User manual

Saxby Lighting

Saxby Lighting Lucca Mini User manual

Saxby Lighting 13889 User manual

Saxby Lighting

Saxby Lighting 13889 User manual

Saxby Lighting Odyssey Bollards ST501228 User manual

Saxby Lighting

Saxby Lighting Odyssey Bollards ST501228 User manual

Saxby Lighting 73721 Manual

Saxby Lighting

Saxby Lighting 73721 Manual

Saxby Lighting 43810 Manual

Saxby Lighting

Saxby Lighting 43810 Manual

Saxby Lighting 1818PIR Manual

Saxby Lighting

Saxby Lighting 1818PIR Manual

Saxby Lighting Kios 2 User manual

Saxby Lighting

Saxby Lighting Kios 2 User manual

Saxby Lighting SIGHTPRO 108087 User manual

Saxby Lighting

Saxby Lighting SIGHTPRO 108087 User manual

Saxby Lighting 97818 User manual

Saxby Lighting

Saxby Lighting 97818 User manual

Saxby Lighting Surge PIR Manual

Saxby Lighting

Saxby Lighting Surge PIR Manual

Saxby Lighting 75272 Manual

Saxby Lighting

Saxby Lighting 75272 Manual

Popular Lighting Equipment manuals by other brands

Brizo 8SP-MU-4 manual

Brizo

Brizo 8SP-MU-4 manual

LUCE&LIGHT BROM 1.0 installation instructions

LUCE&LIGHT

LUCE&LIGHT BROM 1.0 installation instructions

IKEA BJÖRKSPIREA manual

IKEA

IKEA BJÖRKSPIREA manual

Laserworld Evolution Series ES-400RGB manual

Laserworld

Laserworld Evolution Series ES-400RGB manual

EuroLite LED B-40 user manual

EuroLite

EuroLite LED B-40 user manual

Qazqa Suplux SL 3 Black 103062 instruction manual

Qazqa

Qazqa Suplux SL 3 Black 103062 instruction manual

Commercial Electric 54568141 Use and care guide

Commercial Electric

Commercial Electric 54568141 Use and care guide

CREE LIGHTING 304 Series installation instructions

CREE LIGHTING

CREE LIGHTING 304 Series installation instructions

Goobay 49867 user manual

Goobay

Goobay 49867 user manual

ECOMAN ITALIA LED T8 instruction manual

ECOMAN ITALIA

ECOMAN ITALIA LED T8 instruction manual

Alkalite Krypton KT-81 user manual

Alkalite

Alkalite Krypton KT-81 user manual

Clas Ohlson GU10 manual

Clas Ohlson

Clas Ohlson GU10 manual

DTS DELTA 10 F user manual

DTS

DTS DELTA 10 F user manual

ring Solar Steplight manual

ring

ring Solar Steplight manual

One Stop Gardens 57696 Owner's manual & safety instructions

One Stop Gardens

One Stop Gardens 57696 Owner's manual & safety instructions

SIREM Swimeo A2 instructions

SIREM

SIREM Swimeo A2 instructions

Silvair MESH-CEDRP quick start guide

Silvair

Silvair MESH-CEDRP quick start guide

S&P PCRL80 manual

S&P

S&P PCRL80 manual

https://manuals.online logo
https://manuals.online logoBrands
  • About & Mission
  • Contact us
  • Privacy Policy
  • Terms and Conditions

Copyright 2026 Manuals.Online. All Rights Reserved.

www.saxbylighting.com
Instruction manual
75530, 94422, 99562
Kios 2 LED Kit
We recommend cleaning with a soft dry cloth. Do not use solvents or abrasive cleaners as these could damage the finish.
For your safety, always switch off the power supply before cleaning.
Care and Safety
Technical data
220-240V~, 50Hz
Supply
Voltage:
Bulb
Type:
75530-10 x 0.45W LED module (SMD), 6500K
94422-10 x 0.45W LED module (SMD), Blue
99562-10 x 0.45W LED module (SMD), 3000K
The power supply is Double Insulated and does not require connection to an Earth circuit.
Waste electrical products should not be disposed of with household waste. Please recycle where facilities
exist. Check with your Local Authority or local store for recycling advice.
This product is not suitable for dimming.
This product is rated at IP44.
IP
44
Connectors
You have correctly identified the wires.
The connections are tight.
Check that...
make sure that arrows molded on
connectors facing each other.
Class III product - designed to be supplied from a SELV
(Separated or Safety Extra-Low Voltage) power source.
BS Plug-in LED driver Rico Electronic
Model: RKP-UK1200500DP-1
Input: 100-240V~, 50/60 Hz
Output: CV 12V, 500mA 6W max IP20 TUV CE approved
To prolong the life and condition of the product, it is recommended that periodically it is cleaned using a
soft cloth followed by the application of a light coating of oil, such as WD40.
Do not clean the units with a pressure washer.
Conformity with all relevant EC Directive requirements.
Conformity with all relevant UKCA Directive requirements.
Non-replaceable light source
Except the 94422, these products contain a light source of energy efficiency class G.
V3 16/12/2021
EU Manufacturer: Brilliant AG,
Brilliantstrasse 1, D-27442 Gnarrenburg
UK Manufacturer: BH17 7BY
For further information, please visit https://www.lighting-info.co.uk/75530
Replaceable control gear by a
professional
Warning
Please read these instructions carefully before commencing any work
This unit must be fitted by a competent and qualified electrician.
Install in accordance with the IEE Wiring regulations and current Building Regulations.
Check the pack and make sure you have all the parts listed.
This system operates at Safety Extra Low Voltage (12V), via a transformer. Never connect the
light fittings directly to the mains without using a transformer.
Ensure that the supplied transformer is used.
The mains plug must be situated indoors (e.g. house, garage, shed) in order to protect it from the elements.
Do not exceed the transformer load. Transformers may require a minimum load to operate.
Always disconnect the transformer from the mains when installing or maintaining this system.
This system contains non-replaceable parts and cannot be serviced. If damage occurs the part should be scrapped.
The product is designed to be fitted horizontally and vertically in decking, walls, steps etc.
It is not suitable for installation directily into the ground.
Waste electrical products should not be disposed of with household waste. Please recycle where facilities exist.
Check with your local authority or retailer for recycling advice.
Thank you for purchasing this light fitting. Please read the instruction carefully before use to ensure safe and satisfactory
operation of this product. Please retain these instruction for future reference.
Layout
Plan the desired layout of these fittings carefully, ensuring the cables will reach the distances between the indoor
transformer and each light fitting.
Installation
Existing fittings must be completely removed before installation of a new product. Before removing the existing fitting, carefully
note the position of each set of wires.
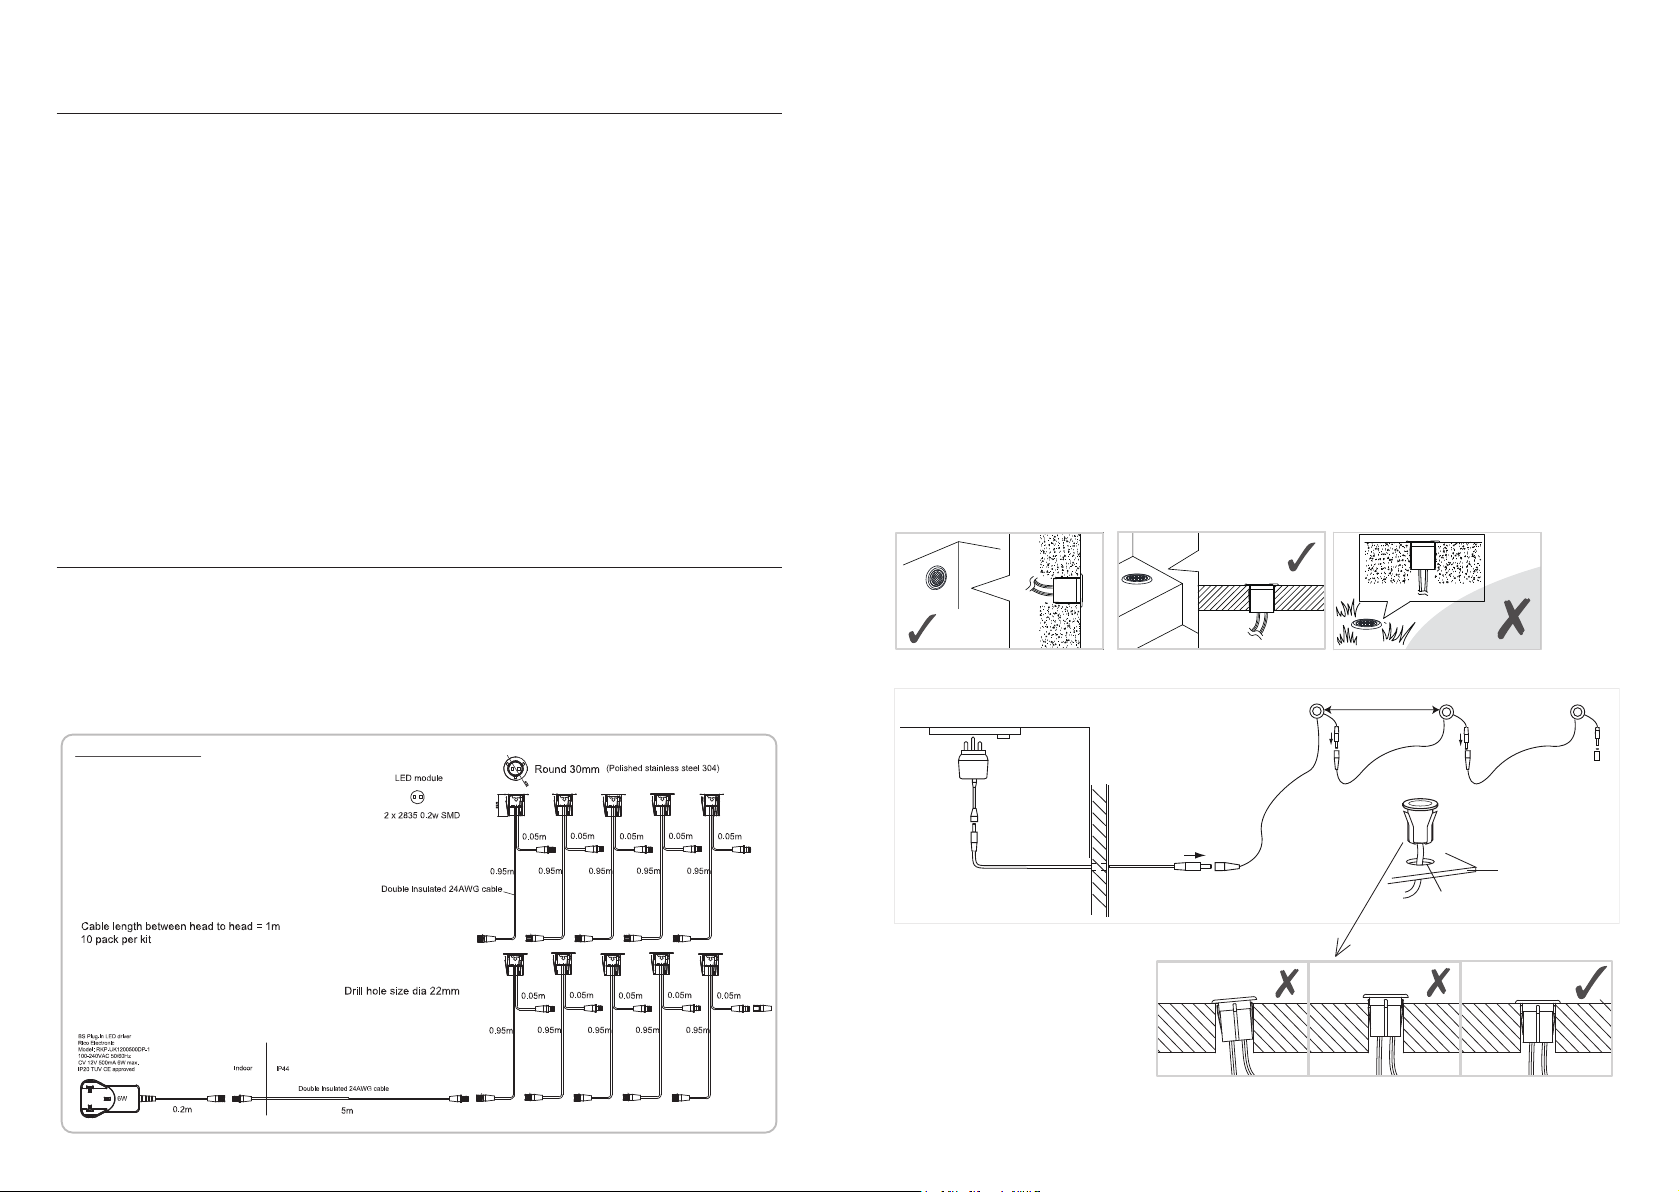
Kit Layout Diagram
Avoid locating any cables in positions that would cause a trip hazard. Position cables away from areas where they
may be at risk from being cut, trapped or damaged.
• Ensure the connectors are accessible for future maintenance.
• The plug-in transformer has no special protection against moisture and must be situated indoors.
• The light units are rated at IP44. Avoid positioning head units and conectors in very wet areas.
• Position the plug- in transformer next to the indoor mains outlet socket that the system will connect to. Do not plug-in
at this stage.
• After deciding the layout of the light fittings, ensure the cables are long enough to connect to the desired positions.
• Drill the mounting holes for the light units taking care not to damage any pipes or mains cables beneath the mounting
surface. These require a 22mm clearance hole. Ensure a minimum depth of 35mm is available.
• Feed the plug and cables of each light unit through the mounting holes and push unit into the hole to secure.
• Connect each LED light to the next LED light ensuring the arrows on connectors are facing each other and all plugs are
fully fitted into the sockets. See Connectors Drawing below.
• Connect the extension cable to the transformer.
• Plug the transformer into the mains socket and switch on.
800mm Max
End cap
30mm diameter LED
22mm diameter mounting hole
(minimum 35mm depth)
• Maximum distance between heads is 800mm.
• Note that the switch is turned off before installation.
Mounting board
Minimum thickness 12mm