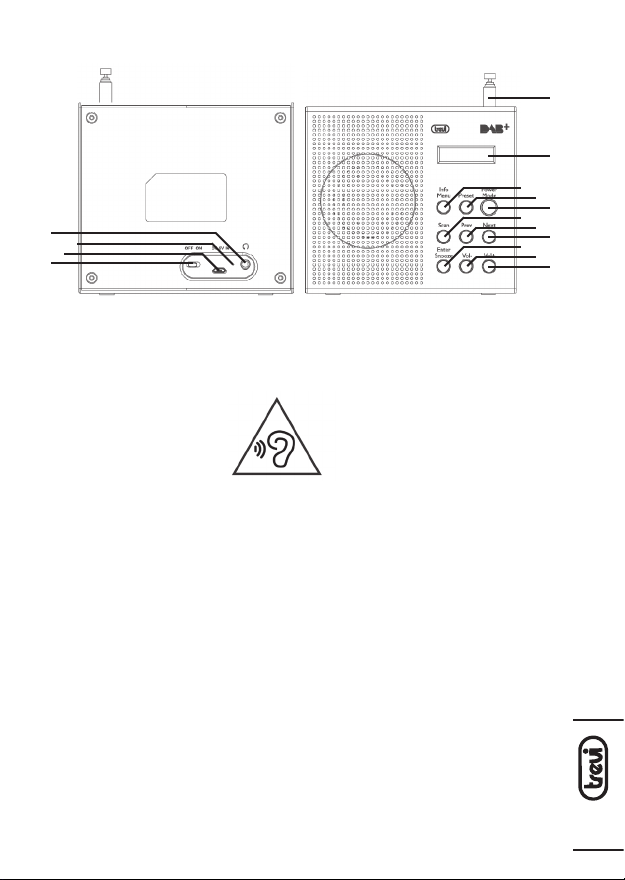
Trevi DAB 791 R User manual

* Per informazioni integrative e aggiornamenti di questo prodotto vedi: www.trevi.it
* For additional information and updates of this product see: www.trevi.it
ita
eng
fra
deu
esp
DAB 791 R
Guida d’uso / User Guide
RADIO CON SISTEMA DAB / DAB+/ FM
RADIO WITH DAB / DAB+/ FM
RADIO AVEC DAB / DAB+/ FM
RADIO MIT DAB / DAB+/ FM
RADIO DAB / DAB+/ FM

DAB 791 R
2
NOTE D’USO
Non usare alimentatori con un voltaggio superiore a 5V , causa il danneggiamento del
riproduttore.
Ascoltare a volume alto per lungo tempo, potrebbe danneggiare il vostro udito.
Evitare di posizionare il riproduttore:
- Vicino a campi magnetici.
- Vicino a fonti di calore come caloriferi e stufe.
- In luoghi molto umidi come stanze da bagno, piscine, ecc...
- In luoghi molto polverosi.
- In luoghi soggetti a forti vibrazioni.
Posizionare l’apparecchio in modo che ai suoi lati ci sia sempre abbastanza spazio per la
libera circolazione di aria (almeno 5 cm).
Sedeiliquidipenetranoall’interno dell’apparecchio scollegare immediatamente la spina dalla
presa e portare l’apparecchio al più vicino centro assistenza autorizato TREVI.
Controllare sempre prima di ricaricare l’apparecchio, che i cavi di alimentazione e di colle-
gamento siano installati correttamente.
Nessuna sorgente di fiamma nuda, quali candele accese, dovrebbe essere posta sull’ap-
parecchio.
L’apparecchio non deve essere esposto a stillicidio o a spruzzi d’acqua e nessun oggetto
pieno di liquido, quali vasi, deve essere posto sull’apparecchio.
Conservare il presente manuale per futuri riferimenti.
CURA E MANUTENZIONE
Per la pulizia si consiglia l’uso di un panno morbido, leggermente inumidito. Evitate solventi
o sostanze abrasive.
IMPORTANTE
La buona costruzione di questo apparecchio ne garantisce per lungo tempo il perfetto
funzionamento. Se tuttavia dovesse presentarsi qualche inconveniente, sarà opportuno
consultare il più vicino Centro Assistenza autorizzato.
TREVI persegue una politica di continua ricerca e sviluppo. Pertanto i prodotti possono
presentare caratteristiche diverse da quelle descritte.
AVVERTENZA PER IL CORRETTO UTILIZZO DELLA BATTERIA RICARICABILE
- Ricaricare la batteria ad una temperatura compresa tra i 5°C e i 35°C.
- Nonprolungarelaricaricaoltreitempiindicatiperevitareilrischiodisurriscaldamento escoppio.
- Non ricaricare la batteria per un tempo superiore alle 4 ore.
- La ricarica della batteria oltre i tempi indicati o un prolungato periodo di inattività possono
ridurne la durata.
- La batteria ricaricabile è soggetta ad usura e la sua capacità diminuisce gradualmente.
- Perprolungareladuratadellabatteria,utilizzarlaquandoècompletamentecaricafinoalcompleto
scaricamento, quindi ricaricarla completamente di nuovo prima di utilizzarla nuovamente.
Mettendo in carica una batteria non completamente esaurita, la sua durata risulterà ridotta.
In questo caso, ripetere il ciclo caricamento/scaricamento completo più volte.
- Evitare di tenere la batteria sotto carica tutta la notte.
•
ITALIANO

DAB 791 R
3
ITALIANO
DESCRIZIONE COLLEGAMENTI E COMANDI
1. Presa cuffie
2. LED indicatore di carica
3. Ingresso adattatore 5V 1A
4. Interruttore ON/OFF,
accensione/spegnimento
5. Antenna telescopica
6. Display LCD
7. Tasto INFO/MENU
8. Tasto PRESET
9. Tasto POWER/MODE
10. Tasto SCAN
11. Tasto PREV
12. Tasto NEXT
13. Tasto ENTER/SNOOZE
14. Tasto VOL-
15. Tasto VOL+
RICARICA DELLA BATTERIA
1. Ricaricare il dispositivo con un carica batterie 5V 1A con presa microUSB.
2. Il LED indicatore di carica (2) si accenderà di colore rosso ad indicare la fase di carica.
Nota: Per una buona durata della batteria è consigliato tenere l’apparecchio spento
durante la fase di ricarica.
3. A carica ultimata il LED indicatore di carica (3) si accenderà di colore blu.
Nota: Con batteria in esaurimento sul display lampeggerà la scritta Low Power.
All’esaurimento della batteria il dispositivo si spegnerà.
7.8. 9.
10.
11.
12.
13.
14.
15.
6.
5.
2.
3.
4.
1.
Per evitare possibili danni all’udito,
limitare il tempo di ascolto a volumi
elevati

DAB 791 R
4
ACCENSIONE/SPEGNIMENTO- STANDBY
1. Estendere l’antenna telescopica (5).
2. Portare l’interruttore ON/OFF (4) in posizione ON.
3. Premere il tasto POWER/MODE (9) per accendere l’apparecchio.
4. Premere nuovamente il tasto POWER/MODE (9) per commutare tra il sistema di ricezione
DAB/DAB+ ed il sistema di ricezione FM.
Nota: in caso di prima accensione o dopo un ripristino alle impostazioni fabbrica,
l’apparecchio effettuerà una scansione automatica delle stazioni DAB/DAB+,
memorizzandole in ordine alfabetico.
5. Tenere premutoperqualche secondoiltasto POWER/MODE(9)per portare l’apparecchio
in modalità Stand-by.
6. Portare l’interruttore ON/OFF (4) in posizione OFF per spegnere completamente l’appa-
recchio.
REGOLAZIONE VOLUME
1. Premere il tasto VOL- (14) o VOL+(15) per diminuire o aumentare il volume.
MENU IMPOSTAZIONI
1. In modalità radio, premere e tenere premuto il tasto INFO/MENU (7), sul display apparirà
Set Menu.
2. Premere i tasti PREV (11) o NEXT (12) e selezionare la voce desiderata tra: Time/Date,
Alarm 1 Set, Alarm 2 Set, Sleep Set, Factory reset,System version eFM Scan set (solo
in modalità Radio FM).
3. PremereiltastoENTER/SNOOZE (13)perentrarenelleimpostazioni dellavoceselezionata.
Set Menu
Time/Date: premere il tasto ENTER/SNOOZE (13) per impostare Ora (Hour) -> Minuti (Min)
-> Anno (Year) -> Mese (Month) -> Data (Date). Premere i tasti PREV (11) o NEXT
(12) per modificare i parametri.
Nota: Se l’apparecchio viene spento tramite l’interruttore ON/OFF, le impostazioni di
Time/Date verranno resettate. Una volta riacceso l’apparecchio, le impostazioni di Time/
Date verranno sincronizzate con l’emittente trasmessa.
Alarm 1/2 Set: premere il tasto ENTER/SNOOZE (13) per impostare Allarme ON/OFF (Alarm
1o 2) -> Ora (Hour) -> Minuti (Min) -> Volume dell’allarme (Vol) -> Modalità dell’al-
larme DAB/FM/Allarme (Mode). Premere i tasti PREV (11) o NEXT (12) per modificare
i parametri. Quando gli allarmi vengono attivati, in standby sul display compare l’icona
di un campanello (due icone se gli allarmi sono attivi contemporaneamente).
SleepSet:permettedi selezionareuntempodopoilqualela radiosispegneautomaticamente.
Premere il tasto ENTER/SNOOZE (13) per impostare la funzione Sleep; premere i tasti
PREV (11) o NEXT (12) per modificare i parametri della funzione Sleep (OFF, 120, 90,
60, 45, 30, 15, 5 minuti). Quando e’ attiva la funzione, sul display compare la lettera S
seguita dal numero di minuti mancanti all’auto spegnimento.
System version: per visualizzare la versione software dell’apparecchio.
Factory Reset: premere il tasto ENTER/SNOOZE (13) e selezionare “Si” se volete che
ITALIANO

DAB 791 R
5
l’apparecchio torni alle impostazioni iniziali di fabbrica.
FM Scan setting(solo in modo FM): premere il tasto ENTER/SNOOZE (13) per entrare nella
funzione e scegliere tra:
Only: per avviare la ricerca delle sole stazioni con segnale più forte.
All: per avviare la ricerca di tutte le stazioni (con segnale debole e forte).
SPEGNIMENTO DELLA SVEGLIA
Per disinserire la sveglia (suoneria o radio) premere il tasto POWER/MODE(9) per arrestarlo
completamente.
Se desiderate spegnere momentaneamente la sveglia, premere il tastoENTER/SNOOZE (13);
l’interruzione dura 9 minuti, trascorsi i quali la sveglia si riaccende.
RADIO DAB/DAB+
1. In modalità Stand-by, premere il tasto POWER/MODE (9) fino a selezionare la modalità
DAB (DAB Mode). Alla prima installazione il dispositivo attiverà automaticamente la
ricerca delle stazioni. In assenza di segnale, sul display, verrà visualizzato “No stazione”.
2. Premere il tasto SCAN (10) per avviare la scansione delle stazioni DAB. Durante la scan-
sione, il display mostrerà la barra di avanzamento e il numero di stazioni memorizzate.
3. Premerei tasti PREV (11) o NEXT (12) per visualizzarelalistadellestazioniradioricevute.
Premere il tasto ENTER/SNOOZE (13) per selezionare la stazione desiderata.
Nota: In modalità DAB, la data e l’ora del dispositivo vengono sincronizzati con quelli
della stazione che si stà ascoltando.
INFORMAZIONI TRASMISSIONE DAB/DAB+
In modalità DAB, sul display verranno visualizzate una serie di informazioni relative alla
stazione in ascolto.
1. Premere ripetutamente il tasto MENU/INFO (7) per cambiare le informazioni visualizzate.
Nota: non tutte le stazioni DAB forniscono le informazioni visualizzabili
dall’apparecchio.
DLS:visualizzainformazionirelative albranomusicaletrasmesso(artista,titolobrano,ecc...).
Potenza segnale: visualizza le informazioni relative alla potenza del segnale tramite una
barra sul display, più il segnale è forte, più la barra risulterà piena.
Tipo programma: visualizza le informazioni relative al tipo di programma trasmesso.
Nome trasmittente: visualizza le informazioni relative al trasmittente del servizio.
Numero/Frequenza trasmittente: visualizza le informazioni relative a numero e frequenza
della stazione DAB/DAB+ trasmessa.
Indice di errore del segnale: visualizza le informazioni relative al livello degli errori del
segnale nella trasmissione corrente. Più basso è il numero, migliore è qualità del segnale.
Bit Rate: visualizza informazioni relative al rapporto di compressione della trasmissione
corrente. Più è alto il valore, migliore è la qualità della trasmissione.
Ora: visualizza informazioni relative all’orario della trasmissione corrente.
Data: visualizza informazioni relative alla data della trasmissione corrente.
MEMORIZZAZIONE STAZIONI RADIO DAB/DAB+
1. Premere per qualche secondo il tasto PRESET (8), sul display verrà visualizzato “Preset
ITALIANO

DAB 791 R
6
Store” <X: (Empty)>.
2. Premere i tasti PREV (11) o NEXT (12) per selezionare il numero (da 1 a 10) dove si
desidera salvare la stazione radio.
3. Premere il tasto ENTER/SNOOZE(13) per salvare, il display mostrerà la scritta “Stored”.
Nota: Si possono salvare 10 stazioni in Funzione DAB/DAB+ e 10 stazioni in Funzione
Radio FM.
SELEZIONE STAZIONI RADIO MEMORIZZATE
1. Premere il tasto PRESET (8), sul display verrà visualizzato “Preset Recall”.
2. Premere i tasti PREV (11) o NEXT (12) per selezionare il numero (da 1 a 10) della stazione
radio memorizzata che si vuole richiamare.
3. Premere il tasto ENTER/SNOOZE(13).
RADIO FM
1. In modalità Stand-by, premere il tasto POWER/MODE (9) fino a selezionare la modalità
FM.
2. Premere più volte i tasti PREV (11) o NEXT (12) per spostarsi all’indietro o in avanti di
0,05MHz per effettuare una regolazione fine.
3. Premere e tenere premuto i tasti PREV (11) o NEXT (12) per spostarsi all’indietro o in
avanti velocemente.
4. Premere il tasto SCAN (10) per sintonizzarsi sulla stazione successiva con segnale
migliore. Tenere premuto il tasto SCAN (10) per qualche secondo per sintonizzarsi sulla
stazione precedente con segnale migliore.
Nota: La sensibilità della scansione automatica è regolabile nel Menu “Impostazioni” alla
voce “FM Scan Setting”.
INFORMAZIONI TRASMISSIONE FM
In modalità FM, sul display verranno visualizzate una serie di informazioni relative alla
stazione in ascolto.
1. Premere ripetutamente il tasto MENU/INFO (7) per cambiare le informazioni visualizzate.
Nota: non tutte le stazioni FM forniscono le informazioni visualizzabili dall’apparecchio.
Informazioni RDS: visualizza informazioni relative alla stazione FM.
PTY, Tipo programma: visualizza le informazioni relative al tipo di programma trasmesso.
Nome trasmittente: visualizza le informazioni relative alla stazione FM (nome e frequenza).
Ora: visualizza informazioni relative all’orario della trasmissione corrente.
Data: visualizza informazioni relative alla data della trasmissione corrente.
MEMORIZZAZIONE/SELEZIONE STAZIONI RADIO FM
Per memorizzare le stazioni radio FM, fare riferimento al paragrafo “Memorizzazione stazioni
Radio DAB/DAB+”.
CURA E MANUTENZIONE
Questo apparecchio è uno strumento elettronico di alta precisione; si raccomanda quindi
di non usarlo in luoghi molto umidi, polverosi, con eccessivi sbalzi di temperatura , e di non
esporlo direttamente ai raggi solari.
ITALIANO

DAB 791 R
7
Per la pulizia si consiglia l’ uso di un panno morbido, leggermente inumidito. Evitate solventi
o sostanze abrasive.
SPECIFICHE TECNICHE
Alimentazione: ...................... 5V
Batteria:................................ interna ricaricabile al Lithio
Gamma di frequenza DAB/+: 174 - 240 MHZ
Gamma di frequenza FM: ...... 87.5-108MHz
Dimensioni: .......................... 135x145x41 mm
INFORMATIVA SULLA RIMOZIONE E LO SMALTIMENTO DELLE BATTERIE
Attenzione: l’operazione di rimozione e smaltimento è riservata esclusivamente al
personale tecnico specializzato!
1. Rimuovere le 5 viti che serrano il mobile.
2. Sollevare il mobile posteriore.
3. Staccare il connettore e rimuovere la batteria dal suo alloggiamento.
Qualunque sia il tipo di batteria esaurita, essa non deve essere gettata tra i rifiuti domestici,nel
fuoco o nell’acqua. Ogni tipo di batteria esaurita deve essere riciclata oppure smaltita presso
gli appositi centri raccolta dedicati.
GARANZIA
1. L’apparecchio è garantito per 24 mesi dalla data di fabbricazione indicata sull’etichetta
applicata sul prodotto.
2. La garanzia si applica solo ad apparecchi non manomessi, riparati da centri assistenza
TREVI, essa comprende la riparazione dei componenti per difetti di fabbricazione con
l’esclusione di etichette, manopole e parti asportabili.
3. TREVI non risponde di danni diretti o indiretti a cose o/e persone causati dall’uso o
sospensione d’uso dell’apparecchio.
ITALIANO
INFORMAZIONI AGLI UTENTI ai sensi del Decreto Legislativo N° 49 del 14 Marzo 2014
“AttuazionedellaDirettiva 2012/19/UE sui rifiutidiapparecchiatureelettricheed elettroniche (RAEE)”
Il simbolo del cassonetto barrato riportato sull’apparecchiatura indica che il prodotto alla fine della propria
vita utile deve essere raccolto separatamente dagli altri rifiuti. L’utente dovrà, pertanto, conferire l’apparec-
chiatura integra dei componenti essenziali giunta a fine vita agli idonei centri di raccolta differenziata dei
rifiuti elettronici ed elettrotecnici, oppure riconsegnarla al rivenditore al momento dell’acquisto di nuova
apparecchiatura di tipo equivalente, in ragione di uno a uno, oppure 1 a zero per le apparecchiature aventi
latomaggiore inferiore a25cm.L’adeguataraccoltadifferenziata per l’avviosuccessivodell’apparecchiatura
dimessa al riciclaggio, al trattamento e allo smaltimento ambientale compatibile contribuisce ad evitare
possibili effetti negativi sull’ambiente e sulla salute e favorisce il riciclo dei materiali di cui è composta
l’apparecchiatura. Lo smaltimento abusivo del prodotto da parte dell’utente comporta l’applicazione delle
sanzioni amministrative di cui al D.Lgs n. Decreto Legislativo N° 49 del 14 Marzo 2014.

DAB 791 R
8
ENGLISH
USAGE NOTES
Do not use power supply with a voltage higher than 5V , cause damage to the player.
Listen at high volume for long periods of time, may damage your hearing.
Avoid placing the player:
- Near magnetic fields.
- Near any heat sources such as heaters and stoves.
- In very damp places like bathrooms, swimming pools, etc...
- In very dusty places.
- In places subject to strong vibrations.
Place the appliance so that its sides there is always enough room for free air circulation
(at least 5 cm).
If liquids penetrate into the appliance immediately disconnect the plug from the wall socket
and set the appliance to your nearest authorised TREVI Service Centre.
Always check before charging, power cables and connection are installed properly.
CARE AND MAINTENANCE
For cleaning it is recommended to use a soft, slightly damp cloth. Avoid solvents or abrasive
substances.
IMPORTANT
The construction of this device guarantees long flawless operation. However, if come some
problem, you should consult your nearest authorized service center.
TREVI pursues a policy of continuous research and development. Therefore, the products
may show different characteristics from those described.
WARNING FOR A CORRECT USE OF RECHARGEABLE BATTERY
- Recharge the battery in an ambient temperature between 5°C and 35°C.
- Don’t recharge more than the suitable period to prevent the risk of overheating and burst.
- Don’t recharge the battery for more than 4 hours.
- Recharging the battery over the suitable period or an extended period of inactivity may
reduce battery duration.
- Rechargeable battery is liable to wear and tear and its performance will reduce gradually.
- To extend the duration of the battery use it when is completely charged up to the complete
discharging, then recharge it fully before use it again. Recharge a battery not completely
consumed,willresultareducedduration.Inthiscase,repeatthefullcharging/discharging
cycle many times.
- Avoid recharge the battery for the whole night.

DAB 791 R
9
DESCRIPTION AND CONTROLS
ENGLISH
7.8. 9.
10.
11.
12.
13.
14.
15.
6.
5.
2.
3.
4.
1.
1. Headphone jack
2. LED charge indicator
3. Input for power adapter
4. ON / OFF switch
5. Telescopic Antenna
6. LCD Display
7. INFO / MENU button
8. PRESET button
9. POWER / MODE button
10. SCAN button
11. PREV button
12. NEXT Button
13. ENTER / SNOOZE button
14. VOL- Button
15. VOL + Button
CHARGING THE BATTERY
1. Connect the power adapter to input(3).
2. The LED charge indicator (2) will light up red to indicate charging.
Note: For a good battery life it is recommended to keep the unit switched off during charging.
3. When charge is completed , LED(3) will turn blue.
Note: With low battery display will flash Low Power.
POWER / STANDBY
1. Extend the telescopic antenna (5).
2. Turn the ON / OFF switch (4) to ON.
3. Press the POWER / MODE button (9) to turn on the device.
4. Press the POWER / MODE button (9) to switch between the receiving system DAB / DAB
+ and FM receiving system.
To avoid possible hearing damage,
limit the time listening at high volumes

DAB 791 R
10
ENGLISH
Note: When first turned on or after a reset to factory settings, the unit will automatically
scan the stations DAB / DAB +.
5.Holdfora fewseconds,thePOWER/MODEbutton(9)toswitchthesystemtostandby mode.
6. Turn the ON / OFF switch (4) to the OFF position to turn off the device completely.
VOLUME ADJUSTMENT
1. Press the VOL (14) or VOL + (15) to decrease or increase the volume.
SETTINGS MENU
1. In radio mode, press and hold the INFO / MENU button (7), the display will show Menu Set.
2. Press the PREV (11) and NEXT (12) and select the desired item among: Time / Date,
Alarm 1 Set, Alarm 2 set, Sleep Set, Factory Reset, System version and FM Scan set
(only in Radio FM).
3. Press the ENTER / SNOOZE button (13) to enter the settings of the selected item.
Menu Set
Time / Date: Press the ENTER / SNOOZE button (13) to set Time (Hour) -> Minutes (Min)
-> Year (Year) -> Month (Month) -> Data (Date). Press the PREV (11) and NEXT (12)
to change the parameters.
Note: If the unit is turned off using the ON / OFF switch, the settings for Time / Date will
be reset. After turning the unit on, the settings for Time / Date will be synchronized with
the broadcast station.
Alarm 1/2 Set: press the ENTER / SNOOZE button (13) to set ON / OFF Alarm (Alarm 1
or 2) -> Time (Hour) -> Minutes (Min) -> Alarm Volume (Vol) -> Alarm mode DAB
/ FM / alarm (mode). Press the PREV (11) and NEXT (12) to change the parameters.
When alarms are activated, standby the display shows the icon of a bell (two icons if
the alarms are active simultaneously).
Sleep Set: allows you to select a time after which the radio will automatically shut down.
Press the ENTER / SNOOZE button (13) to set the Sleep function; Press the PREV (11)
and NEXT (12) to change the parameters of Sleep (OFF function, 120, 90, 60, 45, 30,
15, 5 minutes). When and ‘enables the function, the display shows the letter S followed
by the number of minutes off the car missing.
System version: To view the software version.
Factory Reset: press the ENTER / SNOOZE button (13) and select “Yes” if you want the
device to return to their factory settings.
FM Scan setting (FM mode only): Press the ENTER / SNOOZE button (13) to enter the
function and choose from:
Only: to start the search of the only stations with stronger signal.
All: to start the search of all stations (with weak and strong signal).
SWITCHING OFF THE ALARM
Todisarmthealarm(radio orbuzzer),pressthePOWER/MODEbutton(9)tostopitcompletely.
If you want to silence the alarm, press the ENTER / SNOOZE button (13); the interruption
lasts nine minutes, after which the alarm on again.

DAB 791 R
11
ENGLISH
RADIO DAB / DAB +
1. Press the POWER / MODE button (9) to select the DAB mode (DAB mode). At the first
installation, the device will automatically activate the station search. If no signal, the
screen will display “No station.”
2. Press the SCAN button (10) to start the scan of DAB stations. During scanning, the display
will show the progress bar and the number of stations stored.
3. Press the PREV (11) and NEXT (12) to display the list of received stations. Press the
ENTER / SNOOZE button (13) to select the desired station.
Note: In DAB mode, the date and time of the device are synchronized with those of the
station that is being listening.
TRANSMISSION INFORMATION DAB / DAB +
In DAB mode, the display will show a series of information about the current radio station.
1. Press the MENU / INFO button (7) to change the displayed information.
Note: Not all DAB stations provide the information displayed by the device.
DLS: displays information about the song broadcast (artist, track title, etc ...).
Signal Strength: displays information about the signal strength via a bar on the display, the
more the signal is stronger, the bar becomes full.
Program Type: Displays information about the type of material being broadcast.
Transmitter Name: displays information about the sender of the service.
Number / transmitter frequency: displays information relating to the number and frequency
of DAB / DAB + broadcast station.
Signal Error index: Displays information about the level of signal errors in the current
transmission. The lower the number, the better the signal quality.
Bit Rate: Displays information related to the transmission of the current compression ratio.
The higher the value, the better the quality of the transmission.
Time: displays information relating to the hours of the current transmission.
Date: displays information about the date of the current transmission.
STORING STATIONS RADIO DAB / DAB +
1.PressforafewsecondsthePRESET(8),thedisplaywillshow“PresetStore”<X:(Empty)>.
2. Press the PREV (11) and NEXT (12) to select the number (1 through 10) where you want
to save the radio station.
3. Press the ENTER / SNOOZE (13) key to save, the display will show “Stored”.
Note: You can save 10 stations Function DAB / DAB + and 10 FM radio stations in function.
SELECTING RADIO STATIONS STORED
1. Press the PRESET (8), the display will show “Preset Recall”.
2. Press the PREV (11) and NEXT (12) to select the radio station number (1 to 10) stored
that you want to recall.
3. Press the ENTER / SNOOZE button (13).
RADIO FM
1. Press the POWER / MODE button (9) to select FM mode.
2. Press the PREV (11) and NEXT (12) to move backward or forward to 0.05MHz to make

DAB 791 R
12
ENGLISH
a fine adjustment.
3. Press and hold the PREV button (11) or NEXT (12) to move backward or forward quickly.
4. Press the SCAN button (10) to tune to the next station with acceptable signal. Press
and hold the SCAN button (10) for a few seconds to tune to the previous station with
a better signal.
Note: The automatic scanning sensitivity can be adjusted in the menu “Settings” under
“FM Scan Setting”.
TRANSMISSION INFORMATION FM
In FM mode, the display will show a series of information about the current radio station.
1. Press the MENU / INFO button (7) to change the displayed information.
Note: Not all FM stations provide the information displayed by the device.
RDS Information: Displays information about the FM station.
PTY, Programme Type: displays information about the type of material being broadcast.
sender’s name: Displays information about the FM station (name and frequency).
Time: displays information relating to the hours of the current transmission.
Date: displays information about the date of the current transmission.
STORAGE / FM RADIO STATIONS SELECTION
To store FM radio stations, refer to the paragraph “Storing stations Radio DAB / DAB +”.
CARE AND MAINTENANCE
This device is an electronic precision instrument; it is therefore recommended not to use it in
a humid, dusty, with excessive temperature changes, and do not expose it to direct sunlight.
Forcleaningwerecommendthe ‘useofasoft,slightly dampcloth.Avoidsolventsorabrasives.
TECHNICAL SPECIFICATIONS
Power: ................................. 5V
Battery: ................................ internal rechargeable Lithium battery
Frequency range DAB / +: ... 174-240 MHZ
Frequency range FM: ............87.5-108MHz
Dimensions: ........................ 135x145x41 mm
INFORMATION ON THE REMOVAL AND DISPOSAL OF BATTERIES
Warning: the operation of removal and disposal is reserved to technical personnel!
1. Remove the 5 screws that fasten the cabinet.
2. Raise the rear moving.
3. Disconnect the connector and remove the battery from its compartment.
Whatever type of battery used up, it should never be placed in household waste, fire or
water. Each type of used battery must be recycled or disposed of at an appropriate dedicated
collection points.

DAB 791 R
13
USERS INFORMATION pursuant to Legislative Decree No. 49 of March 14, 2014
“Implementation of Directive 2012/19 / EU on Waste Electrical and Electronic Equipment
(WEEE)”
This wheeled bin symbol on the product indicates that at the end of its life must be collected
separately from other waste. The user must, therefore, take the remote control integrates the
essential components that got to its life to the appropriate differentiated collection centers
for electronic and electro-technical waste, or return it to the dealer when purchasing a new
appliance of equivalent type, in terms of one to one, or one to zero for equipment having
longer side of less than 25 cm. Appropriate separate collection for the decommissioned
equipment for recycling, processing and environmentally compatible disposal helps pre-
vent negative impact on the environment and human health and promotes recycling of the
materials making up the product. Illegal dumping of the product by the user entails the
application of administrative sanctions stated in Legislative Decree n. Legislative Decree
No. 49 of March 14, 2014.
WARRANTY
1. This unit is guaranteed for a period of 24 months from the date of production printed on
the product itself or on label on product.
2. The warranty is valid only if the unit has not been tampered with. The warranty is valid
only at authorized TREVI assistance centres, that will repair manufacturing defects,
excluded replacement of labels and removable parts.
3. TREVI is not liable for damage to people or things caused by the use of this unit or by
the interruption in the use of this unit.

DAB 791 R
14
NOTES D’EMPLOI
Ne pas utiliser les alimentateurs avec une tension supérieure à 5V . Cela cause un
endommagement du lecteur.
Ne pas écouter à un volume trop élevé à plusieurs reprises. Cela pourrait endommager
votre ouïe.
Éviter de placer le lecteur :
- Près de champs magnétiques.
- Près de sources de chaleur comme des radiateurs et des poêles.
- Dans des endroits très humides comme les salles de bains, les piscines, etc.
- Dans des endroits très poussiéreux.
- Dans des endroits exposés à de fortes vibrations.
Placer l’appareil de sorte qu’il y ait toujours assez d’espace sur ses côtés pour laisser
circuler librement l’air (au moins 5 cm).
Si des liquides pénètrent à l’intérieur de l’appareil, débranchez-le immédiatementetamenez-le
au centre d’assistance agréé TREVI le plus proche.
Contrôlez toujours, avant de recharger l’appareil, que les câbles d’alimentation et les câbles
de connexion sont correctement installés.
MANIEMENT ET ENTRETIEN
Pour le nettoyage, il est conseillé d’utiliser un chiffon doux, légèrement humide. Évitez
l’emploi de solvants ou de substances abrasives.
IMPORTANT
La bonne fabrication de cet appareil garantit un fonctionnement parfait pour une longue
période. Si toutefois
quelques inconvénients devaient se présenter, adressez-vous au Centre d’Assistance agréé
le plus proche.
TREVI poursuit une politique de recherche et de développement continus. C’est pourquoi
ses produits peuvent présenter des caractéristiques différentes par rapport à celles qui
sont décrites.
AVERTISSEMENT RELATIF À L’UTILISATION ADÉQUATE DE LA BATTERIE
RECHARGEABLE
- Rechargez la batterie à une température comprise entre 5°C et 35°C.
- Ne prolongez pas le rechargement au-delà des délais indiqués afin d’éviter
les risques de surchauffe et d’explosion.
- Ne pas recharger la batterie pendant une durée supérieure à 4 heures.
- La recharge au-delà des délais indiqués ou une période d’inactivité prolongée
peut réduire la durée de vie de la batterie.
- La batterie rechargeable est soumise à l’usure et sa capacité diminue petit à petit.
- Pour prolonger la durée de vie de la batterie, utilisez-la lorsqu’elle est complètement
FRANÇAISE

DAB 791 R
15
CONTRÔLES ET DESCRIPTION LIENS
FRANÇAISE
rechargéejusqu’àundéchargementcomplet.End’autrestermes,rechargezcomplètement
la batterie avant de l’utiliser à nouveau.
7.8. 9.
10.
11.
12.
13.
14.
15.
6.
5.
2.
3.
4.
1.
1. Prise casque
2. Indicateur LED de charge
3. Entrée pour adaptateur secteur
4. Interrupteur marche / arrêt
5. Antenne télescopique
6. Écran LCD
7. Bouton INFO / MENU
8. Bouton PRESET
9. Touche POWER / MODE
10. Bouton SCAN
11. Bouton PREV
12. Bouton SUIVANT
13. Touche ENTER / SNOOZE
14. Bouton VOL-
15. Touche VOL +
CHARGEMENT DE LA BATTERIE
1. Branchez l’adaptateur à l’entrée (3).
2. L’indicateur LED de charge (2) s’allume en rouge pour indiquer la charge.
Remarque: Pour une bonne durée de vie de la batterie, il est recommandé de garder
l’appareil éteint pendant la charge.
3. Lorsque la charge est terminée, la DEL (3) devient bleue.
Remarque: Lorsque l’affichage des piles est faible, le flash clignote.
PUISSANCE / STANDBY
1. Étendre l’antenne télescopique (5).
2. Mettre l’interrupteur MARCHE / ARRÊT (4) sur ON.
Pour éviter d’éventuels dommages
auditifs, limiter le temps d’écoute à
volume élevé.

DAB 791 R
16
FRANÇAISE
3. Appuyez sur le bouton POWER / MODE (9) pour allumer l’appareil.
4. Appuyez sur le bouton POWER / MODE (9) pour basculer entre le système récepteur DAB
/ DAB + et le système de réception FM.
Remarque: Lors de la première mise sous tension ou après une réinitialisation aux réglages
d’usine, l’appareil recherche automatiquement les stations DAB / DAB +.
5. Maintenez la touche POWER / MODE enfoncée pendant quelques secondes (9) pour
mettre le système en mode veille.
6. Mettez l’interrupteur MARCHE / ARRÊT (4) sur OFF pour éteindre complètement l’appareil.
RÉGLAGE DU VOLUME
1. Appuyez sur VOL (14) ou VOL + (15) pour diminuer ou augmenter le volume.
MENU RÉGLAGES
1. En mode radio, appuyez sur la touche INFO / MENU (7) et maintenez-la enfoncée, l’écran
affiche Menu Set.
2. Appuyez sur PREV (11) et NEXT (12) et sélectionnez l’élément souhaité parmi: Time /
Date, Alarm 1 Set, Alarm 2 set, Sleep Set, Factory Reset, version système et FM Scan
(uniquement dans Radio FM) .
3. Appuyez sur le bouton ENTER / SNOOZE (13) pour saisir les paramètres de l’élément
sélectionné.
Ensemble de menus
Heure / Date: Appuyez sur la touche ENTER / SNOOZE (13) pour régler Heure (Heure) ->
Minutes (Min) -> Année (Année) -> Mois (Mois) -> Données (Date). Appuyez sur
PREV (11) et NEXT (12) pour modifier les paramètres.
Remarque: Si l’appareil est éteint à l’aide de l’interrupteur ON / OFF, les réglages de l’heure
/ date seront réinitialisés. Après avoir mis l’appareil sous tension, les réglages de l’heure
/ date seront synchronisés avec la station de diffusion.
Alarme 1/2 Réglage: appuyez sur la touche ENTER / SNOOZE (13) pour activer / désactiver
l’alarme (Alarme 1 ou 2) -> Heure (Heure) -> Minutes (Min) -> Volume d’alarme
(Vol) DAB / FM / alarme (mode). Appuyez sur PREV (11) et NEXT (12) pour modifier
les paramètres. Lorsque les alarmes sont activées, l’écran affiche l’icône d’une sonnerie
(deux icônes si les alarmes sont activées simultanément).
SleepSet:permetdesélectionneruneheureaprèslaquellelaradios’arrêteraautomatiquement.
Appuyez sur la touche ENTER / SNOOZE (13) pour régler la fonction Sleep; Appuyez sur
les touches PREV (11) et NEXT (12) pour modifier les paramètres de sommeil (fonction
OFF, 120, 90, 60, 45, 30, 15, 5 minutes). Quand et ‘active la fonction, l’écran affiche la
lettre S suivie du nombre de minutes de la voiture absente.
Version du système: Pour afficher la version du logiciel.
Réinitialisation d’usine: appuyez sur la touche ENTER / SNOOZE (13) et sélectionnez “Oui”
si vous voulez que l’appareil retourne à ses réglages d’usine.
Réglage de la numérisation FM (mode FM uniquement): Appuyez sur la touche ENTER /
SNOOZE (13) pour accéder à la fonction et choisissez parmi:
Seulement: pour lancer la recherche des seules stations avec un signal plus fort.

DAB 791 R
17
FRANÇAISE
All: pour lancer la recherche de toutes les stations (avec signal faible et fort).
ÉTEINDRE L’ALARME
Pour désarmer l’alarme (radio ou buzzer), appuyez sur le bouton POWER / MODE (9) pour
l’arrêter complètement.
Si vous souhaitez désactiver l’alarme, appuyez sur la touche ENTER / SNOOZE (13); L’in-
terruption dure neuf minutes, après quoi l’alarme recommence.
RADIO DAB / DAB +
1. Appuyez sur le bouton POWER / MODE (9) pour sélectionner le mode DAB (mode DAB).
Lorsde lapremière installation,l’appareilactive automatiquementlarecherche destation.
En l’absence de signal, l’écran affichera «Pas de station».
2. Appuyez sur la touche SCAN (10) pour lancer le balayage des stations DAB. Pendant la
numérisation,l’écranaffiche labarredeprogressionetlenombredestations mémorisées.
3. Appuyez sur PREV (11) et NEXT (12) pour afficher la liste des stations reçues. Appuyez
sur la touche ENTER / SNOOZE (13) pour sélectionner la station désirée.
Remarque: En mode DAB, la date et l’heure de l’appareil sont synchronisées avec celles
de la station en cours d’écoute.
INFORMATIONS DE TRANSMISSION DAB / DAB +
En mode DAB, l’écran affiche une série d’informations sur la station de radio en cours.
1. Appuyez sur la touche MENU / INFO (7) pour modifier les informations affichées.
Remarque:TouteslesstationsDAB nefournissentpaslesinformationsaffichéesparl’appareil.
DLS: affiche des informations sur la diffusion de la chanson (artiste, titre de plage, etc ...).
Force du signal: affiche des informations sur la puissance du signal via une barre sur l’écran,
plus le signal est plus fort, la barre devient pleine.
Type de programme: Affiche des informations sur le type de matériel diffusé.
Nom de l’émetteur: affiche des informations sur l’expéditeur du service.
Fréquence nombre / émetteur: affiche les informations relatives au nombre et à la fréquence
de la station de diffusion DAB / DAB +.
Signal Indice d’erreur: Affiche des informations sur le niveau d’erreurs de signal dans la
transmission en cours. Plus le nombre est bas, meilleure est la qualité du signal.
Bit Rate: Affiche des informations relatives à la transmission du taux de compression actuel.
Plus la valeur est élevée, meilleure est la qualité de la transmission.
Heure: affiche les informations relatives aux heures de la transmission en cours.
Date: affiche des informations sur la date de la transmission en cours.
STATIONS DE STOCKAGE RADIO DAB / DAB +
1. Pressez pendant quelques secondes le PRESET (8), l’écran affiche “Preset Store” <X:
(Vide)>.
2. Appuyez sur les touches PREV (11) et NEXT (12) pour sélectionner le numéro (1 à 10)
dans lequel vous souhaitez enregistrer la station de radio.
3. Appuyez sur la touche ENTER / SNOOZE (13) pour enregistrer, l’écran affiche “Stored”.
Remarque: Vous pouvez enregistrer 10 stations Fonction DAB / DAB + et 10 stations radio
FM en fonction.

DAB 791 R
18
FRANÇAISE
SÉLECTION DES STATIONS DE RADIO STOCKÉES
1. Appuyez sur la touche PRESET (8), l’écran affiche “Preset Recall”.
2. Appuyez sur PREV (11) et NEXT (12) pour sélectionner le numéro de station radio (1 à
10) mémorisé que vous souhaitez rappeler.
3. Appuyez sur la touche ENTER / SNOOZE (13).
RADIO FM
1. Appuyez sur la touche POWER / MODE (9) pour sélectionner le mode FM.
2. Appuyez sur les touches PREV (11) et NEXT (12) pour avancer ou revenir à 0.05MHz
pour effectuer un réglage précis.
3. Appuyez et maintenez enfoncée la touche PREV (11) ou NEXT (12) pour avancer ou
reculer rapidement.
4. Appuyez sur la touche SCAN (10) pour syntoniser la station suivante avec un signal
acceptable. Appuyez et maintenez la touche SCAN (10) pendant quelques secondes
pour syntoniser la station précédente avec un meilleur signal.
Remarque: La sensibilité de balayage automatique peut être réglée dans le menu “Réglages”
sous “Réglage de balayage FM”.
INFORMATIONS DE TRANSMISSION FM
En mode FM, l’écran affiche une série d’informations sur la station radio actuelle.
1. Appuyez sur la touche MENU / INFO (7) pour modifier les informations affichées.
Remarque:Toutes lesstations FMnefournissentpas lesinformationsaffichéespar l’appareil.
Informations RDS: Affiche des informations sur la station FM.
PTY, Type de programme: affiche des informations sur le type de matériel diffusé.
Nom de l’expéditeur: Affiche des informations sur la station FM (nom et fréquence).
Heure: affiche les informations relatives aux heures de la transmission en cours.
Date: affiche des informations sur la date de la transmission en cours.
STOCKAGE / SÉLECTION DE STATIONS DE RADIO FM
Pour mémoriser les stations de radio FM, reportez-vous au paragraphe “Mémorisation des
stations Radio DAB / DAB +”.
ENTRETIEN ET ENTRETIEN
Ce dispositif est un instrument électronique de précision; Il est donc recommandé de ne
pas l’utiliser dans un endroit humide, poussiéreux, avec des changements de température
excessifs, et ne pas exposer à la lumière directe du soleil.
Pour le nettoyage, nous recommandons l’utilisation d’un chiffon doux légèrement humide.
Éviter les solvants ou les abrasifs.

DAB 791 R
19
SPÉCIFICATIONS TECHNIQUES
Puissance: ........................... 5V
Batterie: ............................... Lithium rechargeable interne
Plage de fréquences DAB/+: 174-240 MHZ
Gamme de fréquences FM: .. 87,5-108 MHz
Dimensions: ........................ 135x145x41 mm
RENSEIGNEMENTS SUR LE RETRAIT ET L’ÉLIMINATION DES PILES
Attention: l’opération d’enlèvement et d’élimination est réservée au personnel technique!
1. Retirez les 5 vis qui fixent l’armoire.
2. Soulevez l’arrière en mouvement.
3. Débranchez le connecteur et retirez la batterie de son compartiment.
Quel que soit le type de batterie utilisée, elle ne doit jamais être placée dans les ordures
ménagères, le feu ou l’eau. Chaque type de batterie usagée doit être recyclé ou éliminé à
un point de collecte approprié.
UTILISATEURS INFORMATION conformément au décret législatif n ° 49 du 14
Mars, 2014
“La mise en œuvre de la directive 2012/19 / UE relative aux déchets d’équipements
électriques et électroniques (DEEE)”
Ce symbole de poubelle sur roues sur le produit indique que, à la fin de sa durée de vie doit
être collecté séparément des autres déchets. L’utilisateur doit donc prendre le contrôle à
distance intègre les éléments essentiels qui ont obtenu à sa vie dans les centres de collecte
différenciés appropriés pour les déchets électroniques et électro-technique, ou le retourner
chez le concessionnaire lors de l’achat d’un nouvel appareil de type équivalent, en termes
de un à un, ou un à zéro pour les équipements ayant plus côté de moins de 25 cm. collecte
séparée appropriée pour l’équipement mis hors service pour le recyclage, le traitement
et l’élimination respectueuse de l’environnement contribue à éviter les effets négatifs sur
l’environnement et la santé humaine et favorise le recyclage des matériaux qui composent
le produit. le dumping illégal du produit par l’utilisateur entraîne l’application des sanctions
administratives prévues par le décret législatif n. Décret législatif n ° 49 du 14 Mars 2014.
CONDITIONS DE GARANTIE
1. L’appareil est garanti pendant une période de 24 mois de la date de fabrication indiquée sur
l’étiquette se trouvant sur le produit.
2. La garantie n’est appliquée que sur les appareils non altérés, ayant été réparés chez un Service
Après-Vente TREVI. Elle comprend la réparation des composantes à la suite de défauts de
fabrication, à l’exclusion d’étiquettes, boutons de réglage et parties amovibles.
3. TREVI ne répond pas des dommages directs ou indirects aux choses et/ou aux personnes
entraînés pendant l’usage ou la suspension d’usage de l’appareil.

DAB 791 R
20
GEBRAUCHSHINWEISE
Netzgeräte mit einer Spannung von mehr als 5V dürfen nicht veSKIP-endet werden. Sie
könnten das Gerät beschädigen.
Nicht für längere Zeit bei hoher Lautstärke Musik hören. Dies könnte zu Hörschäden führen.
Das Gerät sollte nicht in folgenden Bereichen aufgestellt werden:
- in der Nähe von Magnetfeldern.
- in der Nähe von Wärmequellen wie Heizkörpern und Öfen.
- in sehr feuchten Räumen wie Badezimmern, Schwimmbädern, usw.
- in sehr staubigen Räumen.
- An Orten, die starken Schwingungen ausgesetzt sind.
DasGerätsolltesoaufgestelltwerden,dassaufdenSeitenjeweilsgenügendRaumverbleibt,um
eine freie Luftzirkulation zu gewährleisten (mindestens 5 cm).
Sollten Flüssigkeiten ins Innere des Geräts eindringen, den Stecker un verzüglich von der
Steckdose abziehen und das Gerät zur nächstgelegenen autorisierten TREVI-Kundendienst-
stelle bringen.
Vor der Aufladung des Geräts ist stets sicherzustellen, dass Netzkabel und Anschlusskabel
korrekt installiert sind.
PFLEGE UND WARTUNG
Für die Reinigung wird die VeSKIP-endung eines leicht angefeuchteten, weichen Tuchs
empfohlen. Der Einsatz von Lösungsmitteln oder scheuernden Substanzen sollte vermieden
werden.
WICHTIG
Der fachgerechte Bau dieses Geräts gewährleistet langfristig einen einwandfreien Betrieb.
Sollten dennoch Betriebsstörungen auftreten, wenden Sie sich bitte an die nächstgelegene
autorisierte Kundendienststelle.
TREVIverfolgt eine Politik ständiger Forschung und Weiterentwicklung. Die Produkte können
daher andere als die beschriebenen Eigenschaften auSKIP+eisen.
HINWEISE FÜR DEN KORREKTEN GEBRAUCH DER AUFLADBAREN BATTERIE
- Die Ladung der Batterie sollte bei einer Temperatur zwischen 5°C und 35°C erfolgen.
- Die Ladezeit sollte die angegebenen Zeiten nicht überschreiten, um die Gefahr der
Überhitzung und Explosion zu vermeiden.
- Die Batterie sollte nicht für einen Zeitraum von mehr als 64 hinaus oder eine
längere Nichtbenutzung können deren Lebensdauer reduzieren.
- Die aufladbare Batterie ist ein Verschleißteil, ihre Ladekapazität reduziert sich allmählich.
- Um die Lebensdauer der Batterie zu erhöhen, sollte diese stets komplett aufgeladen
und vollständig entleert werden. Vor der erneuten Benutzung sollte sie wieder komplett
aufgeladen werden. Wird eine nicht vollständig entleerte Batterie aufgeladen, so wird
deren La deautonomie reduziert. In diesem Falle sollte der Vorgang der vollständigen
DEUTSCH
Table of contents
Languages:
Other Trevi Radio manuals

Trevi
Trevi RA 767 User manual

Trevi
Trevi CMP 582 DAB User manual

Trevi
Trevi RA742T User manual

Trevi
Trevi CD 512 User manual

Trevi
Trevi MB 748 W User manual

Trevi
Trevi DR 740 SD User manual

Trevi
Trevi CMP 588 DAB User manual

Trevi
Trevi VRA 782 User manual

Trevi
Trevi CMP 544 BT User manual

Trevi
Trevi CMP 583 DAB User manual

Trevi
Trevi DAB 792 R User manual

Trevi
Trevi DAB 7F91 R User manual

Trevi
Trevi MB 749 W User manual

Trevi
Trevi XF 100 User manual

Trevi
Trevi DR 7F40 BT User manual

Trevi
Trevi MRA 784USB User manual

Trevi
Trevi DAB 795 R User manual

Trevi
Trevi CMP 510 DAB User manual

Trevi
Trevi DAB 7F94 R User manual

Trevi
Trevi RA 7F25 BT User manual