Trevi RR 511 DAB User manual

* Per informazioni integrative e aggiornamenti di questo prodotto vedi: www.trevi.it
* For additional information and updates of this product see: www.trevi.it
RR 511 DAB
Guida d’uso / User Guide
RADIO REGISTRATORE CON DAB/FM/USB/SD/MP3/BT
RADIO CASSETTE RECORDER WITH DAB/FM/USB/SD/MP3/BT
RADIO MAGNETOPHONE AVEC DAB/FM/USB/SD/MP3/BT
RADIO CASSETTE RECORDER MIT DAB/FM/USB/SD/MP3/BT
REGISTRADOR DE RADIO CASSETTE CON DAB/FM/USB/SD/MP3/BT
ita
eng
fra
deu
esp

2
PROSOCH
PROSOCH. MHN ANOIGETE THN SUSKEUH. DEN UPARCOUN STO ESWTERIKO THS ENTOLES
POU NA MPOREI NA CEIRISTEI O KATANALWTHS OUTE ANTALLAKTIKA TMHMATA. GIA OPO-
IADHPOTE EPISKEUH H¢ SUNTHRHSH APEUQUNQEITE SE ENA APO TA EXOUSIODOTHMENA
KENTRA ANTIPROSWPEIAS TREVI.
KINDUNOS HLEKTROPLHXIAS
MHN EKQETETE
SE BROCH KAI UGRASIA
ATENÇÃO
PERIGO DE CHOQUES ELÉTRICOS
NÃO EXPOR A CHUVA E UMIDADE
ATENÇÃO: NÃO ABRIR O APARELHO. NO INTERIOR DO MESMO NÃO EXISTEM COMANDOS OU
PEÇAS DE SUBSTITUIÇÃO QUE POSSAM SER MANIPULADOS PELO USUÁRIO.EM CASO DE EVENTUAL
OPERAÇÃO DE SERVIÇO, DIRIGIR-SEA UM CENTRO DEASSISTÊNCIA AUTORIZADOTREVI
ATENCION
ATENCION: NO ABRIR EL APARATO, EN SU INTERIOR NO HAY MANDOS QUE PUEDAN SER MANI-
PULADOS POR EL USUARIO NI PARTES DE REPUESTO. PARA TODAS LAS OPERACIONES DE SERVICIO
DIRIGIRSE A UN CENTRO DE ASISTENCIA AUTORIZADOTREVI.
PELIGRO DE CHOQUES ELECTRICOS
NO EXPONER A LLUVIAY HUMEDAD
ACHTUNG
GEFAHR ELEKTRISCHER SCHLÄGE
NICHT DER FEUCHTIGKEIT UND
DEM REGEN AUSSETZEN
ACHTUNG: DAS GERÄT NICHT ÖFFNEN. IM INNERN BEFINDEN SICH KEINEVOM BENUTZER SELBST
INSTANDSETZBARENTEILE UNDAUCH KEINE ERSATZTEILE.FÜR JEGLICHE SERVICEARBEITEN,WENDEN
SIE SICH BITTE AN EINETREVI AUTORISIERTEN KUNDENDIENSTSTELLE.
ATTENTION
ATTENTION: NE PAS OUVRIR L’APPAREIL,A L’INTERIEUR IL N’YA PAS DE COMMANDESA MANIPULER
PAR L’UTILISATEUR OU DE PIECES DE RECHANGE.POURTOUTES LES OPERATIONS DE SERVICE IL FAUT
S’ADRESSER A UN SERVICE D’ASSISTANCE AUTORISE TREVI.
RISQUE DE DECHARGES ELECTRIQUES
NE PAS EXPOSER A LA PLUIE ET A
L’HUMIDITE
WARNING!
WARNING: DO NOT OPENTHE SET. NEITHER CONTROLS OR SPARE PARTSTO BE USED BYTHE USER
ARE TO BE FOUND INSIDE IT.APPLY TOAUTHORISED TREVI CENTERS FOR SERVICE OPERATIONS.
DANGER OF ELECTRIC SHOCK!
DO NOT EXPOSE TO
RAIN OR HUMIDITY
ATTENZIONE
RISCHIO DI SCOSSE ELETTRICHE!
NON ESPORRE A PIOGGIA E UMIDITÀ
ATTENZIONE:NONAPRITE L'APPARECCHIO.ALL'INTERNO NONVI SONO COMANDI MANIPOLABILI
DALL'UTENTE NE PARTI DI RICAMBIO. PER TUTTE LE OPERAZIONI DI SERVIZIO RIVOLGERSI AD UN
CENTRO DI ASSISTENZA AUTORIZZATO TREVI
RR 511 DAB WARNING!

RR 511 DAB
3
ITALIANO
NOTE D’USO
Non ascoltare a volume alto per diverso tempo, potrebbe danneggiare il vostro udito.
Evitare di posizionare il riproduttore:
• Vicino a campi magnetici.
• Vicino a fonti di calore come caloriferi e stufe.
•In luoghi molto umidi come stanze da bagno, piscine, ecc...
• In luoghi molto polverosi.
•In luoghi soggetti a forti vibrazioni.
• Non avvicinare l’orecchio all’altoparlante durante le fasi di messa punto e regolazioni del volume,
e in particolare di tenere il volume al minimo nella fase di accensione.
• Posizionare l’apparecchio in modo che ai suoi lati ci sia sempre abbastanza spazio per la libera
circolazione di aria (almeno 5 cm).
• Se dei liquidi penetrano all’interno dell’apparecchio scollegare immediatamente la spina dalla
presa e portare l’apparecchio al più vicino centro assistenza autorizato TREVI.
• Controllaresempre prima diricaricarel’apparecchio, cheicavi dialimentazionee di collegamento
siano installati correttamente.
• Nessunasorgentedifiammanuda, qualicandele accese,dovrebbeessere postasull’apparecchio.
• L
’apparecchio non deve essere esposto a stillicidio o a spruzzi d’acqua e nessun oggetto pieno
di liquido, quali vasi, deve essere posto sull’apparecchio.
• Prima di accendere l’apparecchio, verificare sempre che il cavo di alimentazione e il cavo di
collegamento siano installati correttamente.
• L’adattatore di corrente deve essere collegato a una presa vicina al dispositivo e deve essere
facilmente accessibile.
• Se si nota un calore eccessivo sul dispositivo o sull’adattatore di corrente, scollegare immedia-
tamente la spina dalla presa di corrente principale.
• Non tirare il cavo di alimentazione
• Conservare il presente manuale per futuri riferimenti.
CURA E MANUTENZIONE
Per la pulizia si consiglia l’uso di un panno morbido, leggermente inumidito. Evitate solventi o
sostanze abrasive.
IMPORTANTE
La buona costruzione di questo apparecchio ne garantisce per lungo tempo il perfetto funzionamento.
Se tuttavia dovesse presentarsi qualche inconveniente, sarà opportuno consultare il più vicino Centro
Assistenza autorizzato.
TREVI persegue una politica di continua ricerca e sviluppo. Pertanto i prodotti possono presentare
caratteristiche diverse da quelle descritte.
VOLTAGGIO
PERICOLOSO
Questo simbolo
riportato sul retro
dell'apparecchio ed in questo
manuale segnala la presenza
all'interno di questo
apparecchio di componenti
operanti ad alta tensione, non
apritelo per evitare il rischio di
scosse elettriche.
ATTENZIONE
Questo simbolo
riportato sul retro
dell'apparecchio ed in
questo manuale indicano
la presenza sugli stessi di
importanti istruzioni per la
sicurezza d'uso. Leggetele
attentamente prima di
utilizzare l'apparecchio.

RR 511 DAB
4
DESCRIZIONE COMANDI
1. ALTOPARLANTI
2. REGOLAZIONE VOLUME
3. REGOLAZIONE BASSI
4. VANO CASSETTE
5. PAUSA CASSETTE
6. STOP/APERTURA VANO CASSETTE
7. AVANZAMENTO VELOCE CASSETTE
8. TASTO INDIETRO VELOCE CASSETTE
9. TASTO LETTURA CASETTE
10.SEZIONEDICONTROLLOEDISPLAYLCD
11. SELETTORE FUNZIONI
12. NON UTILIZZATO
13. MANOPOLA UP/DOWN/TASTO CON-
FERMA
14. MICROFONO
15. INGRESSO SD
16. INGRESSO USB
17. PRESA ALIMENTAZIONE RETE
LCD DISPLAY
MODE PRESET INFO MENU SCAN PLAY
FUNCTION
DAB
OFF
DOWN UP
ENTER
230V
MIC
LT-400RUC
USB/SD/BT operation
REC
LT-400RUC
USB/SD/BT operation
VANO BATTERIE
PRESA
CUFFIE
LCD DISPLAY MODE PRESET INFO MENU SCAN PLAY
FUNCTION
DAB
OFF
DOWN UP
ENTER
230V
MIC
10
16
15 17
ITALIANO

RR 511 DAB
5
ALIMENTAZIONE BATTERIE
Aprire il vano batterie ed inserire 4 batterie formato “D” (UM-1) avendo cura di rispettare
attentamente le polarità indicate. Sostituire immediatamente le batterie scariche e toglierle
se prevedete di non utilizzare l’apparecchio per lungo tempo.
RETE
Collegare il cavo di alimentazione alla presa AC IN(17). Inserire la spina in una presa
di corrente 230V~50Hz. Non collegare l’apparecchio a prese con tensione diversa da
quella indicata.
REGOLAZIONE VOLUME - TONI BASSI
Ruotare la regolazione volume(2) in senso orario o antiorario per aumentare o diminuire
il volume.
Ruotare la regolazione bassi(3) in senso orario o antiorario per aumentare o diminuire
i toni bassi.
SELEZIONE SORGENTE
Agire sul selettore funzione (11) per selezionare DAB/FM oppure BT/USB/SD oppure
TAPE/OFF.
RADIO DAB/FM
1. Portare il selettore funzioni (11) sulla posizione DAB/FM.
2. Premere il tasto MODE (10) per selezionare la radio digitale DAB oppure la radio FM.
3. Spegnere la radio commutando il selettore (11) in posizione “TAPE/OFF”
RADIO FM
1. Aprire l’antenna telescopica per tutta la sua lunghezza.
2. Premere a lungo il tasto SCAN (10) per effettuare la sintonia e memorizzazione
automatica delle stazioni radio. Possono essere salvate fino a 30 stazioni radio.
3. Per selezionare una stazione radio salvata premere il tasto PRESET nella sezione
comandi (10), selezionare e confermare con il tasto/manopola (13).
4. Per effettuare la ricerca manuale di una stazione radio ruotare la manopola (13) per
ricercare la frequenza desiderata e confermare premendo la manopola stessa.
5. Per salvare una stazione radio premere a lungo il tasto PRESET(10) fino a far com-
parire sul display “Preset store” e selezionare/confermare la locazione di memoria
tramite il tasto/manopola (13).
5. Premere il tasto INFO(10) per visualizzare sul display varie informazioni trasmesse
dalle stazioni radio.
6. Premere il tasto MENU’(10) per accedere al menu di impostazioni della radio FM,
muoversi all’interno dei menu’ e confermare tramite il tasto/manopola(13).
Sono disponibili le seguenti impostazioni:
- SCAN SETTING: e’ possibile selezionare se durante la ricerca automatica vengano
memorizzate tutte le stazioni (All station) o solo quelle con segnale forte (Strong
station).
- AUDIOSETTING: e’possibileselezionarel’ascoltoinMONO(Forcedmono)oSTEREO
(Stereo allowed).
ITALIANO

RR 511 DAB
6
ITALIANO
RADIO DAB
1. Alla prima accensione l’apparecchio effettuerà una scansione automatica dei canali
radio disponibili.
2. Agiresultasto/manopola (13)perselezionareunaradio traquelledisponibili, premere
la manopola per confermare la stazione scelta.
3. Se necessario, premere il tasto SCAN (10) per effettuare una nuova sintonia auto-
matica delle stazioni radio.
4. Per salvare una stazione radio premere a lungo il tasto PRESET(10) fino a far com-
parire sul display “Preset store” e selezionare/confermare la locazione di memoria
tramite il tasto/manopola (13). Sono disponibili 30 locazioni di memoria.
5. Per selezionare una stazione radio salvata premere il tasto PRESET (10), sul display
compare “Preset recall”. Selezionare e confermare con il tasto/manopola (13).
6. Premere il tasto INFO(10) per visualizzare sul display varie informazioni trasmesse
dalle stazioni radio.
7. Premere il tasto MENU’(10) per accedere al menu di impostazioni della radio DAB,
muoversi all’interno dei menu’ e confermare tramite il tasto/manopola(13).
Sono disponibili le seguenti impostazioni:
- FULL SCAN: per effettuare una nuova scansione delle stazioni radio DAB disponibili.
- MANUAL TUNE: per effettuare una ricerca manuale delle stazioni DAB presenti.
- DRC: permette di abilitare/disabilitare la funzione DRC per migliorare il suono durante
l’ascolto in ambienti rumorosi. È possibile impostare il livello di DRC in alto (high),
basso (low) o Off (spento).
- PRUNE: permette di eliminare dalle lista delle stazioni memorizzate tutte le radio
trovate ma non disponibili (scarso segnale).
NOTA: Per ottenere la migliore ricezione estendete e orientate l’antenna. Se la ricezione
non è buona provate a regolare diversamente la lunghezza e l’orientamento dell’antenna,
comunque la qualità della ricezione dipende molto dal luogo dove è posto l’apparecchio.
LETTORE MP3 USB/SD
1. Impostare il selettore(11) sulla posizione BT/USB/SD.
2. Premere il tasto MODE (10) per selezionare l’ingresso attivo (USB o SD).
3. Collegare l’ USB Flash Disk o la memoria SD nell’ingresso USB(16) o nell’ingresso
SD(15).
4. Attendere alcuni secondi, la riproduzione partira’ automaticamente.
5. Premere il tasto PLAY(10) per attivare la pausa in lettura (display lampeggiante),
premerlo di nuovo per riprendere la riproduzione.
6. Ruotare la manopola (13) per selezionare un brano differente.
BLUETOOTH
1. Impostare il selettore(11) sulla posizione BT/USB/SD.
2. Premere il tasto MODE (10) per selezionare l’ingresso Bluetooth.
3. Ricercare l’apparecchio nominato “RR 511 DAB” , eseguire l’accoppiamento con il
proprio smartphone ed inserire il PIN “0000” se richiesto.

RR 511 DAB
7
4. Ad accoppiamento avvenuto l’apparecchio emetterà un suono di risposta.
5. Attivare la riproduzione musicale dal proprio dispositivo. E’ possibile la selezione
dei brani da riprodurre agendo sulla manopola (13) e sospendere/attivare la lettura
tramite il tasto PLAY(10).
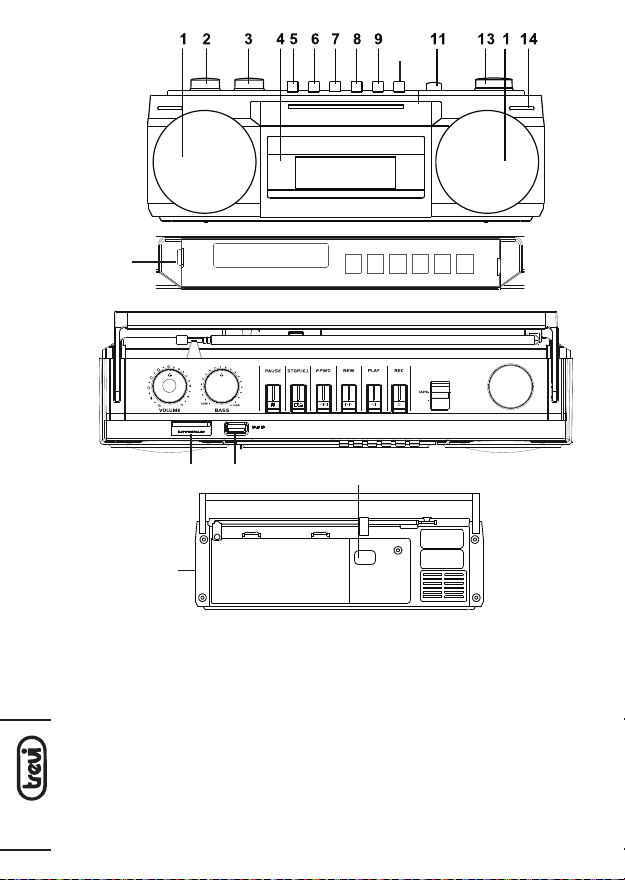
RIPRODUTTORE CASSETTE
RIPRODUZIONE CASSETTE
1. Posizionare il selettore sulla posizione TAPE/OFF e aprite il vano cassette con il tasto
(6).
2. Inserire una cassetta nel vano con il lato che desiderate ascoltare rivolto verso
l’esterno.
3. Regolare a vostro piacimento il volume.
4. Premere il tasto PLAY(9) per iniziare la riproduzione.
5. Premere il tasto PAUSE(5) per fermare momentaneamente la riproduzione, premerlo
nuovamente per riprenderla.
6. Per far avanzare velocemente il nastro premete il tasto F.FWD(7).
7. Per riavvolgere velocemente il nastro premete il tasto REW(8).
8. Premereiltasto STOP/EJECT(6)per fermaredefinitivamentelariproduzione,premerlo
nuovamente per estrarre la cassetta.
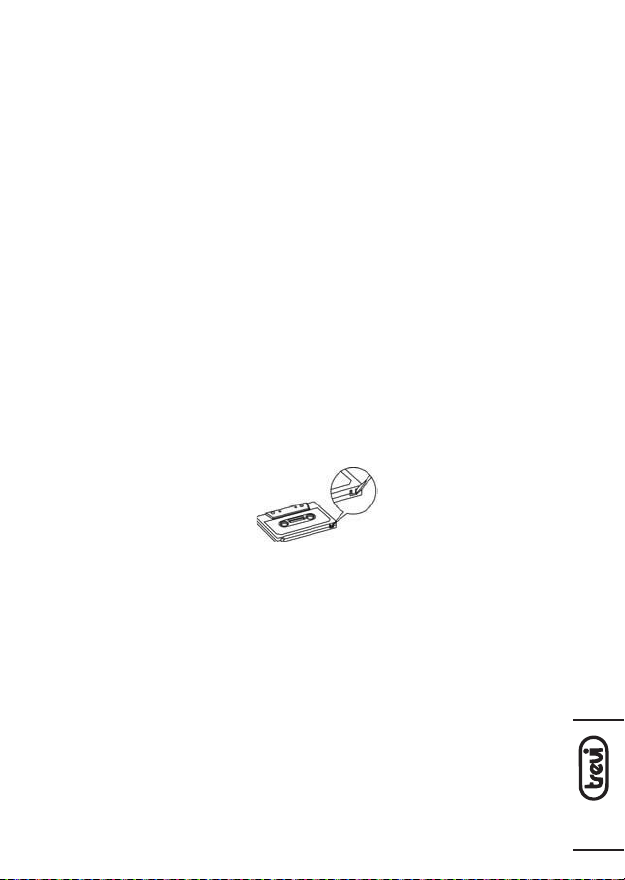
REGISTRAZIONE DA ALTRE SORGENTI
Nota: assicurarsi che la linguetta di abilitazione delle registrazioni sia presente
altrimenti non sara’ possibile registrare la cassetta.
1. Posizionare il selettore sulla sorgente desiderata (Radio, lettore Usb, SD, Bluetooth)
ed avviare la riproduzione.
2. Inserire la cassetta nel vano.
3. Premere il tasto REC per iniziare la registrazione.
4. Utilizzare il tasto PAUSE(5) per fermare momentaneamente la registrazione, premerlo
nuovamente per riprenderla.
5. Premere il tasto STOP/EJECT(6) per fermare definitivamente la registrazione.
REGISTRAZIONE DA MICROFONO INCORPORATO
1. Posizionare il selettore sulla posizione TAPE.
2. Inserire la cassetta nel vano.
3. Premere il tasto REC per iniziare la registrazione ed iniziare a parlare frontalmente
all’apparecchio.
4. Utilizzare il tasto PAUSE(5) per fermare momentaneamente la registrazione, premerlo
nuovamente per riprenderla.
5. Premere il tasto STOP/EJECT(6) per fermare definitivamente la registrazione.
¡
¡
ITALIANO

RR 511 DAB
8
PRESA CUFFIE
1. Inserire le cuffie nella presa cuffie.
2. Avviare la riproduzione desiderata e regolare il volume.
IMPOSTAZIONI DI SISTEMA
1. Premere a lungo il tasto MENU’(10). Muoversi all’interno dei menu’ e confermare le
opzioni scelte tramite il tasto-manopola (13).
2. Selezionare SYSTEM e confermare con il tasto-manopola (13).
3. Sono disponibili varie voci di menu’ :
Alarm: e’ possibile impostare la funzione di allarme sveglia (vedi relativo capitolo
per le impostazioni).
Time: e’ possibile impostare data/ora corrente (vedi relativo capitolo per le impo-
stazioni).
Sleep: e’ possibile attivare lo spegnimento automatico dell’unita’ (standby) dopo un
certo tempo.Impostareiltempo di spegnimento automatico desiderato econfermare
premendoiltastomanopola(13);e’ possibile selezionare tra 90, 60,45,30,15minuti
e OFF (funzione Sleep non attiva).
Language: e’ possibile impostare una differente lingua per il menu’ (default: Inglese).
Factory reset: e’ possibile effettuare un ripristino delle impostazioni ai valori di
fabbrica.
Software upgrade: menu’ riservato ai centri di assistenza tecnica, non utilizzare.
SW version: mostra la versione del software corrente.
REGOLAZIONE ORA E DATA
1. Con l’apparecchio in standby premere il tasto MENU’(10). Muoversi all’interno dei
menu’ tramite il tasto-manopola (13).
2. Sul display compare l’indicazione SYSTEM, confermare e selezionare la voce TIME,
confermare di nuovo.
3. Selezionare la voce SET TIME/DATE ed impostare l’ora e la data corrente.
4. Selezionare la voce SET DATE FORMAT per impostare la visualizzazione della data.
5. SelezionarelavoceAUTO UPDATEperlaregolazione automatica dell’ora/data tramite
la radio FM, DAB o da entrambe le sorgenti.
FUNZIONE ALLARME SVEGLIA
Questo apparecchio e’ dotato di funzione allarme sveglia; e’ possibile impostare fino a
due allarmi sveglia.
1. Con l’apparecchio in standby premere il tasto MENU’(10). Muoversi all’interno dei
menu’ e confermare le opzioni scelte tramite il tasto-manopola (13).
2. Sul display compare l’indicazione SYSTEM, confermare. Selezionare la voce ALARM
Per evitare possibili danni all’udito, limitare il tempo di ascolto a
volumi elevati.
ITALIANO

RR 511 DAB
9
e confermare.
3. Selezionare ALARM1 SETUP o ALARM2 SETUP.
4. Impostare l’ora di attivazione dell’allarme (ON TIME).
5. Impostare la durata dell’allarme (DURATION).
6. ImpostarelafrequenzadiattivazioneDAILY(ognigiorno),ONCE(unavolta),WEEKENDS
(sabato e domenica), WEEKDAYS (dal lunedi’ al venerdi’). Confermare/impostare la
data dell’allarme se richiesto.
7. Selezionare l’attivazione (ON) dell’allarme (allarme disattivato=OFF).
Alterminel’allarmeimpostato verràsalvato(SAVED)ecompareunaindicazionesuldisplay
ad allarme attivo. Per spegnere l’allarme premere il tasto-manopola (13).
CARATTERISTICHE TECNICHE
Alimentazione: ........................................230V~/ 50Hz - 4 Batterie D (UM-1)
........................................batterie non incluse
Gamma di ricezione:................................FM 87.5 - 108.0 MHz
........................................DAB 174 - 240 MHz
Potenza di trasmissione Bluetooth:........... 2,5mW
Frequenza di trasmissione Bluetooth: ....... 2,4GHz
Dimensioni: ........................................317 x 114 x 89 mm
INFORMAZIONI AGLI UTENTI ai sensi del Decreto Legislativo N° 49 del 14
Marzo 2014
“Attuazione della Direttiva 2012/19/UE sui rifiuti di apparecchiature elettriche ed
elettroniche (RAEE)”
Il simbolo del cassonetto barrato riportato sull’apparecchiatura indica che il prodotto alla fine della propria vita utile
deve essere raccolto separatamente dagli altri rifiuti. L’utente dovrà, pertanto, conferire l’apparecchiatura integra dei
componenti essenziali giunta a fine vita agli idonei centri di raccolta differenziata dei rifiuti elettronici ed elettrotecnici,
oppure riconsegnarla al rivenditore al momento dell’acquisto di nuova apparecchiatura di tipo equivalente, in ragione
di uno a uno, oppure 1 a zero per le apparecchiature aventi lato maggiore inferiore a 25 cm. L’adeguata raccolta diffe-
renziata per l’avvio successivo dell’apparecchiatura dimessa al riciclaggio, al trattamento e allo smaltimento ambientale
compatibile contribuisce ad evitare possibili effetti negativi sull’ambiente e sulla salute e favorisce il riciclo dei materiali
di cui è composta l’apparecchiatura. Lo smaltimento abusivo del prodotto da parte dell’utente comporta l’applicazione
delle sanzioni amministrative di cui al D.Lgs n. Decreto Legislativo N° 49 del 14 Marzo 2014.
ITALIANO

RR 511 DAB
10
USE NOTES
Do not listen at high volumes for a long time, it could damage your hearing.
Avoid placing the player:
• Near magnetic fields.
• Near heat sources such as heaters and stoves.
• In very humid places such as bathrooms, swimming pools, etc ...
• In very dusty places.
• In places subject to strong vibrations.
• Do not bring your ear close to the speaker during the adjustment and volume adjustment phases,
and in particular to keep the volume to a minimum in the ignition phase.
• Position the appliance so that there is always enough space on its sides for the free circulation
of air (at least 5 cm).
• If liquids penetrate inside the appliance, immediately disconnect the plug from the socket and
take the appliance to the nearest authorized TREVI service center.
• Always check before recharging the appliance, that the power and connection cables are installed
correctly.
• No naked flame sources, such as lighted candles, should be placed on the appliance.
• The appliance must not be exposed to dripping or splashing water and no objects filled with
liquid, such as vases, must be placed on the appliance.
• Before turning on the appliance, always check that the power cable and the connection cable
are installed correctly.
• The power adapter must be connected to an outlet near the device and must be easily accessible.
• If you notice excessive heat on the device or on the power adapter, immediately disconnect the
plug from the main power socket.
• Do not pull on the power cable
• Keep this manual for future reference.
CARE AND MAINTENANCE
For cleaning we recommend the use of a soft, slightly moistened cloth. Avoid solvents or abrasive
substances.
IMPORTANT
The good construction of this appliance guarantees perfect operation for a long time. However, should
any inconvenience arise, it is advisable to consult the nearest authorized Service Center.
TREVI pursues a policy of continuous research and development. Therefore the products may have
different characteristics from those described.
DANGEROUS
VOLTAGE
This symbol on the back of the
unitandinthismanualindicates
the presence in this equipment
components operating at high
voltage, do not open it to avoid
the risk of electric shock.
CAUTION
This symbol on the back of
theunit andin thismanualin-
dicate the presence on them
of important instructions for
safe use. Please read them
carefully before using the
appliance.
ENGLISH

RR 511 DAB
11
ENGLISH
LCD DISPLAY
MODE PRESET INFO MENU SCAN PLAY
FUNCTION
DAB
OFF
DOWN UP
ENTER
230V
MIC
LT-400RUC
USB/SD/BT operation
REC
LT-400RUC
USB/SD/BT operation
BATTERY
HEADPHONE
LCD DISPLAY MODE PRESET INFO MENU SCAN PLAY
FUNCTION
DAB
OFF
DOWN UP
ENTER
230V
MIC
10
16
15 17
1. SPEAKERS
2. VOLUME ADJUSTMENT
3. BASS ADJUSTMENT
4. CASSETTE COMPARTMENT
5. CASSETTE PAUSE
6. STOP/EJECT CASSETTE
7. CASSETTE FAST FORWARD
8. CASSETTE FAST REWIND
9. CASSETTE PLAY
10. CONTROL SECTION AND LCD DISPLAY
11. FUNCTION SELECTOR
12. NOT USED
13. UP/DOWN KNOB/CONFIRMATION
BUTTON
14. MICROPHONE
15. SD INPUT
16. USB INPUT
17. AC SOCKET

RR 511 DAB
12
BATTERY POWER
Open the battery compartment and insert 4 “D” (UM-1) batteries, taking care to carefully
respectthepolarities indicated.Immediatelyreplace exhausted batteriesandremove them
if you do not intend to use the appliance for a long time.
POWER ON
ConnectthepowercabletotheACINsocket(17).Insertthepluginto a230V~50Hzpower
outlet. Do not connect the appliance to sockets with a voltage other than that indicated.
VOLUME ADJUSTMENT - LOW TONES
Turn the volume control (2) clockwise or counterclockwise to increase or decrease the
volume.
Turn the bass adjustment (3) clockwise or counterclockwise to increase or decrease
the bass tones.
SOURCE SELECTION
Use the function selector (11) to select DAB / FM or BT / USB / SD or TAPE / OFF.
DAB / FM RADIO
1. Turn the function selector (11) to the DAB / FM position.
2. Press the MODE button (10) to select the DAB digital radio or the FM radio.
3. Turn off the radio by turning the selector (11) to the “TAPE / OFF” position
FM RADIO
1. Open the telescopic antenna along its entire length.
2. Long press the SCAN button (10) to automatically tune in and store radio stations.
Up to 30 radio stations can be saved.
3. To select a saved radio station, press the PRESET button in the control section (10),
select and confirm with the button / knob (13).
4. To manually search for a radio station, turn the knob (13) to search for the desired
frequency and confirm by pressing the knob.
5. To save a radio station, long press the PRESET button (10) until the “Preset store”
appears on the display and select / confirm the memory location using the button /
knob (13).
5. Press the INFO button (10) to view various information transmitted by radio stations
on the display.
6. Press the MENU ‘button (10) to access the FM radio settings menu, move within
the menus and confirm with the button / knob (13).
The following settings are available:
- SCAN SETTING: it is possible to select whether all the stations (All station) or only
those with strong signal (Strong station) are stored during the automatic search.
- AUDIO SETTING: it is possible to select listening in MONO (Forced mono) or STEREO
(Stereo allowed).
ENGLISH

RR 511 DAB
13
RADIO DAB
1. The first time the device is turned on it will automatically scan the available radio
channels.
2. Use the button / knob (13) to select a radio from those available, press the knob to
confirm the selected station.
3. If necessary, press the SCAN button (10) to perform a new automatic tuning of the
radio stations.
4. To save a radio station, long press the PRESET key (10) until the “Preset store”
appears on the display and select / confirm the memory location using the key /
knob (13). 30 memory locations are available.
5. To select a saved radio station, press the PRESET button (10), the display shows
“Preset recall”. Select and confirm with the button / knob (13).
6. Press the INFO button (10) to view various information transmitted by radio stations
on the display.
7. Press the MENU ‘button (10) to access the DAB radio settings menu, move within
the menus and confirm with the button / knob (13).
The following settings are available:
- FULL SCAN: to carry out a new scan of the available DAB radio stations.
- MANUAL TUNE: to perform a manual search of the DAB stations present.
- DRC: allows you to enable / disable the DRC function to improve the sound when
listening in noisy environments. You can set the DRC level to high (high), low (low)
or Off (off).
- PRUNE: allows you to delete all the radios found but not available from the list of
stored stations (poor signal).
NOTE: To obtain the best reception, extend and orient the antenna. If the reception is
not good, try adjusting the length and orientation of the antenna differently, however the
quality of reception depends a lot on the place where the device is placed.
USB / SD MP3 PLAYER
1. Set the function switch (11) to the BT / USB / SD position.
2. Press the MODE key (10) to select the active input (USB or SD).
3. Connect the USB Flash Disk or SD memory to the USB input (16) or the SD input
(15).
4. Wait a few seconds, the playback will start automatically.
5. Press the PLAY key (10) to activate the pause in reading (display flashing), press it
again to resume playback.
6. Turn the knob (13) to select a different song.
ENGLISH

RR 511 DAB
14
BLUETOOTH
1. Set the function switch (11) to the BT / USB / SD position.
2. Press the MODE button (10) to select the Bluetooth input.
3. Search for the device named “RR 511 DAB”, pair with your smartphone and enter
the PIN “0000” if required.
4. Once paired, the appliance will emit a response sound.
5. Activate music playback from your device. It is possible to select the songs to be
played by turning the knob (13) and suspending / activating the reading via the PLAY
button (10).
CASSETTE PLAYER
CASSETTE REPRODUCTION
1. Position the selector on the TAPE / OFF position and open the cassette compartment
with the key (6).
2. Insert a cassette into the compartment with the side you wish to listen facing
outwards.
3. Adjust the volume to your liking.
4. Press the PLAY (9) button to start playback.
5. Press the PAUSE (5) button to stop playback momentarily, press it again to resume
it.
6. To fast forward the tape, press the F.FWD button (7).
7. To rewind the tape quickly, press the REW (8) button.
8. Press the STOP / EJECT button (6) to stop playback permanently, press it again to
eject the cassette.
REGISTRATION FROM OTHER SOURCES
Note: make sure that the record enabling tab is present otherwise it will not be possible
to record the cassette.
1. Position the selector on the desired source (Radio, Usb reader, SD, Bluetooth) and
start playback.
2. Insert the cassette into the compartment.
3. Press the REC button to start recording.
4. Use the PAUSE button (5) to temporarily stop the recording, press it again to resume
it.
5. Press the STOP / EJECT button (6) to stop recording permanently.
RECORDING FROM BUILT-IN MICROPHONE
1. Place the switch in the TAPE position.
2. Insert the cassette into the compartment.
3. Press the REC button to start recording and start speaking from the front of the
¡
¡
ENGLISH

RR 511 DAB
15
device.
4. Use the PAUSE button (5) to temporarily stop the recording, press it again to resume
it.
5. Press the STOP / EJECT button (6) to stop recording permanently.
HEADPHONES
1. Insert the headphones into the headphones jack.
2. Start the desired playback and adjust the volume.
SYSTEM SETTINGS
1. Long press the MENU button (10). Move within the menus and confirm the options
chosen using the button-knob (13).
2. Select SYSTEM and confirm with the knob button (13).
3. Various menu items are available:
Alarm:itis possibleto setthe alarm function(see therelevant chapterforthesettings).
Time: it is possible to set the current date / time (see the relevant chapter for the
settings).
Sleep: it is possible to activate the automatic shutdown of the unit (standby) after a
certain time. Set the desired automatic switch-off time and confirm by pressing the
knob button (13); it is possible to select between 90, 60, 45, 30, 15 minutes and
OFF (Sleep function not active).
Language: it is possible to set a different language for the menu (default: English).
Factory reset: it is possible to restore the settings to factory values.
Software upgrade: menu is reserved for technical assistance centers, do not use.
SW version: shows the current software version.
TIME AND DATE ADJUSTMENT
1. With the appliance on standby, press the MENU button (10). Move within the menus
using the button-knob (13).
2. The indication SYSTEM appears on the display, confirm and select the TIME item,
confirm again.
3. Select the SET TIME / DATE item and set the current time and date.
4. Select the SET DATE FORMAT item to set the date display.
5. Select the AUTO UPDATE item for automatic time / date adjustment via FM radio,
DAB or from both sources.
To avoid possible hearing damage, limit the time listening at
high volumes
ENGLISH

RR 511 DAB
16
ALARM FUNCTION
Thisappliance isequippedwithanalarmalarmfunction; uptotwoalarmalarmscanbe set.
1. With the appliance on standby, press the MENU button (10). Move within the menus
and confirm the options chosen using the button-knob (13).
2. The indication SYSTEM appears on the display, confirm. Select the ALARM item and
confirm.
3. Select ALARM1 SETUP or ALARM2 SETUP.
4. Set the alarm activation time (ON TIME).
5. Set the duration of the alarm (DURATION).
6. Set the activation frequency DAILY (every day), ONCE (once), WEEKENDS (Saturday
and Sunday), WEEKDAYS (from Monday to Friday). Confirm / set the alarm date if
required.
7. Select the activation (ON) of the alarm (alarm deactivated = OFF).
At the end, the set alarm will be saved (SAVED) and an indication will appear on the display
when the alarm is active. To turn off the alarm, press the button-knob (13).
TECHNICAL FEATURES
Power supply: ........................................ 230V ~ / 50Hz - 4 D batteries (UM-1)
........................................batteries not included
Reception range: ....................................FM 87.5 - 108.0 MHz
........................................DAB 174 - 240 MHz
Bluetooth transmission power: ................2.5mW
Bluetooth transmission frequency: ..........2.4GHz
Dimensions: ........................................317 x 114 x 89mm
Precautions for correct disposal of the product.
The symbol shown on the equipment indicates that waste must be disposed of in “sepa-
rate collection” and so the product must not be disposed of together with urban waste.
The user must take the product to special “separate waste collection centres” provided
by local government, or deliver it to the retailer against the purchase of a new product.
Separatecollectionofwaste and subsequent treatment, recyclinganddisposaloperations
promotes the production of equipment with recycled materials and limits negative effects
on the environment and on health caused by improper handling of waste.
Illegal disposal of the product leads to the enforcement of administrative penalties.
ENGLISH

RR 511 DAB
17
NOTES D’EMPLOI
N’écoutez pas à un volume élevé pendant longtemps, cela pourrait endommager votre audition.
Évitez de placer le lecteur:
• Près des champs magnétiques.
• Près de sources de chaleur telles que des radiateurs et des poêles.
• Dans des endroits très humides tels que salles de bain, piscines, etc ...
• Dans des endroits très poussiéreux.
• Dans des endroits soumis à de fortes vibrations.
• Ne rapprochez pas votre oreille du haut-parleur pendant les phases de réglage et de réglage du
volume, et notamment pour maintenir le volume au minimum en phase d’allumage.
• Positionnez l’appareil de manière à ce qu’il y ait toujours suffisamment d’espace sur ses côtés
pour la libre circulation de l’air (au moins 5 cm).
• Si des liquides pénètrent à l’intérieur de l’appareil, débranchez immédiatement la fiche de la prise
et apportez l’appareil au centre de service TREVI agréé le plus proche.
• Vérifiez toujours avant de recharger l’appareil que les câbles d’alimentation et de connexion sont
correctement installés.
• Aucune source de flamme nue, telle que des bougies allumées, ne doit être placée sur l’appareil.
• L’appareil ne doit pas être exposé à des gouttes ou des éclaboussures d’eau et aucun objet
rempli de liquide, comme des vases, ne doit être placé sur l’appareil.
• Avant d’allumer l’appareil, vérifiez toujours que le câble d’alimentation et le câble de connexion
sont correctement installés.
• L
’adaptateur secteur doit être connecté à une prise à proximité de l’appareil et doit être facilement
accessible.
• Si vous constatez une chaleur excessive sur l’appareil ou sur l’adaptateur secteur, débranchez
immédiatement la fiche de la prise de courant principale.
• Ne tirez pas sur le câble d’alimentation
• Conservez ce manuel pour référence future.
ENTRETIEN ET MAINTENANCE
Pour le nettoyage, nous recommandons l’utilisation d’un chiffon doux légèrement humide. Évitez les
solvants ou les substances abrasives.
IMPORTANT
La bonne construction de cet appareil garantit un fonctionnement parfait pendant longtemps. Cepen-
dant, en cas de désagrément, il est conseillé de consulter le centre de service agréé le plus proche.
TREVI poursuit une politique de recherche et développement continue. Par conséquent, les produits
peuvent avoir des caractéristiques différentes de celles décrites.
VOLTAGE
DANGEREUX
Cesymboleapposésurle
dos de l’appareil et reproduit dans
ce manuel indique la présence
d’éléments fonctionnant à haute
tensionà l’intérieurdecetappareil;
ne l’ouvrez pas, afin d’éviter le
risque de décharges électriques.
ATTENTION
Ce symbole apposé sur
le dos de l’appareil et
reproduitdanscemanuelindique
laprésence d’instructions impor-
tantes pour la sécurité d’emploi.
Lisez-les avec attention avant
d’utiliser l’appareil.
FRANÇAISE

RR 511 DAB
18
1. SPEAKERS
2. AJUSTEMENT DU VOLUME
3. AJUSTEMENT DES BASSES
4. COMPARTIMENT CASSETTE
5. PAUSE CASSETTE
6. CASSETTE STOP / EJECT
7. CASSETTE AVANCE RAPIDE
8. CASSETTE FAST REWIND
9. LECTURE DE CASSETTE
10. SECTION DE CONTRÔLE ET
ÉCRAN LCD
11. SÉLECTEUR DE FONCTIONS
12. NON UTILISÉ
13. BOUTON HAUT / BAS / BOUTON DE CON-
FIRMATION
14. MICROPHONE
15. ENTRÉE SD
16. ENTRÉE USB
17. AC SOCKET
LCD DISPLAY
MODE PRESET INFO MENU SCAN PLAY
FUNCTION
DAB
OFF
DOWN UP
ENTER
230V
MIC
LT-400RUC
USB/SD/BT operation
REC
LT-400RUC
USB/SD/BT operation
LCD DISPLAY MODE PRESET INFO MENU SCAN PLAY
FUNCTION
DAB
OFF
DOWN UP
ENTER
230V
MIC
10
16
15 17
HEADPHONE
FRANÇAISE

RR 511 DAB
19
FRANÇAISE
PUISSANCE DE LA BATTERIE
Ouvrezlecompartimentdespilesetinsérez4piles“D”(UM-1),enprenantsoinderespecter
soigneusement les polarités indiquées. Remplacez immédiatement les piles épuisées et
retirez-les si vous n’avez pas l’intention d’utiliser l’appareil pendant une longue période.
ALLUMER
Connectez le câble d’alimentation à la prise AC IN (17). Insérez la fiche dans une prise
de courant de 230 V ~ 50 Hz. Ne connectez pas l’appareil à des prises avec une tension
autre que celle indiquée.
RÉGLAGE DU VOLUME - TONS BAS
Tournez la commande de volume (2) dans le sens horaire ou antihoraire pour augmenter
ou diminuer le volume.
Tournez le réglage des graves (3) dans le sens horaire ou antihoraire pour augmenter
ou diminuer les tons graves.
SÉLECTION DE SOURCE
Utilisez le sélecteur de fonction (11) pour sélectionner DAB / FM ou BT / USB / SD ou
TAPE / OFF.
RADIO DAB / FM
1. Tournez le sélecteur de fonctions (11) sur la position DAB / FM.
2. Appuyez sur le bouton MODE (10) pour sélectionner la radio numérique DAB ou la
radio FM.
3. Éteignez la radio en tournant le sélecteur (11) sur la position “TAPE / OFF”
RADIO FM
1. Ouvrez l’antenne télescopique sur toute sa longueur.
2. Appuyez longuement sur le bouton SCAN (10) pour accorder et mémoriser automati-
quementlesstationsderadio.Jusqu’à 30 stations de radio peuvent être enregistrées.
3. Pour sélectionner une station de radio enregistrée, appuyez sur le bouton PRESET
dans la section de contrôle (10), sélectionnez et confirmez avec le bouton / bouton
(13).
4. Pour rechercher manuellement une station de radio, tournez le bouton (13) pour
rechercher la fréquence souhaitée et confirmez en appuyant sur le bouton.
5. Pour enregistrer une station de radio, appuyez longuement sur le bouton PRESET
(10) jusqu’à ce que «Preset store» apparaisse à l’écran et sélectionnez / confirmez
l’emplacement de la mémoire à l’aide du bouton / bouton (13).
5. Appuyez sur le bouton INFO (10) pour afficher diverses informations transmises par
les stations de radio sur l’écran.
6. Appuyez sur le bouton MENU ‘(10) pour accéder au menu des paramètres de la radio
FM, déplacez-vous dans les menus et confirmez avec le bouton / bouton (13).
Les paramètres suivants sont disponibles:
- SCAN SETTING: il est possible de sélectionner si toutes les stations (Toutes les sta-
tions) ou seulement celles avec un signal fort (Station forte) sont stockées pendant

RR 511 DAB
20
la recherche automatique.
- AUDIO SETTING: il est possible de sélectionner l’écoute en MONO (mono forcé) ou
STEREO (stéréo autorisé).
RADIO DAB
1. La première fois que l’appareil est allumé, il recherche automatiquement les canaux
radio disponibles.
2. Utilisez le bouton / bouton (13) pour sélectionner une radio parmi celles disponibles,
appuyez sur le bouton pour confirmer la station sélectionnée.
3. Si nécessaire, appuyez sur le bouton SCAN (10) pour effectuer un nouveau réglage
automatique des stations de radio.
4. Pour enregistrer une station de radio, appuyez longuement sur la touche PRESET
(10) jusqu’à ce que «Preset store» apparaisse à l’écran et sélectionnez / confirmez
l’emplacementdela mémoireà l’aidedela touche/du bouton(13).30 emplacements
mémoire sont disponibles.
5. Pour sélectionner une station de radio enregistrée, appuyez sur le bouton PRESET
(10), l’écran affiche “Rappel préréglé”. Sélectionnez et confirmez avec le bouton /
bouton (13).
6. Appuyez sur le bouton INFO (10) pour afficher diverses informations transmises par
les stations de radio sur l’écran.
7. Appuyez sur le bouton MENU (10) pour accéder au menu des paramètres de la radio
DAB, déplacez-vous dans les menus et confirmez avec le bouton / bouton (13).
Les paramètres suivants sont disponibles:
- FULL SCAN: pour effectuer un nouveau scan des stations de radio DAB disponibles.
- MANUAL TUNE: pour effectuer une recherche manuelle des stations DAB présentes.
- DRC: permet d’activer / désactiver la fonction DRC pour améliorer le son lors de
l’écoute dans des environnements bruyants. Vous pouvez régler le niveau DRC sur
élevé (élevé), faible (faible) ou désactivé (désactivé).
- PRUNE: permet de supprimer toutes les radios trouvées mais non disponibles de la
liste des stations mémorisées (mauvais signal).
REMARQUE: pour obtenir la meilleure réception, déployez et orientez l’antenne. Si la
réception n’est pas bonne, essayez d’ajuster la longueur et l’orientation de l’antenne
différemment, mais la qualité de la réception dépend beaucoup de l’endroit où l’appareil
est placé.
LECTEUR MP3 USB / SD
1. Réglez le commutateur de fonctions (11) sur la position BT / USB / SD.
2. Appuyez sur la touche MODE (10) pour sélectionner l’entrée active (USB ou SD).
3. Connectez le disque flash USB ou la mémoire SD à l’entrée USB (16) ou à l’entrée
SD (15).
4. Attendez quelques secondes, la lecture commencera automatiquement.
5. Appuyez sur la touche PLAY (10) pour activer la pause de lecture (affichage cligno-
tant), appuyez à nouveau pour reprendre la lecture.
FRANÇAISE
Table of contents
Languages:
Other Trevi Radio manuals

Trevi
Trevi XF 100 User manual

Trevi
Trevi DAB 795 R User manual

Trevi
Trevi VRA 782 User manual

Trevi
Trevi DAB 795 R User manual

Trevi
Trevi CMP 588 DAB User manual

Trevi
Trevi DR 752 BT User manual

Trevi
Trevi RA 7F25 BT User manual

Trevi
Trevi CMP 581 DAB User manual

Trevi
Trevi RA 704 V User manual

Trevi
Trevi CD 512 User manual

Trevi
Trevi CMP 582 DAB User manual

Trevi
Trevi RC 855C User manual

Trevi
Trevi RC 832 User manual

Trevi
Trevi RA 742 T User manual

Trevi
Trevi CMP 544 BT User manual

Trevi
Trevi RA742T User manual

Trevi
Trevi DAB 7F91 R User manual

Trevi
Trevi MB 748 W User manual

Trevi
Trevi DAB 791 R User manual

Trevi
Trevi CMP 576 DAB User manual