manuals.online logo
Brands
  1. Home
  2. •
  3. Brands
  4. •
  5. Viabizzuno
  6. •
  7. Lighting Equipment
  8. •
  9. Viabizzuno F7.156.61 User manual

Viabizzuno F7.156.61 User manual

istruzioni di montaggio
installing instructions
Gebrauchsanweisung
instructions de montage
instrucciones de montaje
Viabizzuno
Alvaline
For m
progettiamo la luce
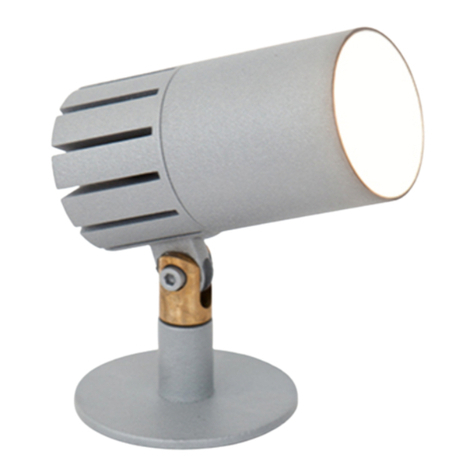
obiettivo track led
2
IT ATTENZIONE:
La sicurezza dell’apparecchio è garantita solo rispettando
queste istruzioni sia in fase di installazione che di impiego.
GB WARNING:
Fitting safety is only guaranteed if the following
instructionsare strictly observed both during installation and
use.
DE ACHTUNG:
Für die Sicherheit des Geräts kann nur dann die Garantie
übernommen werden, wenn die in den vorliegenden
Anweisungen enthaltenen Hinweise sowohl bei der
Installation als auch beim Betrieb beachtet werden.
FR ATTENTION:
La sécurité de l’appareil n’est assurée que lorsque les
consignes portées sont respectées, tant lors de l’installation
que durant l’utilisation de l’appareil.
ES ATENCIÓN:
La seguridad del aparato está garantizada sólo si se
respetan estas instrucciones durante la fase de instalación
y de empleo.
IT AVVERTENZE: All’atto dell’installazione, ed ogni volta che
si interviene sulla lampada, assicurarsi che sia stata tolta
la tensione di alimentazione. Le operazioni di installazione
e collegamento alla rete elettrica devono essere effettuate
esclusivamente da personale qualificato.
GB WARNING: When installing fixture and during unkeep take
care that the mains voltage is switched off. The operations
of installation and connection to power mains should be
done by skilled personnel only.
DE HINWEISE: Während der Installation und bei allen
nachfolgenden Arbeiten auf der Lampe sollte sichergestellt
werden, daß die Versorgungsspannung vorher
abgenommen wurde. Die Arbeiten zur Installation und
zum Anschluss an das Stromnetz sind von Fachpersonal
durchzuführen.
FR AVVERTISSEMENTS: Lors de l’installation et à chaque
fois que l’on fait un entretien sur la lampe, s’assurer que
la tension d’alimentation ait été coupée. Les opérations
d’installation et de branchement au réseau électrique
doivent être effectuées par un personnel qualifié.
ES ADVERTENCIA: Durante la instalación, y cada ve que se
interviene sobre la lámpara, asegurarse que la alimentación
haya sido desconectada. Las operaciones de instalación
y conexión a la red eléctrica tienen que ser efectuadas
exclusivamente por personal cualificado.
33
IT garanzia
GB warranty
DE garantie
FR garantie
ES garantía
IT
GB
DE
FR
ES
La presente garanzia è valida 24 mesi se timbrata
e datata dal rivenditore autorizzato Viabizzuno. Il
periodo di garanzia è di 2 anni a partire dalla data
della timbratura e decade in caso di uso improprio,
manomissione o cancellatura della data, perdita o
illeggibilità del presente libretto di istruzioni.
The warranty covers 24 months if stamped and dated
by the authorised Viabizzuno dealer. The 24 months
warranty shall no apply in case of wrong use, altered or
deleted date, or if this instructions booklet gets lost or
becomes unreadable.
Die Garantie gilt 24 Monate nur, wenn sie von dem
zugelassenen Verkäufer Viabizzuno gestempelt wird.
Die Garantie gilt 2 Jahr seit dem Stempeldatum und
verfällt bei unberechtigten Gebrauch, Manipulation
des Datums, Verlust oder Unlesbarkeit von den
Gebrauchsanweisungen.
La durée de la garantie est de 24 mois si elle est
marquée par le distributer autorisé Viabizzuno. La
garantie est valable 2 ans depuis le jour où elle a été
marquée et échoit en cas d’usage impropre, alteration
ou effacement de la date, e si le carnet d’instructions est
perdu ou est indéchiffrable.
Esta garantìa es valida por 24 meses sòlo si està
datada y sellada por el revendedor autorizado
Viabizzuno. El período de garantía es de 2 años a
partir de la fecha del sello, y decae en caso de empleo
impropio, alteración o borrado de la fecha, pérdida o
ilegibilidad del presente manual de instrucciones
SDM-051212-40582
4
IT Viabizzuno si riserva il diritto di apportare ai
propri modelli, senza nessun preavviso, qualsiasi
modifica ritenga opportuna. le nostre idee e i nostri
apparecchi sono depositati e coperti da brevetti
internazionali. uomo avvisato, mezzo salvato.
GB Viabizzuno reserves the right to introduce any changes
to its own models, without prior notice. our ideas
and our lighting fittings are registered and covered
by international patents. forewarned is forearmed.
DE Viabizzuno bahält sich das Recht vor jederzeit und
ohne Ankündigung die technischen Daten der
im Katalog abgebildetem Produkte zu ändern.
unsere Ideen und unsere Beleuchtungskörper
sind eingetragt und international patentiert. wer
gewarnt ist, ist halb gerettet
FR Viabizzuno se réserve le droit d’apporter une
quelconque modification aux produits sans préavis.
nos ideés et nos corps d’illumination sont déposés
et couverts de brevets internationales. un homme
averti en vaut deux.
ES Viabizzuno se reserva el derecho de aportar a
sus modelos, sin ningùn preavviso, cualquier
modificación que considere oportuna. nuestros
diseños y nuestros aparatos están todos provistos y
cubiertos por patentes internacionales. el que avisa
no es traidor.
5
obiettivo track 240V-50/60Hz ECG IP20
100
100 50
120
F7.156.61 argento - adattat. bianco
silver - white adapter
Silber - Weißadapter
argent - adapteteur blanc
plate - adaptador blanco
led 3000K 17W
F7.156.62 nero - adattat. nero
black - black adapter
Schwarz - Schwarzadapter
noir - adapteteur noir
negro - adaptador negro
led 3000K 17W
F7.156.63 bianco - adattat. bianco
white - white adapte
Weiß - Weißadapter
blanc - adapteteur blanc
blanco - adaptador blanco
led 3000K 17W
6
A
fig.5
Y
X
posizione d’inserimento a binario
position of insertion on a track
fig.1
fig.2
fig.3
fig.4
posizione di aggancio a binario
position of latching on a track
linea 1 selezionata
line 1 selected
linea 2 selezionata
line 2 selected
linea 3 selezionata
line 3 selected
1.
7
IT Inserire l’adattatore (A) nel binario posizio-
nando le ghiere (X) e (Y) come in fig.1.
Per fissare l’adatatore ruotare la ghiera (X)
come in fig.2.
Per selezionare la linea di alimentazione
ruotare la ghiera (Y) nel seguente modo :
Linea 1: ruotare la ghiera (Y) come in fig.3.
Linea 2: ruotare la ghiera (Y) come in fig.4.
Linea 3: ruotare la giera (Y) come in fig.1,
tirare come in fig.5, quindi ruotare come
fig.4.
Linea 0 (neutro): ruotare la giera (Y) come
in fig.1, tirare come in fig.5, quindi ruotare
come fig.3.
GB Fit the adapter (A) into the binary, by placing
the ring nuts (X) and (Y) as shown on fig.1.
In order to fix the adapter, turn the ring nut
(X) as shown on fig.2.
To select the power line, turn the ring nut (Y)
as follows:
Line 1: turn the ring nut (Y) as shown on
fig.3.
Line 2: turn the ring nut (Y) as shown on
fig.4.
Line 3: turn the ring nut (Y) as shown on
fig.1, pull as shown on fig. 5, then turn as
shown on fig. 4.
Line 0 (neutral): turn the ring nut (Y) as
shown on fig.1., pull as shown on fig. 5,
then turn as shown on fig. 3
DE Den Adapter (A) in die Schiene einsetzen
und die Ringmuttern (X) und (Y) so positio-
nieren, wie in Abb. 1 gezeigt.
Zur Befestigung des Adapters die Ringmutter
(X) so drehen, wie in Abb. 2 gezeigt.
Zur Auswahl der Versorgungsleitung die
Ringmutter (Y) drehen wie folgt:
Leitung 1: Ringmutter (Y) drehen, wie in
Abb. 3 gezeigt.
Leitung 2: Ringmutter (Y) drehen, wie in
Abb. 4 gezeigt.
Leitung 3: Ringmutter (Y) drehen, wie in
Abb. 1 gezeigt, ziehen, wie in Abb. 5 ge-
zeigt, dann drehen, wie in Abb. 4 gezeigt.
Leitung 0 (Nullleiter): Ringmutter (Y) drehen,
wie in Abb. 1 gezeigt, ziehen, wie in Abb. 5
gezeigt, dann drehen, wie in Abb. 3 gezeigt.
FR Introduire l’adaptateur (A) dans la voie en
positionnant les embouts (X) et (Y) comme
indiqué sur la fig.1.
Pour fixer l’adaptateur, tourner l’embout (X)
comme indiqué sur la fig.2.
Pour sélectionner la ligne d’alimentation,
tourner l’embout (Y) de la manière suivante :
Ligne 1: tourner l’embout (Y) comme indiqué
sur la figure 3.
Ligne 2: tourner l’embout (Y) comme indiqué
sur la figure 4.
Ligne 3: tourner l’embout (Y) comme indiqué
sur la fig.1, tirer comme indiqué sur la fig.5,
puis tourner comme indiqué sur la fig.4.
Ligne 0 (neutre): tourner l’embout (Y) com-
me indiqué sur la fig.1, tirer comme indiqué
sur la fig.5, puis tourner comme indiqué sur
la fig.3.
ES Introducir el adaptador (A) en el riel colo-
cando las tuercas (X) e (Y) como indicado
en la fig. 1.
Para fijar el adaptador, girar la tuerca (X)
como indicado en la fig. 2.
Para seleccionar la línea de alimentación,
girar la tuerca (Y) de la manera siguiente:
Línea 1: girar la tuerca (Y) como indicado
en la fig. 3.
Línea 2: girar la tuerca (Y) como indicado
en la fig. 4.
Línea 3: girar la tuerca (Y) como indicado en
la fig. 1, tirar como indicado en la fig. 5 y
luego girar como indicado en la fig. 4.
Línea 0 (neutro): girar la tuerca (Y) como
indicado en la fig. 1, tirar como indicado
en la fig. 5 y luego girar como indicado En
la fig. 3.
8
180°
B
A
355°
C
2.
9
IT Orientare la lampada rispetto l’asse verticale
(fig.1). Una volta stabilita la posizione serrare
le due viti (A). Allentare la vite di blocco rotazi-
one (B) e orientare il faretto (C) (fig.2-fig.3) .
Serrare la vite di blocco rotazione.
ATTENZIONE: quando il faretto si trova
nella posizione di 0° non è possibile eseguire
l’orientamento di fig.3
GB Direct the lamp with respect to the vertical axis
(fig.1). Once the required position is reached,
tighten the two screws (A). Loosen the rotation
block screw (B) and direct the spotlight (C)
(fig.2-fig.3). Tighten the rotation block screw.
ATTENTION: when the spotlight finds itself in
the 0° position the lamp may not be directed
as illustrated on fig. 3.
DE Die Lampe in der Horizontalen ausrichten
(Abb.1). Wenn die richtige Stellung gefunden
ist, die zwei Schrauben (A) festziehen. Die
Sperrschraube (B) lockern und den Strahler (C)
(Abb. 2-Abb.3) ausrichten. Die Sperrschraube
wieder anziehen. ACHTUNG: Steht der
Strahler in der 0°-Stellung, kann die Ausrich-
tung von Abb.3 nicht vorgenommen werden.
FR Orienter la lampe par rapport à l’axe vertical
(fig.1). Une fois la position établie, serrer
les deux vis (A). Desserrer la vis de blocage
rotation (B) et orienter le spot (C) (fig.2-fig.3).
Serrer la vis de blocage rotation.
ATTENTION: quand le spot se trouve dans la
position de 0°, il n’est pas possible d’effectuer
l’orientation de la fig.3.
ES Orientar la lámpara respecto al eje vertical
(Fig. 1). Una vez establecida la posición, ap-
retar los dos tornillos (A). Aflojar el tornillo de
bloqueo de la rotación (B) y orientar el foco (C)
(Fig. 2 - Fig. 3). Apretar el tornillo de bloqueo
de la rotación.
ATENCIÓN: cuando el foco se encuentra en
la posición de 0° no es posible efectuar la
orientación reflejada en la Fig. 3.
10
IT
A fine vita l’apparecchio di illuminazione un rifiuto che rientra nella categoria
Raee (Rifiuto di Apparecchiatura Elettrica ed Elettronica), pertanto non deve
essere smaltito come un rifiuto municipale misto ma deve essere smaltito
correttamente per evitare danni all’ambiente, alle persone e agli animali,
ed evitare lo spreco di materiali riciclabili. E’ possibile consegnare il vecchio
apparecchio al venditore nel momento in cui si acquista un nuovo apparecchio
di illuminazione, oppure portare l’apparecchio nelle aree pubbliche di raccolta
predisposte dalle amministrazioni comunali, o depositarlo negli appositi
contenitori.
GB
At the end of the its life cycle, the light fixture should be considered as a Weee
(Waste of electrical and electronic equipment) category waste, therefore it
should be disposed of not as generic municipal waste, but properly in order
to avoid damages to the environment, people and animals, and to avoid any
waste of recyclable materials.When ordering a new light fixture, the customer
may give back his/her old one to the seller, or bring it to the public collection
sites arranged by the municipal authorities, or simply put it in special collection
containers.
DE
Am Ende der Lebensdauer ist das Gerät als Elektro- und Elektronik-Altgerät
(ElektroG) zu behandeln und darf daher nicht zum Restmüll gegeben, sondern
muss korrekt entsorgt werden, um die Schädigung von Umwelt, Personen
und Tieren sowie die Verschwendung recycelbarer Materialien zu vermeiden.
Das ausgediente Gerät kann beim Kauf eines neuen Gerätes beim Händler
abgegeben oder zu einer öffentlichen Sammelstelle gebracht bzw. in den dafür
vorgesehenen Behältern deponiert werden.
FR
A la fin de sa durée de vie, l’appareil d’éclairage est un déchet qui entre dans la
catégorie DEEE (Déchets des Equipements Electriques et Electroniques) ; il ne doit
donc pas être éliminé comme un déchet municipal mixte mais correctement pour
éviter tout dommage à l’environnement, aux personnes et aux animaux, et éviter
le gaspillage de matériaux recyclables. Il est possible de remettre le vieil appareil
au vendeur lorsque l’on achète un nouvel appareil d’éclairage, ou de porter
l’appareil dans les aires publiques de collecte prévues par les administrations
communales, ou de le déposer dans les contenants prévus à cet effet.
ES
Al final de su vida, el aparato de iluminación es un residuo que está incluido
en la categoría Raee (Residuo de aparatos eléctricos y electrónicos), por lo
tanto no tiene que eliminarse como un residuo urbano mixto, sino que tiene
que eliminarse de forma correcta para evitar daños al medio ambiente, a las
personas y los animales, y para evitar el derroche de materiales reciclables.
Es posible entregare el aparato antiguo al vendedor en el momento en qué
se compre un aparato de iluminación nuevo, o bien llevar el aparato a la
zona públicas de recogida preparadas por las administraciones municipales, o
depositarlo en los contenedores al efecto.
IT
smaltimento dell’apparecchio
GB
equipment disposal
DE
entsorgung des geräts
FR
elimination de l’appareil
ES
eliminación del aparato
11
IT Alimentatore elettronico
GB Eletronic gears
DE elektrisches Vorschaltgerät
FR Platine d’alimentation électronique
ES Alimentador electrónico
ECG
IT classe 1 (solo isolamento fondamen-
tale; inoltre le parti conduttrici acces-
sibili sono collegate ad un conduttore
di terra. Messa a terra tassativa).
GB class1 (only basic insulation, accessi-
ble conductors are earthed. Earthing
compulsory).
DE Klass 1 (Grundisolation leitenden;
berührbare Metallteile sind mit Schu-
tzerdung verbunden. Schtzerdung
vorgeschriben)
FR class 1 (seulement isolation de base,
les partes condutrices acessibles sont
reliées à un conducteur terre. Mise à
la terre obligatorie).
ES Clase 1 (sólo aislamiento fundamen-
tal; además, las partes conductoras
accesibles están conectadas a un
conductor de tierra.Puesta a tierra
indispensable).
IT Apparecchi idonei al montaggio
diretto su superfici normalmente
infiammabili
GB Luminaries suitable for direct moun-
ting on flamable surfaces
DE Geeignet fuer direkt Einbau auf
entzuenlichen Oberflaechen
FR Appareil predisposè à un montage
direct sur une superficie normalment
inflamable
ES Aparatos adecuados para el montaje
directo sobre superficies normalmente
inflamables
IP40 IT Apparecchio a prova di penetrazione
di oggetti solidi con diametro supe-
riore a 1 mm
GB Protect against solid objects greater
than 1mm
DE Gerät geschützt gegen feste Fremd-
körper mit Durchmesser > 1mm
FR Appareil résistant à la pénétration
d’objets solides ayant un diamètre
supérieur à 1 mm
ES Aparato a prueba de penetración de
objetos sólidos con diámetro superior
a 1 mm.
IT indice marcature
GB marking index
DE Kennzeichnenverzeichniss
FR index de marquage
ES indice de marcado
IT prodotto conforme alle direttive
europee
GB produced in compliance with EC
directives
DE Gebaut gemaeß EG-Vorschriften
FR produit conforme aux Directives de la
Comunautè Européenne
ES Producto conforme con las directivas
europeas
12
For m
For m divide lo spazio verticalmente:
equilibrata, razionale, rigorosa.
il corpo illuminante evolve nella sua
funzione di fare luce:
il suo uso é sempre più flessibile e la sua
capacità di fondersi con l’architettura
ne fa un vero materiale da costruzione,
attraverso un design non invasivo,
non mimetico, non sfacciatamente
decorativo.
i corpi illuminanti si ritraggono nelle
pareti, a filo intonaco, a scomparsa,
nascosti alla vista lasciando piena
soggettività alla luce. il grigio dei
materiali come cemento, alluminio,
acciaio é il colore della collezione For m.
For m divides space vertically. it is
balanced, rational and rigorous. the
lighting element is an evolution in
the way that light is shed: its way of
being used becomes evermore flexible
and its capacity of blending with the
surrounding architecture makes it a true
building material, thanks to its non-
intrusive yet non-mimetic design, which
is not brazenly decorative. the recessed
lighting elements retract into the wall,
grazing against the plaster to hide away
from sight and leave the whole scene
to the light. the gray of materials like
cement, aluminium, and steel is the
colour of the For m collection.
13
english
español
deutsch
cod.19093
italiano
cod.19091
english
français
cod.19092
cod. 19941
la letteratura For m - For m literature
libro For m
book For m
cartella colori e finiture
folder sample finishes
and colours
manuale For m 2007
manual For m 2007
autore mario nanni
progetto editoriale
e grafico Viabizzuno
edito da Viabizzunoeditore
seconda edizione
author mario nanni
Viabizzuno publishing
and graphics project edited
by Viabizzunoeditore
second edition
cod. 15248
14
Alvaline
Alvaline attraversa lo spazio
diagonalmente: dinamica, irriverente,
ironica, giocosa. inizia il gesto, dove si
muovono gli sguardi, dove la materia si
fonde mescolandosi alla luce,
si originano così colore e forma, che
vivono per se stesse e per l’emozione
che li circonda. il blu della notte é il suo
colore.
Alvaline cuts through space diagonally
with dynamism, irreverence, irony and
playfulness. its gesture is marked by
the shifting of glances, by the blending
of matter with light thus giving life to
colour and form which live a life of their
own with the emotions surrounding
them. midnight blue is its colour.
15
vol.7 mon amour
cod.00282
vol.6 biblio
cod.00288
vol.5 clv1
cod.00286
vol.4 alva1
cod.00291
vol.3 bamboo
cod.00289
vol.2 h2o
cod.00283
vol.1 E27
cod.00285
vol.18 toccami
cod.17777
vol.14 steelon
cod.17904
vol.13 UpOGalleggio
cod.15215
vol.11 fileau
cod.14564
vol.10 tulp
cod.00290
vol.9 clv2
cod.00284
vol.8 emma
cod.00287
vol.19 la DOdò
cod.17779
vol.20 plag in
cod.17778
cartella colori e finiture
folder sample finishes
and colours
la letteratura Alvaline - Alvaline literature
manuale Alvaline 2007
manual Alvaline 2007
volumi Alvaline
Alvaline volumes
italiano
cod.16162-2
english
français
cod.16164-2
english
español
deutsch
cod.16166-2
cod. 19941
Viabizzuno srl
10 via romagnoli
40010 bentivoglio
bologna italia
t+39 0518908011
f+390518908089
www.viabizzuno.com
[email protected]

This manual suits for next models

2

Other Viabizzuno Lighting Equipment manuals

Viabizzuno Vb Series Instruction Manual

Viabizzuno

Viabizzuno Vb Series Instruction Manual

Viabizzuno Econo Track Instruction Manual

Viabizzuno

Viabizzuno Econo Track Instruction Manual

Viabizzuno F6.205.03 Instruction Manual

Viabizzuno

Viabizzuno F6.205.03 Instruction Manual

Viabizzuno F6.100.01 Instruction Manual

Viabizzuno

Viabizzuno F6.100.01 Instruction Manual

Viabizzuno clv 1 Instruction Manual

Viabizzuno

Viabizzuno clv 1 Instruction Manual

Viabizzuno n55 terra Instruction Manual

Viabizzuno

Viabizzuno n55 terra Instruction Manual

Viabizzuno net 48 muro Instruction Manual

Viabizzuno

Viabizzuno net 48 muro Instruction Manual

Viabizzuno 094 Instruction Manual

Viabizzuno

Viabizzuno 094 Instruction Manual

Viabizzuno catena Instruction Manual

Viabizzuno

Viabizzuno catena Instruction Manual

Viabizzuno anselmo parete Instruction Manual

Viabizzuno

Viabizzuno anselmo parete Instruction Manual

Viabizzuno F6.169.95 Instruction Manual

Viabizzuno

Viabizzuno F6.169.95 Instruction Manual

Viabizzuno M4 led spot short User manual

Viabizzuno

Viabizzuno M4 led spot short User manual

Viabizzuno a1 system Instruction Manual

Viabizzuno

Viabizzuno a1 system Instruction Manual

Viabizzuno cubo doccia User manual

Viabizzuno

Viabizzuno cubo doccia User manual

Viabizzuno M4 short led spot Instruction Manual

Viabizzuno

Viabizzuno M4 short led spot Instruction Manual

Viabizzuno reflex Instruction Manual

Viabizzuno

Viabizzuno reflex Instruction Manual

Viabizzuno square system 1600 User manual

Viabizzuno

Viabizzuno square system 1600 User manual

Viabizzuno lettera O User manual

Viabizzuno

Viabizzuno lettera O User manual

Viabizzuno vase-big feet-m3 Instruction Manual

Viabizzuno

Viabizzuno vase-big feet-m3 Instruction Manual

Viabizzuno zero4 Instruction Manual

Viabizzuno

Viabizzuno zero4 Instruction Manual

Viabizzuno eco mini User manual

Viabizzuno

Viabizzuno eco mini User manual

Viabizzuno 094 Instruction Manual

Viabizzuno

Viabizzuno 094 Instruction Manual

Viabizzuno toccami A9.533.61 Instruction Manual

Viabizzuno

Viabizzuno toccami A9.533.61 Instruction Manual

Viabizzuno trasparenza parete 100 Instruction Manual

Viabizzuno

Viabizzuno trasparenza parete 100 Instruction Manual

Popular Lighting Equipment manuals by other brands

Inspire LEDFLEXI 2128KS-1.5-CCT-P instruction manual

Inspire

Inspire LEDFLEXI 2128KS-1.5-CCT-P instruction manual

Somogyi home WL5-4LED instruction manual

Somogyi

Somogyi home WL5-4LED instruction manual

OttLite B2190Z quick start guide

OttLite

OttLite B2190Z quick start guide

Avanto Lifestyle CHEST LIGHT PRO instructions

Avanto Lifestyle

Avanto Lifestyle CHEST LIGHT PRO instructions

Asaklitt PRL-444 quick start guide

Asaklitt

Asaklitt PRL-444 quick start guide

EuroLite CRT-200PRO MK2 user manual

EuroLite

EuroLite CRT-200PRO MK2 user manual

Pixapro LED Series user guide

Pixapro

Pixapro LED Series user guide

Conrad 77 61 02 operating instructions

Conrad

Conrad 77 61 02 operating instructions

ProLights Diamond 193 user manual

ProLights

ProLights Diamond 193 user manual

Lightolier Paralyte 2424 PLA2G9LP3FT specification

Lightolier

Lightolier Paralyte 2424 PLA2G9LP3FT specification

Lupo SUPERPANEL DUAL COLOR 30 user manual

Lupo

Lupo SUPERPANEL DUAL COLOR 30 user manual

EuroLite LED DMX Flash 6000K & UV user manual

EuroLite

EuroLite LED DMX Flash 6000K & UV user manual

Airport L-861SE instruction manual

Airport

Airport L-861SE instruction manual

Clevertronics LP CFLLED Series Installation & maintenance instructions

Clevertronics

Clevertronics LP CFLLED Series Installation & maintenance instructions

Sharp Recessed Led installation instructions

Sharp

Sharp Recessed Led installation instructions

ETC GDS BluesSystem installation manual

ETC

ETC GDS BluesSystem installation manual

Chauvet Rogue user manual

Chauvet

Chauvet Rogue user manual

Eternal Lighting EventCUBE CW user manual

Eternal Lighting

Eternal Lighting EventCUBE CW user manual

manuals.online logo
manuals.online logoBrands
  • About & Mission
  • Contact us
  • Privacy Policy
  • Terms and Conditions

Copyright 2025 Manuals.Online. All Rights Reserved.