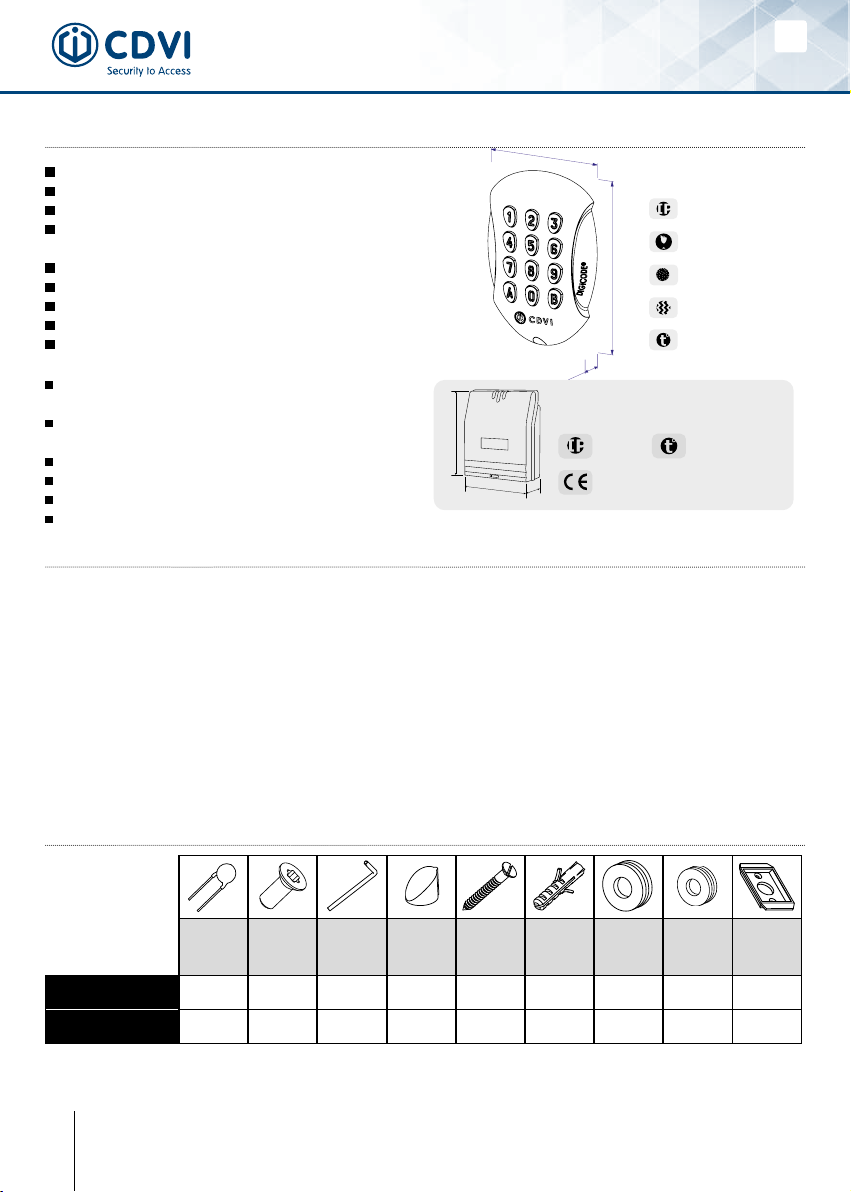
CDVI GALEO BT User manual

1
FI
NO
DK
SE
EN
GALEO BT
Keypad GALEO Bluetooth

EN
GALEO BT
Keypad GALEO Bluetooth
2cdvigroup.com
75
110
15
147
124 55
IP52
CE certication
Remote electronics
-25°C to +70°C
1] GENERAL INFORMATION
Construction: Zamak®cast alloy
Remote electronics
Surface mount
Capacity of 100 user codes
of 4 or 5 digits
Stored in EEPROM memory
Buzzer audible signal
Backlit keys
Bluetooth connection
3 dry contact relay outputs
Adjustable time output:
1 to 99 seconds and toggle mode
Operating voltage:
12-24Vac and 12-48Vdc
Consumption: 54 to 195mA
Mounting with Torx®screws
Dimensions (L x W x D): 110 x 75 x 15 mm
Usermodicationofcodes
3] MOUNTING KITMOUNTING KIT
2]2] NOTES & RECOMMENDATIONS
Recommended power supplies.
- ADC335 (230V input), BS60 (230V input).
-Separatepowersupplyforthecontrolelements.
Wiring
- The distance between the keypad
and the remote electronic can not exceed
more than 50 meters.
- Make sure that the cable is not near by a high
voltage cables (ex: 230V ac).
-Recommended cable between the keypad
and the remote electronics: 2 twisted pairs
(4 wires) SYT1 0.8MM.
Mounting recommendations
Mountthekeypadonaatsurfacetoavoid
any vandalism and to insure the best mounting.
Security advice
- For security advice reasons, change
thefactorydefaultmastercode.
- When selecting a master code and user code
avoid simple codes (example : 3 4 5 6 7).
Back EMF protection
Tosecurethesystemfrombackelectromagnetic
eldsdonotforgettomountthevaristor
in parallel on the lock.
IP64
-25°C to +70°C
Vibrations tests
Salt spray
IK10
Varistor (M4x10)
Torx®
screw
T20 Torx®
Spanner Caps (M4x30)
mounting
screws
Plastic
anchors
Wiring
sealed
cap
Wiring
sealed
cap
Mounting
plate for
remote
electronic
box
GALEO - 1 1 1 2 2 - - -
Remote
Controller 1 - - - 2 2 2 2 1

EN GALEO BT
Keypad GALEO Bluetooth
3cdvigroup.com
4] MOUNTING
GALEO ®
GALEO ®
(x4)
1
GALEO ®
GALEO ®
(x4)
4
GALEO ®
GALEO ®
(x4)
2
GALEO ®
GALEO ®
(x4)
5
GALEO ®
GALEO ®
(x4)
3
GALEO ®
GALEO ®
(x4)
6
Verify the distance between the
GALEO keypad and its remote
electronic (Refer to page 3 «Notes and
Recommendations»). Place the back
plate of the GALEO on the wall and
the bracket of the remote electronic
then mark with a pen the hole location
then drill the 2 mounting holes (drill bit
Ø 5 mm and 35 mm hole depth)
and the hole wiring access.
Fasten the GALEO keypad to the back
plate by using the supplied (M4x10)
Torx® screw and T20 Trox spanner
hardware. Place the screw cap at the
bottom of the keypad.
Insert the 2 plastic anchors in the
holes. Place the back plate of the
GALEO and screw on the wall using
the supplied (M4x30) mounting
screws.
Insert the 2 plastic anchors in the holes.
Place the bracket of the electronic
and screw on the wall using the supplied
M4x30 screws. Slide the box from up
to down on the bracket.
Insert the cable in the hole access
area of the back plate. Then mount
the keypad on the back plate,
placing rst the top in the hooks
and then the bottom.
Insert the cable in the remote electronic
and wire the cable to the terminals.
Do not forget to install the varistor
on the lock (Refer to page 3 «Notes
and Recommendations»).

EN EN
GALEO BT
Keypad GALEO Bluetooth
4cdvigroup.com
BP1
PB1
BP2
PB2
P1P2
230 V AC
Alimentation
Input voltage
12V / 24V AC
12V / 48V DC
12 VDC
ADC335
Alimentation
préconisée
Recommended
Power Suply
5] WIRING DIAGRAM
Remote electronics
P2 jumper allows
to the user to modify
its own Pin code.
To enable this feature
put the jumper on.
P1 jumper resets the
keypad to factory
default values.
Remove the power
from the keypad then put
the jumper.
PB1 request-to-exit input activates
relay 1.
PB2 request-to-exit input activates
relay 2.
Latch or toggled output.
H input can be used with a timer to
enable free access by pressing on any
digit key on the keypad. When the
contact is open then the request-to-
enter is disabled. Then the contact
is closed then press any key on the
keypad to enter.
Outputs Wiring table
INPUT
V
Input voltage 12V to 24VAC or 12V to 48VDC
V
Input voltage 12V to 24VAC or 12V to 48VDC
DOOR 1
NC N/C contact relay 1
CCommon relay 1
NO N/O contact relay 1
DOOR 2
NC N/C contact relay 2
CCommon relay 2
NO N/O contact relay 2
DOOR 3
NC N/C contact relay 3
CCommon relay 3
NO N/O contact relay 3
Push
button
PB1 Request-to-exit input relay 1
MCommon of inputs
PB2 Request-to-exit input relay 2
Clock
PX Not usedNot used
HNot usedNot used
HTimer Contact
Keypad
TMGALEO
+ White wire from keypad
-Brown wire from keypad
EGreen or Blue wire (illumination)

EN EN GALEO BT
Keypad GALEO Bluetooth
5cdvigroup.com
A. First use after reset
1. Power up the system
On the remote electronics:
- Green LED lights on
- Then the Red LED lights on
-ThentheRedandGreenLEDash
On the keypad:
- 1 beep is emitted
-Thekeypadlightsonandashes
2. Enter a new code twice for the master code
(only 5 terms).
The 12345 code is forbidden in master code.
-Thekeypadstopashing
-Aftertherstentryofthemastercode,the
keypadashes1time
-Enterthesecondentryofthemastercode
-Ifbothentryofthemastercodearethesame,2
beeps are emitted.
Otherwise,waituntilthekeypadashesagainto
enter the new master code twice
(about 10 seconds)
- Entry in programming mode
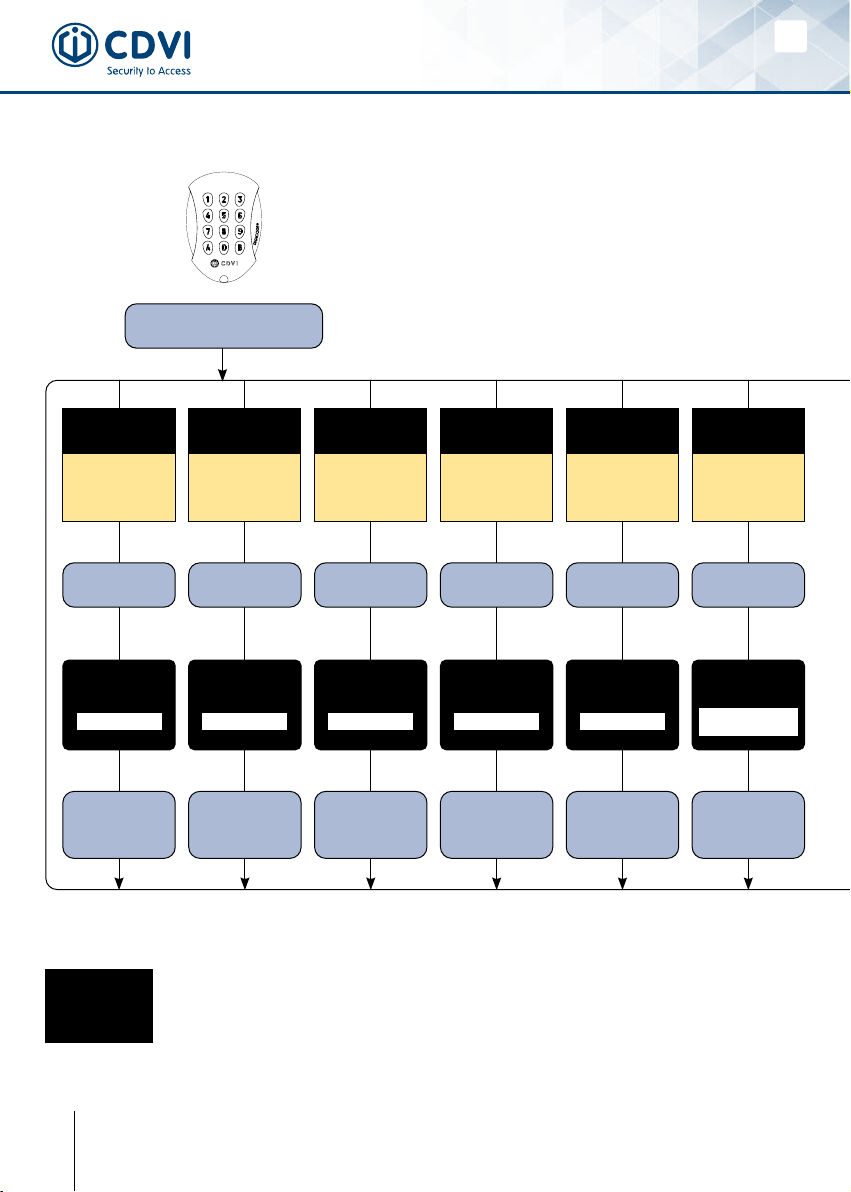
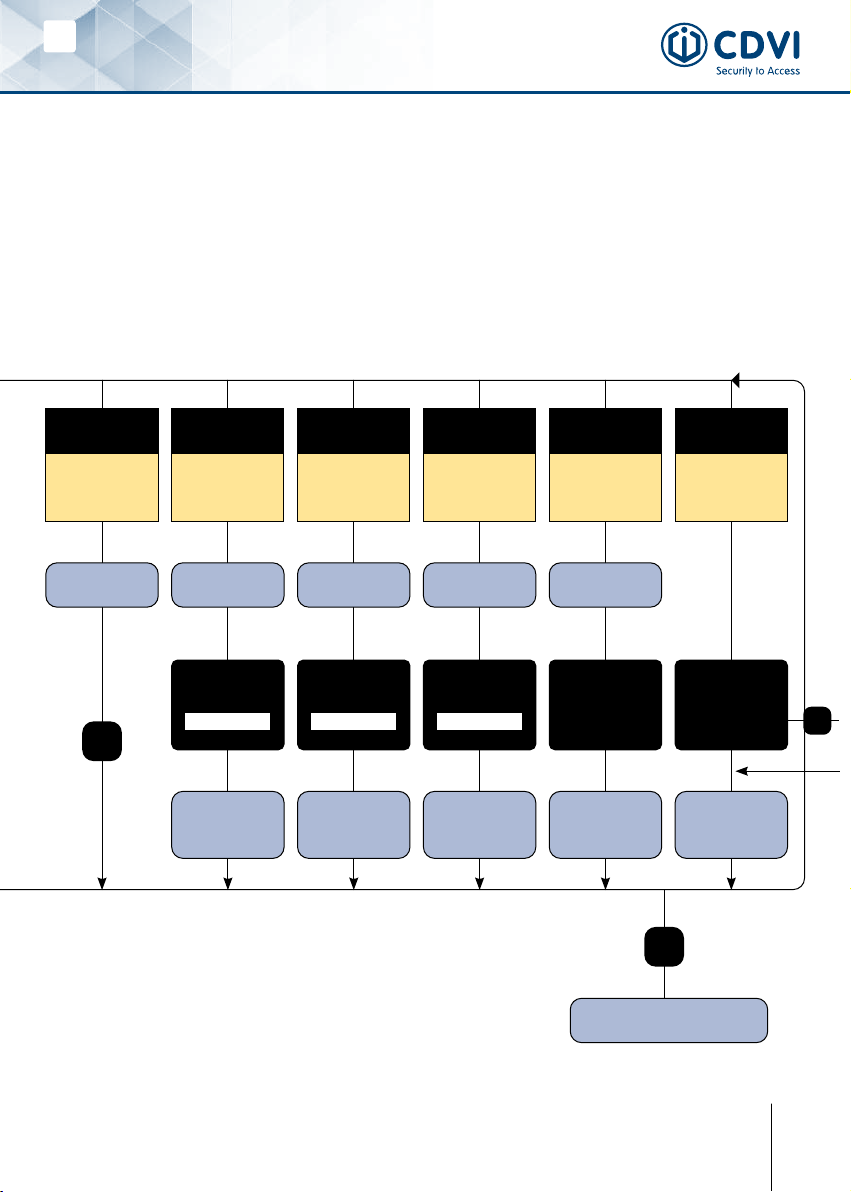
3. Congure the system with the
programming chart on the next page.
-PressBtoexitfromprogrammingmode.
B. Reset memory
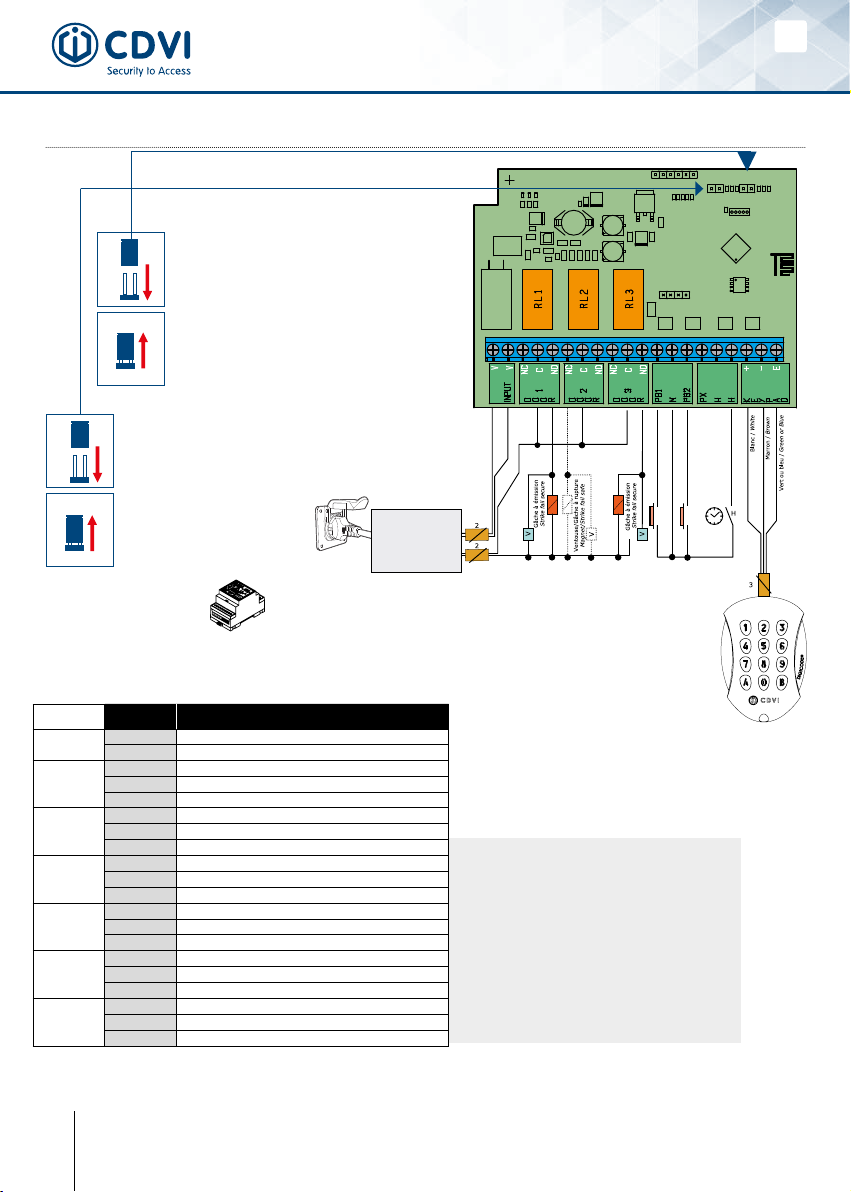
1. Cut off the power and put the jumper on
P1.
-Refertopage4forthejumperP1ontheremote
electronics
2. Put the power back :
On the remote electronics:
- Red LED lights on during reset
-Afterthereset,RedandGreenLEDsstillashing
while waiting new master code
On the Keypad:
- 6 short beeps are emitted during reset and at the
end 1 long beep is emitted
-Thekeypadstillashingwhilewaitingnewmaster
code
3. Pull out the jumper on P1
- Master code and user codes are cleared and set
todefaultvalue
4. Start again from part A
C. Reset master code
On stand-by operating mode, put a jumper on
P1. Wait until the keypad ashes to enter new
master code.
On the remote electronics:
-RedLEDlightsonduringtheresetofthemaster
code
- Then Green LED lights on
On the keypad:
-3shortbeepsareemittingduringtheresetofthe
mastercodeandafterthat1longbeepisemitted
-Thekeypadasheswhilewaitingtheentryofa
new master code
D. Changing the code by user
To authorize a user to modify its own user
code, put a jumper on P2 (to disable the
feature, remove the jumper)
1. Enter the current user code
- The relay is activated and a beep is emitted
2. Enter the 2 digits sub master code
-Relay1,defaultsubmastercode:AandB
-Relay2,defaultsubmastercode:1and3
-Relay3,defaultsubmastercode:4and6
-Abeepisemittedtoauthorizethemodication
3. Enter the new user code
-2beepsareemittedtoconrmthenewcode
4. Check the new user code to be sure of the
modication

EN EN
GALEO BT
Keypad GALEO Bluetooth
6cdvigroup.com
Enter Master Enter Master
code twicecode twice
2 x beeps
1 x beep
1 x beep = OK
4 beeps = Error
10-99 sec
00 = permanent
10=Default
A0
Illumination
duration
1 x beep
1 x beep = OK
4 beeps = Error
01-99 sec
00 = toggled
01=Default
A2
Time Relay 2
1 x beep
1 x beep = OK
4 beeps = Error
01-99 sec
00 = toggled
01=Default
A1
Time Relay 1
1 x beep
1 x beep = OK
4 beeps = Error
01-99 sec
00 = toggled
01=Default
A3
Time Relay 3
1 x beep
1 x beep = OK
4 beeps = Error
4’ or 5’
digits
5=Default
A4
Code length
1 x beep
1 x beep = OK
4 beeps = Error
Change master
code
12345=prohibited
A5
Master code
GALEO Relays 3 (3 outputs)
Relay 1 : From 00 to 59,
Relay 2 : From 60 to 79,
Relay 3 : From 80 to 99.
REMINDER

EN EN GALEO BT
Keypad GALEO Bluetooth
7cdvigroup.com
2 x beeps
1 x beep
A6
Reset
1 x beep
1 x beep = OK
4 beeps = Error
2
digits
AB=default
A7
Sub master
code 1
1 x beep
1 x beep = OK
4 beeps = Error
2
digits
13=default
A8
Sub master
code 2
1 x beep
1 x beep = OK
4 beeps = Error
2
digits
46=default
A9
Sub master
code 3
1 x beep
1 x beep = OK
4 beeps = Error
0= Buzzer
disabled
1 = Buzzer
enabled
AA
Buzzer
(Audible
feedback)
1 x beep = OK
4’ or 5’ digit code
------------------
4 beeps = User
location: “used”
00-99
User codes
B
AB

EN EN
GALEO BT
Keypad GALEO Bluetooth
8cdvigroup.com
Once you have connected the remote electronics (BOXCODE)
Download Manager (CDVI) app.
Open the app,
press box connec-
ted and get
familiarewiththe
menus.
Go to the menu Settings and choose code length.
Standard is 5 digits.
Go to the menu User codes and press + to add the
user codes on each relay.

EN EN GALEO BT
Keypad GALEO Bluetooth
9cdvigroup.com
Creat a user in the menu User and assign the
codes that you have created to each user.
Youcanalsoimportauserfrom
your contact list.
Share your users to your
clients so that they can use
the Digicode®app to open
doors and share their
codestofriends.
Tap the symbol on the bottom
leftcornertosharetheuser.
GotothemenuTimerCongurationandsetthe
timesforhowlongeachdoorshouldbeunlocked.
In this menu you also set how long time the
backlightofthekeypadshouldbeon.

EN EN
GALEO BT
Keypad GALEO Bluetooth
10 cdvigroup.com
Onceyouhavereceivedthee-mailfromyourinstaller/administrator:
Download Digicode®app.
Open the app and
getfamiliarewith
the menus.
Choose your password to start the app
(activate Touch ID on your phone).
Filloutthequestionsifyouwere
to loose your password
To retrive your user:
- Go to your inbox
-OpentheattachedleusingDigicode®app

EN EN GALEO BT
Keypad GALEO Bluetooth
11cdvigroup.com
Onceyouhavereceivedthee-mailfromyourinstaller/administrator:
User codes in the menu, codes
SAFEBOX, to secure
yourles.
Share your user codes
withyourfriends
Files that are shared will be stored in « contacts »

EN EN
GALEO BT
Keypad GALEO Bluetooth
12 cdvigroup.com
This spread sheet will help you keep track of the user codes programmed in the keypad
User
location Code Name
00
01
02
03
04
05
06
07
08
09
10
11
12
13
14
15
16
17
18
19
20
21
22
23
24
25
26
27
28
29
30
31
32
33
User
location Code Name
34
35
36
37
38
39
40
41
42
43
44
45
46
47
48
49
50
51
52
53
54
55
56
57
58
59
60
61
62
63
64
65
66
67
User
location Code Name
68
69
70
71
72
73
74
75
76
77
78
79
80
81
82
83
84
85
86
87
88
89
90
91
92
93
94
95
96
97
98
99
GALEO Relays 3 (3 outputs)
Relay 1 : From 00 to 59,
Relay 2 : From 60 to 79,
Relay 3 : From 80 to 99.
REMINDER
RAPPEL

EN EN GALEO BT
Keypad GALEO Bluetooth
13cdvigroup.com
6] LIMITED LIFETIME WARRANTY [EXTRACT]*
*Refer to Limited Lifetime Warranty conditions
7] NOTES
CDVIwarrantsthisproducttobefreefromdefectsinmaterialandworkmanship,whenithasbeeninstalledin
accordancewiththemanufacturer’sinstructionsandhasnotbeenmodiedortamperedwith.Onlyproduct
recognized by CDVI to be defective should be returned under these warranty terms if accompanied
by an RMA (Return Material Authorization Number) provided by CDVI. CDVI, at its option, shall repair
orreplacethedefectiveproductatCDVIpremisesoratanyCDVIapprovedservicecenter.Thiswarranty
does not cover any damage due to accident, misuse, abuse or negligence. This warranty is valid only
iftheproductisregistered,within1monthfromdeliverytothenalcostumer.Toobtainfulldetailsofthis
warrantyandtoregistertheproducttocommencethe“LimitedLifetimeWarranty”,completetheenclosed
registrationcardandreturnit,eitherbye-mailorpost,totherelevantCDVIaddressorcompletionofthe
onlineregistrationatwww.cdvigroup.com.Repairorreplacementofthedefectiveproductistheexclusive
remedy.CDVIshallnotbeliableforanyincidentalorconsequentialdamagesarisingfromanydefectin,or
malfunctionof,itsproduct.Innoeventtheentireliabilitycannotexceedthepurchasepriceoftheproduct.
TheCDVIlocalcountrycontactdetailscanbefoundonlinebyvisitingwww.cdvigroup.comorontheback
coveroftheinstallationmanual.
DISCLAIMER OF WARRANTY: EXCEPT AS STATED ABOVE, CDVI MAKES NO WARRANTIES, EITHER
EXPRESS OR IMPLIED, AS TO ANY MATTER WHATSOEVER, INCLUDING THE CONDITION OF ITS PRODUCTS,
THE TRANSPORTATION, THEIR MERCHANTABILITY OR FITNESS FOR ANY PARTICULAR PURPOSE.

SE SE
GALEO BT
Kodlås GALEO Bluetooth
14 cdvigroup.com
75
110
15
147
124 55
IP52
CE certication
Styrenhet
-25°C to +70°C
1] PRODUKTSPECIFIKATION1] PRODUKTSPECIFIKATION
Material: Zamak® gjutaluminium.
Delat montage
Utanpåliggande montage
Klarar upp till 100 koder
med 4 eller 5 siffror
Inbyggt EEPROM-minne
Ljudindikering
Bakgrundbelysta knappar
Bluetooth programmering
3 potentialfria reläutgångar
Tidinställningförreläutgång:
1till99sekunderellerväxlandefunktion
Spänningsmatning:
12-24Vac och 12-48Vdc
Strömbörbrukning:54till195mA
Monteras med Torx®skruvar
Dimensioner (L x B x H): 110 x 75 x 15 mm
Användaren kan själv byta kod
3] MONTERINGSSATSMONTERINGSSATS
2] INFORMATION OCH REKOMMENDATIONER2] INFORMATION OCH REKOMMENDATIONER
Rekommenderade nätaggregat
- ADC335 (230Vac), BS60 (230Vac).
-Separatnätaggregatförtillkoppladeenheter.
Kablage
- Avståndet mellan knappsatsen och styrenheten
börinteöverstiga50meter.
- Se till att kablarna inte dras nära
högspänningsledningar(ex:230VAC).
-Rekommenderad kabel mellan knappsatsen och
styrenhet:Enfyrledare(4trådar)SYT10,8mm.
Monteringsrekommendation
Monterakodlåsetpåenplanytaförattförhindra
vandalismochförattfåbästamöjligamontage.
Säkerhets tips
-Avsäkerhetsskälbördenförinställda
standardiserade masterkoden ändras.
- Vid val av masterkod och användarkod, undvik
sekventiella koder (ex: 3 4 5 6 7).
Rekommenderad installation
Förattsäkrasystemetmotelektromagnetiskafält,
koppla in varistorn parallelt med låsenheten.
IP64
-25°C to +70°C
Vibrations tests
Salt spray
IK10
Varistor (M4x10)
Torx®
skruv
T20 Torx®
fastnyckel Täcklock (M4x30)
monte-
rings-skruv Plastplugg Packningar Packningar
Monterings-
platta för
styrenhet
GALEO - 1 1 1 2 2 - - -
Styrenhet 1 - - - 2 2 2 2 1

SE SE GALEO BT
Kodlås GALEO Bluetooth
15cdvigroup.com
4] MONTERING4] MONTERING
GALEO ®
GALEO ®
(x4)
1
GALEO ®
GALEO ®
(x4)
4
GALEO ®
GALEO ®
(x4)
2
GALEO ®
GALEO ®
(x4)
5
GALEO ®
GALEO ®
(x4)
3
GALEO ®
GALEO ®
(x4)
6
Kontrollera avståndet mellan GALEO
kodlås och styrenhet (Se sid 3
«Information och rekommendationer»).
Sätt kodlåsets bakstycke och
styrenhetens monteringsplatta mot
väggen och markera hålens placering
med en penna. Borra sedan två
monteringshål och hål för kabeln (Ø 5
mm bits och min. djup 35 mm).
Skruva fast knappsatsen med M4x10
TORX® skruv och T20 nyckel. Sätt
dit skruvens täcklock i nederkant av
knappsatsen.
Sätt plastpluggar i de borrade
hålen. Placera kodlåsets bakstycke
mot väggen och skruva fast med
de bifogade monteringsskruvarna
(M4x30).
Sätt plastpluggar i de borrade hålen.
Skruva fast styrenhetens monterings-
platta med M4x30 skruvar. För styren-
heten uppifrån och ner för att haka
fast den på monteringsplattan.
Trä GALEO-kabeln genom kabelhålet
i bakstycket.
Kroka fast kodlåset på bakstycket
genom att föra det uppifrån och ner.
För in kabeln i styrenheten och ans-
lut med kopplingsplintarna. Glöm inte
installera varistorn (Se sid 3 «Infor-
mation och rekommendationer»).

SE SE
GALEO BT
Kodlås GALEO Bluetooth
16 cdvigroup.com
BP1
PB1
BP2
PB2
P1P2
230 V AC
Alimentation
Input voltage
12V / 24V AC
12V / 48V DC
12 VDC
ADC335
Alimentation
préconisée
Recommended
Power Suply
5] KOPPLINGSSCHEMA
Remote electronics
P2 Låter användaren
själv ändra sin PIN-
kod.
Byglas för att aktivera
den här funktionen.
(Se «Programmering»)
P1 Kodlåsets
alla inställningar
återställs till
fabriksinställningarna.
Slå av strömmen och
bygla sedan för att
aktivera funktionen
(Se avsnittet
«Programmering»)
PB1 öppnarknappsingång aktiverar
relä 1.
PB2 öppnarknappsingång aktiverar
relä 2.
H Timeringången H (om ansluten) gör
det möjligt att använda alla knappar
på knappsatsen öppnaknappar.
Om timerkontakten är bruten
är funktionen avaktiverad. Om
timerkontakten är sluten är
funktionen aktiverad och alla knappar
på knappsatsen fungerar som
öppnarknappar.
Plint Beskrivning
INGÅNG
V
Inspänning 12-24V AC eller 12-48V DC
V
Inspänning 12-24V AC eller 12-48V DC
DÖRR 1
NC N/C kontakt relä 1
CGemensam relä 1
NO N/O kontakt relä 1
DÖRR 2
NC N/C kontakt relä 2
CGemensam relä 2
NO N/O kontakt relä 2
DÖRR 3
NC N/C kontakt relä 3
CGemensam relä 3
NO N/O kontakt relä 3
Öppnar-
knapp
PB1 Ingång för öppnarknapp relä 1
MGemensam ingångar
PB2 Ingång för öppnarknapp relä 2
Clock
PX Används ejAnvänds ej
HAnvänds ejAnvänds ej
HTimer ingång
Knappsats
GALEO
+ Vit kabel från knappsatsen
-Brun kabel från knappsatsen
EGrön eller Blå kabel (Bakgrundsbelysning)

SE SE GALEO BT
Kodlås GALEO Bluetooth
17cdvigroup.com
A. Vid första användning eller efter
återställning
1. Sätt i strömmer
Vid styrenheten:
-GrönaLEDlampanärpå
-SentändsdenrödaLEDlampan
-SenblinkarbådeRödochGrönLEDlampa
Vid knappsatsen:
-1pipsignalgörs
-Knappsatsentändsochbörjarblinka
2. Skriv in den nya masterkoden två gånger
(endast 5 siffror).
Koden 12345 är förbjuden som masterkod.
- Knappsatsen slutar blinka
-Närduknapparinmasterkodenförstagången
blinkar knappsatsen 1 gång
- Knappa in masterkoden en gång till
-Ombådainmatningarnaärkorrektahörs2
pipsignaler
Ominte,väntatillsknappsatsenbörjarblinka
igen och skriv in en ny masterkod två gånger
(tar ca 10 sekunder)
- Du är nu i programmeringsläge
3. Gör alla inställningar i systemet enligt
programmeringsschemat på kommande
uppslag
- Tryck B för att gå ur programmeringsläget
B. ÅB. Återställ minnetterställ minnet
1. Slå av strömmen och sätt en bygeln på P1.
-Sesidan16föratthittabygelnP1påstyrenheten
2. Slå på strömmen :
På styrenheten:
-RödLEDärtändunderåterställningen
-Efteråterställningen,RödochGrönLEDblinkar
under tiden den väntar på en ny masterkod
På knappsatsen:
-6kortapipsignalerhörsunderåterställningenoch
avslutas med 1 lång signal
- Knappsatsen blinkar under tiden den väntar på en
ny masterkod
3. Ta bort bygeln från P1
- Masterkoden och användarkoderna är nu
återställda till standardinställningarna
4. Starta igen från steg A
C. Återställ masterkoden
Vid stand-by läge, sätt en bygel på P1. Vänta
tills knappsatsen blinkar och skriv in den nya
masterkoden.
På styrenheten:
-RödLEDlampaärpåundertidenåterställningen
av masterkoden
-SentändsdenGrönaLEDlampan
På knappsatsen:
-3kortapipsignalenhörsundertiden
återställningen av masterkoden, det avslutas med
1 lång pipsignal
- Knappsatsen blinkar under tiden den väntar på en
ny masterkod
D. Ändra koden som användare
För att användaren skall få tillåtelse att ändra
sin egen kod, sätt en bygel på P2 (för att
inaktivera funktionen, ta bort bygeln)
1. Skriv in din nuvarande användarkod
-Reläetakriverasoch1pipsignalhörs.
2. Skriv in de 2 knapparna i
undermasterkoden
- Relä 1, standard undermasterkod: A och B
- Relä 2, standard undermasterkod: 1 och 3
- Relä 3, standard undermasterkod: 4 och 6
-1pipsignalhörsförattbekräftatillåtelseatt
ändra
3. Skriv in din nya användarkod
-2pipsignalerhörsförattbekräftadennyakoden
4. Testa den ny användarkoden för att
försäkra dig om att den fungerar

SE SE
GALEO BT
Kodlås GALEO Bluetooth
18 cdvigroup.com
vv
Knappa in Knappa in
masterkoden masterkoden
två gångertvå gånger
2 x pipsignaler
1 x pip
1 x pip = OK
4 pip = Fel
10-99 sek
00 =permanent
10=Standard
A0
Tidsinställning
belysning
1 x pip
1 x pip = OK
4 pip = Fel
01-99 sek
00 = växlande
01=standard
A2
Tidsinställning
relä 2
1 x pip
1 x pip = OK
4 pip = Fel
01-99 sek
00 = växlande
01=standard
A1
Tidsinställning
relä 1
1 x pip
1 x pip = OK
4 pip = Fel
01-99 sek
00 = växlande
01=standard
A3
Tidsinställning
relä 3
1 x pip
1 x pip = OK
4 pip = Fel
4’ eller 5’
siffror
5=standard
A4
Kodlängd
1 x pip
1 x pip = OK
4 pip = Fel
Ändra
Masterkoden
12345=ej möjlig
A5
Masterkod
GALEO 3 Relä
Relä 1 : Plats 00 till plats 59,
Relä 2 : Plats 60 till plats 79,
Relä 3 : Plats 80 till plats 99.
Kodplats

SE SE GALEO BT
Kodlås GALEO Bluetooth
19cdvigroup.com
vv
2 x pip
1 x pip
A6
Återställa
masterkod och
användarkod
1 x pip
1 x pip = OK
4 pip = Fel
2
siffror
AB=standard
A7
Undermasterkod
relä 1
1 x pip
1 x pip = OK
4 pip = Fel
2
siffror
13=standard
A8
Undermasterkod
relä 2
1 x pip
1 x pip = OK
4 pip = Fel
2
siffror
46=standard
A9
Undermasterkod
relä 3
1 x pip
1 x pip = OK
4 pip = Fel
0= avaktiverad
ljudsignal
1 = aktiverad
ljudsignal
AA
Ljudsignal vid
knapptryck
1 x pip = OK
4’ eller 5’ siffror
------------------
4 pip =
användarplatsen
är upptagen
00-99
Programmera
koder (ändra,
lägg till, ta bort)
B
A
B

SE SE
GALEO BT
Kodlås GALEO Bluetooth
20 cdvigroup.com
När du har kopplat in din styrenhet (BOXCODE)
LaddanerManager(CDVI)appendärapparnns.
Öppna appen,
tryck på box
ansluten och kika
igenom de olika
menyerna
Gå till menyn Settings och ställ in kodlängden
standarvärde5siffror
Klicka på ändra användarkod och tryck på +
förattläggatilldeanvändarkodersomdu
skall ha på respektive relä
Table of contents
Languages:
Other CDVI Keypad manuals

CDVI
CDVI GALEO 4.0 - Bluetooth User manual

CDVI
CDVI SUBLIM User manual

CDVI
CDVI GALEO 4.0 - Bluetooth User manual

CDVI
CDVI KCIENSBP User manual

CDVI
CDVI GALEO/W User manual

CDVI
CDVI Krypto K3 Instruction Manual

CDVI
CDVI KCIN User manual

CDVI
CDVI Galeo User manual

CDVI
CDVI KCINBT User manual

CDVI
CDVI GALEOR User manual