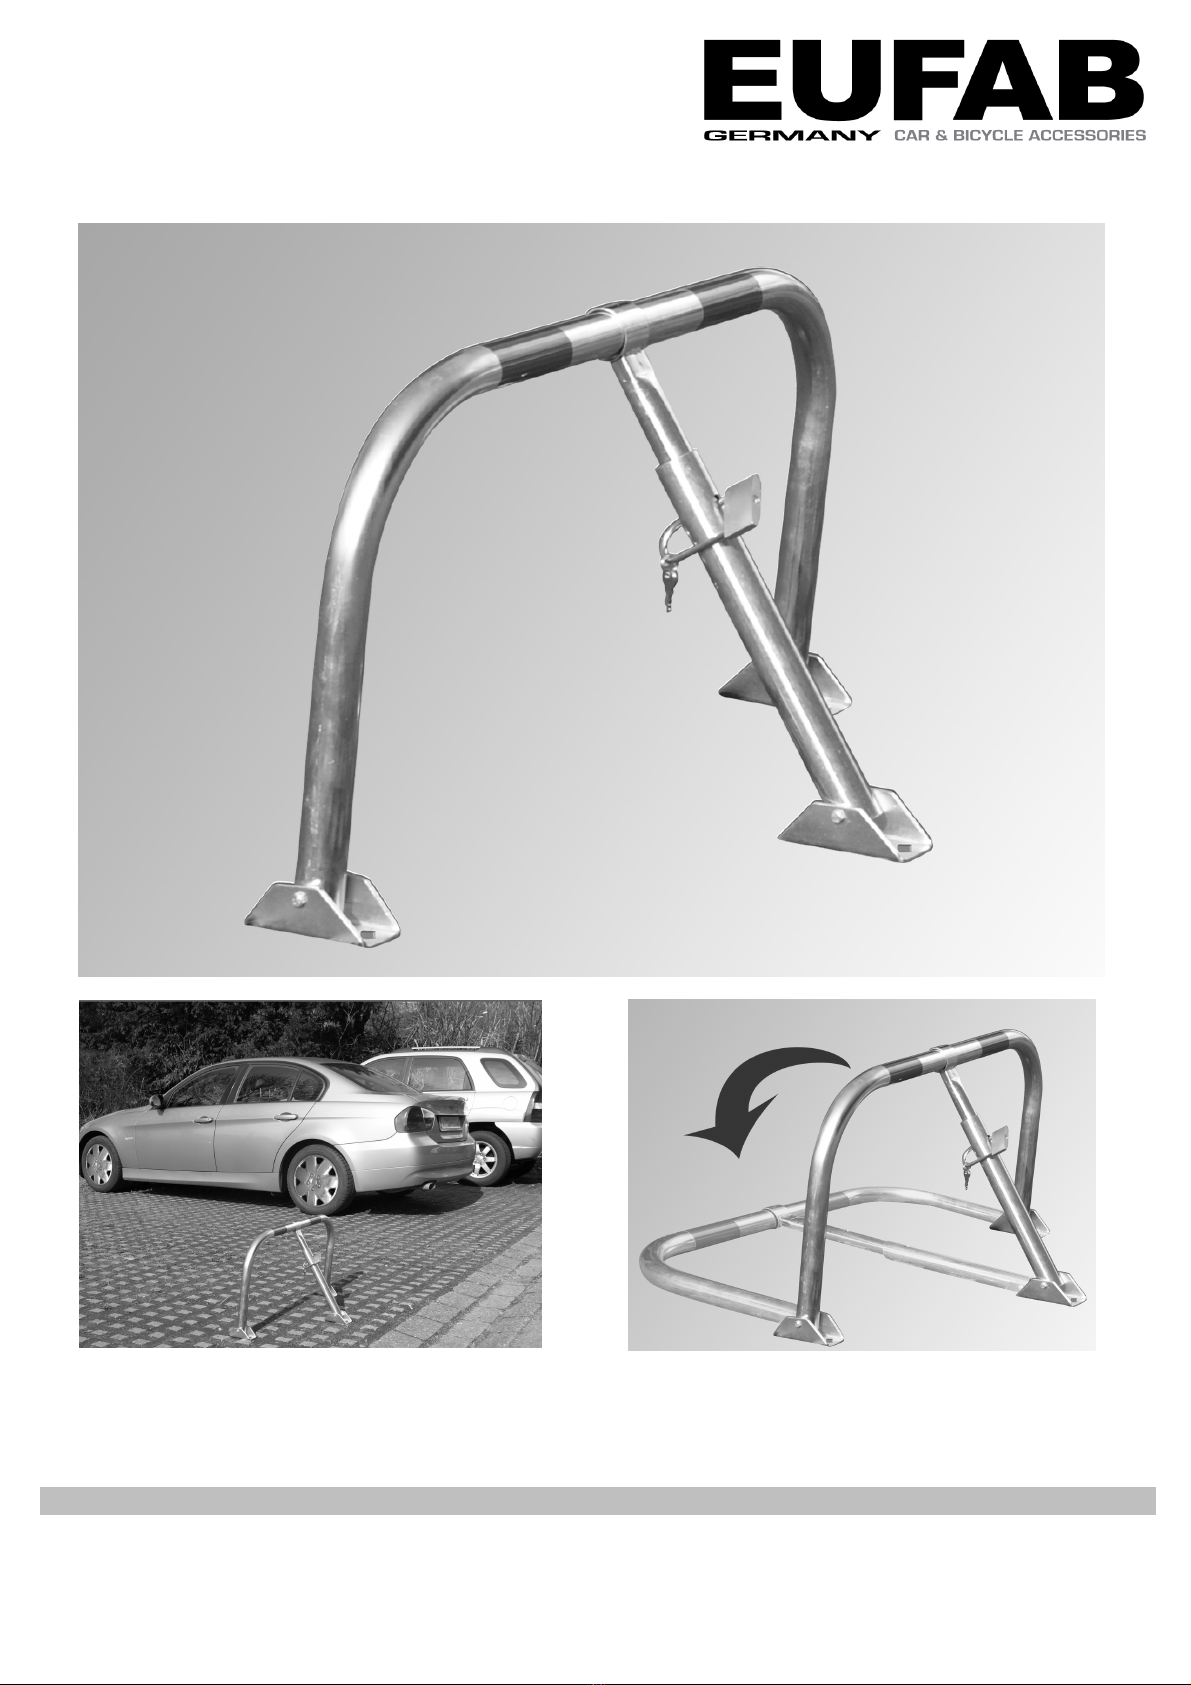
EUFAB 16420 User manual

DE
Art.-Nr.16420
PARKPLATZSPERRE
DE GB FR I NL CZ SK

Stückliste
1. 1x Inneres Rohr
2. 1x Äußeres Rohr
3. 2x Reflektorstreifen
4. 1x Bügel
5. 3x Befestigungsschuh
6. 1x Schrägstütze, bestehend aus 1 und 2
7. 1x Bügelschloss
8. 6x Schraube 6x90 mm
9. 6x Dübel 8 mm
10. 6x Selbstsichernde Mutter M6
11. 6x Schraube M6 x16
Parts list
1. 1x inside pipe
2. 1x outside pipe
3. 2x reflector stripes
4. 1x bracket
5. 3x mounting shoes
6. 1x diagonal support, consisting of 1 and 2
7. 1x shackle lock
8. 6x screws 6x90 mm
9. 6x dowels 8 mm
10. 6x self-locking nuts M6
11. 6x screws M6 x16
Nomenclature
1. 1x tube intérieur
2. 1x tube extérieur
3. 2x bandes réfléchissantes
4. 1x étrier
5. 3x sabot de fixation
6. 1x support oblique, se composant de 1 et 2
7. 1x serrure à étrier
8. 6x vis 6x90 mm
9. 6x cheville 8 mm
10. 6x écrou autobloquant M6
11. 6x vis M6 x16
Elenco dei pezzi
1. 1 tubo interno
2. 1 tubo esterno
3. 2 strisce catarifrangenti
4. 1 staffa
5. 3 basi di fissaggio
6. 1 sostegno inclinato, composto da 1 e 2
7. 1 lucchetto bloccastaffa
8. 6 viti 6x90 mm
9. 6 tasselli 8 mm
10. 6 dadi autobloccanti M6
11. 6 viti M6 x16
DE
Art.-Nr. 16420
PARKPLATZSPERRE
Bedienungsanleitung
Verwendungszweck
Dieses Produkt ist vorgesehen für das Sperren von Verkehrswegen gegen unbefugte Benutzung auf ausschließlich privatem Gelände. Das Produkt ist nicht
vorgesehen für den Einsatz auf öffentlichen Verkehrsflächen und nicht im Geltungsbereich straßenverkehrsrechtlicher Bestimmungen.
Technische Daten
Größe: 75,5 cm x 40 cm
Rohrdurchmesser: 38 mm
Material: A3 Stahl, verzinkt
Montage
1. Setzen Sie die Schrägstütze 6 zusammen, indem Sie das innere Rohr 1 in das äußere
Rohr stecken 2. Schieben Sie dann die Schrägstütze 6 auf den Bügel 4, etwa in dessen Mitte.
2. Schrauben Sie nun erst die drei Befestigungsschuhe 5 an die Rohrenden, wie aus dem Bild ersichtlich. Hierzu stecken Sie je 2 Schrauben 11 von der
Innenseite der Rohre nach außen durch die Befestigungsschuhe. Drehen Sie die selbstsichernden Muttern 10 auf und ziehen Sie diese mit 2
Steckschlüsseln 10 mm nur soweit fest, dass die Befestigungsschuhe noch leicht beweglich sind.
3. Arretieren Sie die Schrägstütze 6 mit dem Bügelschloss 7, so dass die komplette Parkplatzsperre in der aufgerichteten Position steht. Kleben Sie die
beiden Reflektorfolien 3 auf, wie gezeichnet.
4. Halten Sie die Parkplatzsperre an die vorgesehne Stelle und zeichnen Sie dort die 6 Bohrlöcher von den Befestigungsschuhen auf den Steinboden.
Bohren Sie diese mit einem 8 mm Bohrer und stecken Sie die 6 Dübel 9 hinein. Schrauben Sie die Parkplatzsperre mit den Schrauben 8 fest.
Heben Sie die Anleitung für den späteren Gebrauch auf. Händigen Sie bei Weitergabe des Produktes an Dritte auch die Anleitung aus.
Stuklijst
1. 1x binnenbuis
2. 1x buitenbuis
3. 2x reflecterende strook
4. 1x beugel
5. 3x bevestigingsschoen
6. 1x schuine steun, bestaand uit 1 en 2
7. 1x beugelslot
8. 6x schroef 6 x 90 mm
9. 6x plug 8 mm
10. 6x zelfborgende moer M6
11. 6x schroef M6 x16
!
Kusovník
1. 1x vnit!ní trubka
2. 1x vn"j#í trubka
3. 2x odrazov$pruh
4. 1x oblouk
5. 3x upev%ující patka
6. 1x #ikmá podp"ra, skládá se z 1 a 2
7. 1x zámek oblouku
8. 6x #roub 6x90 mm
9. 6x hmo&dinka 8 mm
10. 6x samopojistná matice M6
11. 6x #roub M6 x16
!
Rozpiska
1. 1x vnútorná rúrka
2. 1x vonkaj#ia rúrka
3. 2x odrazov$pruh
4. 1x rukovä'
5. 3x upev%ujúca pätka
6. 1x #ikmá podpera, zlo&ená z 1 a 2
7. 1x zámka rukoväti
8. 6x skrutka 6x90 mm
9. 6x hmo&dinka 8 mm
10. 6x samoistiaca matica M6
11. 6x skrutka M6 x16
!

EN
Art. No.16420
PARKING BARRIER
Operating instructions
Intended purpose
This product is intended for use as a barrier of transport r
outes against unauthorized use on exclusively private properties. The product is not intended for use
on public transport areas or within the scope of road traffic law regulations.
Technical data
Size: 75.5 cm x 40 cm
Pipe diameter : 38 mm
Material: A3 galvanised steel
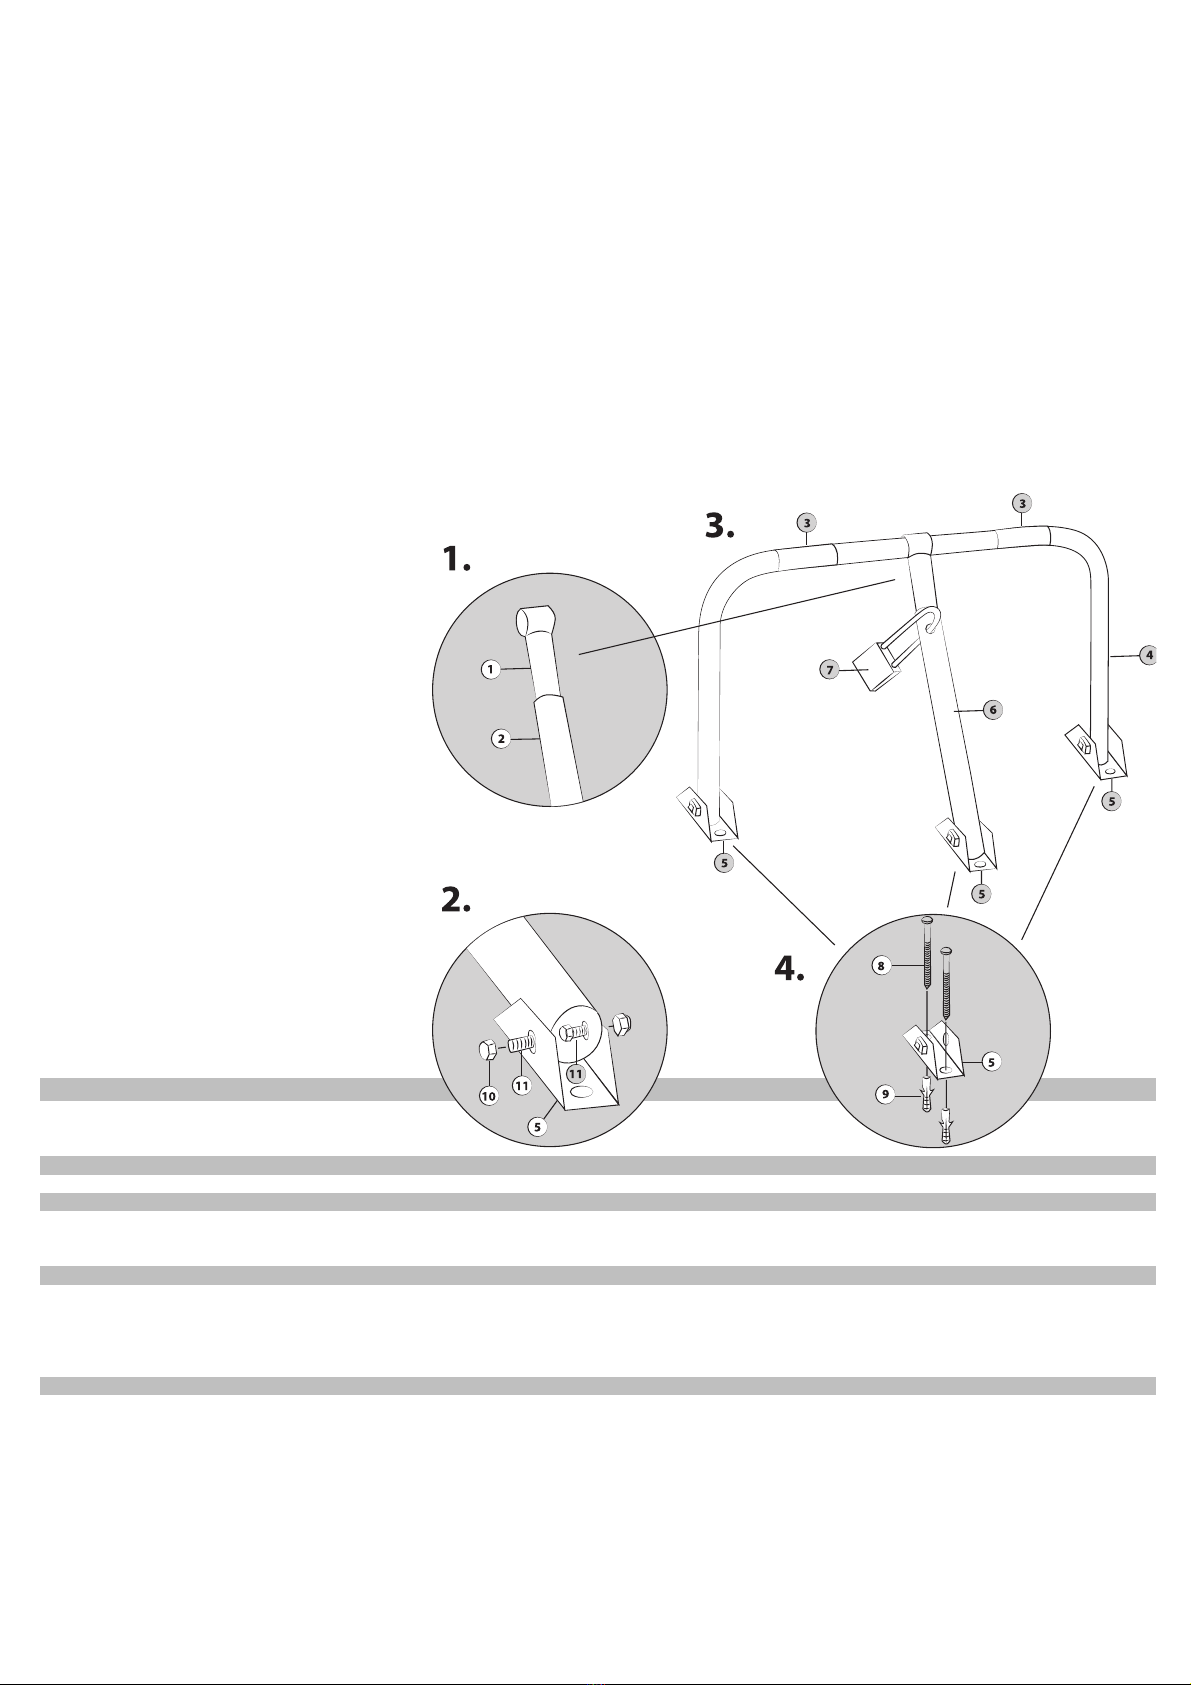
Assembly
1. Assemble the diagonal support 6 by inserting the inside pipe 1 into the outside pipe 2. Then push the diagonal support 6 onto the bracket 4,
approximately into the centre.
2. Now first screw the three mounting shoes 5 to the pip
e ends as shown in the diagram. To do this, insert 2 screws 11 from the inside of the pipe outwards
through each of the mounting shoes. Unscrew the self-locking nuts 10 and tighten them using 2 10 mm socket wrenches, but leave them loose enough
so that the mounting shoes can still be moved slightly.
3.
Lock the diagonal support 6 with the shackle lock 7, so that the entire parking barrier stands in upright position. Stick on the two reflector film labels 3 as
shown in the diagram.
4. Hold the parking barrier at the intended location and draw the 6 drill holes for the mounting shoes onto the stone floor. Drill them with an 8 mm drill and
insert 6 dowels 9 into them. Screw down the parking barrier using the screws 8.
Please keep these instructions for later use. Should you forward the product on to third parties, please issue them with these instructions.
FR
Réf. n° 16420
BARRIERE DE PARKING
Mode d'emploi
Utilisation
Cet article est destiné à bloquer les voies de circulation contre une utilisation non autorisée exclusivement sur les propriétés privées. La barrière de parking
n'est pas prévue pour une utilisation sur des voies de circulation publiques et ne relève pas du domaine de validité des dispositions du Code de la route.
Caractéristiques techniques
Dimensions : 75,5 cm x 40 cm
Diamètre de tube : 38 mm
Matériau : Acier A3, galvanisé
Montage
1. Assemblez le support oblique 6 en emboîtant le tube intérieur 1 dans le tube extérieur 2.
Poussez ensuite le support oblique 6 sur l'étrier 4, légèrement au centre de ce dernier.
2.
Vissez maintenant tout d'abord les trois sabots de fixation 5 sur l'extrémité du tube comme montré sur la figure. À cette fin, assemblez respectivement 2
vis 11 de la face intérieure des tubes vers l'extérieur à travers les sabots de fixation. Vissez les écrous autobloquants 10 et serrez ces écrous avec 2
clés à pipe de 10 mm de manière que les sabots de fixation puissent encore être légèrement bougés.
3. Bloquez le support oblique 6 avec la serrure à étrier 7 de manière que la barrière de par
king complète soit en position déployée. Collez les deux bandes
réfléchissantes 3 comme montré sur la figure.
4. Maintenez la barrière de parking à l'endroit prévu et dessinez à cet endroit les 6 perçages des sabots de fixation sur le sol en pierre. Percez ces trous
avec un foret de 8 mm et enfoncez les 6 chevilles 9. Vissez à fond la barrière de parking avec les vis 8.
Conservez la notice pour pouvoir la consulter ultérieurement. N'oubliez pas de joindre la notice si vous remettez la barrière à une tierce personne.
I
N. art. 16420
BARRIERA DI PARCHEGGIO
Istruzioni per l’uso
Uso previsto
Questo prodotto è progettato per bloccare passaggi e posteggi contro un uso non autorizzato di terreni esclusivamente privati. Il prodotto non è previsto per
l’uso su aree viabili pubbliche e nell’ambito di applicazione della normativa stradale.
Dati tecnici
Dimensioni: 75,5 cm x 40 cm
Diametro tubi: 38 mm
Materiale: acciaio A3, zincato
Montaggio
1. Assemblare il sostegno inclinato 6 inserendo il tubo interno 1 in quello esterno 2. Applicare poi il sostegno inclinato sulla staffa 4, spingendo fino al centro.
2. Ora avvitare dapprima le tre basi di fissaggio alle estremità dei tubi, come illustrato nell’immagine. Per questo inserire ogni volta nelle basi di fissaggio 2 viti 11 dal lato interno
dei tubi verso l’esterno. Avvitare i dadi autobloccanti 10 e con 2 chiavi a tubo da 10 mm stringerli in modo che le basi di fissaggio possano ancora essere mosse leggermente"
3. Con il lucchetto 7 bloccare il sostegno inclinato in modo che l’intera barriera di parcheggio si trovi in posizione rialzata. Applicare le due pellicole catarifrangenti 3 come
riportato nell’illustrazione.
4. Sistemare la barriera di parcheggio sul punto previsto e contrassegnare sul pavimento di pietra la posizione d
ei 6 fori delle basi di fissaggio. Con una punta da 8 mm praticare
i fori e inserire i 6 tasselli 9. Avvitare la barriera di parcheggio con le viti 8.
Conservare le istruzioni per consultazioni successive. In caso di cessione del prodotto a terzi consegnare anche le istruzioni.

NL
Art.-nr.16420
PARKEERBEUGEL
Handleiding
Gebruiksdoel
Dit product is voorzien voor het afsluiten van privéterreinen tegen gebruik door onbevoegden. Het product is niet bedoeld voor gebruik op openbare
verkeersterreinen en valt niet onder de bepalingen van het verkeersreglement.
Technische gegevens
Afmetingen: 75,5 cm x 40 cm
Buisdiameter: 38 mm
Materiaal: A3 staal, verzinkt
Montage
1. Monteer de schuine steun (6) door de binnenbuis (1) in de buitenbuis (2) te steken.
Schuif dan de schuine steun (6) op de beugel (4), ongeveer in het midden.
2. Schroef nu eerst de drie bevestigingsschoenen (5) op de buisuiteinden, zoals op de afbeelding. Hiervoor steekt u telkens 2 schroeven (11) van de binnenkant van de buizen
naar buiten door de bevestigingsschoenen. Draai de zelfborgende moeren (10) op en trek deze met 2 steeksleutels 10 mm zover vast dat de bevestigingsschoenen nog licht
beweegbaar zijn.
3. Zet de schuine steun (6) vast met het beugelslot (7) zodat de volledige parkeerbeugel rechtop staat. Kleef de beide reflecterende stroken (3) op zoals getekend.
4. Houd de parkeerbeugel op de voorziene plaats en teken daar de 6 boorgaten voor de bevestigingsschoenen op de grond. Boor de gaten met een 8 mm boor en steek de 6
pluggen (9) erin. Schroef de parkeerbeugel met de schroeven (8) vast.
Bewaar de handleiding voor later gebruik. Als u het product doorgeeft aan derden, overhandig dan ook de handleiding.
CZ
!. v"r. 16420
PARKOVACÍ ZÁBRANA
Návod na obsluhu
Ú#el pou$ití
Tento v$robek je ur(en k zablokování dopravních komunikací proti neoprávn"nému pou&ívání ve v$lu(n"soukromém areálu. V$robek není ur(en k pou&
ití na
ve!ejn$ch dopravních plochách, ani v rozsahu platnosti právních ustanovení silni(ní dopravy.
Technické údaje
Rozm"ry: 75,5 cm x 40 cm
Pr)m"r trubky: 38 mm
Materiál: ocel A3, pozinkováno
Montá$
1. Smontujte #ikmou podp"ru 6 zasunutím vnit!ní trubky 1 do vn"j#í trubky
2 Poté nasu%te #ikmou podp"ru 6 na oblouk 4, p!ibli&n"uprost!ed.
2. Nyní na#roubujte nejd!íve t!i upev%ovací patky 5 na konec trubky, jak je znázorn"no na obrázku. P!itom prostr(te po 2 #roubech 11 z vnit!ní strany trubky sm"rem ven skrz
upev%ovací patky. Na#roubujte samopojistné matice 10 a dotáhn"te je pomocí 2 nástr(n$ch klí() 10 mm tak, aby se upev%ovací patky mohly stále mírn"pohybovat.
3. Zajist"te #ikmou podp"ru 6 pomocí zámku oblouku 7 tak, aby kompletní parkovací zábrana stála ve vzp!ímené poloze. Nalepte ob"odrazové fólie 3 podle znázorn"ní.
4. Podr&te parkovací zábranu na vyhrazeném míst"a ozna(te na n"m 6 otvor)k vrtání do kamenného podkladu pro upev%ovací patky. Vyvrtejte otvory 8 mm vrtákem a vlo&te
do nich 6 hmo&dinek 9. Parkovací zábranu p!i#roubujte pomocí #roub)8.
Návod uschovejte pro pozd"j#í pou&ití. Pokud v$robek odevzdáte t!etím osobám, p!ilo&te k n"mu i návod.
SK
!. v"r. 16420
PARKOVACIA ZÁBRANA
Návod na obsluhu
Ú#el pou$itia
Tento v$robok je ur(en$na zablokovanie dopravn$ch komunikácií proti neoprávnenému pou&ívaniu vo v$lu(ne súkromnom areáli. V$robok nie je ur(en$na
pou&itie na verejn$ch dopravn$ch plochách, ani v rozsahu platnosti právnych ustanovení cestnej premávky.
Technické údaje
Rozmery: 75,5 cm x 40 cm
Priemer rúrky: 38 mm
Materiál: oce*A3, pozinkovaná
Montá$
1. Zlo&te #ikmú podperu 6 zasunutím vnútornej rúrky 1 do vonkaj#ej
rúrky 2. Potom nasu%te #ikmú podperu 6 na rukovä'4, pribli&ne uprostred.
2. Teraz priskrutkujte tri upev%ovacie pätky 5 ku koncom rúrky, tak ako to vidno na obrázku. Pritom prestr(te zaka&d$m 2 skrutky 11 z vnútornej strany rúrky smerom von cez
upev%ovacie pätky. Naskrutkujte samoistiace matice 10 a dotiahnite ich pomocou 2 nástr(n$ch k*ú(ov 10 mm tak, aby sa upev%ovacie pätky mohli stále mierne pohybova'.
3. Zaistite #ikmú podperu 6 pomocou zámky rukoväti 7, tak aby kompletná parkovacia zábrana stála vo vzpriamenej polohe. Nalepte obe odrazové fólie 3 pod*a znázornenia.
4. Podr&te parkovaciu zábranu na vyhradenom mieste a ozna(te na %om 6 otvorov na v+tanie do kamennej dlá&ky pre upev%ovacie pätky. Vyv+tajte otvory 8 mm vrtákom
a vlo&te do nich 6 hmo&diniek 9. Parkovaciu zábranu priskrutkujte pomocou skrutiek 8.
Návod uschovajte pre neskor#ie pou&itie. Ak v$robok odovzdávate tretím osobám, prilo&te k nemu aj návod.
EAL GmbH • Postfach 14 41 24 • 42310 Wuppertal
Other EUFAB Automobile Accessories manuals

EUFAB
EUFAB QUICK FIT PRO User manual

EUFAB
EUFAB 17453 User manual

EUFAB
EUFAB EASY BIKE Alu Plus User manual

EUFAB
EUFAB PROBC2 / FG2 User manual

EUFAB
EUFAB CROW BASIC User manual

EUFAB
EUFAB JAMES User manual

EUFAB
EUFAB FINCH User manual

EUFAB
EUFAB 16458 User manual

EUFAB
EUFAB 16475 User manual

EUFAB
EUFAB 21069 User manual