manuals.online logo
Brands
  1. Home
  2. •
  3. Brands
  4. •
  5. JSI
  6. •
  7. Indoor Furnishing
  8. •
  9. JSI CAAV User manual

JSI CAAV User manual

INSTALLATION INSTRUCTIONS
NOTE: all screws provided must be
installed for proper installation and
compliance with product warranty.
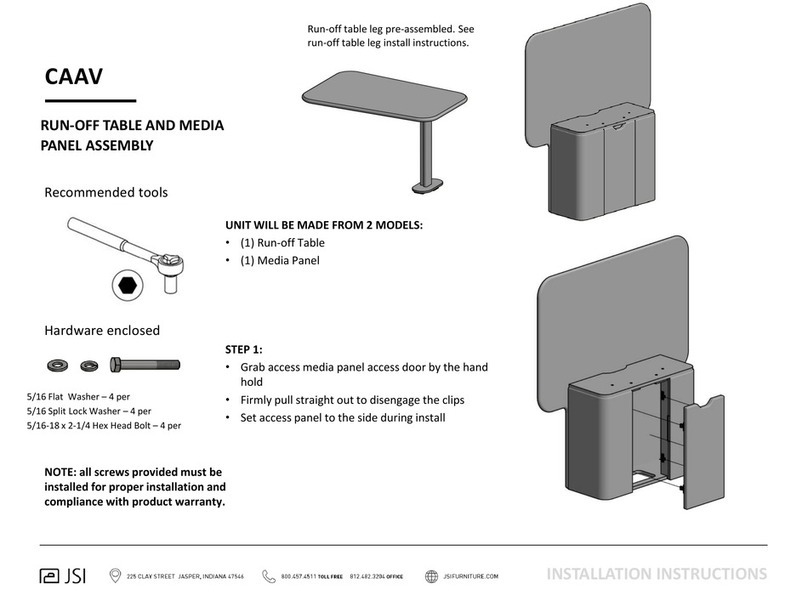
Recommended tools
Hardware enclosed
CAAV
STAND UP SURFACE INSTALL
UNIT WILL COME PACKED IN MULTIPLE BOXES:
•1ST box will contain the chair with screen
•Remaining box(s) will contain the top panel and
leg supports
STEP 1:
•Attach rear leg supports to screen by aligning
the cleat on the back of the screen to the
hanger inside the rear leg support.
CHAIR WITH SCREEN:
HANGING CLEATS
ARE PRE-INSTALLED
ON PANEL
“L” Brackets – 1 per leg support
#8 x 1-½ pan head screws –1 per leg support
#8 x 7/8 flat head screw –6 per leg support
#8 x ½ pan head screw –2 per leg support
CLEAT HANGER
PANEL
INSTALLATION INSTRUCTIONS
NOTE: all screws provided must be
installed for proper installation and
compliance with product warranty.
Recommended tools
Hardware enclosed
CAAV
STEP 2:
•Apply downward pressure on the leg assembly to fully
engage the cleat and the hanger
•Lock the leg support down with a #8x1-1/2 pan head
screw thru the top of the rear support as shown. Only
do this with the hand screw driver –fasten slowly –you
may torque down with drill after hand tightened- This
will help avoid pulling threads or foam when installing.
STEP 3:
•Place the work surface on top of the support plates.
•Align pilot holes in top with holes in plate
•Use the #8x7/8 flat head screws to fasten top in place.
STAND UP SURFACE INSTALL
“L” Brackets – 1 per leg support
#8 x 1-½ pan head screws –1 per leg support
#8 x 7/8 flat head screw –6 per leg support
#8 x ½ pan head screw –2 per leg support
INSTALLATION INSTRUCTIONS
NOTE: all screws provided must be
installed for proper installation and
compliance with product warranty.
Recommended tools
Hardware enclosed
CAAV
STEP 4 (optional):
•Apply “L” brackets to the bottom of the top if additional
stability is desired.
•Install using the #8x1/2 pan head as shown below. Only do
this with the hand screw driver –fasten slowly –you may
torque down with drill after hand tightened- This will help
avoid pulling threads or foam when installing.
STEP 5:
•Properly level unit using the leveling glides
•Install complete
STAND UP SURFACE INSTALL
“L” Brackets – 1 per leg support
#8 x 1-½ pan head screws –1 per leg support
#8 x 7/8 flat head screw –6 per leg support
#8 x ½ pan head screw –2 per leg support

Other JSI Indoor Furnishing manuals

JSI Flux User manual

JSI

JSI Flux User manual

JSI FLUX OPEN PLAN Guide

JSI

JSI FLUX OPEN PLAN Guide

JSI Lok ZLKT2430-29TTT User manual

JSI

JSI Lok ZLKT2430-29TTT User manual

JSI CAAV User manual

JSI

JSI CAAV User manual

JSI Vision-Wall Mounted Floating Shelf User manual

JSI

JSI Vision-Wall Mounted Floating Shelf User manual

JSI Reef User manual

JSI

JSI Reef User manual

JSI Moto User manual

JSI

JSI Moto User manual

JSI Flux User manual

JSI

JSI Flux User manual

JSI Bourne User manual

JSI

JSI Bourne User manual

JSI Flux User manual

JSI

JSI Flux User manual

JSI SWISH  Side Access Storage User manual

JSI

JSI SWISH Side Access Storage User manual

JSI CAAV User manual

JSI

JSI CAAV User manual

JSI Flux User manual

JSI

JSI Flux User manual

JSI Reef User manual

JSI

JSI Reef User manual

JSI CAAV User manual

JSI

JSI CAAV User manual

JSI Bourne User manual

JSI

JSI Bourne User manual

JSI Moto User manual

JSI

JSI Moto User manual

JSI CONNECT User manual

JSI

JSI CONNECT User manual

JSI Apogee Service manual

JSI

JSI Apogee Service manual

JSI SWISH User manual

JSI

JSI SWISH User manual

JSI CAAV User manual

JSI

JSI CAAV User manual

JSI FLUX LOCKER User manual

JSI

JSI FLUX LOCKER User manual

JSI Vision-ADJUSTABLE HEIGHT DESK WITH RETURN Configuration guide

JSI

JSI Vision-ADJUSTABLE HEIGHT DESK WITH RETURN Configuration guide

JSI Reef User manual

JSI

JSI Reef User manual

Popular Indoor Furnishing manuals by other brands

PARISOT 7964POTI manual

PARISOT

PARISOT 7964POTI manual

RTA TVM-060 Assembly instructions

RTA

RTA TVM-060 Assembly instructions

Woodland CALAHAN Assembly instruction

Woodland

Woodland CALAHAN Assembly instruction

Wholesale Interiors 5018 Assembly instructions

Wholesale Interiors

Wholesale Interiors 5018 Assembly instructions

BePureHome ORGANIZE STORAGE CABINET 44CM manual

BePureHome

BePureHome ORGANIZE STORAGE CABINET 44CM manual

Sanus Foundations JFV60 manual

Sanus Foundations

Sanus Foundations JFV60 manual

Barbeques Galore MATINO Assembly instructions

Barbeques Galore

Barbeques Galore MATINO Assembly instructions

Argos New Sywell 5 Drawer Chest Assembly instructions

Argos

Argos New Sywell 5 Drawer Chest Assembly instructions

ISOKING at home FLORENCE BOOKCASE Assembly instructions

ISOKING

ISOKING at home FLORENCE BOOKCASE Assembly instructions

VITRA EM Table Assembly instructions

VITRA

VITRA EM Table Assembly instructions

KITALY Genio 6062 1201 Assembly instructions

KITALY

KITALY Genio 6062 1201 Assembly instructions

Lee & Plumpton AURABENCH instructions

Lee & Plumpton

Lee & Plumpton AURABENCH instructions

Hammerbacher VXMST Assembly instructions

Hammerbacher

Hammerbacher VXMST Assembly instructions

Habitat SCOTTIE 4638052 quick start guide

Habitat

Habitat SCOTTIE 4638052 quick start guide

Lee & Plumpton AURABENCH Assembly instructions

Lee & Plumpton

Lee & Plumpton AURABENCH Assembly instructions

Lloyd Pascal 052.95.053M Assembly instructions

Lloyd Pascal

Lloyd Pascal 052.95.053M Assembly instructions

Furniture of America CM3744SC-2PK Assembly instructions

Furniture of America

Furniture of America CM3744SC-2PK Assembly instructions

Jula 666-022 User instructions

Jula

Jula 666-022 User instructions

manuals.online logo
manuals.online logoBrands
  • About & Mission
  • Contact us
  • Privacy Policy
  • Terms and Conditions

Copyright 2025 Manuals.Online. All Rights Reserved.