NEC GT210 User manual

GVT-055600-001
Issue 3.0
April, 2020
Before using this product and document, please read the following document carefully.
Also, please keep this document to the place where you can see any time.
- Safety Precautions and Regulatory Notices for GT Series
Standard SIP Terminal
IP Phone GT210
User Guide

1
Table of Contents
DOCUMENT PURPOSE ............................................................................................. 2
THE TERMS AND CONDITIONS OF SOFTWARE .................................................... 2
FIRMWARE VERSION CHECK .................................................................................... 2
PRODUCT OVERVIEW .............................................................................................. 4
Model Line Up of GT210 Series
.............................................................................................................. 4
Feature Highlights
................................................................................................................................. 4
Supporting Communication Servers
........................................................................................................ 4
Technical Specifications (Firmware version 1.0.4.152)
........................................................................... 5
INSTALLATION ........................................................................................................... 6
Equipment Packaging .......................................................................................................................... 6
Connecting Your Phone ....................................................................................................................... 6
Stand Installation ................................................................................................................................. 7
Wall Mount Installation .......................................................................................................................... 7
OPERATION (FW version 1.0.4.152) .......................................................................... 9
Idle Screen ........................................................................................................................................... 9
Using the Keypad ............................................................................................................................... 11
Call Operation List ............................................................................................................................. 13
Making Phone Calls........................................................................................................................... 15
Handset, Speaker and Headset Mode ....................................................................................... 15
SIP Accounts and Lines ............................................................................................................. 15
Completing Calls ......................................................................................................................... 15
Making Calls Using IP Addresses .............................................................................................. 17
Quick IP Call Mode ..................................................................................................................... 18
Answering Phone Calls ...................................................................................................................... 19
Receiving Calls ........................................................................................................................... 19
Do Not Disturb ............................................................................................................................ 19
Reject .......................................................................................................................................... 19
During A Phone Call .......................................................................................................................... 20
Call Hold ..................................................................................................................................... 20
Mute ............................................................................................................................................ 20
Group Listening with Speaker .................................................................................................... 20
Call Transfer ............................................................................................................................... 20
Conferencing .............................................................................................................................. 21
Voicemail ........................................................................................................................................... 23
CONNECTING TO DEVICES ................................................................................... 24
EHS Headset ..................................................................................................................................... 24
RESTORE FACTORY DEFAULT SETTINGS ............................................................. 25
Restore to Factory Default via Keypad Menu .................................................................................... 25
Restore to Factory Default via Web GUI ............................................................................................ 25

2
DOCUMENT PURPOSE
This user guide describes the basic concept and tasks necessary to use and configure your GT210
phone. This document covers the topics of phone installation, making basic calls and using basic call
features.
To learn the advanced features and configurations, please refer to “GT210 Administration Guide”.
THE TERMS AND CONDITIONS OF SOFTWARE
The software embedded in GT210 contains certain third party open source software components
which are provided under the terms and conditions designated at
https://mind.bcom.nec.co.jp/customernet/soft-license/ITX-1615-1W_OSS.html.
FIRMWARE VERSION CHECK
GT210 has two FW versions (version 1.0.4.152). Before using this document, please check the
GT210 FW version.
1. Enter MENU options. When the phone is in idle, press the round MENU button to enter the
configuration menu.
2. Navigate in the menu options. Press the UP/DOWN/LEFT/RIGHT arrow keys to navigate in the
menu options.
3. Go to Status System Status Software Version Prog
4. Check the firmware version.
5. Exit. Press LEFT arrow key to exit to the previous menu.
6. The phone automatically exits MENU mode with an incoming call, when the phone is off hook or
the MENU mode if left idle for more than 60 seconds.

3
Caution:
Changes or modifications to this product not expressly approved by NEC, or operation of this
product in any way other than as detailed by this User Manual, could void your manufacturer warranty.
Caution:
User ID and password are important information. Be careful when handling them. Default password
is given for initial maintenance and operational settings. To enhance the safety, change the default
password in the course of the initial settings and periodically thereafter.
Warning:
Reproduction or transmittal of the entire or any part, in any form or by any means, electronic or print,
for
any purpose without the express written permission of NEC Corporation is not permitted.
FCC Caution:
Any Changes or modifications not expressly approved by the party responsible for compliance could
void the user's authority to operate the equipment.
This device complies with part 15 of the FCC Rules. Operation is subject to the following two
conditions: (1) This device may not cause harmful interference, and (2) this device must accept any
interference received, including interference that may cause undesired operation.
Note: This equipment has been tested and found to comply with the limits for a Class B digital
device, pursuant to part 15 of the FCC Rules. These limits are designed to provide reasonable
protection against harmful interference in a residential installation. This equipment generates, uses
and can radiate radio frequency energy and, if not installed and used in accordance with the
instructions, may cause harmful interference to radio communications. However, there is no
guarantee that interference will not occur in a particular installation. If this equipment does cause
harmful interference to radio or television reception, which can be determined by turning the
equipment off and on, the user is encouraged to try to correct the interference by one or more of the
following measures:
-
Reorient or relocate the receiving antenna.
-
Increase the separation between the equipment and receiver.
-
Connect the equipment into an outlet on a circuit different from that to which the receiver is
connected.
-
Consult the dealer or an experienced radio/TV technician for help.

4
PRODUCT OVERVIEW
Model Line Up of GT210 Series
Model Name Description
ITX-1615-1W(BK)TEL IP Telephone with 2 line buttons (Black)
Feature Highlights
132*48-pixel graphical LCD display.
2 dual-color line keys, 3 XML programmable context-sensitive soft keys, 3-way conference,
multi-language support.
Superb full-duplex hands-free speakerphone with advanced acoustic echo cancellation and
excellent double-talk performance.
Large phonebook (up to 500 contacts) and call history (up to 200 records).
Personalized music ring tone/ring back tone, flexible customizable screen content & format using
XML, and advanced Web and enterprise applications.
Dual switched 10/100 Mbps ports and integrated PoE.
Automated provisioning using encrypted XML configuration file, SRTP and TLS for advanced
security protection, 802.1x for media access control.
Innovative UI design (easy and useable multi-language support).
Supporting Communication Servers
The following communication servers support GT210.
Communication Server Name
1 UNIVERGE SV9500
2 UNIVERGE SV9300
3 UNIVERGE SV9100
4 SL2100
5 SL1000/1100
6 UNIVERGE 3C
7 SIP@Net

5
Technical Specifications (Firmware version 1.0.4.152)
Protocols/Standards SIP RFC3261, TCP/IP/UDP, RTP/RTCP, HTTP/HTTPS, ARP/RARP, ICMP,
DNS (A record, SRV, NAPTR), DHCP, PPPoE, SSH, TFTP/FTP/FTPS, NTP,
STUN, SIMPLE, LLDP-MED, LDAP, 802.1x, SRTP, TLS.
Network Interfaces
Dual switched 10/100 Mbps ports, integrated PoE (IEEE802.3af class 1).
Graphic Display 132*48 LCD display.
Feature Keys
2 line keys with dual-color LED and 1 SIP account.3 XML programmable
context sensitive soft keys. 5 (navigation, menu) keys. 13 dedicated function
keys for PAGE/INTERCOM, PHONEBOOK, MESSAGE, HOME, HOLD, MUTE,
HEADSET, TRANSFER, CONFERENCE, SEND and REDIAL,
SPEAKERPHONE, VOLUME.
Voice Codecs Support for G.711µ/a, G.722 (wide-band), G.729 A, in-band and out-of-band
DTMF (In audio, RFC2833, SIP INFO).
Telephony Features Hold, transfer,3-way conference, downloadable phone book (LDAP, up to 500
items), call waiting, call history (up to 200 records), off-hook auto dial, auto
answer, click-to-dial, flexible dial plan, Hot Desking, personalized music
ringtones, server redundancy & fail-over.
Headset Jack
RJ9 headset jack (allowing EHS with Plantronics headsets).
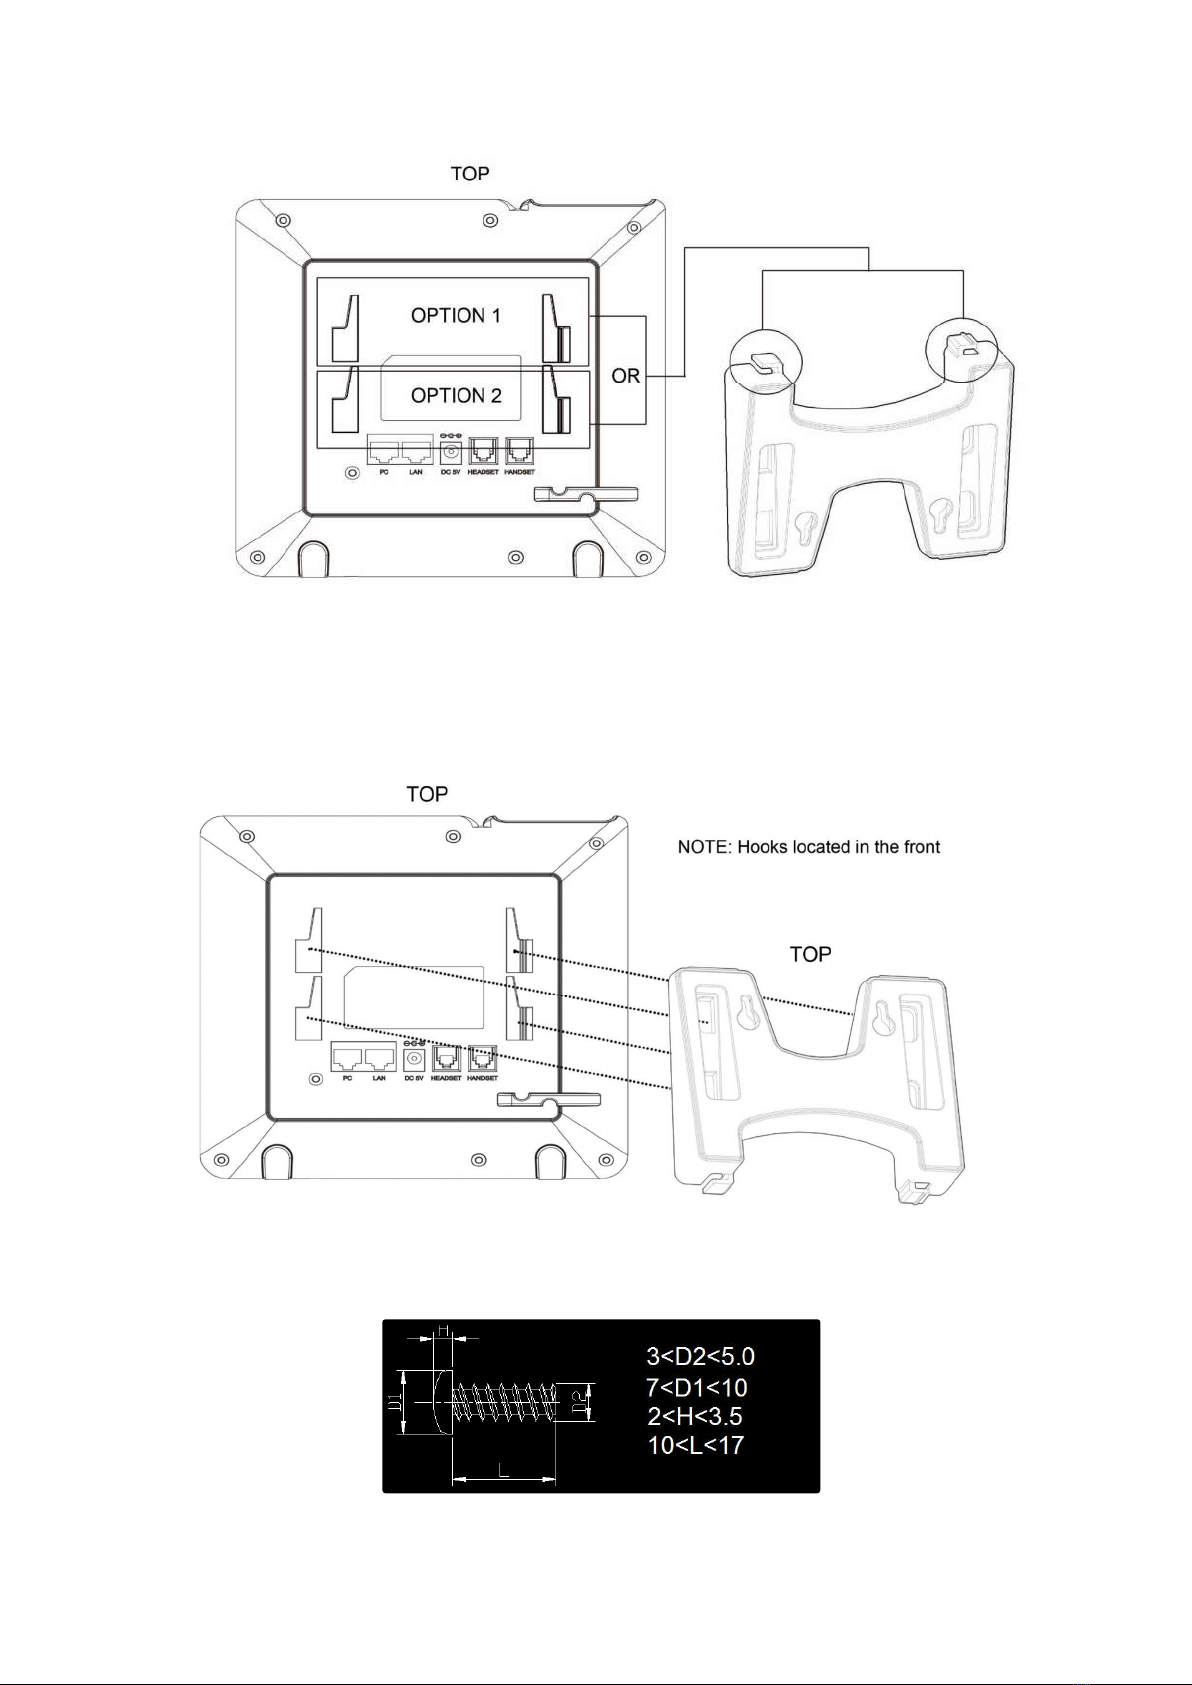
Base Stand Yes, allow 2 angle positions available, Wall Mountable.
QoS
Layer 2 QoS (802.1Q, 802.1P) and Layer 3 (ToS, DiffServ, MPLS) QoS.
Security User and administrator level access control, MD5 and MD5-sess based
authentication, 256-bit AES encrypted configuration file, TLS, SRTP, HTTPS,
802.1x media access control.
Multi-language English, German, Italian, French, Spanish, Portuguese, Russian, Croatian,
simplified and traditional Chinese, Korean, Japanese, and more.
Upgrade/Provisioning Firmware upgrade via TFTP / HTTP / HTTPS / FTP / FTPS,
mass provisioning using AES encrypted XML configuration file.
Temperature and
Humidity
Operation: 0°C to 40°C.
Storage: -10°C to 60°C.
Humidity: 10% to 90% Non-condensing.
Physical
Dimension: 209mm(L)x 184.5mm(W)x 76.2mm(H) (with handset).
Unit Weight: 0.78kg.
Package Weight: 0.99kg.
Package Content Handset with cord, base stand and network cable.
Compliance FCC: Part 15 (CFR 47) Class B
CE: EN55022 Class B, EN55024, EN61000-3-2, EN61000-3-3, EN60950-1
RCM: AS/NZS CISPR22/24; AS/NZS 60950; AS/NZS 60950.1.

6
INSTALLATION
Equipment Packaging
VoIP Phone 1
Handset 1
Phone Cord 1
Phone Stand 1
LAN Cable 1
Connecting Your Phone
Slots for Phone Stand
Slots for the phone stand if placing the phone on a flat surface
PC Port 10/100M Ethernet to connect PC
LAN Port 10/100M Ethernet to connect LAN
integrated PoE:IEEE802.3af class 2,-48V/75mA
DC 5V Power Port 5V/600mA power port to connect to power adaptor
HEADSET Port To connect to RJ9 or EHS headphones
HANDSET Port To connect handset RJ9
Cord Slot To place and fix the phone cords
Cord Slot
Slots for
Phone Stand

7
Stand Installation
1 Insert the hooks on the top of the stand into the slots, you have option to use either upper slots
OR lower slots.
2 After both hooks are in the slots, firmly slide the entire stand upward to lock them in place.
Wall Mount Installation
1. Insert all 4 hooks into the slots.
2. Firmly slide the wall mount upward to lock it in place.
3. Attach the phone to the wall via the wall mount hole. Refer the specification of screws.
Specification of screws for wall mount

8
To set up the GT210, follow the steps below:
1. Attach the phone stand or wall mount to the back of the phone where there are slots.
2. Connect the handset and VoIP phone with the phone cord.
3. Connect the LAN port of the phone to the RJ45 socket of a PoE switch using the Ethernet cable.
4. The LCD will display provisioning or firmware upgrade information. Before continuing, please
wait for the date/time display to show up.
Note: For details, contact the system administrator.

FW version 1.0.4.152
9
OPERATION (FW version 1.0.4.152)
Idle Screen
GT210 screen displays differently depending on whether the phone is idle or in use (active). User can
show/hide softkeys and customize the main screen softkey by assigning a multi-purpose function
The following table describes the items displayed on the GT210 idle screen.
Date and Time
Displays the current date and time. It can be synchronized with Internet time
servers.
Network Icon Shows the status of network. It will
indicate whether the network is down or
starting.
Status Icon
Shows the status of the phone for registration status, call features and etc.,
using icons as shown in the next table.
Softkeys in Idle
Screen
The softkeys are context sensitive and will change depending on the status of
the phone. Typical functions assigned to softkeys are:
NextScr
Toggles between default idle screen and IP address information.
Redial
Redials the last dialed number when there is an existing number in the
call log.
Missed
Shows unanswered calls to this phone.
Softkeys in Call
Screen
The softkeys are context sensitive and will change depending on the call status
of the phone. Here are the main softkeys in call screen.
Redial
Redials the last dialed number after off hook when there is
an existing call
in the log.
Dial
Dials the call out after off hook and entering the number.
Answer
Answers the incoming call when the phone is ringing.
Reject
Rejects the incoming call when the phone is ringing.
EndCall
Ends the active call.
Transfer
Transfer softkey will show up after pressing TRANSFER key and entering
transfer target number. Press Transfer softkey to do blind transfer.
Split
In auto-attended transfe
r mode, after establishing the second call, press
Split to quit transfer and go back to normal talking status.
ConfCall
Conferences the active calls.
ReConf
Re-establish the conference among the calls on hold.
200
2017-12-31
09:15AM

FW version 1.0.4.152
10
Registration Status.
Solid: Registered
Blank: Unregistered
Handset Status.
OFF - handset on hook
ON - handset off hook
Speaker Status.
OFF - speaker off
ON - speaker on
Headset Status.
OFF - headset off
ON - headset on
Mute Status.
OFF - The active call is not muted
ON - The active call is muted
Call Forward Status.
OFF - Call Forward feature disabled
ON - Call Forward feature enabled
Note) This icon is not displayed even if the Call Forwarding is set by SIP
server/PBX.
DND Status.
OFF - Do Not Disturb disabled
ON - Do Not Disturb enabled
SRTP Status.
OFF - SRTP is not used
ON - SRTP is being used

FW version 1.0.4.152
11
Using the Keypad
LINE Key
Switch between line 1 and line 2.
Solid Green: Calling, Talking.
Flash Green: Call on hold.
Flash Red: Incoming call.
Softkeys The softkeys are context sensitive and will change depending on
the status of the phone.
MESSAGE
Press to view messages.
PHONEBOOK
Press to view phonebook.
HOME
Press to go to idle screen, when stay in submenu.
PAGE/INTERCOM
If the intercom number has been set, it will be called directly.
If the intercom number has not been set, pressing this key will have
no effect.
HOLD
Place an active call on hold or resume a current call on hold.
Standard Keypad
To dial phone numbers.
Press numeric keys "0-9" to enter phone numbers.
Press “*” to enter the voice menu, input special characters or long
press it to lock the keypad.
Press "#" to dial out numbers or input special characters.
Navigation Keys.
While in the menu:
Press the UP/DOWN keys to scroll through menu options.
Press the LEFT key to go back to the previous menu.
The RIGHT key has no function.
In Idle:
Press the UP key to view missed calls.
Press the DOWN key to view dialed calls.
Press the RIGHT key to view answered calls.

FW version 1.0.4.152
12
MENU/OK
In Idle:
Press to enter the main menu.
Confirm a selection or the current information.
Off hook:
Press Menu to switch between an outgoing call or a paging call.
MUTE
To mute/unmute an active call.
When DND is on: Enable/Disable DND when the phone is in idle.
HEADSET
Press to switch between headset and handset mode in an active
call.
TRANSFER
Transfer an active call to another number.
CONFERENCE
Establish 3-way conference with other 2 parties.
SEND
Send. Enter the digits and then press send to dial out.
Redial. Press redial when there is a previously dialed call.
SPEAKER
Press to switch between speaker and handset mode in an active
call.
Message Waiting Indicator
Message Waiting Indicator.
The LED Indicator will flash red when there is new voice mail.

FW version 1.0.4.152
13
Call Operation List
Operation SV9500 SV9300
SV9100
SL2100
SL1000
/1100
3C SIP@NET
Making Phone Calls
Handset, Speaker
and Headset Mode
Yes Yes Yes Yes Yes Yes Yes
SIP Accounts and Lines Yes Yes Yes Yes Yes Yes Yes
Completing Calls
On hook dialing. Yes Yes Yes Yes Yes Yes Yes
Off hook and dial Yes Yes Yes Yes Yes Yes Yes
Predictive dialing Yes Yes Yes Yes Yes Yes Yes
Redial Yes Yes Yes Yes Yes Yes Yes
Via Call History Yes Yes Yes Yes Yes Yes Yes
Via Phonebook Yes Yes Yes Yes Yes Yes Yes
Speed Dial from Line Key *1 Yes Yes Yes Yes Yes Yes Yes
Call Return *1 Yes Yes Yes Yes Yes Yes Yes
Via Paging/Intercom *2 No No No No No No No
Via Intercom Hard Button *2 No No No No No No No
Making Calls Using
IP Addresses *3
Yes Yes Yes Yes Yes Yes Yes
Quick IP Call Mode *3 Yes Yes Yes Yes Yes Yes Yes
Answering Phone Calls
Receiving Calls
Single incoming call Yes Yes Yes Yes Yes Yes Yes
Multiple incoming calls No*4 No*4
No*4
No*4
No*4
Yes Yes
Do Not Disturb Yes Yes Yes Yes Yes Yes Yes
Reject Yes*5 Yes Yes Yes Yes Yes Yes
During A Phone Call *6
Call Hold Yes Yes Yes Yes Yes Yes Yes
Mute Yes Yes Yes Yes Yes Yes Yes
Forward *7 No No No No No No No
Call Transfer
Blind Transfer Yes Yes Yes Yes Yes Yes Yes
Attended Transfer Yes*8 Yes Yes Yes Yes Yes Yes
Auto-Attended Transfer Yes*8 Yes Yes Yes Yes Yes Yes
Conferencing
Initiate a conference call Yes*9 Yes Yes Yes Yes Yes Yes*10
Cancel Conference Yes Yes Yes Yes Yes Yes Yes
Hold and Re-conference Yes No Yes Yes Yes Yes Yes
End Conference Yes Yes Yes Yes Yes Yes Yes
Easy Conference Mode
Initiate a conference call Yes*9 Yes No No No Yes Yes*10
Cancel Conference Yes No*11
No No No Yes Yes
Hold and Re-conference Yes No No No No Yes Yes
End Conference Yes Yes No No No Yes Yes
*1. When configuring the LINE keys for a function other than Line, Call transfer and Conferencing are
not available because they require 2 line keys.
*2. If the called party cannot auto answer the phone will ring normally.
*3. This feature is available only the call between the Standard-SIP Phones.
*4. The Busy Tone is sent to the second calling party.
*5. When a called party presses Reject, ringing stops but the calling party continues to hear ring back.

FW version 1.0.4.152
14
*6. The GT210 does not have internal hold tone. To provide the hold tone to the phone connected with
the SV9100/SL2100/SL1000/SL1100 systems, it is required to change the setting of “Peer to Peer
mode” to OFF. For details, contact the system administrator.
*7. This feature is provided by phone itself however it cannot be used. Please use the similar feature
supported by SIP server/PBX.
*8. For the SV9500, the following system setting is required.
- AUACN : Hold 2nd Call =1 (Intermediate Party is Released)
For details, contact the system administrator.
*9. When switching from two-party call to three party conference, if the third party is NEC's DT series
SIP terminal, the RTP warning tone is heard from the DT series SIP terminal. The RTP Warning
Tone can be canceled by the system data settings of SIP server/PBX.
*10. Dialing the feature access code *30 (add-on) is not available.
*11. Call Transfer will be performed instead of cancelling a conference call.
*12. By default, # can be used as SEND key to dial the number out. If the # has must be used as a
normal digit, users can disable it by setting "Use # as Dial Key" to "No" from Web GUIAccount
1Call Settings. In this user guide, if it is written as "press SEND key or #", press the SEND key.

FW version 1.0.4.152
15
Making Phone Calls
Handset, Speaker and Headset Mode
The GT210 allows users to switch among handset,
speaker or headset when making calls. Press the
Hook Switch to switch to handset; press the HEADSET key to switch to headset; or press the
SPEAKER key to switch to speaker.
SIP Accounts and Lines
GT210 can support 1 SIP account. Each of the LINE keys is "virtually" mapped to an
individual SIP
account. In off hook state, select an idle line and the dial tone will be heard.
To make a call, select the line you wish to use. The corresponding LINE LED will light up in green. The
user
can switch lines before dialing any number by pressing the LINE keys.
For example:
Incoming calls to a specific account will attempt to use its corresponding LINE if it is not in use. When
the
"virtually" mapped line is in use, the GT210 phone will
flash the other available LINE in red. A
line is ACTIVE when it is in use and the corresponding LED is red.
Completing Calls
There are several ways to complete a call.
On hook dialing. Enter the number when the phone is on hook and then send out.
1. When the phone is idle, enter the number to be dialed out.
2. Take handset off hook; or
Press SPEAKER key; or
Press HEADSET key with headset plugged in; or
Select an available LINE key.
3. The call will be dialed out.
Off hook and dial. Off hook the phone, enter the number and send out.
1. Take handset off hook; or
Press SPEAKER key; or
Press HEADSET key with headset plugged in; or
Press an available LINE key to activate speaker.
2. You will hear dial tone after going off hook.
3. Enter the number.
4. Press SEND key or # to dial out.
Predictive dialing: While dialing, the phone will predict and list candidates of the target number
based
on the entered digits. If the target number exists in the phonebook/call log, the phone will

FW version 1.0.4.152
16
display a list
of matched numbers and the user could select the number using the Up/Down key
and dial out.
Redial. Redial the last dialed number.
1. Take handset off hook; or
Press SPEAKER key; or
Press HEADSET key with headset plugged in; or
Press an available LINE key to activate speaker; or
When the phone is in idle.
2. Press SEND key, or the REDIAL soft key.
Via Call History. Dial the number logged in phone's call history.
1. Press MENU key to bring up the main menu.
2. Enter Call History.
3. Select the entry you would like to call using the navigation arrow keys.
4. Press SEND key to dial out.
Via Contacts. Dial the number from the Contacts.
1. Press MENU key to bring up the main menu.
2. Enter "Contacts" using the navigation arrow keys..
3. Under Contacts, enter Local Phonebook using the navigation arrow key.
4. Select the contact you would like to call using the navigation arrow key.
5. Press SEND key to dial the selected contact.
Note: Broadsoft Phonebook is not available.
Speed Dial from Line Key. Dial the number configured as Speed Dial on LINE Key.
1. Go to phone's Web GUISettingsProgrammable KeysProgrammable Keys,
configure the LINE Key's Key Mode as Speed Dial. Select the account to dial from, enter the
Name and User ID (the number to be dialed out) for the LINE Key. Click on "Save and
Apply" at the bottom of the Web GUI page.
2. Go off hook on the phone, or directly press the Speed Dial key to dial out.
Call Return. Dial the last answered call.
1. Go to phone's Web GUISettingsProgrammable KeysProgrammable Keys,
configure the LINE Key's Key Mode as Call Return. Select the account to dial from, no
Name or User ID has to be set on for Call Return.
2. Go off hook on the phone, or directly press the Call Return key to dial out.

FW version 1.0.4.152
17
Via Paging/Intercom.
1. Take handset off hook; or
Press SPEAKER key; or
Press HEADSET key with headset plugged in; or
Press an available LINE key to activate speaker.
2. You shall hear dial tone after off hook.
3. Press MENU key to switch the call screen from "Dialing" to "Paging".
4. Enter the number.
5. Press SEND key or # to dial out.
Via Intercom Hard Button. Dial pre-configured intercom number.
1. Go to phone’s Web GUISettingsCall Features, configure the Intercom User ID as the
destination number of intercom call.
2. When phone is idle, press the in Intercom Hard Button to dial pre-configured number.
Notes:
After entering the number, the phone waits for the No Key Entry Timeout (Default timeout is 4
seconds, configurable via Web GUI) before dialing out. Press SEND or # key to override the No
Key Entry Timeout.
If digits have been entered after handset is off hook, the SEND key will work as SEND instead
of REDIAL.
By default, # can be used as SEND key to dial the number out. Users can disable it by setting
"Use # as Dial Key" to "No" from Web GUIAccountsAccount 1Call Settings.
For Paging/Intercom, if the SIP Server/PBX supports the feature and has Paging/Intercom
feature code set up already, users do not necessarily need toggle to paging mode in the call
screen. Simply dial the feature code with extension as a normal call.
Making Calls Using IP Addresses
Direct IP Call allows two phones to talk to each other in an ad-hoc fashion without a SIP proxy. VoIP
calls
can be made between two phones if:
Both phones have public IP addresses; or
Both phones are on the same LAN/VPN using private or public IP addresses; or
Both phones can be connected through a router using public or private IP addresses (with
necessary port forwarding or DMZ).
To make a direct IP call, please follow the steps below:
1. Press MENU key to bring up main menu.
2. Select "Direct IP Call" using the navigation arrow keys.
3. Press MENU to enter the Direct IP Call mode.
4. Input the 12-digit target IP address (Please see example below).

FW version 1.0.4.152
18
5. Press the "More" softkey to make sure the softkey selection "IPv4" or "IPv6" is correctly selected
depending on your network environment.
6. Press "OK" softkey to dial.
For example:
If the target IP address is 192.168.1.60 and the port is 5062 (i.e., 192.168.1.60:5062), input the
following:
192*168*1*60#5062. The * key represents the dot (.), the # key represents colon (:).
Wait for about 4
seconds and the phone will initiate the call.
Quick IP Call Mode
The GT210 also supports Quick IP Call mode. This
enables the phone to make direct IP calls using
only the last few digits (last octet) of the target phone's IP
address. This is possible only if both
phones are under the same LAN/VPN. This simulates a PBX function
using the CSMA/CD without a
SIP server. Controlled static IP usage is recommended.
To enable Quick IP Call Mode, go to phone's Web GUISettingsCall Features, set "Use Quick IP -
call
mode" to "Yes". Clicking on "Save and Apply" on the bottom of Web GUI page to take the change.
To make
Quick IP Call, take the phone off hook first. Then dial #xxx where x is 0-9 and xxx<255.
Press # or SEND
key and a direct IP call to aaa.bbb.ccc.XXX will be completed. "aaa.bbb.ccc" is
from the local IP address
regardless of subnet mask. The number #xx or #x are also valid. The
leading 0 is not required (but it's OK).
For example:
192.168.0.2 calling 192.168.0.3 -- dial #3 followed by # or "SEND".
192.168.0.2 calling 192.168.0.23 -- dial #23 followed by # or "SEND".
192.168.0.2 calling 192.168.0.123 -- dial #123 followed by # or "SEND".
192.168.0.2: dial #3 and #03 and #003 results in the same call -- call 192.168.0.3.
Notes:
The # will represent colon ":" in direct IP call rather than SEND key as in normal phone call.
If you have a SIP server configured, direct IP call still works. If you are using STUN, direct IP
call will also use STUN.
Configure the "Use Random Port" to "No" when completing direct IP calls. The option “Use
Random Port” is under phone’s Web GUISettings General Settings page.

FW version 1.0.4.152
19
Answering Phone Calls
Receiving Calls
Single incoming call. Phone rings with selected ring tone. The corresponding LINE key will
flash in
red. Answer call by taking handset off hook, or using Speaker/Headset, or pressing the
flashing LINE
key.
Multiple incoming calls. When another call comes in while having an active call, the
phone will
produce a Call Waiting tone (stutter tone). The other LINE key will flash in red.
Answer the incoming
call by pressing the flashing LINE key. The current active call will be put on
hold automatically.
Do Not Disturb
Do Not Disturb can be enabled/disabled from phone's Keypad Menu by following the steps below:
1.
Press the MENU key and select "Preference" using navigation keys.
2.
Press MENU key again to get into Preference options.
3.
Select "Do Not Disturb" and press MENU key.
4.
Use arrow keys to select and press MENU key to enable or disable "Do Not Disturb" feature.
When Do Not Disturb feature is turned on, the DND icon will appear on the right side of the LCD.
The
incoming call will not be accepted.
Reject
Reject the incoming call by pressing the “Reject” softkey when the phone is ringing.
Table of contents
Other NEC IP Phone manuals

NEC
NEC Aspire Technical specifications

NEC
NEC UNIVERGE SV9100 DT820 User manual

NEC
NEC Univerge SV8100 User manual

NEC
NEC DT330 User manual

NEC
NEC DT730 User manual

NEC
NEC Univerge DT820 Instruction manual

NEC
NEC SL1100 User manual

NEC
NEC DT430 Series Reference guide

NEC
NEC Aspire User manual

NEC
NEC UX5000 User manual

NEC
NEC Univerge SV8100 User manual

NEC
NEC DT830 Series User manual

NEC
NEC UNIVERGE DT830G(DG) User manual

NEC
NEC Dterm DTL-8R-1 User manual

NEC
NEC UNIVERGE GT890 User manual

NEC
NEC UNIVERGE Aspire UX Assembly instructions

NEC
NEC Univerge SV8100 User manual

NEC
NEC SL1100 Instruction manual

NEC
NEC SV8500 User manual

NEC
NEC UNIVERGE SV8100 DT7 SERIES User manual