NEC ITK-32LCGS-1 User manual

\ Orchestrating a brighter world
UNIVERGE BLUE™ CONNECT
QUICK START GUIDE
ITK-32LCGS-1
NDA-32024
Issue 1.0

WELCOME TO UNIVERGE BLUE CONNECT
All of your business communications
integrated, efficient and reliable.

1
What’s in the box?
NEC ITK-32LCGS-1
ITK-32LCGS-1 Base & Handset

2
Guided Setup
Adjust the Angle of the Tilt Leg
To adjust the tilt level of the ITK-32LCGS-1:
1. The height can be adjusted by moving the legs, which are attached to
the bottom of the terminal.
2. Turn the phone over (key side down).
3. Adjust the legs to the desired height (upward to raise the height and
downward to lower the height).
Connect Cables
Please follow the diagram to install your phone. Once plugged in, the phone will
automatically download its configuration and start to work. The voicemail box
will be functional with a default greeting.
1. Connect an Ethernet cable to the LAN port on the phone and connect
the other end to your network. (Fig. A)
2. Insert the RJ-9 handset connector into the “Handset” port on the back
of the phone. (Fig. B)
A. B.

3
Configure a Headset
To utilize a headset, you must first enable headset mode on the ITK-32LCGS-1:
1. Press the “Multi” button.
2.
Press the “Settings” button.
3. Press 1 for User Settings.
4. Press 2 for Headset.
5. Press 1 for Enable/Disable.
6. Press 2 for Enable.
7. Press the check mark soft key.
8. Press the Home button to return to the main menu.
Connect a Headset
To connect a headset:
1. Insert the RJ-9 headset connector into the “HEADSET” port on the
back of the phone.
The phone will now pick the headset as the default
communication method when placing and answering phone calls.
To return the phone to non-headset mode, follow the steps in
“Configure a Headset” and set
Headset to Disabled.

4
Features
NEC ITK-32LCGS-1
Reference
Number Feature Feature Description
1 Call Indicator Lamp
If missed call notification for the call indicator
lamp is disabled (default), the lamp flashes for
incoming and missed calls, and displays steady
red for message waiting.
If missed call notification for the call indicator
lamp is enabled, the lamp flashes for incoming
calls and missed calls, including missed calls
where someone has left a voice mail. The lamp
only display steady red if you still have mes-
sages waiting after you have cleared your
missed calls.

5
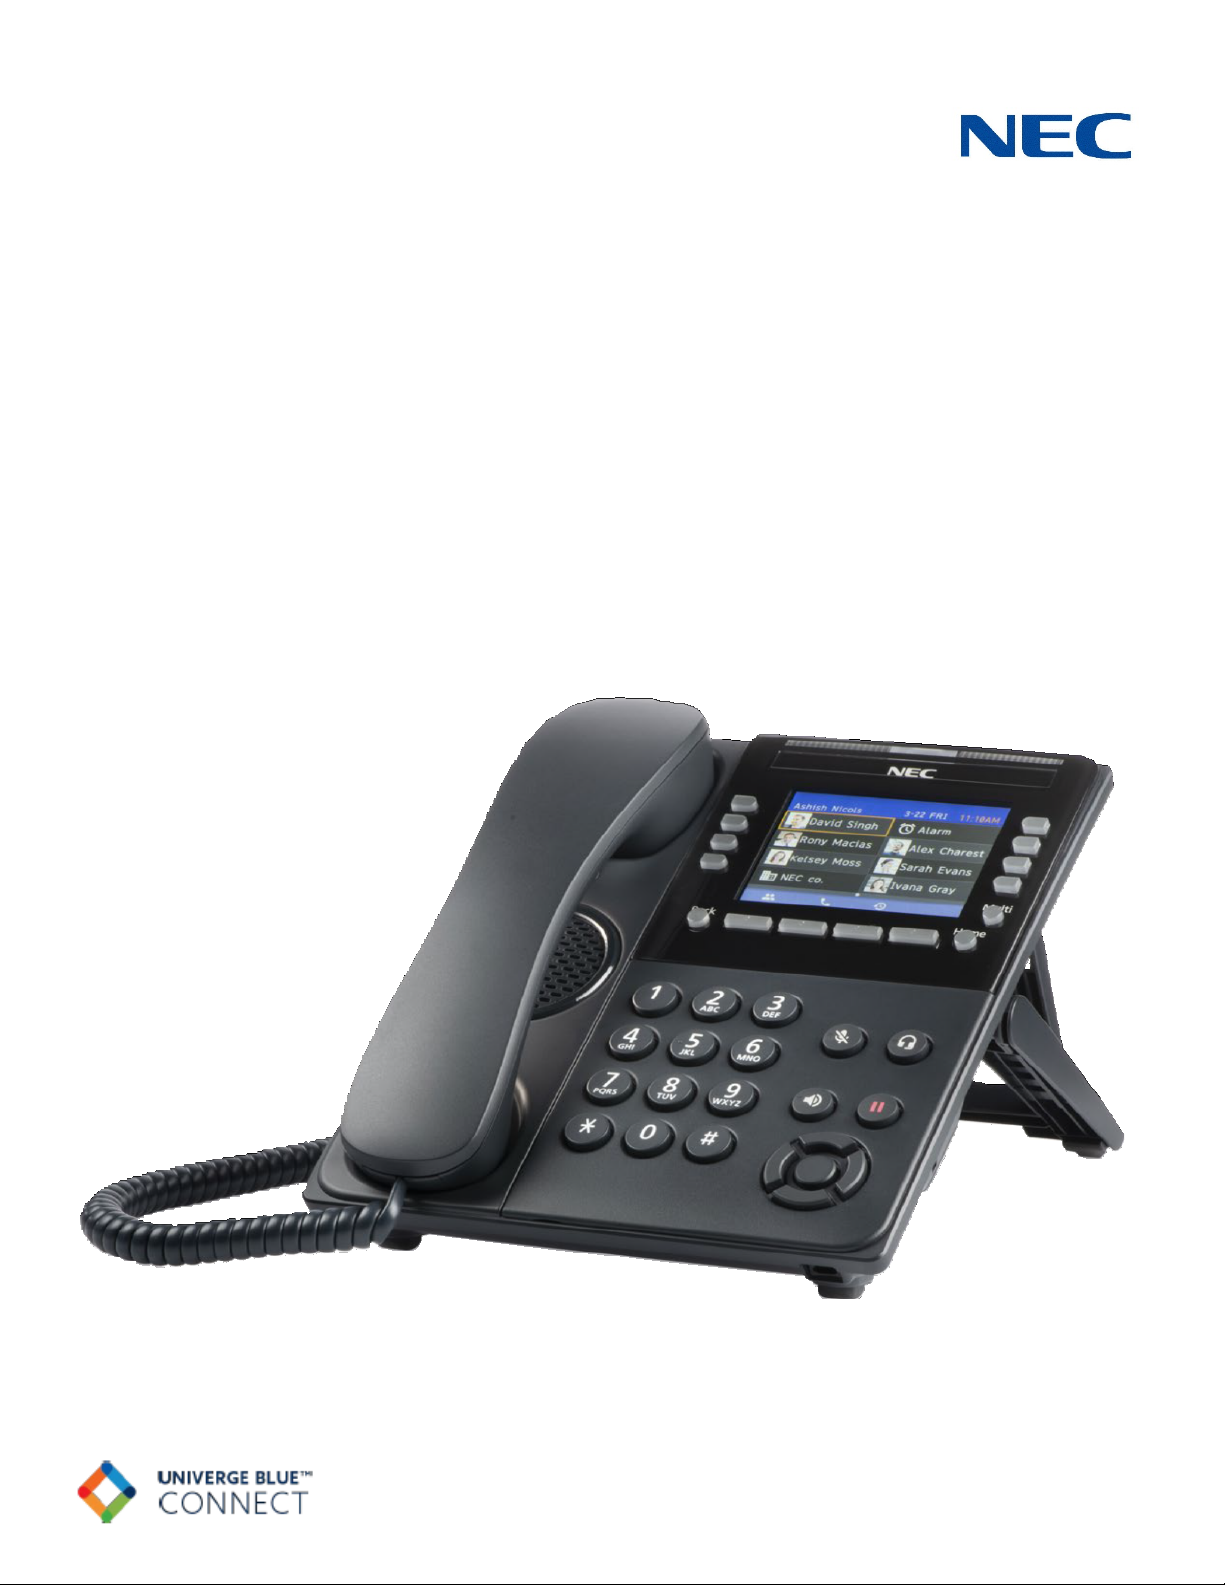
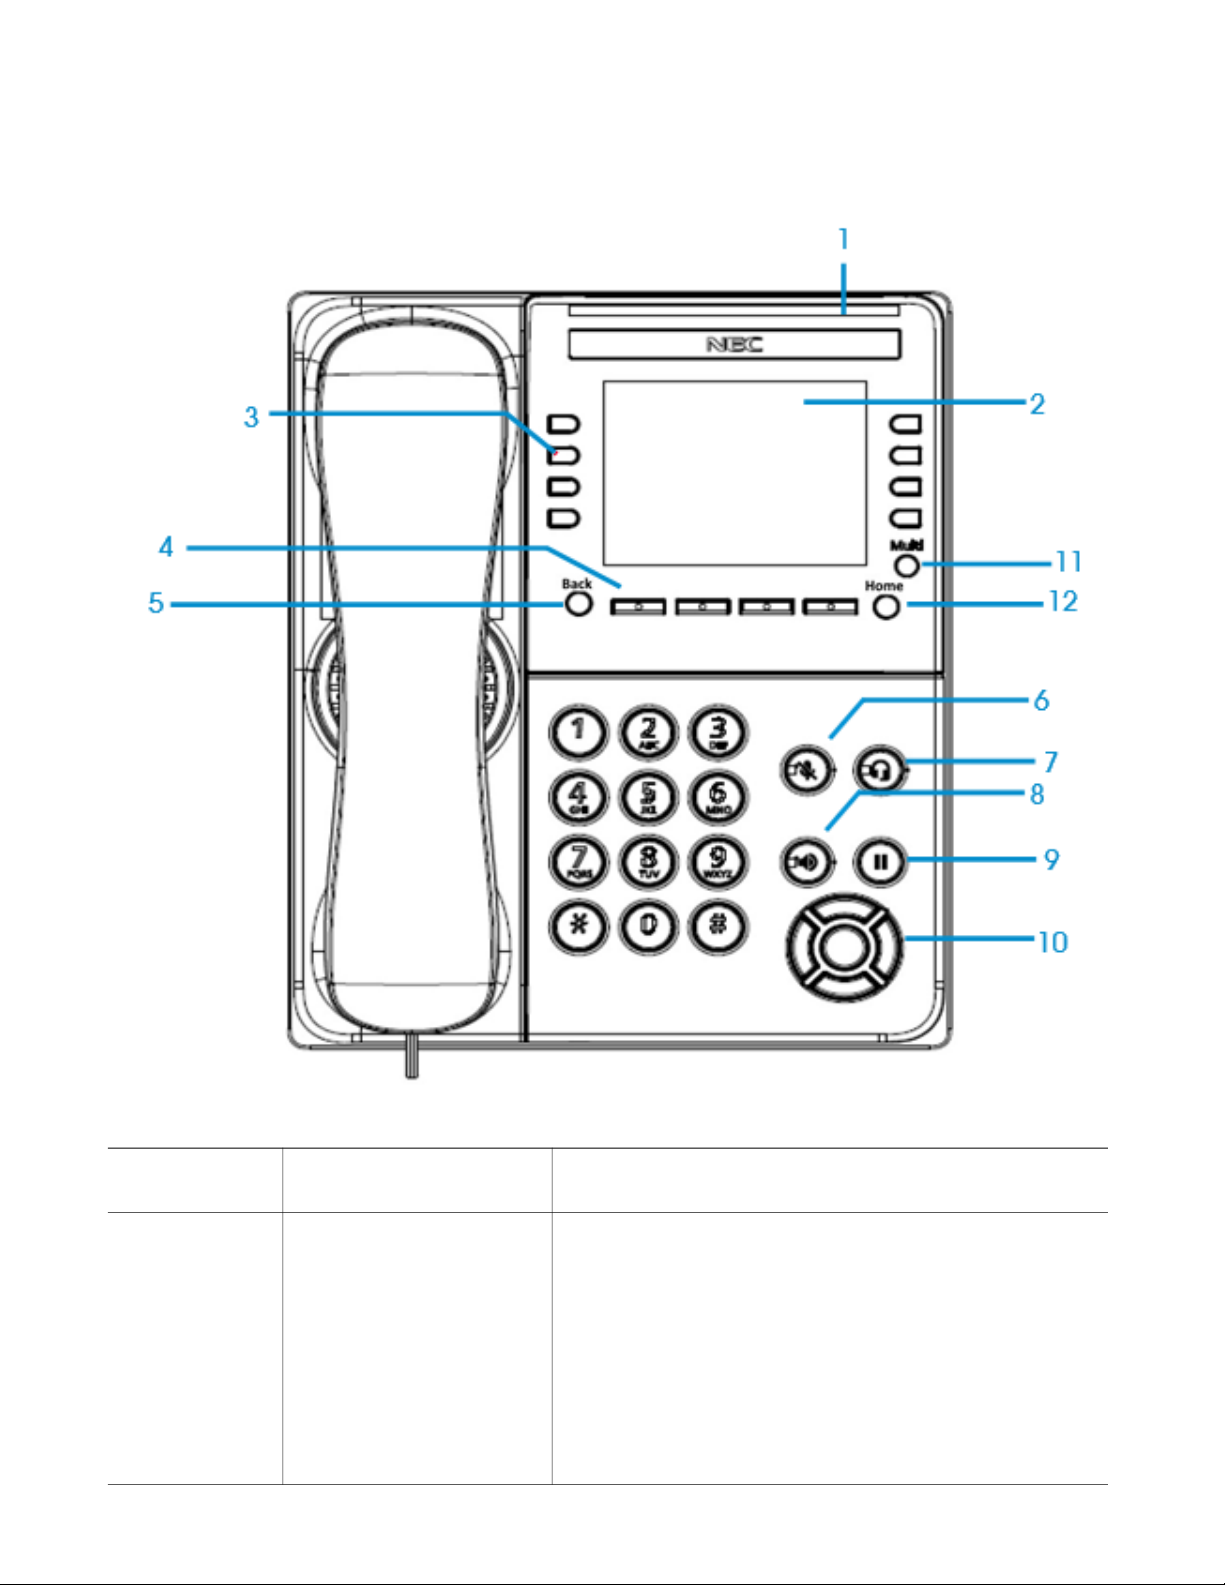
2 LCD The LCD (Liquid Crystal Display) provides call status
activity information plus date, time and soft key
operation.
3 Soft keys
The soft keys show the available features for your
current activity. Any feature shown at the bottom of
the LCD is available. The appropriate key is
displayed on the screen according to the call
handling process.
4 Programmable keys
The first programmable key is reserved as the Line
Key. Line Keys allow the user to select which line to
operate on.
Any programmable keys not used as Line Keys can
be programmed as Speed Dial Keys by the user or
system administrator. Numbers up to 24 digits can
be assigned to Speed Dial Keys. The numbers may
be a telephone number or star/hash codes.
5 Back key This key allows you to exit from the Menu or Help
mode and go back to the telephone main screen.
6 Mute key
Press key to mute the microphone. The LED on this key
flashes when the microphone is muted. Press the key
again to un-mute the microphone.
This button displays a red light when the phone
is idle.
The light does not display when the micro-
phone is in use during a call.
7 Headset key Press the Headset key to enable the use of a
supported headset.
8 Speaker key
Controls the built-in speaker which can be used for
Hands Free dialing and conversations.
The LED on this key lights when the speaker is
active.
9 Hold key Press this key to place a call on hold.
10 Cursor pad
Use this key to navigate to various features.
The up and down keys on the cursor pad can
be used to adjust the volume of the phone.
11 Multi (Scroll) key Press this key to scroll to the next page of
Programmable Keys.
12 Home key Press the Home key to return to the home screen.
Reference
Number Feature Feature Description

6
Voicemail Box Setup
RECORDING YOUR PERSONAL VOICEMAIL GREETING
1. Press the “Voicemail” soft key.
2. Enter the PIN provided to you by your Administrator, followed by the #
key.
3. Select option 3 for personal options.
4. Select option 1 to record your voicemail greeting.
5. Follow the voice prompts to record and check your greeting.
CHANGING THE PIN FROM THE PHONE
1. Press the “Voicemail” soft key.
2. Enter the PIN provided to you by your Administrator, followed by the #
key.
3. Select option 3 for personal options.
4. Select option 2 to change your PIN.
5. Enter the new PIN when prompted. Press # when done.
Home Screen and Line Keys
HOME SCREEN
To access or return to the Home screen press the Home button.
LINE KEYS
While on Home screen, you can access the Line Keys pages by pressing the >
soft key.
The terminal supports 32 Line Keys. There are 4 pages of Line Keys, therefore
each page displays 8 Line Keys

7
Commonly Used Features
PLACING OUTGOING CALLS
When the phone is not in use:
1. Pick up the handset or press the “Speakerphone” button.
2. Dial an extension or telephone number.
When you are already on a call:
1.
Press the “Hold” button.
2. Press the “More" >>> soft key.
3. Press the “New Call” soft key. The original call is put on hold.
4. Dial an extension or telephone number.
ANSWERING AN INCOMING CALL
On the Handset:
Pick up the handset to answer the call.
On a Headset:
Press the “Headset” button.
On Speakerphone:
Press the “Speaker”
button (or the “Answer” soft key) to
answer
the call.
REJECTING AN INCOMING CALL
Press the “Reject” soft key to immediately send the caller to voicemail.
REDIAL LAST NUMBER DIALED
Press the “Redial” soft key to immediately dial the last number dialed.

8
ENDING A CALL
On a Handset:
Hang up or press the “End Call” soft key.
On a Headset:
Press the “Headset” button.
On Speakerphone:
Press the “Speaker”
button.
HOLD
Placing a Call On Hold:
While on a call,
press the “Hold” button.
Retrieving Calls On Hold:
Press the “Hold” button
or press the "Resume" soft key.
MUTE
1. To mute the microphone on an active call, press the “Mute” button.
2. To un-mute the microphone, press the “Mute” button again.
TRANSFERRING CALLS
Blind Transfers:
1. While on a call, press the “Transfer” line key.
2. Press the “Blind” line key.
3. Dial an extension or telephone number.
4. The call is automatically transferred.
Attended (Consultative or Warm) Transfers:
1. While on a call, press the “Transfer” line key.
2. Dial an extension or telephone number.

9
3. Wait for the party to answer. Announce the call and indicate you are
transferring.
4. Press the “Transfer” soft key to transfer the call.
CALL WAITING
While already on a call and a new call rings in, you hear a beep tone emitted by
your phone.
Answering the Second Call:
1. Press the Call Indicator soft key.
2. Press the “Answer” line key. The first call will be placed on hold.
3. Once your second call has ended, resume the original call by pressing
the “Resume” button.
Rejecting the Second Call:
1. Press the first line key. The line key will begin blinking.
2. Press the “Reject” soft key to immediately send the caller to voicemail.
VOLUME ADJUSTMENT
In-Call Volume:
While on a call, press the Up and Down cursor pad buttons to adjust
in-call volume on the phone.
Ringer Volume:
While the phone is not in use, press the Up and Down cursor pad
buttons to adjust ringer volume on the phone.
VOICEMAIL
1. While the phone is not in use, press the “Voicemail” soft key.
2. Enter your voicemail PIN followed by #.
3. Press 1 to listen to new voicemail messages.

10
Advanced Features
CALL PARK
Placing Calls on Park:
While on a call press the Call Park line key (programmed previously
via Control Panel) or dial *7.
You will hear an announcement telling you which extension your call is
parked.
Retrieving Calls from Park:
From any phone, dial the extension where the call was parked or
select the Monitor Park Slot Line Key (programmed previously via
Control Panel).
The Monitor Park slot line key enables you to add the Park.
Extensions to line keys for accessing the parked call as well as a
visual indication of the parked call.
CALL PICKUP
To pickup a call from an extension (Directed Call Pickup):
From any phone, dial *95 and the extension number of the ringing
station you would like to answer or select the Call Pickup “from specific
extension” (programmed previously via Control Panel).
To Pickup a Call from a Group that you are a member of (Group Call Pickup):
From any phone, dial *97 or select the Call Pickup “from any Pickup
Group” (programmed previously via Control Panel).
To Pickup a Call from any Group (Group Call Pickup):
From any phone, dial *97 and the Group number that the call is ringing,
or select the Call Pickup “from specific Pickup Group” (programmed
previously via Control Panel).

11
To pickup a call from any station (Any Call Pickup):
From any phone, dial *96 to answer a call of any ringing station or
select the Call Pickup “Any company call” (programmed previously via
Control Panel).
CONFERENCE
Conferencing a Call:
1. While on a call, press the “Conf” soft key or press the “Transfer” soft
key.
2. Use the keypad to dial the telephone number of the party to be joined
to the conference.
3. Press the “Dial” soft key to initiate the call or wait a few seconds for the
call to be automatically dialed.
4. If you decide not to complete the conference, the call can be
terminated by pressing the “EndCall” soft key.
5. If you want to switch between each party before the conference is
established, you can use the “Shuttle” soft key.
6. You can complete the conference by pressing the “Conf” soft key.
Hang Up while conferencing:
1. If you are establishing a conference call and want to hang up on the
person you are calling, press the “EndCall” soft key.
2. key while the phone for the third party is still ringing, the other two parties
will be connected in a blind transfer call.
3. If you hang up the telephone handset or press “Speaker”.
INTERCOM
To intercom a station (Voice Announce):
Dial *90 and extension number of the user you want to intercom.

12
CALLFLIP
Transferring Calls to Your Other Devices:
While on a call, select the "Transfer" soft key, "Blind" soft key, dial your
own extension number and hangup.
CALL OR TRANSFER DIRECT TO AN EXTENSION'S VM BOX
To leave a VM message by calling and extension's VM Box Direct:
Dial * and the extension number where you want to leave the VM.
To Transfer a Caller to Leave a VM message in the extension's VM Box Direct
(Quick Transfer to VM):
While on a call, select the "Transfer" soft key then dial * and the
extension number where the caller wants to leave the VM and hang
up.
ON-DEMAND CALL RECORDING
Enabling On-Demand Call Recording:
While on a call dial #9 or select the Record line key (programmed
previously via Control Panel) to start and stop the recording.
The recording feature must be enabled by your admin before the
feature can be used.
Note: Note: Different states have different laws about the notification that calls are being
recorded. Administrators can choose whether to enable or disable a call recording
announcement based on their state’s requirements.
If enabled, “Your call is being recorded” plays when you start recording.
PAGING
Paging Phones in a Group:
Dial the Page Group extension number or select the Paging line key
(programmed previously via Control Panel).
To Answer a Page:
Dial *80 and or select the Intercom key (previously programmed via
Control Panel) you will be connected to the person that initiated the
Page.

13
PERSONAL CONTACTS
To access Personal Contacts:
Press the soft key.
Using Personal Contacts:
Use the UP and Down keys on the cursor pad to scroll through the
Personal Contacts.
You can also select the soft key and the keypad to search for an
entry.
Once the entry is highlighted you can call the contact by simply going
off hook on handset, speaker, or headset (if enabled) or by selecting
the soft key.
To view a specific Personal Contacts entry:
1. Use the Up and Down keys on the cursor pad to scroll through the
Personal Contacts.
2. You can select the entry via the middle button on the cursor pad to
view the details for that entry.
3. This displays the name and number for the entry, along with the Speed
Dial and Monitor settings.
4. You can also call the entry by selecting the soft key or you can
Edit or Delete the entry by selecting the … soft key.
5. Press the X soft key to exit details screen and return to the Personal
Contacts.

14
To add a Personal Contacts entry:
1. Press the soft key.
2. Select the … soft key.
3. Select 1 to Add.
4. Use the keypad to enter a name for the Personal Contact then press
the soft key. Use the * key to switch between uppercase and
lowercase keypad entry modes.
5. Use the telephone keypad to enter a phone number for the entry and
press the soft key.
6. Use the telephone keypad to enter a Speed Dial number (if desired)
for the entry and press the soft key.
Note: Only digits* and # are accepted as numerical input in a Speed Dial.
7. If you have set a Speed Dial Key number for this entry, set the monitor
settings for this entry and press the soft key.
8. Press the soft key to save your changes.
CALL HISTORY
The phone stores call information of the most recent 50 calls, displaying the
newest entries first.
For multiple phone calls from the same telephone number, the most recent
time and date information for that number is shown.
If you have a Personal Directory entry for a number in your Call History, the
name from the Personal Directory is shown.
The icon appears in the display when there is a
missed call. Once you
have checked the missed call log in the Call History information, this icon
disappears.

15
To View Call History:
1. Press the soft key.
2. Select > soft key to choose between All, Missed, Incoming, and
Outgoing calls.
3. Use the Up and Down keys of the cursor pad to scroll through the call
information.
To Dial an Entry from Call History:
Once the entry is highlighted you can call the contact by simply going
off hook on the handset, speaker or headset (if enabled) or by
selecting the soft key.
To Add Entries in Call History to Personal Contacts:
1. When an entry is highlighted, press the "..." soft key.
2. Select 2 for Directory Add.
3. Select the soft key if the info does not need any changes.
4. If changes are required, select the portion of the entry to change by
using the UP and Down keys on the cursor pad, then select
the soft key.
5. Once the entry has been modified select the soft key, then select
the soft key to save the entry.
To Delete Call History:
1. Press the soft key.
2. Select > soft key to choose between All, Missed, Incoming, and
Outgoing calls.
3. Use the Up and Down keys of the cursor pad to scroll through the call
information.
4. Select the ... soft key.
5. Select 3 to Delete the entry you highlighted on the previous page or
select 4 to Delete all entries.
Table of contents
Other NEC IP Phone manuals

NEC
NEC SV8500 User manual

NEC
NEC UX5000 User manual

NEC
NEC Dterm DTZ-8R-1 User manual

NEC
NEC Univerge SV9100 User manual

NEC
NEC Univerge DV8100 User manual

NEC
NEC Univerge SV8100 User manual

NEC
NEC DT430 Series Reference guide

NEC
NEC ITK-6DGS-1 Guide

NEC
NEC ITK-6DGS-1 User manual

NEC
NEC UNIVERGE DT830G(DG) User manual