manuals.online logo
Brands
  1. Home
  2. •
  3. Brands
  4. •
  5. Neopost
  6. •
  7. Postal Equipment
  8. •
  9. Neopost AutoStamp User manual

Neopost AutoStamp User manual

Adding Credit to your Autostamp
TM
(see page 24 of the User’s Guide)
Ensure that your Autostamp
TM
is connected to the telephone wall socket by way of the
Modem Cable (as detailed under ‘Connecting the Modem Cable’ section of this document).
In order to add credit to your Autostamp
TM
, you will need your Credifon PIN, this
will have been sent to you separately.
Your Autostamp
TM
is programmed with the direct dial Credifon telephone number.
The Credifon Crediting System telephone number must be prefixed by the appropriate
outside line digit (for most systems this is a 9 or a 0), if your outside line is routed through
a switchboard (this procedure is detailed on pages 24 - 25 of your User’s Guide).
You are now on your way to crediting your AutoStamp
TM
.
1. Press the Funds key , the Recredit display will
be observed:
Press to confirm.
2. Enter your Credifon PIN.
3. Enter the credit amount you wish to purchase (e.g. £20)
(£10 - £500 in units of £10).
Press: , verify the amount before
proceeding (If incorrect, press and start again).
4. Press to confirm.
5. Your AutoStamp
TM
will now connect to the Credifon Crediting System - showing
CONNECTING and TRANSACTING displays - and the credit will be added to your Autostamp
TM
.
On completion of the crediting procedure, the following
display will be observed:
6. Press to go to Ready mode.
Note:
You will be prompted to connect to the Credifon Crediting System every 90 days.
This allows the Royal Mail to inspect your meter and help prevent possible fraud.
YOU ARE NOW READY TO USE YOUR AUTOSTAMP
TM
For further details or in case of difficulty, please refer to the User’s
Guide.
If the Autostamp
TM
is to be returned for any reason, please remove
and retain the ink cartridge.
{RECREDIT? }
£0.00
CREDIFON PIN
----
CREDIT ENTRY
£20.00
RECREDIT DONE
£20.00
1
2
3
4
6
7
10
8 9
11
5
01/02/2006 - 3400037E/F
AutoStampTM Getting Started...
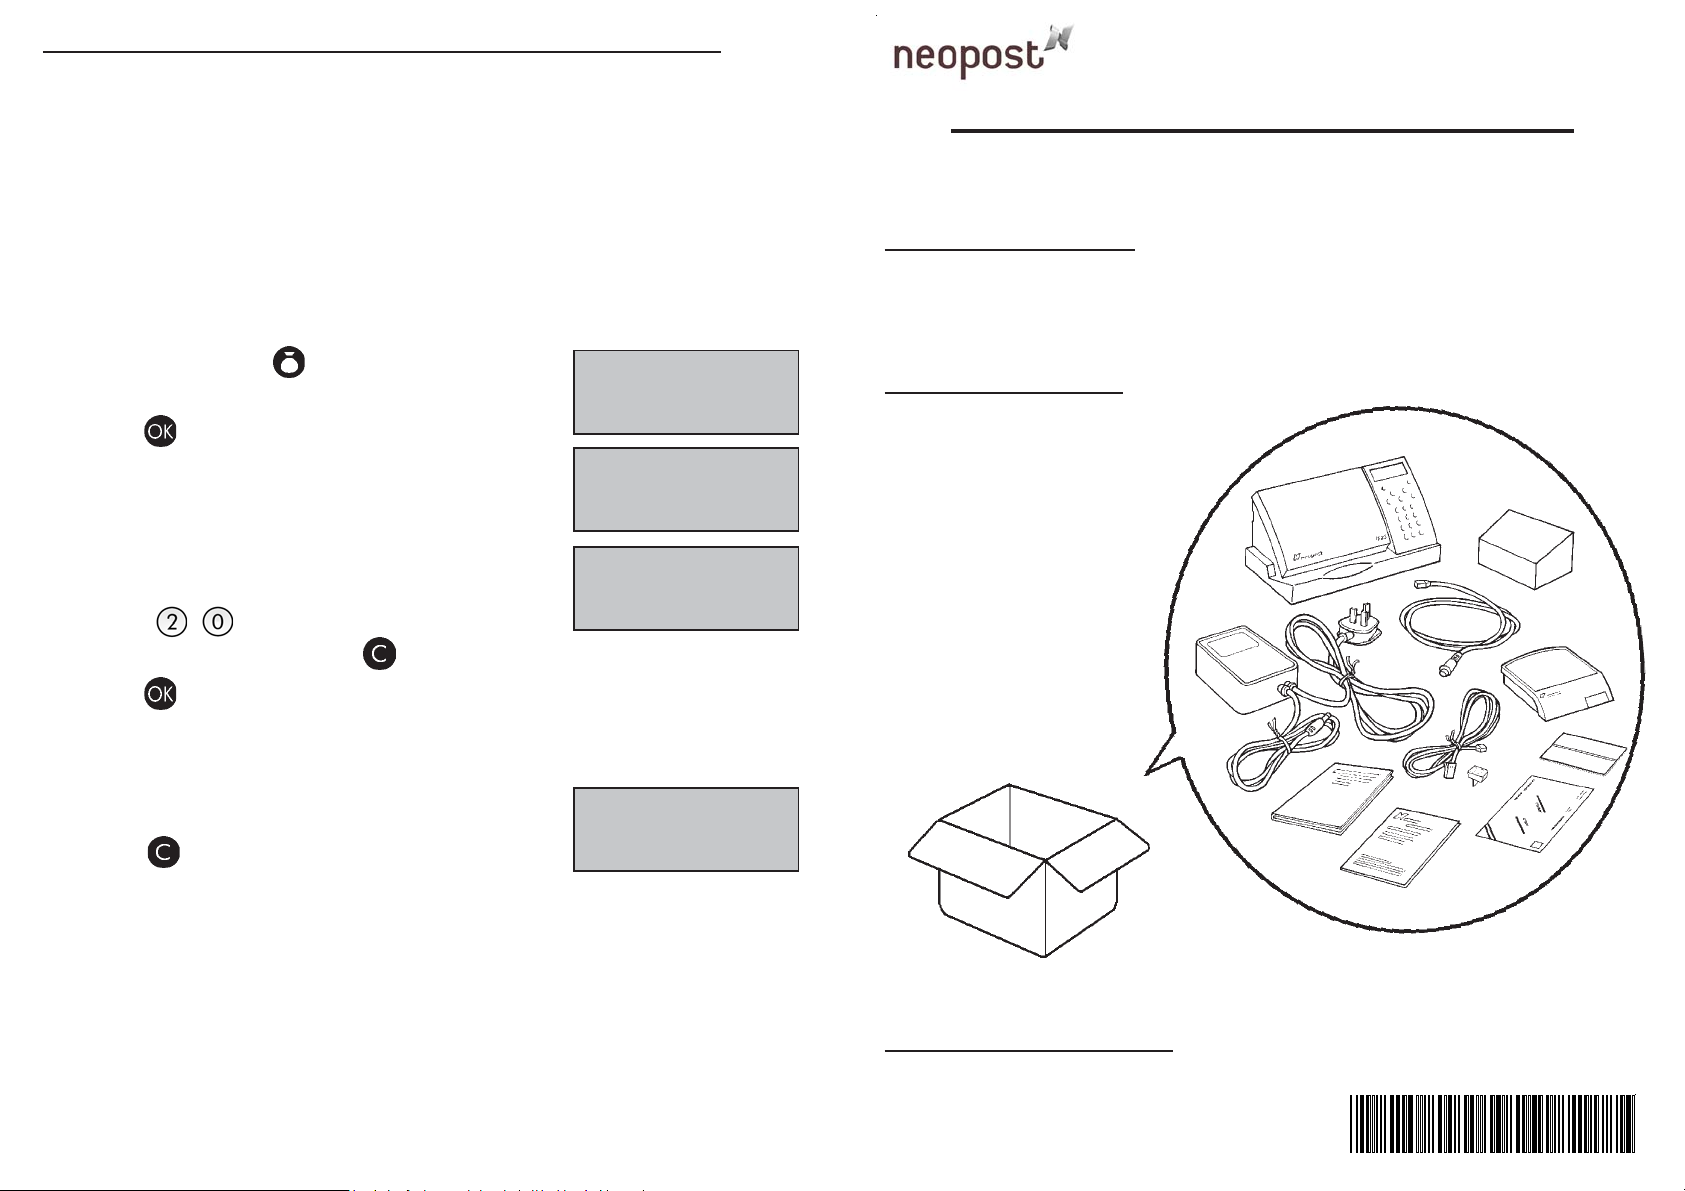
Please ensure that you have all components before
starting
Location of installation
This equipment should be installed in close proximity to an easily accessible switched
power supply and telephone socket.
Start by removing the AutostampTM from its packing carton, open the front cover and
remove the white cardboard packing material before unpeeling the protective tape.
Your Carton Contains
1. AutostampTM
2. Ink Cartridge
3. Power Supply
4. User’s Guide
5. Getting Started Guide
6. Weighscale
7. Weighscale Cable
8. Modem Cable
9. Self Adhesive Labels
(30 off)
10. Meter Posting Envelopes
(10 off)
11. Telephone Adaptor
Please retain all packaging for the Autostamp
TM
to be returned in the event of a repair.
Items Sent Separately
Credifon PIN Number & Customised Memory Card with your own message.
Connecting the Weighscale (Item Nos. 6 & 7 on previous page) (See page 8 of
the User’s Guide)
1. Remove the scale from the packaging and place close to the Autostamp
TM
.
2. Locate the scale cable, connect the round plug to the scale and the square
plug to the socket marked at the back of the Autostamp
TM
.
Connecting the Modem Cable (Item No. 8 on previous page) (See page 24 of the
User’s Guide)
1. Locate the modem cable, this has a standard telephone connector on one end.
2. Insert the telephone connector into the telephone wall socket and the small square
plug into the socket marked at the back of the Autostamp
TM
.
Connecting to the Power Supply (Item No. 3 on previous page) (See page 6 of
the User’s Guide)
The D.C. power unit connects directly to the main power supply socket and is intended
to serve as the device for isolation of the power supply. The Autostamp
TM
is designed to
be continually powered.
1. Connect to your power supply socket.
2. Insert the round plug into the socket marked at the back of the Autostamp
TM
.
3. Turn the switch on your power supply socket to the ON position.
4. Press to unlock the Autostamp
TM
. This is the factory set PIN, which
can be changed. (see page 19 of the User’s Guide)
The CARTRIDGE INSTALL display will now be
observed:
Fitting the ink cartridge (see pages 16 & 17 of
the user’s Guide)
Note:
Please follow these instructions carefully otherwise your Autostamp
TM
will display an
error message.
1. Raise the Autostamp
TM
front cover.
2. Open fully the Blue Latch to the right.
Remove the ink cartridge from its box and
peel off the Blue Tape seal that protects the
Print Head.
3. Insert the cartridge into the Autostamp
TM
pressing fully home as illustrated, close the
Blue Latch locking the cartridge in place.
Close the top cover and press .
The following display will now be observed
Notes:
a) The ink charging process may take a short while
to complete, during this time the Autostamp
TM
may produce some mechanical
sounds, this is normal.
b) Once installed, do not open the blue latch again until you need to fit a new
cartridge.
4. You will now have to produce a test print by inserting
a blank envelope or card, as illustrated.
The following display will now be observed:
Enter the number that corresponds to the straightest
vertical line (for the example above: line 5).
Press .
The message WARNING INSPECTION REQD will now
be observed. This message is displayed because your
Autostamp
TM
requires a crediting transaction.
Press the key.
Preparing your Autostamp
TM
for use
CARTRIDGE
INSTALL?
INSERT ITEM
ALIGNMENT
5
PLEASE
WAIT
WARNING
INSPECTION REQD

Other Neopost Postal Equipment manuals

Neopost IS-430 User manual

Neopost

Neopost IS-430 User manual

Neopost IJ 70 User manual

Neopost

Neopost IJ 70 User manual

Neopost IS-400 Series Parts list manual

Neopost

Neopost IS-400 Series Parts list manual

Neopost IJ65 User manual

Neopost

Neopost IJ65 User manual

Neopost IM-18 User manual

Neopost

Neopost IM-18 User manual

Neopost 5060 User manual

Neopost

Neopost 5060 User manual

Neopost DS-90 User manual

Neopost

Neopost DS-90 User manual

Neopost ij25 User manual

Neopost

Neopost ij25 User manual

Neopost POSTMASTER 6000 User manual

Neopost

Neopost POSTMASTER 6000 User manual

Neopost IJ-40 User manual

Neopost

Neopost IJ-40 User manual

Neopost 5050 User manual

Neopost

Neopost 5050 User manual

Neopost IN-360 User manual

Neopost

Neopost IN-360 User manual

Neopost IJ65 User manual

Neopost

Neopost IJ65 User manual

Neopost IN-600 Series User manual

Neopost

Neopost IN-600 Series User manual

Neopost ij25 User manual

Neopost

Neopost ij25 User manual

Neopost IS-200 Series User manual

Neopost

Neopost IS-200 Series User manual

Neopost IS-6000 User manual

Neopost

Neopost IS-6000 User manual

Neopost IS-350 User manual

Neopost

Neopost IS-350 User manual

Neopost IJ35 User manual

Neopost

Neopost IJ35 User manual

Neopost IJ 80 User manual

Neopost

Neopost IJ 80 User manual

Neopost IJ-50 User manual

Neopost

Neopost IJ-50 User manual

Neopost IJ35 User manual

Neopost

Neopost IJ35 User manual

Neopost IJ35 User manual

Neopost

Neopost IJ35 User manual

Neopost IS-440 User manual

Neopost

Neopost IS-440 User manual

Popular Postal Equipment manuals by other brands

Pitney Bowes dm60 series Update instructions

Pitney Bowes

Pitney Bowes dm60 series Update instructions

FP PostBase installation guide

FP

FP PostBase installation guide

quadient IN-700 user guide

quadient

quadient IN-700 user guide

quadient IS-420 Quick installation guide

quadient

quadient IS-420 Quick installation guide

quadient IX-7 user guide

quadient

quadient IX-7 user guide

quadient IS-330 Quick installation guide

quadient

quadient IS-330 Quick installation guide

Opex Perfect Pick user manual

Opex

Opex Perfect Pick user manual

quadient IS-280 Operator's manual

quadient

quadient IS-280 Operator's manual

FP optimail Operator's manual

FP

FP optimail Operator's manual

Frama Matrix F Series Quick installation guide

Frama

Frama Matrix F Series Quick installation guide

Frama Matrix F32 Installation and safety instructions

Frama

Frama Matrix F32 Installation and safety instructions

manuals.online logo
manuals.online logoBrands
  • About & Mission
  • Contact us
  • Privacy Policy
  • Terms and Conditions

Copyright 2025 Manuals.Online. All Rights Reserved.