Zolia KEIKO User manual

Zolia KEIKO Ferret Cage / Cage à Furet Zolia KEIKO / Jaula para hurón Zolia KEIKO / Frettchenkäfig Zolia KEIKO
/ Gabbia per furetti Zolia KEIKO / Gaiola para furões Zolia KEIKO / Zolia KEIKO Frettenkooi

EN- A1- Front Leg
A2- Back Leg
B- Metal Shelf with hole
C- Side panel
D1- Front bottom with hole
D2- Front top without hole
E1- Back bottom with hole
E2- Back top without hole
F- Bottom panel without hole
G- Middle panel
H- Side tubing
I- Top panel
J- Shelf
L- Ramp
M- Door for middle panel
N- Tray
O- Rolling caster
P- Long screw
Q- Short screw
FR - A1- Armatures du bas avant
A2- Armatures du bas arrière
B- Grille métallique avec trous de fixation
C- Panneau latéral
D1- Porte avant du bas avec trous de fixation
D2- Porte avant du haut sans trou de fixation
E1- Panneau arrière avec trous de fixation
E2- Panneau arrière sans trou de fixation
F- Grille inférieure sans trou de fixation
G- Grille centrale de séparation
H- Tubes latéraux
I- Grille supérieure
J- Étagères
L- Rampes
M- Porte pour la grille centrale
N- Tiroir
O- Roues
P- Vis longues
Q- Vis courtes
ES - A1- Marcos delanteros inferiores
A2- Marcos inferiores traseros
B- Rejilla metálica con orificios de fijación
C- Panel lateral
D1- Puerta frontal inferior con orificios de fijación
D2- Puerta frontal superior sin orificio de fijación
E1- Panel trasero con agujeros de fijación
E2- Panel trasero sin orificio de fijación
F- Rejilla inferior sin orificio de fijación
G- Rejilla de separación central
H- Tubos laterales
I- Rejilla superior
J- Estantes
L- Rampas
M- Puerta para la rejilla central.
N- Cajón
O- Ruedas
P- Tornillos largos
Q. Tornillos cortos
DE - A1- Untere vordere Rahmen
A2- Hintere untere Rahmen
B- Metallgitter mit Befestigungslöchern
C- Seitenwand
D1- Untere Vordertür mit Befestigungslöchern
D2- Obere Vordertür ohne Befestigungsloch
E1 -Rückwand mit Befestigungslöchern
E2- Rückwand ohne Befestigungsloch
F- unteres Gitter ohne Befestigungsloch
G- Zentrales Trenngitter
H- Seitenrohre
I- oberes Gitter
J- Ebenen
L- Rampen
M- Tür für das zentrale Gitter
N- Schublade
O- Rollen
P- lange Schrauben
Q- kurze Schrauben
IT - A1- Telaio inferiore anteriore
A2- Telaio inferiore posteriore
B- Griglia metallica con fori di fissaggio
C- Pannello laterale
D1- Porta anteriore inferiore con fori di montaggio
D2- Porta anteriore superiore senza foro di fissaggio
E1- Pannello posteriore con fori di montaggio
E2- Pannello posteriore senza foro di montaggio
F- Griglia inferiore senza foro di montaggio
G- Griglia di separazione centrale
H- Tubi laterali
I- Griglia superiore
J- Scaffali
L- Rampe
M- Porta per la griglia centrale
N- Cassetto
O- Ruote
P- Viti lunghe
Q- Viti corte
PT- A1. Quadros frontais inferiores
A2- Quadros traseiros inferiores
B- Grade metálica com furos de fixação
C- Painel lateral
D1- Porta frontal inferior com orifícios de fixação
D2- Porta frontal superior sem orifício de fixação
E1- Painel traseiro com orifícios de fixação
E2- Painel traseiro sem orifícios de fixação
F- Grelha inferior sem orifício de fixação
G- Grelha central de separação
H- Tubos laterais
I- Grelha superior
J- Plataformas interiores/Prateleiras
L- Rampas
M- Porta para grelha central
N- Gaveta
O- Rodas
P- Parafusos longos
Q- Parafusos curtos
NL- A1- Onderste voorframe
A2- Achterste bodemframe
B- Metalen rooster met bevestigingsgaten
C- Zijpaneel
D1- Onderste voordeur met montagegaten
D2- Bovenste voordeur zonder bevestigingsgat
E1- Achterpaneel met bevestigingsgaten
E2- Achterpaneel zonder bevestigingsgat
F- Onderste rooster zonder bevestigingsgat
G- Centraal scheidingsrooster
H- Zijbuizen
I- Bovenrooster
J- Planken
L- Loopplanken
M- Deur voor het centrale rooster
N- Lade
O- Wielen
P- Lange schroeven
Q- Korte schroeven

1
1
EN- Assemble part A1, A2 and B, secure with long screws, then attached rolling
casters as shown.
FR- Assembler A1, A2 et B à l’aide des vis P puis fixer les roues.
ES- Ensambla A1, A2 y B usando los tornillos P y luego fija las ruedas.
DE- Montieren Sie A1, A2 und B mit den Schrauben P und befestigen Sie die Räder.
IT- Assemblare A1, A2 e B utilizzando le viti P e poi fissare le ruote.
PT- Monte A1, A2, e B com a ajuda dos parafusos P e em seguida fixe as rodas.
NL- Monteer A1, A2 en B met schroeven P en bevestig vervolgens de wielen.
2
2
EN- Assemble part C, D1, E1, F, G and H, secure with long screws.
As shown on picture 1.
FR- Assembler C, D1, E1, F, G et H à l’aide des vis P comme sur
image (1)
ES- Ensambla C, D1, E1, F, G y H usando los tornillos P como en
la imagen (1)
DE- Montieren Sie C, D1, E1, F, G und H mit den Schrauben P wie
in der Abbildung (1).
IT- Assemblare C, D1, E1, E1, F, G e H con le viti P come mostrato
in figura (1)
PT- Monte C, D1, E1, F,G e H com ajuda dos parafusos P como na
imagem (1).
NL- Monteer C, D1, E1, F, G en H met behulp van de schroeven P
zoals op de afbeelding (1)

3
3
EN- Assemble part D2, E2 and C, secure with long screws
a) assemble part G and I, secure with short screws
b) At the time you want to close part G, assemble part M as
shown in picture 2.
FR- Assembler D2, E2 et C à l’aide des vis P.
a) Fixer les grilles G et I à l’aide des vis Q.
b) Pour fermer l’accès entre les 2 étages, positionner la porte M
comme sur image (2)
ES- Ensambla D2, E2 y C usando los tornillos P.
a) Fija las rejillas G e I con los tornillos Q.
b) Para cerrar el acceso entre los 2 estantes: coloca la puerta M
como en la imagen (2)
DE- Montieren Sie D2, E2 und C mit den Schrauben P.
a) Befestigen Sie die Gitter G und I mit den Q-Schrauben.
b) So schließen Sie den Zugang zwischen den beiden Etagen:
Positionieren Sie die Tür M wie in der Abbildung (2).
IT- Assemblare D2, E2 e C con le viti P.
a) Fissare le griglie G e I con le viti Q.
b) Per chiudere l'accesso tra i 2 piani: posizionare la porta M
come mostrato in figura (2).
PT- Monte D2, E2, e C com a ajuda dos parafusos P.
a) Fixe as grelhas G e I com a ajuda dos parafusos Q.
b) Para fechar o acesso entre os 2 andares: posicione a porta M
como na imagem (2)
NL- Monteer D2, E2 en C met schroeven P.
a) Bevestig de roosters G en I met behulp van de Q-schroeven.
b) Om de toegang tussen de 2 verdiepingen te sluiten: plaats
deur M zoals op de afbeelding (2)

4
4
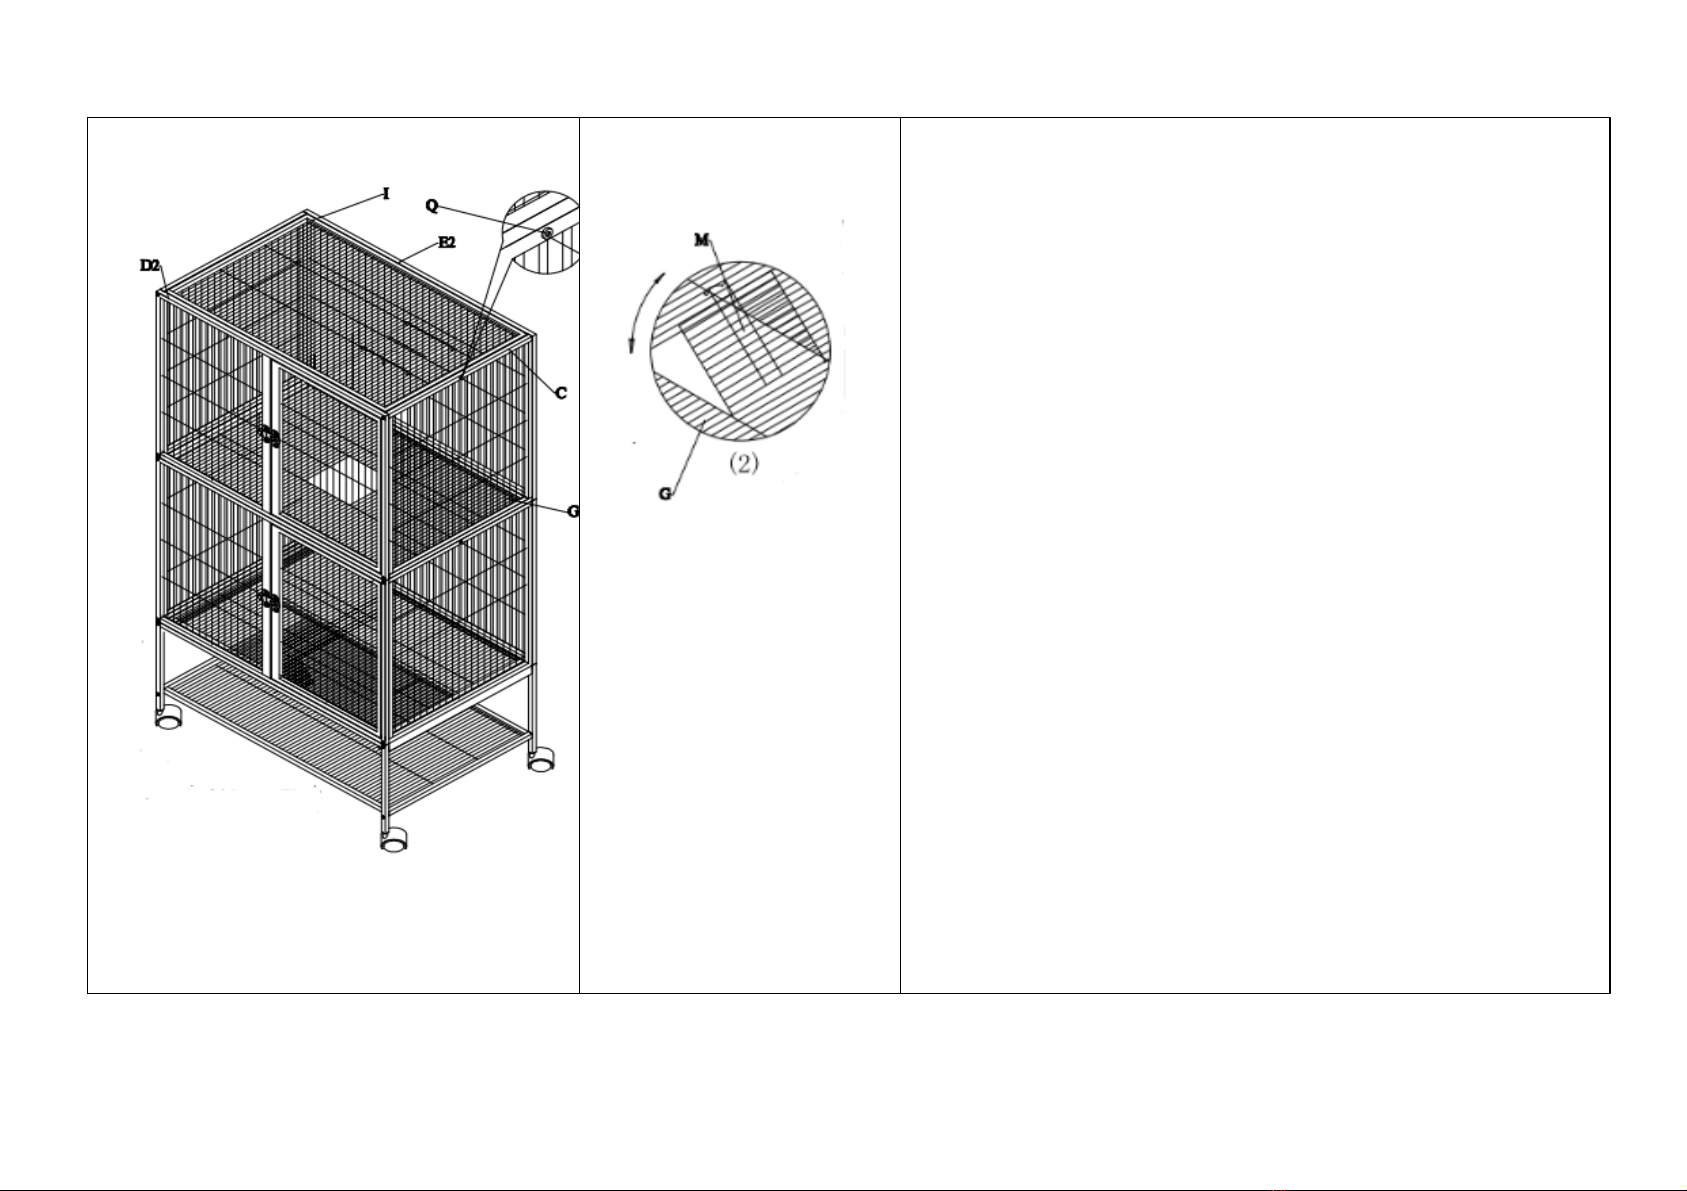
EN- a) Attach the ramps to C, D1, D2, C, E1 and E2, then attach ramps to shelves by hooking ramps
onto shelves by the ends with the half-circles.
b) Insert the shelves and attach to the cage body as shown.
c) Attach remaining 1 ramp to cage body as shown.
d) Slide part N into H.
FR- a) Attacher les rampes L aux panneaux C, D1, D2, E1 et E2 puis fixer les rampes à J en les
crochetant sur les étagères à l’aide des demi-cercles.
b) Insérer les étagères et les fixer à la cage comme sur l’image.
c) Fixer la rampe restante à la cage comme sur l’image.
d) Glissez le tiroir N dans les tubes H.
ES- a) Fija las rampas L a los paneles C, D1, D2, E1 y E2, luego fija las rampas a J enganchándolas a
los estantes utilizando los semicírculos.
b) Inserta los estantes y fíjalos a la jaula como en la imagen.
c) Fija la rampa restante a la jaula como se muestra en la imagen.
d) Desliza el cajón N en los tubos H.
DE- a) Befestigen Sie die Rampen L an den Paneelen C, D1, D2, E1 und E2 und befestigen Sie die
Rampen an J, indem Sie sie mit den Halbkreisen in die Regale einhängen.
b) Setzen Sie die Ebenen ein und befestigen Sie sie wie auf dem Bild am Käfig.
c) Befestigen Sie die verbleibende Rampe wie in der Abbildung gezeigt am Käfig.
d) Schieben Sie die Schublade N in die Röhrchen H.
IT- a) Fissare le rampe L ai pannelli C, D1, D2, E1 ed E2 e poi fissare le rampe a J agganciandole ai
ripiani con i semicerchi.
b) Inserire i ripiani e fissarli alla gabbia come mostrato in figura.
c) Fissare la rampa rimanente alla gabbia come mostrato in figura.
d) Far scorrere il cassetto N nei tubi H.
PT- a) Coloque as rampas L nos painéis C, D1, D2, E1 e E2 e fixe as rampas em J, prendendo-as nas
prateleiras utilizando os semicírculos.
b) Insira as prateleiras e fixe-as na gaiola, como na figura.
c) Fixe a rampa restante à gaiola, como na figura.
d) Coloque a gaveta N dentro dos tubos H.
NL- a) Bevestig de loopplanken L aan de panelen C, D1, D2, E1 en E2 en bevestig deze vervolgens
aan J door ze aan de planken te haken met behulp van de halve cirkels.
b) Plaats de planken en bevestig ze aan de kooi zoals op de afbeelding.
c) Bevestig de resterende loopplank aan de kooi zoals weergegeven in de afbeelding.
d) Schuif de lade N in de buizen H
Other Zolia Pet Care Product manuals

Zolia
Zolia POPPINS User manual

Zolia
Zolia Youyou User manual

Zolia
Zolia 211002 User manual

Zolia
Zolia DOGGY GUARD User manual

Zolia
Zolia HANDSOME User manual

Zolia
Zolia ZD95 User manual

Zolia
Zolia Warmy Up Out Use and care manual

Zolia
Zolia ZD-90 User manual

Zolia
Zolia Rise Falls User manual

Zolia
Zolia ZD6 User manual

Zolia
Zolia CLARA User manual

Zolia
Zolia Barking Stop Plus User manual

Zolia
Zolia Premium User manual

Zolia
Zolia Angel User manual

Zolia
Zolia Flower Falls User manual

Zolia
Zolia DOG TRAINING 200 User manual

Zolia
Zolia ZD 700 User manual

Zolia
Zolia RUMBA User manual

Zolia
Zolia STOOLY User manual

Zolia
Zolia ZD 120 User manual