ATCOM Rainbow1 User manual

Rainbow1 IP Phone User Manual
Version: 1.0
2014-03-27

Rainbow1 IP Phone User Manual
ATCOM TECHNOLOGY CO., LIMITED www.atcom.cn
2
Content
CONTACT ATCOM........................................................................................................................................................................ 4
OVERVIEW OF ATCOM............................................................................................................................................................. 4
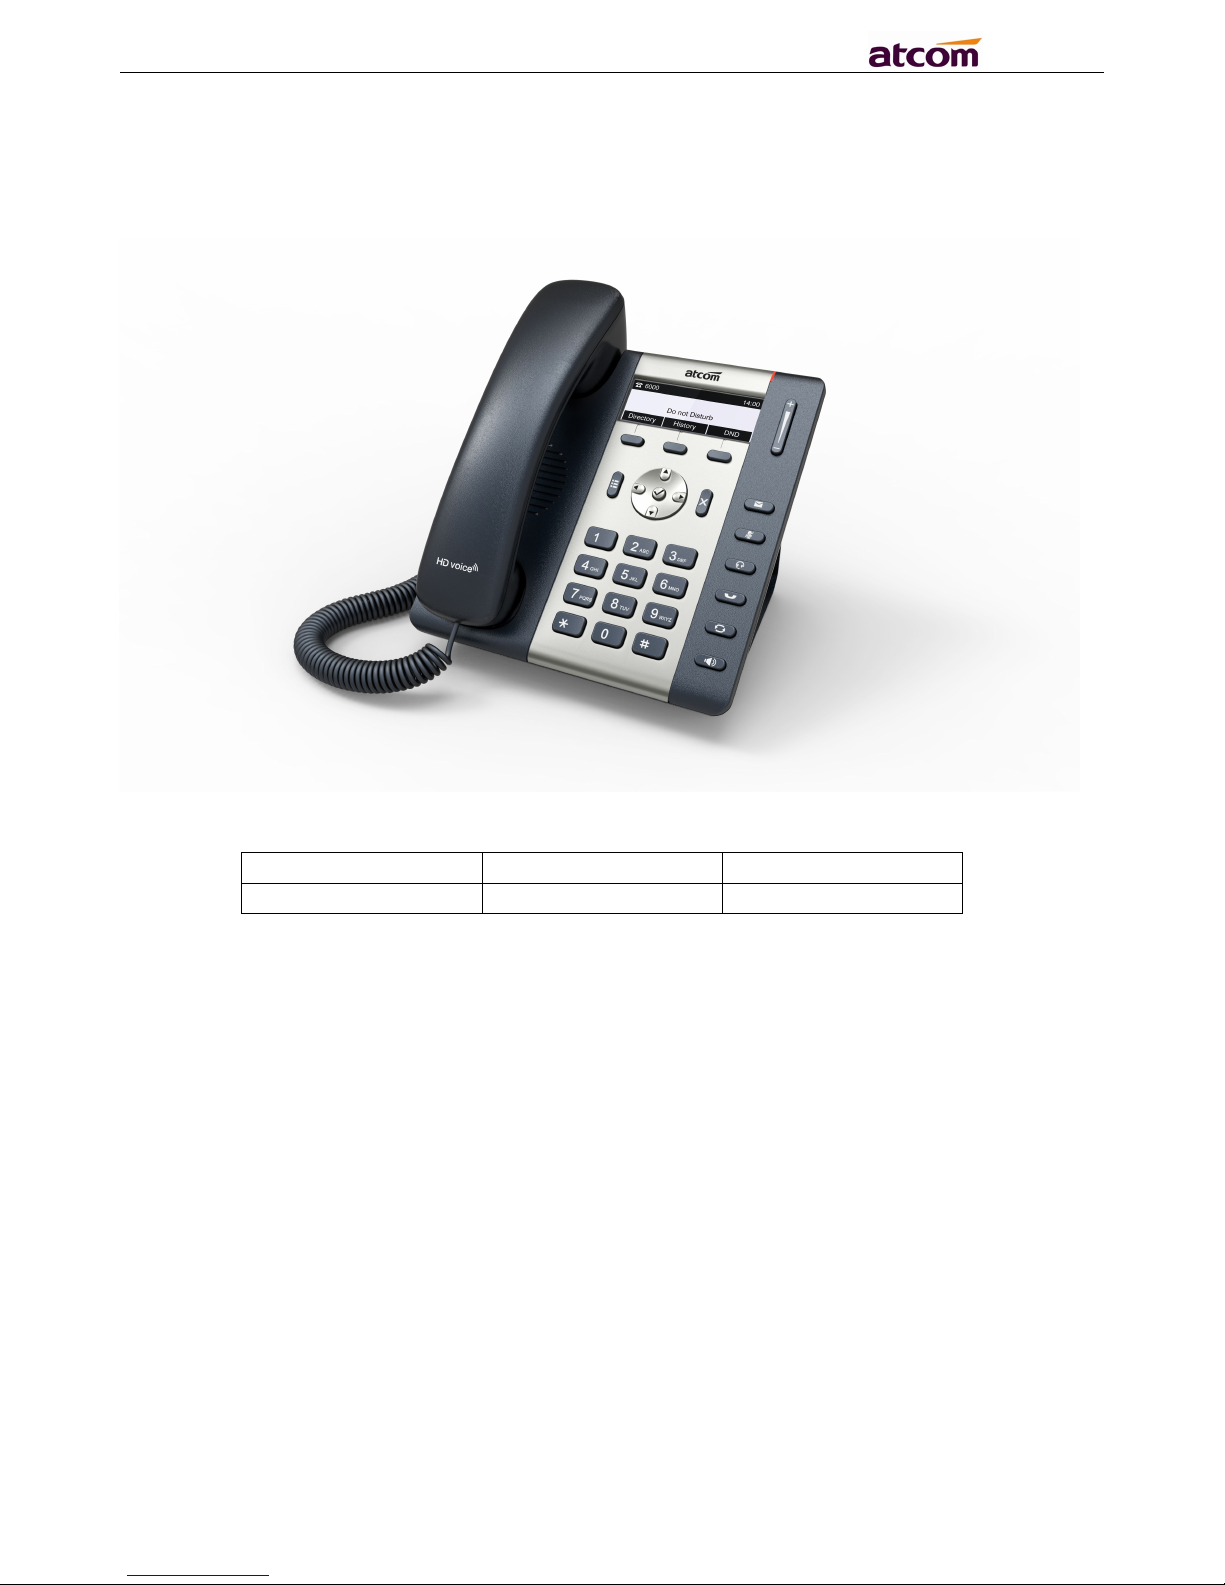
1. OVERVIEW OF RAINBOW 1.......................................................................................................................................................... 5
1.1 INTERFACES..................................................................................................................................................................................... 5
1.2 HARDWARE.....................................................................................................................................................................................5
1.3 SOFTWARE......................................................................................................................................................................................5
1.4 NETWORK.......................................................................................................................................................................................6
1.5 MANAGEMENT AND MAINTENANCE.................................................................................................................................................... 6
1.6 PROTOCOL...................................................................................................................................................................................... 6
1.7 COMPLIANT AND AUTHENTICATED STANDARD....................................................................................................................................... 7
1.8 PACKING LIST.................................................................................................................................................................................. 7
1.9 INSTALLATION..................................................................................................................................................................................7
2. KEYPAD OF IP PHONE................................................................................................................................................................. 14
2.1 DESCRIBE OF THE BUTTONS AND SCREEN............................................................................................................................................14
2.2 DESCRIBE OF THE LCD SCREEN ICONS............................................................................................................................................... 15
3. BASIC FUNCTIONS AND OPERATIONS....................................................................................................................................... 17
3.1 ANSWER THE CALLS........................................................................................................................................................................ 17
3.2 MAKE CALL.................................................................................................................................................................................. 17
3.3 PRE-DIAL..................................................................................................................................................................................... 18
3.4 MULTIPLE LINE DIAL-UP.................................................................................................................................................................. 18
3.5 HANG UP THE PHONE..................................................................................................................................................................... 18
3.6 CALL TRANSFER............................................................................................................................................................................. 19
3.7 VOICEMAIL................................................................................................................................................................................... 19
3.8 MUTE CALLS..................................................................................................................................................................................19
3.9 CALL HOLD................................................................................................................................................................................... 19
3.10 3-WAY CONFERENCE CALL............................................................................................................................................................ 19
3.11 CALL HISTORY............................................................................................................................................................................. 20
3.12 DEFAULT PASSWORD.................................................................................................................................................................... 20
3.13 CHECK THE PHONE’SIP ADDRESS....................................................................................................................................................21
3.14 DIAL PLAN..................................................................................................................................................................................21
4. WEB SETTINGS............................................................................................................................................................................23
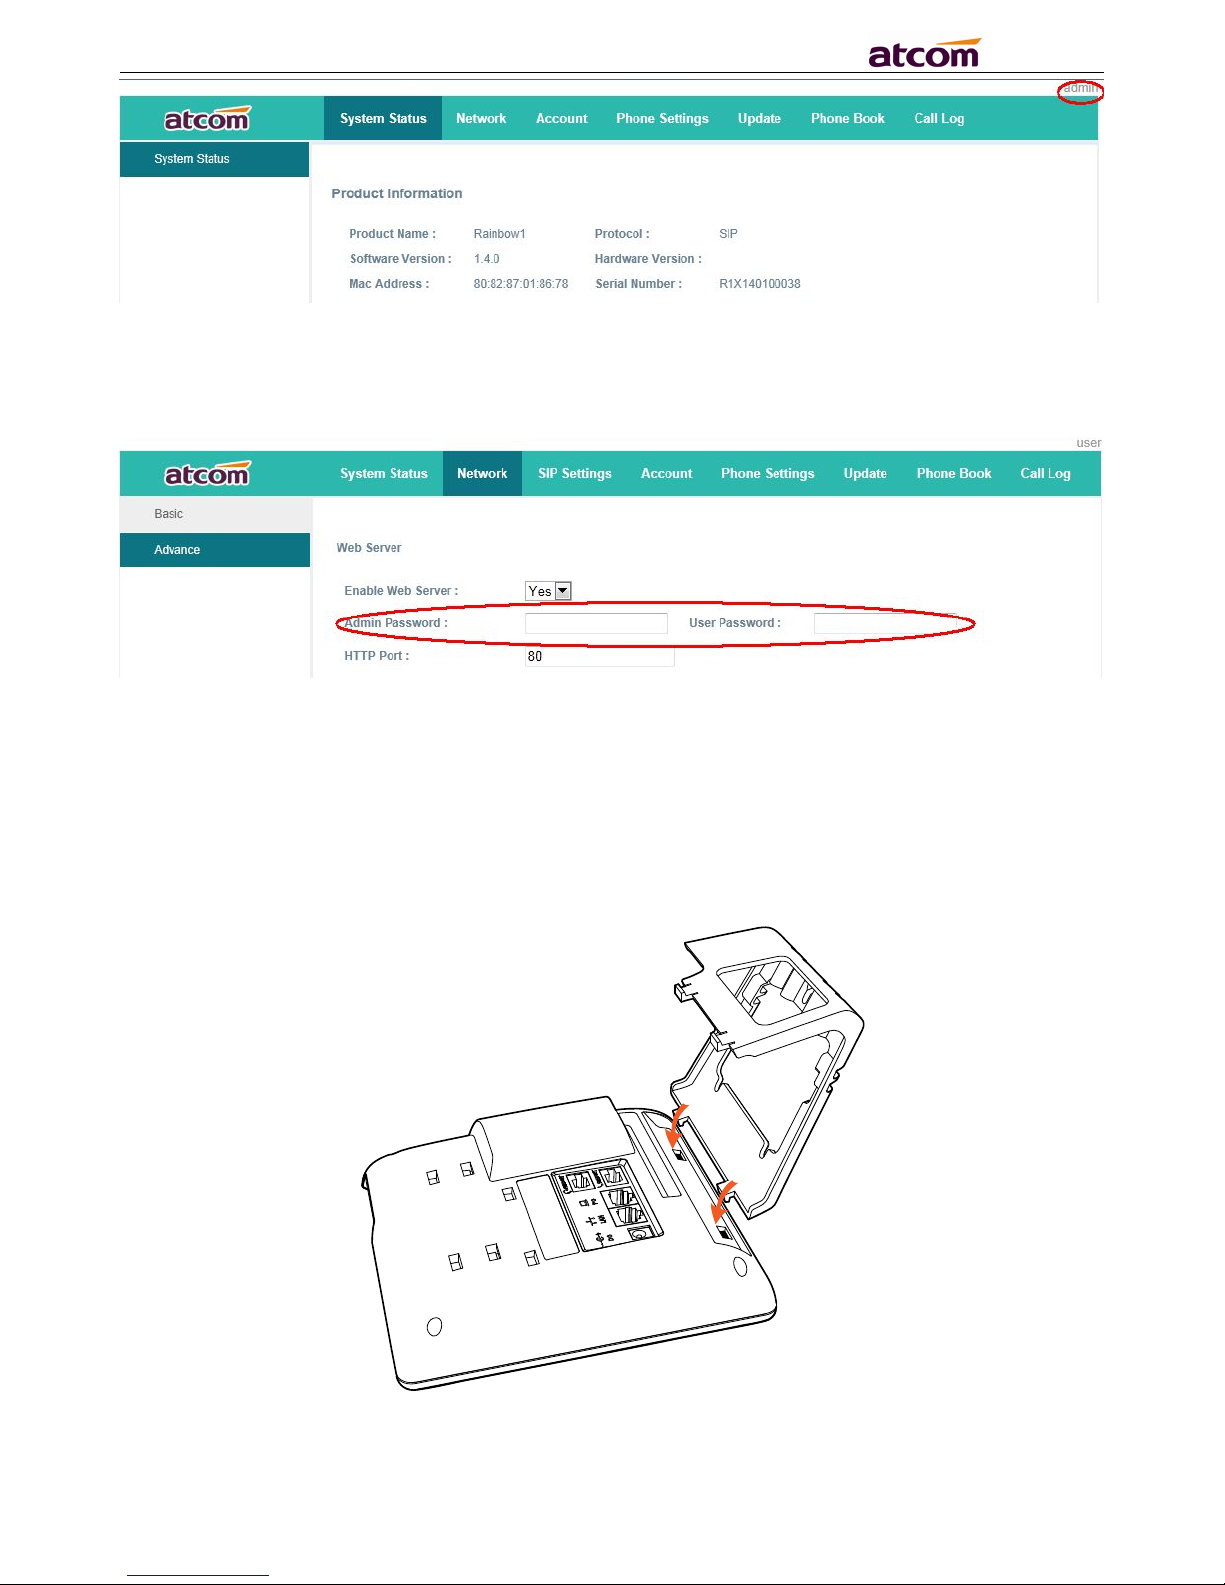
4.1 SYSTEM STATUS.............................................................................................................................................................................. 23
4.2 NETWORK.....................................................................................................................................................................................23
4.2.1 Basic................................................................................................................................................................................... 23
4.2.2 Advance............................................................................................................................................................................. 24
4.3 SIP SETTING................................................................................................................................................................................. 26
4.4 ACCOUNT..................................................................................................................................................................................... 28
4.5 PHONE SETTING............................................................................................................................................................................ 31
4.5.1 Preference..........................................................................................................................................................................31
4.5.2 Features............................................................................................................................................................................. 33
4.5.3 Voice.................................................................................................................................................................................. 34

Rainbow1 IP Phone User Manual
ATCOM TECHNOLOGY CO., LIMITED www.atcom.cn
3
4.5.4 Ring.................................................................................................................................................................................... 35
4.5.5 Tone................................................................................................................................................................................... 35
4.6 UPDATE........................................................................................................................................................................................36
4.6.1 Manual Update.................................................................................................................................................................. 36
4.6.2 Update/Auto Provision...................................................................................................................................................... 36
4.6.3 Reset & Reboot.................................................................................................................................................................. 37
4.7 PHONE BOOK................................................................................................................................................................................37
4.8 CALL LOG..................................................................................................................................................................................... 37
5. FAQ & TROUBLE SHOOTING.......................................................................................................................................................39
5.1 How to make a factory reset.................................................................................................................................................39
5.2 Upgrade firmware under safe mode.................................................................................................................................... 39
5.3 How to make direct IP call.................................................................................................................................................... 39
6. TROUBLE SHOOTING.................................................................................................................................................................. 40
6.1 The phone can’t register successfully...................................................................................................................................40
6.2 The phone can’t obtain IP address....................................................................................................................................... 40
6.3 Only one part can hear the voice during the call................................................................................................................. 40
7. ABBREVIATIONS......................................................................................................................................................................... 41

Rainbow1 IP Phone User Manual
ATCOM TECHNOLOGY CO., LIMITED www.atcom.cn
4
Contact ATCOM
Overview of ATCOM
ATCOM is the leading VoIP hardware manufacturer in global market. We have been keeping
innovating with customer’s needs oriented , working with partners to establish a total solution for
SMB VoIP with IP phone , IP PBX and Asterisk cards
With over 10 years’ experience of R&D , manufacturing and service in network and VoIP filed ;
mission of creating the biggest value for IP terminals , we commit ourselves in supplying the
competitive IP phone and other terminals for IP PBX , softswitch , IMS , NGN providers and carriers;
supplying the competitive total VoIP solution for SMB market. We keep improving the customer’s
experience and creating the bigger value with our reliable products. Until now, our VoIP products
have been available in 100+ countries and used by millions of end users.
Contact Sales
Address
Area C, A2F , Block 3 ,Huangguan Technology Park , #21 Tairan
9th Rd, Chegongmiao , Futian District , Shenzhen China
Tel + (86) 755-83018618-8806
Fax + (86) 755-83018319
E-mail sales@atcomemail.com
Contact Technical Support
Tel + (86) 755-83018618-8008
E-mail Support@atcomemail.com
Website Address:http://www.atcom.cn/
Download Center:http://www.atcom.cn/download.html

Rainbow1 IP Phone User Manual
ATCOM TECHNOLOGY CO., LIMITED www.atcom.cn
5
1. Overview of Rainbow 1
Rainbow1
Type POE Power adapter
Rainbow1 Yes Optional accessory
1.1 Interfaces
Power input: DC 5V, 1000mA or POE
LAN: RJ45 port
PC: RJ45 port
Headset jack 1 : RJ9 port
Handset jack 1 : RJ9 port
1.2 Hardware
LCD: 132×52
FLASH: 16M
RAM: 16M
CPU: 262MHz Dual Core
LED indicator: 1 Status Light
1.3 Software
Sip 2.0 (RFC3261) and other related SIP RFCs
1 SIP lines
STUN
Jitter Buffer, VAD,CNG

Rainbow1 IP Phone User Manual
ATCOM TECHNOLOGY CO., LIMITED www.atcom.cn
6
G.711A/u, G722, G.723, G.726-16, G.726-24, G.726-32, G.726-40, G.729 , Lin16-16, iLBC
Echo Cancellation
SIP Domain name, Authentication
DTMF(inband, RFC2833, info)
Call transfer, Call forward, 3-way conference, Call hold, Call back
DND(Do Not Disturb), Auto answer, Blacklists, Block Call-ID, Block Anonymous call, Dial
plan, IP call
Phone book with 100 white records and 50 black records, 100 answered calls, 100 missed
calls, 100 dialed calls
Update via HTTP, FTP, TFTP, PNP
Syslog
SNTP
WEB access with different login level
Multi-language: English, Chinese, Farsi, French, German, Hebrew, Italian, Portuguese,
Russian, Spanish, Turkish
Soft button: soft button * 3
Redundancy SIP server
1.4 Network
LAN/PC:Support bridge mode
Support PPPoE(ADSL,cable modem used for Internet connecting)
Support VLAN(DATA VLAN and VOICE VLAN)
Support L2TP VPN
LAN support Primary and Secondary DNS
LAN support DHCP Client
Support QoS
1.5 Management and Maintenance
Support safe mode and firmware updating under safe mode
Support different level user management
Configuration via web , keyboard
Support multi-language
Auto provision (Firmware and configuration file)
Support system log and call log
1.6 Protocol
IEEE 802.3 /802.3 u 10 Base T / 100Base TX
PPPoE: PPP over Ethernet
DHCP: Dynamic Host Configuration Protocol
SIP RFC3261, RFC3262, RFC3263, RFC3264, RFC3265, RFC2543, RFC3489, RFC3842,
RFC3515, RFC2976, RFC3428, RFC2327, RFC2782, RFC1889
TCP/IP: Transfer Control Protocol/Internet Protocol
RTP: Real-time Transport Protocol
RTCP:RTP Control Protocol
DNS: Domain Name Server
TFTP: Trivial File Transfer Protocol
HTTP:Hypertext Transfer Protocol
FTP:File Transfer Protocol

Rainbow1 IP Phone User Manual
ATCOM TECHNOLOGY CO., LIMITED www.atcom.cn
7
1.7 Compliant and Authenticated Standard
CE: AGC01180140201E2,AGC01180140202E2
Comply with ROHS in EU
Comply with ROHS in China
Operation temperature: lower than 60° C
Storage temperature: lower than 60° C
Humidity: 10 to 90% no dew
1.8 Packing List
Model Phone Handset Handset
line
Stand
bracket
Ethernet
Cable
User Manual
CD
Rainbow1 1 1 1 1 1pcs
1.5m
1
Note: Power adapter (Input: AC 100~240V, 50/60Hz; Output: 5V, 1000mA;)
1.9 Installation
Connect LAN port to PC with Ethernet cable, or connect Rainbow1 to a switch/router which is in the
same network as your PC. It uses DHCP mode by default, and you can review its current IP address
by pressing
key on idle state. To access the web interface, you can input the IP address in IE
browser. E.G. The IP address of your Rainbow1 is 192.168.1.100, you can input 192.168.1.100 and
press enter key on your browser to access its webpage. There are two login level:
User
Admin

Rainbow1 IP Phone User Manual
ATCOM TECHNOLOGY CO., LIMITED www.atcom.cn
8
No password is set for those two accounts with factory settings. You can click admin button on the
right corner of the webpage to switch from the user to admin mode. To set the password for user and
admin login you can firstly login as admin and enter the Network--->Advance page as following.
Installation instruction
1. Desktop installation
A. Put the bottom side of the IP phone upside and press one-side joints of stand bracket into the slot,
please refer the picture as below:

Rainbow1 IP Phone User Manual
ATCOM TECHNOLOGY CO., LIMITED www.atcom.cn
9
B. Press the other side joints into the slot according to the direction of the arrow
C. It is the right picture after fixing the stand bracket below:
D. Disassemble the stand bracket:
Push the spring joint of stand and pull the stand according to the direction of the arrow. When the
joints are pulled out of the slot, you can take off the stand bracket.

Rainbow1 IP Phone User Manual
ATCOM TECHNOLOGY CO., LIMITED www.atcom.cn
10
2. Wall-hung Installation
A. Put the bottom side of the IP phone upside and press one-side joints of wall-hung stand bracket
into the slot, please refer the picture as below:

Rainbow1 IP Phone User Manual
ATCOM TECHNOLOGY CO., LIMITED www.atcom.cn
11
B. Press the other side joints into the slot according to the direction of the arrow
C. After install the wall-hung stand bracket, press one-side joints of stand bracket into the slot,
please refer the picture as below:

Rainbow1 IP Phone User Manual
ATCOM TECHNOLOGY CO., LIMITED www.atcom.cn
12
D. Press the other side joints into the slot according to the direction of the arrow
E. Knock in nails or screws on the wall according to the proportion of the distance between the
hanging holes as below:
F. It is the right picture after fixing the stand bracket below:

Rainbow1 IP Phone User Manual
ATCOM TECHNOLOGY CO., LIMITED www.atcom.cn
13
G. Disassemble the stand bracket:
Push the spring joint of stand and pull the stand according to the direction of the arrow. According to
the direction of the arrow:

Rainbow1 IP Phone User Manual
ATCOM TECHNOLOGY CO., LIMITED www.atcom.cn
14
2. Keypad of IP Phone
2.1 Describe of the buttons and Screen
Soft Keys
Press to select a function which displayed at the softkey zone
of screen
Display all optional functions at the last line of LCD screen.
Status Indicator
LED
Indicates the phone’s status,
If the phone is being started ,the LED is on
If the phone is standby, the LED is off
If there is income calling, the LED will blink at 120ms on,
120ms off.
If there is a new message, the LED will blink at 600ms on,
600ms off.
LCD Screen
All information such as date, time, phone number, incoming
caller’s ID(if available),line/call status, extension numbers and
the soft key features are displayed on it.
Navigation
OK
Cancel
Soft Key
Dial pad
Speaker
Volume
Redial
Hold
Headset
Mute
VoiceMail
Menu
LCD
Status Indicator LED

Rainbow1 IP Phone User Manual
ATCOM TECHNOLOGY CO., LIMITED www.atcom.cn
15
2.2 Describe of the LCD Screen Icons
Icon Description
The extension is registered
The extension is unregistered
There is a new voice mail
There is an incoming call
Dial pad Entering numbers or characters.
Navigation keys
Allows users to navigate (left, right, up, down). Press can
enter “Directory”. Press can enter “History”.
Confirm users’ operation and show status when Rainbow1 is
idle.
Cancel users’ operation.
Enter menu settings.
Adjust the volume (speaker/handset/headset/ring). Volume
level will be displayed on LCD when pressing volume key.
Pick up and hung up under the speaker mode.
Mute the mic in a conversation by pressing the Mute button;
this prevents the person on the active call from hearing what
you or someone else in the room is saying.
To un-mute, press the Mute button again.
Pick up and hung up under headset mode.
Check the Voicemail status.
Hold the current call.
Redial the last dialed number

Rainbow1 IP Phone User Manual
ATCOM TECHNOLOGY CO., LIMITED www.atcom.cn
16
The call is held
Rainbow1 is in speaker mode
Rainbow1 is in handset mode
Rainbow1 is in headset mode
The call is muted

Rainbow1 IP Phone User Manual
ATCOM TECHNOLOGY CO., LIMITED www.atcom.cn
17
3. Basic functions and operations
3.1 Answer the calls
When there is an incoming call, phone will remind user with ringing. There are 3 ways to answer the
call
A. Answer by handset
Pick up the handset and talk with the caller. If you want to hang up, just put back the handset. When
you are talking with the handset and want to switch to speaker mode or headset mode, please press
key or key, then put down the handset.
B. Answer by speaker
Press
key and talk with callers by built-in Micro-phone and Speaker. If you want to hang
up, please press
key again. Switch calling or talking into handset mode by lifting the
handset under speaker mode. Press key will switch calling or talking into headset mode.
C. Answer by headset
Keep your microphone connected with the RJ9 headset jack, when there is an incoming call, press
key and talk with the caller. If you want to hang up, please press key again.
Pressing
key can change calling or talking into speaker mode, and lifting the handset
switches to handset mode.
3.2 Make Call
A. Use the handset
Pickup the handset and input a phone number. Press soft key "Send" to dial the number. When you
hear the tones of “du~~du~~” and the phone number your dialed is being displayed on the LCD, the
phone at the side of being called should be ringing. If the called party answers this calling, the call is
established and the calling timer is started immediately.
B. Use the speaker
Press
key and input a phone number. Press soft key "Send" to dial the number. When
caller hear the tones of “du~~du~~” and the phone number your dialed is being displayed on the
LCD, the phone at the side of being called should be ringing. If the called party answers this calling,
the call is established and the calling timer is started immediately.
C. Use the headset
Press Key and input a phone number. Press soft key "Send" to dial the number. When
caller hear the tones of “du~~du~~” and the phone number your dialed is being displayed on the

Rainbow1 IP Phone User Manual
ATCOM TECHNOLOGY CO., LIMITED www.atcom.cn
18
LCD, the phone at the side of being called should be ringing. If the called party answers this calling,
the call is established and the calling timer is started immediately.
D. Dial from phone book
1. Press
key and input the keypad password 123 to enter the menu and choose “Directory”
option. Press "Select" soft key and then find the contact person by navigation keys. When the
certain contact person is highlighted, press "Dial" or just pick up the handset to call this number.
2. Pick up the handset, press "Directory" soft key, then select the contact person and press "Dial"
soft key.
3. Pick up the handset, press
and enter “Directory”, then select the contact person and press
“Dial” soft key.
E. Dial from call history
1. Press
key and input the keypad password 123 to enter the menu and choose “History”
option, then enter sub-directory “Dialed Calls”, “Received Calls” or ” Missed Calls” to select one
of call history entry, and press "Dial" soft key or pick up handset to call this number.
2. Pickup the handset, press "History” soft key, then select one of call history entry, and press
"Dial" soft key to call this number.
3. Pickup the handset, press
and enter “Call History” ,then select one of call history entry, and
press "Dial" soft key to call this number.
3.3 Pre- dial
It’s a method to dial a phone number immediacy at standby mode.
A、Dial-up the phone number at standby mode
B、Press soft key "Dial" to send out the number
3.4 Multiple line dial-up
Rainbow1 supports up to 2 concurrent calls. If there is a new incoming call when you’re talking on
Rainbow1, the new incoming call will be displayed on LCD and status indicator LED will be fast
blinking. User can press soft key "Hold" then press “Answer” to receive the new incoming call.
3.5 Hang up the phone
1. Handset hang up
Put back the handset at handset mode, the current calling will be hung up.
2. Speaker hang up
Press
key at speaker model, the current calling will be hung up.
3. Headset Hang up
Press key at headset model, the current calling will be hung up.
4. Hang up one line call
Press the hook to hang up the current calling when 2 calls happened simultaneously.

Rainbow1 IP Phone User Manual
ATCOM TECHNOLOGY CO., LIMITED www.atcom.cn
19
3.6 Call Transfer
1. Attended call transfer
The attended transfer allows user to call a third-party before transferring the calling.
While on calling, press the "Transfer" soft key to hold the current call and phone the third party. Then
dial the target number you want to transfer to on the activated line and press “Send” soft key to call
that number. After the target party answers the call, press "Transfer" soft key again to complete the
transfer.
2. Blind call transfer
The blind transfer allows user to transfer a call without speaking to the third party. On the user side,
the call will be ended as soon as the target phone number is dialed.
Operating steps: Press “More” soft key to get more option, then press “Bxfer” soft key, input the
transfer target number and press “Send” soft key.
3.7 Voicemail
Rainbow1 has a
key for entering voicemail box. Press
key to enter the menu to
configure voicemail number if never configure it previously. Otherwise, the voicemail number will be
called after press it. If you want to modify it after configured it, please go to the Account webpage to
modify the voicemail number.
3.8 Mute calls
The input audio will be not transmitted to peer phone after pressing
key, and the phone
will be muted even switched among different modes of speaker, handset and headset. To un-mute,
just press
key again.
3.9 Call Hold
The current calling will be hold by pressing soft key “Hold” or
key. And the held call will be
resumed after pressing soft key “Resume” or
key or the corresponding line key. Even on
3-way conference calling, the 3-way conference calling will be held after pressing “Hold” key, and be
resumed to 3-way conference after pressing “Hold” Key again. Remember the conversation is still on
hold without being ended even if hung up under the status of hold.
3.10 3-Way Conference Call
To initiate a conference call:
Press “More” soft key on calling to get more options, then press “Conf” soft key to start a conference
call. Enter the phone number of the third party and press “Send” soft key to send it out.
1. After the third party answers the call, pressing "Conf" key again to establish the 3-way conference.
2. 3-way conference initiator can press "Exit" soft key to quit from the conference and leave the other
two parties still in the conversation.
3. If the initiator hangs up the call or press the “End Conf” soft key, the conference will be ended and
the calling between the other two parties will be hung up.

Rainbow1 IP Phone User Manual
ATCOM TECHNOLOGY CO., LIMITED www.atcom.cn
20
3.11 Call History
Rainbow1 supports 100 missed calls list, 100 incoming calls list and 100 dialed calls list. When the
storage is full, the old record will be erased by the new one.
Press "History" soft key or
key when Rainbow1 is standby, all the incoming(->), outgoing(<-)
and missed calls(!) will be listed. There is other ways to check them:
A. Missed call
1. Press
key.
2. Press
key and key to select “Call History” then press “Select” soft key.
3. Press
key and key to select “Missed Calls” then press “Select” soft key.
4. Press
key and
key to browse the missed call record. If there is no record, the LCD
display will be indicated “List is Empty”.
B. Answered call
1. Press
key .
2. Press
key and key to choose “Call History” and then press “Select” soft key.
3. Press
key and key to choose “Answered Calls” and then press “Select” soft key.
4. Press
key and
key to browse the answered call records. If there is no record, the LCD
display will be indicated “List is Empty”.
C. Dialed call
1) Press
key.
2) Press
key and
key to select "Call History" and then press “Select” soft key.
3) Press
key and
key to select “Dialed Calls” and then press “OK” soft key.
4) Press
key and
key to browse the dialed call records. If there is no record, the LCD
display will be indicated “List is Empty”.
3.12 Default Password
Password is needed to access menu and web.
Other manuals for Rainbow1
4
Table of contents
Other ATCOM IP Phone manuals

ATCOM
ATCOM AT840 series User manual

ATCOM
ATCOM A10 User manual

ATCOM
ATCOM AT-640P User manual

ATCOM
ATCOM Rainbow4(s) User manual

ATCOM
ATCOM AT840P Owner's manual

ATCOM
ATCOM AT800D User manual

ATCOM
ATCOM AT800 Series User manual

ATCOM
ATCOM Rainbow1 User manual

ATCOM
ATCOM D2SW User manual

ATCOM
ATCOM AT-320 H323 User manual

ATCOM
ATCOM Rainbow 2 Owner's manual

ATCOM
ATCOM AT840 series User manual

ATCOM
ATCOM AT840 series User manual

ATCOM
ATCOM D2SV-LW User manual

ATCOM
ATCOM AT800D User manual

ATCOM
ATCOM D2SW User manual

ATCOM
ATCOM Rainbow2 User manual

ATCOM
ATCOM AT800 Series User manual

ATCOM
ATCOM AT-620P User manual

ATCOM
ATCOM D2X User manual