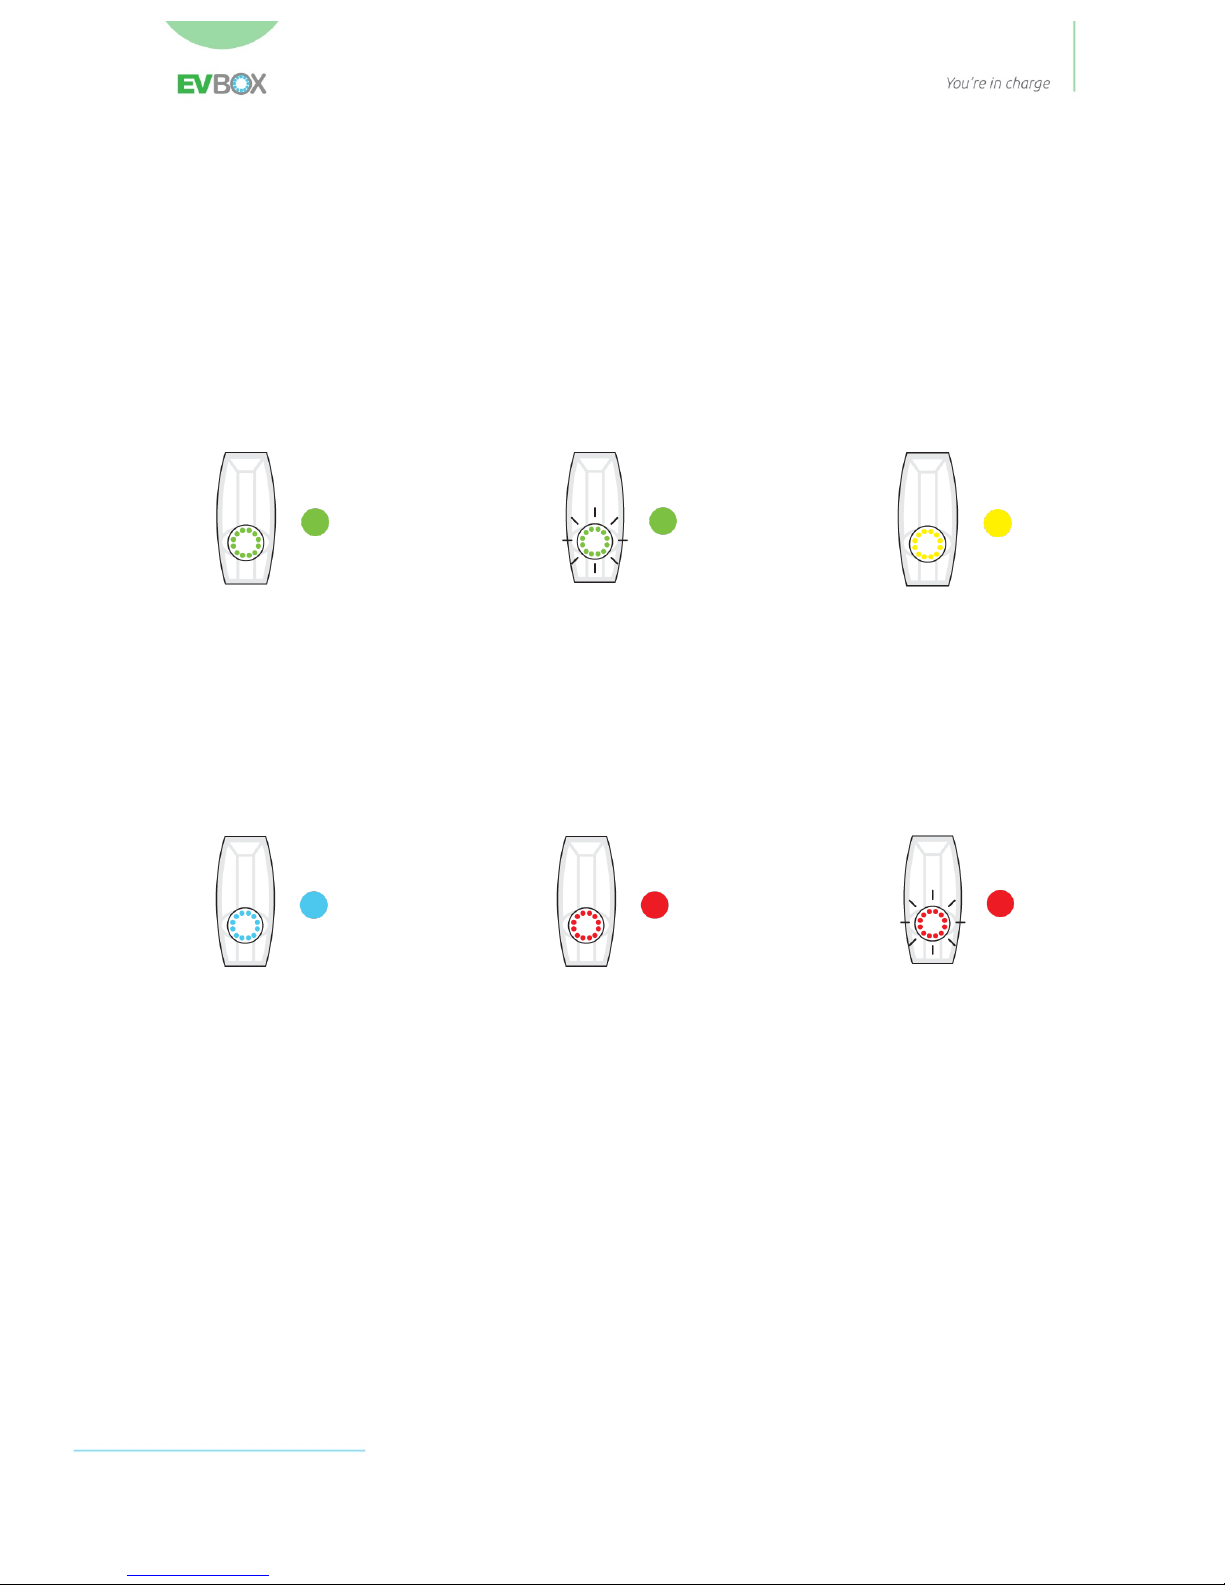
EVBox BusinessLine series User manual

Installation Manual
EV-Box Charging Station
BusinessLine Model
Ver. 4 rev. 3
25-05-2016

2
Table of contents
1. Safety regulations...............................................................................................................3
Transport and storage ............................................................................................................................3
2. Product description............................................................................................................4
General ......................................................................................................................................................4
Online – Model with modem .................................................................................................................4
Safety .........................................................................................................................................................4
Mode 3 Controller ...................................................................................................................................4
Operation..................................................................................................................................................4
Warranty....................................................................................................................................................4
3. Control..................................................................................................................................5
Charging stations with RFID reader......................................................................................................5
Start charging .........................................................................................................................................5
Stop charging:.........................................................................................................................................5
Charging Stations without RFID charging card / modem .................................................................5
LED ring indicator ....................................................................................................................................6
Note for installers....................................................................................................................................6
4. Installation ...........................................................................................................................7
Safety requirements................................................................................................................................7
Location.....................................................................................................................................................7
Power supply cable..................................................................................................................................8
Wall mounting ..........................................................................................................................................8
Pole mounting..........................................................................................................................................8
Wall Mounting Bracket ...........................................................................................................................9
Power Supply cable .................................................................................................................................9
Connecting charging station..................................................................................................................9
Finishing installation............................................................................................................................. 10
Maintenance .......................................................................................................................................... 11
Product and environmental characteristics ..................................................................................... 11
5. Installing the modem externally ................................................................................... 12
6. Adding extra connectors (Satellites)............................................................................ 13
7. Technical Specifications.................................................................................................. 14
8. Troubleshooting .............................................................................................................. 15
9. EU Declaration of Conformity ....................................................................................... 17

3
1.
Safety regulations
WARNING: RISK OF ELECTRIC SHOCK.
• Please read the documentation provided with the charging station to acquaint yourself
with the safety instructions and directions before installing or using the charging station.
• The charging station is designed and tested in accordance with international standards.
• Use this charging station for charging all mode 3 compatible electric vehicles only. Refer to
your vehicle owner’s manual to determine if your vehicle is suitable.
• This charging station must be used exclusively for the purpose intended.
• Do not operate the charging station if it or the charging cable is physically cracked, frayed,
other otherwise visibly damaged. Please consult the stations owner and/or an electrician right
away.
• This charging station contains no user serviceable parts. Please consult EV-Box or a certified
electrician for more information. Do not attempt to service the charging station yourself.
• These directions for use are valid for different models of the charging station. It is possible
that a number of features are described that are not applicable to your charging station.
• This charging station may only be installed, maintained and repaired by qualified personnel.
Incompetent installation or repairs may result in danger to the user.
• Do not install a faulty charging station.
• For instructions on installation, see Chapter 4.
• The charging station is used in combination with a power source. Always switch off the
power supply before carrying out maintenance. The charging station contains no internal
components that can be maintained by the user. The “0n”/ ”Off” and “green” position of the
charging station's main switch does not guarantee that the system is disconnected from the
power source and does not safeguard against the voltage applied.
• Do not switch on the charging station if the covers are not in place.
• Ensure that the equipment is used under the correct operating conditions.
• Do not use explosive or readily flammable substances in the vicinity of the charging station.
• Persons unable to assess the dangers should not use the charging station.
• Do not direct powerful jets of water onto the charging station, and never operate with wet
hands.
• Ensure that the charging cable is
not kinked or jammed
!
• Make sure the charge cable is positioned so it will not be stepped on, driven over, tripped
over, or otherwise subjected to damage or stress.
• Ensure that the charging cable cannot come into contact with heat sources.
• Always pull on the plug's hand grip, and never on the cable.
•
While charging the charging cable must be completely unwound and connected to the
vehicle without overlapping loops!
This is to avoid the risk of the charging cable overheating.
• In the event of danger and/or accidents, have the charging station disconnected
immediately by a competent person (electrician).
• Please carefully read our instructions and the vehicle instructions in your owner’s
handbook before charging your electric vehicle.
Transport and storage
Ensure that the main power source has been disconnected when storing or transporting the
charging station.
No liability can be accepted for damage during transport if the charging station is
transported in anything other than the original packaging.
Store the charging station in a dry environment. The storage temperature must be between
–25°C and +60°C.

4
2.
Product description
General
The EV-Box charging station (Figure 1) is compatible with all mode
3 electric vehicles. The charging station is meant for both indoor
and outdoor use. Usage of the charging station is allowed in an
ambient temperature between -25°C and +60°C. The charging
station is connected to a central system for registration of the
kWh charged.
Online – Model with modem
The smart charging station is designed with a RFID card reader, a Kilowatt hour meter and a
GSM/GPS/GPRS modem. These components together provide for the authorization and
communication of the charging session procedure with the central system (BackOffice) for
processing and settlement of the transactions as required.
A GSM link with the charging
station is essential for the charging station to work properly.
However, a good link cannot
always be obtained in enclosed spaces, for instance a closed or underground car park. In
cases like this, the modem should be positioned outside the charging station along with the
GSM/GPS antenna and connected to the charging station. See Chapter 5.
Safety
There’s no power on the socket of the charging station as long as no plug is inserted and it has
not been started up by the RFID card. In the models with BXXXX-X
1
00 there is a circuit breaker
and a residual current device (type A - 40A-30mA) for each socket. A type B residual current
device is available as an option (Table 7, Technical specifications). Models with BXXXX-X
0
01
do not have residual current devices or circuit breakers. All models feature a circuit breaker
(C6A) for the control circuit.
Mode 3 Controller
The Type 2 socket is connected to the Mode 3 Controller and locking module in accordance
with IEC-61851. This means that the charging station is constantly checking for the presence
of a ground connection. In addition, the current is only switched on once a supported
charging cable has been correctly connected to both the charging station and the vehicle
and the presented RFID card is authorized.
Operation
A charging session may be started by holding an authorized RFID card (Mifare Classic,
13.56Mhz) against the front of the charging station at the round surface showing a hand
with a RFID card (Figure 1). If the charging station is not connected to a vehicle and/or is not
activated by the RFID card, there is no voltage on the socket.
Warranty
EV-Box warranties its equipment and software against errors and defects in materials and
workmanship for twenty-four (24) months from the date of delivery, during which time it will
use its best efforts to repair the errors, if any. However, any such problems encountered out
of any causes that are not attributable to EV-Box, shall be for customer’s risk and account.
Figure 1: BusinessLine

5
3.
Control
Charging stations with RFID reader
Start charging
1. Use your charging cable to connect the EV-Box station to your vehicle.
2. Present your charging card (RFID Card) to the card reader.
The charging station will react with a tone. This indicates your card is being validated. It’s
possible that the LED ring will flash yellow for a couple of seconds.
3. The transaction will start automatically (LED ring is Blue).
Stop charging:
1. Present your charging card (RFID Card) to the card reader.
2. The charging session stops (LED ring will be GREEN or Off)
3. Unplug the charge cable from the EV-Box and your vehicle.
Charging Stations without RFID charging card / modem
For charging stations that don’t operate with a RFID card, there will be either a key switch (or
pushbutton) or with an AUTO-START. With the key switch you turn the key or push the start
button to start or stop the transaction. For AUTO-START just plug the charging cable into the
vehicle and the charging station to start the transaction. Unplug the charging cable from the
vehicle to stop the transaction.

6
LED ring indicator
The socket is surrounded by an LED ring. It shows the status of the charging station, so that
you can see which mode the charging station is in (see Chapter 8). A blinking yellow LED-ring
(once every second) indicates a paused charging session. This is only possible in a Hub-Satellite
configuration (see chapter 6). Charging automatically resumes when power becomes
available. For charging stations that don’t operate with a RFID card the Led ring is off in stand-
by mode. For RFID card operated charging stations the LED ring is green in stand-by mode.
Note for installers
Once the installation has been done, the LED ring indications can be tested with an
appropriate test equipment or with a service card. These are available as an option.
Flashing RED
RED
Green or OFF
Flashing GREEN
YELLOW
BLUE
Stand-by or
ready for use
Your charging card
is being verified
Faulted, please
contact the
service desk
Awaiting
communication from
your vehicle or vehicle is
fully charged
Charging
Your charging card is
not authorized to start
a session

7
4.
Installation
Safety requirements
Connecting and installing the charging station must be done by a qualified technician.
The owner or user is responsible for the installation, operation and maintenance of
the charging station, whereby both the law regarding the safety of persons, animals and
property must be observed, as well as the installation instructions in force in the country of
use.
Read the installation instructions before you start work on the installation.
The charging station complies with Safety Class I (the charging station is supplied with
a ground terminal for safety) and voltage Category III.
The incoming and/or outgoing terminals for the alternating current are fitted with an
uninterruptible grounding for safety. If it is plausible that the ground safety has been
damaged, the charging station must be taken out of operation and secured against being
activated accidentally.
Ensure the correct supply voltage/power and ensure that the meter cabinet is made
properly safe.
Each charging station should be protected by a residual current device Type A
(>30mA/AC). The residual current device must switch off all the phases connected and
the “N”. A residual current device Type B with direct current fault detection >6mA/DC is
necessary for certain electric vehicles. See the vehicle’s owner’s manual. The applied RCB must
comply with local law and regulations.
Never replace a safety component by one of another type.
• All components were correctly connected and operationally tested before dispatch of
the charging station.
• Before switching on the charging station check that the power source available
corresponds to the configuration settings of the charging station as described in the
manual and that all the cables in the charging station have been properly connected.
• Ensure that the equipment is used under the correct operating conditions.
• Never operate the charging station in wet or very dusty surroundings.
• Ensure that there is always adequate free space (at least 20cm) around the charging
station for ventilation purposes.
Location
Position the charging station, where possible, in surroundings not subject to extreme sunlight
and where damage from outside cannot occur. The charging station can be installed on a
stainless steel pole, which can be ordered with the charging station, whereby the supply cable

8
enters through the bottom of the pole. The other option is to mount it onto a sturdy wall
between 90cm and 120cm from ground level. The supply line is fed through a cable gland at
the lower side of the aluminium base plate or the hole on the back side of the base plate. The
wall must be able to bear a load of 40kg.
Power supply cable
The charging station is furnished with one or two 16A or 32A sockets, depending on the type.
Some charging stations with two sockets are equipped with an internal safety. These charging
stations must be connected with ONE power supply cable fitted with a properly dimensioned
circuit breaker (type c) in the meter cabinet
For charging stations without internal security each socket must be fitted with its own power
supply cable, each fitted a properly dimensioned RCB taking in account de-rating according to
IEC61439-2. The appropriate wire gauge of the supply cable depends on the power rating and
the distance between meter cabinet and charging station. The voltage drop must not exceed
5%, it is advisable to take into account a maximum allowable voltage drop of 3%. The
maximum wire gauge that can be fitted is 10mm2.
Wall mounting
Mount the charging station on a flat surface with the bottom of the charging station between
70cm and 110cm above ground level. At least 20cm of free space around the station must be
available for ventilation purposes. The wall must be able to bear a load of 40kg. The power
supply cable can be inserted either through the bottom gland of the charging station or
through the hole on the back side of the base plate . For charging stations equipped with an
attached charging cable the power supply cable must be inserted via the hole on the back
side of the base plate.
Pole mounting
Our charging stations can be mounted on a pole in the
ground.
To this end EV-Box offers its’ CombiPole (art. no. 290150 –
Figure 2). Our double BusinessLine stations can be mounted
directly on the CombiPole without additional provisions.
Our single BusinessLine stations are to be attached to our
CombiPole by using the provided BusinessLine Adapter Kit
(art. no. 290165 – Figure 3). The BusinessLine Adapter Kit is
provided with a separate installation manual.
Important NOTE:
Only single BusinessLine
charging
stations with a permanently attached charging cable can be
mounted on the CombiPole. This is done by using the
BusinessLine AdapterKit. A pole mounted version of the
double BusinessLine station with permanently attached
charging cables is not available yet at the time of writing.
Figure 2 / 3 / 4
2
3
4

9
In the ground:
To install the pole itself dig in the pole to 60cm below
ground level and align vertically (Figure 5). Ensure that the holes for
securing the charging station are in the correct position with respect to
the relevant parking place(s). The pole is provided with anchor blades
of 300 mm x 300 mm. Place the BusinessLine base unit on the Adapter
Kit’s (Figure 4) and tighten the nuts evenly with a hex key so that the
base part is not deformed. The charging stations’ front cover needs to
lock in tightly on the base unit to ensure IP54 level protection.
On foundations
: A pole is available as an option with four bolts for
securing to foundations or on a concrete floor. The base plate measures 195mm x 195mm
with four holes for attachment. The foundation must be able to bear a load of 40kg.
Wall Mounting Bracket
The charging station can also be installed on a wall bracket. The bracket is attached to a plate
measuring 195mm x 195mm with four holes for attachment. Install the bracket at a height of
90 – 120 cm. The wall/foundation must be able to bear a load of 40kg.
Power Supply cable
Lead the supply cable through the slot in the bottom of the pole/bracket
and ensure that it protrudes at least 50 cm above. Ensure that the power
supply cable has sufficient room so that small movements of the
pole/bracket do not lead to a break in the supply cable.
Connecting charging station
• During installation disconnect the power supply both in the
distribution box and by means of the operating switch in the
charging station.
• Accidental switching on of the current during installation must be
prevented. The installation technician must take adequate measures
to ensure this.
• Protect the working environment against unauthorized persons and
inform the surrounding area about the work, for example set up
caution tape or warning notices.
• Use the correct tools and provide resources and protection measures.
Disassemble the cover(s). These are attached to the underside of the
charging station with two hex socket bolts (Figure 3). For this you will need
the Hex key (5mm) provided. Slide the charging station over the pole
(Figure 4).
1. Be sure not to trap any lose wires during the process.
2. Check whether the pole/bracket goes far enough (40 cm) into the
charger and rests on the upper support.
3. Ensure that the power supply cable is passed through and insert it into
one of the holes on the pole, so that it can be easily connected.
4. Connect the power supply cable(s) to the main switch(es) or installation
block.
5. Hold the power supply cable in place with a zip-tie (for strain relief).
Figure 5: Installing a pole
Figure 6: Positioning the
hex socket bolts
Figure 7: Installing
charging station
Figure 8: Securing the
ground

10
6. Holes have been pre-drilled in the pole to attach the charging
station by means of the M6 bolt supplied.
7. Connect the pole to the ground with the ground cable and the M6
bolt + washer supplied to the lowermost tube terminal. (Figure 5).
8. Now tighten the tube clamps that have been pre-mounted. For this
use the two M10 socket spanners (Figure 6).
9. Check all plug connections (on the sealed printed circuit with RFID
reader) by firmly pressing the connectors.
Finishing installation
1. Ensure that the circuit breaker / residual current device in the meter
cabinet is in the “On” position and that the main switch in the charging
station is off.
2. Check the resistance value of the ground. This depends on the user settings. Certain EVs
may need a special grounding resistance. Refer to your EV owner’s manual. If grounding is not
sufficient a grounding rod must be implemented closest to the charging station.
3. Hang the covers onto the frame by inserting the top into the edge
at the top of the frame and hinging them downwards (Figure 7).
Please note! Make sure that each cover locks into the frame
properly and that the rubber pads are in place in order to
guarantee IP54 protection.
4. Check also that the cover locks securely into the open notch at the
bottom of the frame.
5. Switch on the supply current at the main distributor / meter cabinet.
The charging station will now carry out an automatic test. The LED ring
around the socket shows the following color indications during the test
(max. 60 seconds)
a)
RED flashing
: Booting, running test protocol and looking for
connection to the network.
b)
GREEN or OFF:
Stand-by, ready for use. (LED ring is off for
charging stations with pushbutton or autostart, for RFID
operated charging stations Led ring is green in stand-by
mode).
6. Carry out a functional test on both connectors in accordance with
the specifications of the charging station. For this use a test box for
charging stations supplied as an option.
7. You can now tighten the cover bolts at the bottom using the Hex
key. (
TIP
: When the charging station is mounted on a wall the space for tightening these cover
screws is very limited. use a small ratchet with a Hex key bit – 5mm)
Figure 9: Tube terminals
Figure 10: Installing covers

11
Maintenance
Dirt on the outside of the charging station can be cleaned off using a damp soft cloth. The
owner or user is responsible for the maintenance of the charging station, whereby both the
law regarding the safety of persons, animals and property (in NL NEN 3140) must be observed,
as well as the installation instructions in force in the country of use.
Product and environmental characteristics
The charging station has been CE-certified by the manufacturer and bears the
CE logo. The relevant declaration of conformity may be obtained from the
manufacturer.
The charging station complies with the RoHS Directive (RL 2011/65/EU). The
relevant declaration of conformity may be obtained from the manufacturer.
Electrical and electronic appliances, including accessories must be disposed of
separately from the general municipal solid waste. Recycling of materials saves
raw materials and energy and makes a major contribution to conserving the
environment.

12
5.
Installing the modem externally
A GSM link with the charging station is essential for the charging station to function
properly.
However, a good link cannot always be obtained in enclosed spaces, for instance a
closed or underground car park. In cases like this, the modem can be positioned outside the
charging station along with the GSM/GPS antenna and connected to the charging station. The
procedure is as follows:
• Remove the modem from the controller to which it is fixed by pinching the top points of
the white feet on which it rests using pliers.
• Remove the GPS/GSM antenna from the frame.
• Find a suitable point where the GSM signal is well received.
• Install 4-pole plugs on the modem and the controller. These plugs can be obtained
separately.
• Make the connection below. A 4-core RS485 cable (STP/FTP, Profibus or equivalent) should
be used for this. The maximum distance between the modem and the charging station is
1,200m. With large distances (over 60m) it may be necessary to install a 12V external
power supply.
• Install the modem and antenna in a closed cabinet (IP54). An assembly set with all the
materials needed for this (excl. cable and 12V power supply) is available as an option, part#
470050.

13
6.
Adding extra connectors (Satellites)
Several charging stations without a modem (Satellites) can be linked to a charging station
with a modem in a hub / satellite connection thus forming a grid. The grid can support up to
a total of 20 sockets. The advantages are that control of the charging stations is simpler and
that, for locations with a poor GSM link, only a single modem has to be installed externally.
Also a smartgrid can be established over all sockets thus optimizing power usage, enabling
more electrical vehicles to charge simultaneously should power limitations exist The Satellite
charging stations are connected in a chain.
• Use a green 4-pole plug on the Satellite “S” side and a black 2-pole plug on the Hub side of
the controller. These are available as a separate set, part# 471040
• Make the connection below. The network must be set up with a cable suited to the RS485
protocol. (STP/FTP, Profibus or equivalent cable).
• The maximum number of sockets that may be connected to a single modem is 20.
• The network must be closed off with a terminal resistance of 120 Ωat terminals 28 and
29, where more than 6 sockets (3 double charging stations) are installed. The terminator
resistance is available as a separate set, part #471041.
• In the case of a Star or T network, reflections can occur in the cable. This method of
installation is not possible for this use.
For correct performance of the smartgrid it is
essential
that you contact your supplier to set
the maximum power available on the grid.
If multiple three phase satellite stations are connected in the smartgrid it is also advisable to
swap the primary phase to distribute power consumption as evenly as possible over all
phases. Be sure to note the connector number printed on the mode 3 controller board and
the phase it uses as its primary phase.
For optimal performance of the smartgrid it is
essential to inform your supplier of these changes as well.

14
7.
Technical Specifications
These are general specifications for the BusinessLine. You can find more details about the
technical specifications in the “Downloads” section of EV-Box.com.
Item
Description
Connection capacity
1-phase or 3-phase, 50Hz, between 2.5 – 10mm2
Output power per connector
1-phase or 3-phase, 230V – 400V, 16A or 32A
Secondary power supply
12VDC – 2.5A
Load capacity per socket
3.7kW, 7.4kW, 11kW, 22kW
Communication
GPS / GSM / GPRS Modem / controller with RFID reader
Temperature range
- 25°C – +60°C
Moisture (non-regulating)
Max. 95%
Protection class
IP54
Protection class for socket
IP54
Max. Installation height
+2,000m NAP
Dimensions in mm
600 x 250 x 400 for double model
600 x 250 x 200 for single model
Housing
Polycarbonate (Bayblend)
Housing (rating)
IK9
Communication protocols
OCPP 1.2, 1.5 and 1.6
Weight
8 kg (single) 14 kg (double)
Type number guide:
16: 16A
32: 32A
H: HomeLine
B: BusinessLine
ML: PublicLine
MB: Mast
BusinessLine
S: PublicLine
(old)
1: one-phase
2: two-phase
3: three-phase
4: 1 side one-phase,1
side three-phase
0: cable
1: single
2: dual
0: autostart/push
button 4701020
controller, no kWh
meter
1: old modem 471002
controller 471001 S-
pulse kWh meter
2: new modem
471003 controller
471011 S-bus kWh
meter/wall
3: satellite, controller
471001 S0-pulse kWh
meter
5: 471011 + 471046
UMTS-E
6: 471011 + 471011 +
471045 UMTS-A
0: no security
1: RCB type A MCB
2: RCB type A with
32A feeding cable +
MCB (not available in
satellite)
3: RCB type EV, MCB
4: Security with fuse
holders and RCB
type A
0: RFID reader
1: on / off button
2: autostart
controller 471020
3: Key switch
0: no cable
1: N/A
61: EV-Box type 1 cable 6
meters, linear, with position 4=0
62: EV-Box type 2 cable 6 meter,
linear, with position 4=0
81: EV-Box type 1 cable 8
meters, linear, with position 4=0
82: EV-Box type 2 cable 8 meter,
linear, with position 4=0
91: EV-Box type 1 spiral cable
with position 4=0
92: EV-Box type 2 spiral cable
with position 4=0
0: Type 1
1: Type 2
P: Pole attachment
wall-model
Business
ZE: ZE Security
MODEL
PHASE
CAPACITY
SOCKETS
MODEM/kWh
SECURITY
VERSION
SERIAL NUMBER/CABLE
EXTRA

15
8.
Troubleshooting
EV-Box highly recommends the installation work to be done by a qualified
electrician and or installation partner.
Problem
Possible cause
Solution
Charging station does not react
• No power to charging station
• Are the residual current device
and circuit breaker in the meter
cabinet on? (
check by user)
• Is main switch in the charging
station on? (if installed, must be
done
by electrician).
• Is the supply cable entering the
charging station live?
• Turn the charging station on again
Charging station does not emit
clear tone when it is turned on
• Control current circuit breaker
(C6) is off
• 12V is not on (check light on
12V supply is off)
• Small plugs on the controller
are not fully pushed in
• Wiring harness runs too close
to the 12V supply, with the
result that the magnetic field
activates the safety module of
the 12V supply.
• Is the control current circuit
breaker (C6) on? There is a clear
tone when the circuit breaker is
switched on
• Is there 230V on the input
terminals of the power supply? If
this is not the case, check the
circuit breaker
• Is there 12V on the output
terminals of the power supply? If
this is not the case, switch off the
C6 circuit breaker and wait two
minutes before switching on
again. If there is still not 12V DC
on the output, the power supply
should be replaced.
• Snugly fit all plug connections, in
particular to the controller unit.
• Relocate wiring harness
Residual current device trips
constantly
• Grounding error in the
charging station
• Special ground resistance is
needed for the vehicle
• Fault in the vehicle or
defective charging cable
• Check electrical wiring for
damage. Replace damaged wiring
• Moisture or condensation on
electrical connections. Dry the
connections if necessary
• Replace the charging cable
• Measure the grounding resistance
and compare it with the resistance
required by the supplier of the
vehicle, e.g. Renault Zoe < 150
Ohm.
LED ring lights up red constantly
• Residual current device and/or
circuit breaker are off
• Switch on residual current device
and/or circuit breaker
One or more LED ring(s) continues
to flash red in Hub / Satellite
configuration
• Crossover in Hub / Satellite
connection.
• Charge point cannot be
located.
• Check RS485 cabling 1:1
• Press modem into position.
• Check 12V power supply status to
the Hub (Charging station with
modem).

16
Problem
Possible cause
Solution
LED ring continues to light up
yellow
• Charging station waiting for
the vehicle
• Vehicle is fully charged
• Faulty charging cable
• Grounding resistance too
high, with certain vehicles this
must be < 150 Ohm.
• Vehicle is on a timer
• Are the plugs properly inserted
in the vehicle and charging
station? (
check by user)
• Grounding resistance correct?
(grounding measurement by
electrician)
• Replace the charging cable
(have fixed cable replaced by
an electrician)
• Change the setting of the timer
in the vehicle. (
check by user)
Charging station does not start
charging, LED ring flashes green
for 30 seconds, followed by 10 x
red. Then LED ring green or off.
• Plug not locked
• Vehicle not connected
• Lock in charging station
blocked.
• Is the plug pushed far enough
into the charging station?
(
check by user)
• Is the plug properly inserted in
the vehicle? (
check by user)
• Check the plug for damage or
bent pins. (
check by user)
• Check whether there is
something in the socket.
(
check by user)
• Check whether the wiring
harness is blocking the red
locking handle. (
check by
electrician)
Plug does not come out of
charging station
• Incorrect card used to stop
charging (LED ring flashes
purple briefly)
• Unlocking pin will not lift
• Use the same card to stop
charging as to start charging
• Push the plug further into the
charging station and hold the
card against the card reader
again
• Turn power in the meter
cabinet off and then on again
after two minutes
• The red handle on the lock can
be manually turned upwards to
unlock
by the electrician
.
Red LED starts flashing
immediately after the card is held
against the reader
• Charging card is not
authorized for charging at
this charging station.
• There is no communication
with the Back Office.
• Check that the charging card is
registered correctly.
(authorized for use on public
charging stations) (
check by
user)
• Check the settings of your
charging station in your online
account (
check by user)
• Check whether the modem is in
contact with the cellular
network.

17
9.
EU Declaration of Conformity
MANUFACTURER'S DECLARATION
(in accordance with Appendix II-B of the Machinery Directive)
EV-Box B.V., Pedro de Medinalaan 31, 1086XP Amsterdam, The Netherlands, declares under
sole responsibility that the product:
Article B116X-XXXX: EV-Box Charging station 1-phase 16A
Article B132X-XXXX: EV-Box Charging station, 1-phase 32A
Article B316X-XXXX: EV-Box Charging station, 3-phase 16A
Article B332X-XXXX: EV-Box Charging station, 3-phase 32A
to which this declaration refers is CE certified and complies with the essential requirements of
EMC Directive 2004/108/EC and Low Voltage Directive 2006/95/EC in accordance with
standards:
EN 61000-6-3 (2007) & IEC 61851 Part 22CDV (06 15-12-2010) section 11.12 (EMC)
EN 61000-6-2 (2005) & IEC 61851 Part 22CDV (06 15-12-2010) section 11.12 (EMC)
EN 61000-3!2 (2006)
EN 61000-3-3 (1995) + A1 (2001) + A2 (2005)
EN 60950-1 (2006) + A11 (2009) + A1 (2010)
IEC 61851-1 (2010)
IEC 61851-22 (2002)
IEC 60364-4-41 (2007)
EN 62196-1 (2003)
EN 60335-1 (2012) + AC (2014) Safety of household and similar appliances
This manual suits for next models
1
Table of contents
Other EVBox Batteries Charger manuals

EVBox
EVBox HomeLine User manual

EVBox
EVBox Iqon Guide

EVBox
EVBox BusinessLine User manual

EVBox
EVBox 9835662680 User manual

EVBox
EVBox 9835662780 User manual

EVBox
EVBox Elvi V3.3 E3320-A555X-10.3 User manual

EVBox
EVBox BusinessLine User manual

EVBox
EVBox Wall box Series User manual

EVBox
EVBox Elvi User manual

EVBox
EVBox Smart Charging User manual