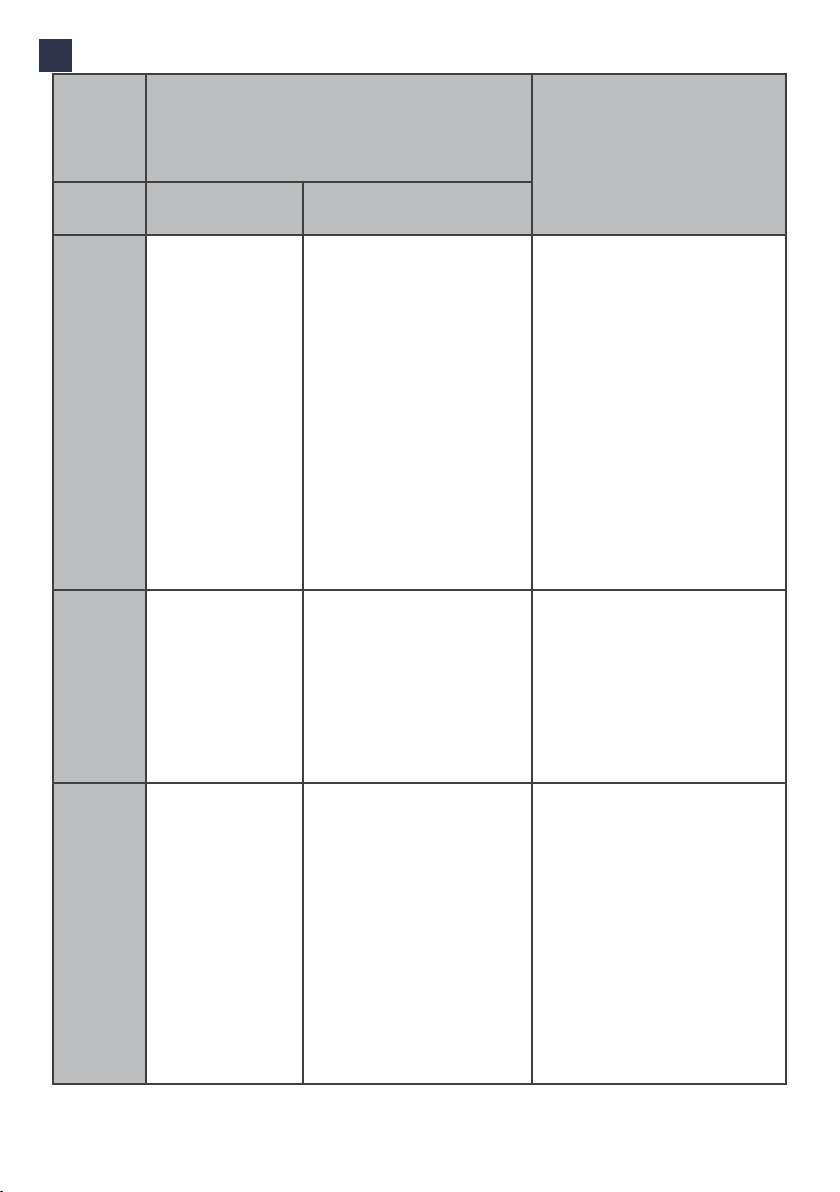
EVBox Wall box Series User manual

(EN) User manual 4
(DE) Benutzerhandbuch 15
(FR) Manuel d’utilisation 26
(ES) Manual de usuario 37
(NL) Gebruikershandleiding 48
(NO) Brukerhåndbok 59
(IT) Manuale utente 70
(PT) Manual do utilizador 81
(PL) Instrukcja obsługi użytkownika 92
WALL BOX
Part number: 9835662780

3
(EN) User manual 4
(DE) Benutzerhandbuch 15
(FR) Manuel d’utilisation 26
(ES) Manual de usuario 37
(NL) Gebruikershandleiding 48
(NO) Brukerhåndbok 59
(IT) Manuale utente 70
(PT) Manual do utilizador 81
(PL) Instrukcja obsługi użytkownika 92
WALL BOX
Part number: 9835662780

User manual
WALL BOX
Part number: 9835662780

5
Contents
Contents 5
Safety precautions 6
Product description 7
Components & features 8
Activate wall box 9
Troubleshooting 11
Declaration of conformity 14
Part number: 9835662780

6
Safety precautions
EN
Warning: Risk of electric shock.
• Read the supplied documentation carefully to familiarize yourself with all safety
instructions and regulations before using this product.
• This product is designed and tested in accordance with international standards.
• The use of this product is limited to those applications it is designed for.
• Installation, maintenance and repairs of this product are only to be performed by
qualied personnel.
• Incorrect installation or repairs may cause hazardous situations for the user of this
product.
• This product is used in combination with a power source.
• Always switch off power before any maintenance activity.
• This product contains no user-serviceable parts. Consult your distributor for more
information. Do not attempt to service or repair the wall box yourself!
• Make sure that the product is only used under the correct operating conditions.
• Make sure that the main power is disconnected before storing or transporting
this product.
• Make sure that the power line to wall box is installed on a dedicated circuit
breaker (MCB) on your service panel. The installation, including the residual-
current device (RCD), must be according to local regulations and IEC 60364. The
MCB rating must must not exceed the current rating of the wall box or the power
supply cable within the installation. In case the maximum current rating of the
wall box is higher than the current allocated for the wall box, the installer must
adjust the internal current rating of the wall box using the EVBox Connect App
(which must be installed on their mobile device).
• To maximize the power output of the wall box, install the wall box in
surroundings not subject to extreme sunlight, this reduces de-rating of the wall
box due to excessive temperatures.
• Store this product in a dry environment; the storage temperature must be
between -25 °C and +60 °C.
• The installing party must always ensure that the wall box is installed according to
the local regulations. The installation settings of the service panel must always be
adjusted by a qualied electrician.
• The supplier is not responsible for any damage that occurs if this product is
transported in a different packaging than the packaging in which the product was
originally supplied.
Part number: 9835662780

7
EN
Product description
Product conguration
The table below contains the available product congurations for the wall box. This manual covers
the wall box versions with xed charging cable. For wall box models with socket and shutter (refer-
ence number 9835663080 and 9835662680), see the installation manual for wall box with socket and
shutter.
PSA Power Vehicle connections
(IEC 62196)
Connectivity
PSA
reference
number
PSA
description
Installation Maximum
output
power
Fixed cable
6m. with
charge
plug type 2
Socket
type
2 with
shutter
Auto-
start
default
Back-
end
ready
9835662980 WALL BOX
11 kW C
3P+N+PE
- 16 A -
230/400 Vac
11 kW • - • -
9835663180 SMART
WALL BOX
7,4 kW C
1P+N+PE -
32 A - 230
Vac
7,4 kW • - - •
9835662780 SMART
WALL BOX
11 kW C
3P+N+PE
- 16 A -
230/400 Vac
11 kW • - - •
9835663080 WALL BOX
7,4 kW S
1P+N+PE -
32 A - 230
Vac
7,4 kW - • • -
9835662680 SMART
WALL BOX
22 kW S
3P+N+PE
- 32 A -
230/400 Vac
22 kW - • - •
Part number: 9835662780

8
Components & features
Charging cable
The charging cable is compat-
ible with all types of electric
vehicles with type 2 charging
plug that can handle capaci-
ties for 7.4 kW or 11 kW.
Card/key fob reader
This is the area where you
scan your charge card or
key fob for WALL BOX with
activated RFID card/keyfob
or SMART wall boxes. The
wall box reads the data from
your card to start or stop a
charging session.
Operating system
Start and stop your
charging session ac-
cording to your wall box
model:
WALL BOX:
Plug your charging
cable into the car to start
charging.
WALL BOX with activated
RFID card/ keyfob:
Plug your charging cable
into the car and hold your
RFID card/key fob in front
of RFID reader to start
charging.
SMART WALL BOX:
Equipped with Wi-Fi,
UMTS and kWh meter.
Plug your charging cable
into the car and hold your
RFID card/key fob in front
of RFID reader to start
charging and track your
sessions online.
2
3
4
5
Housing
The wall box consists of a
wall dock, a wall box and a
charging cable.
The wall box is designed with
rugged, high-impact strength
plastics that make its housing
durable, robust, weather-resis-
tant and wear-resistant.
LED indicator.
This smart status indicator
helps you understand what
the wall box is doing at all
times.
EN
Product Classication
• EV Supply Equipment connected to AC supply network
• Electric connection method: permanently connected
• AC EV Supply Equipment
• Outdoor use
• Equipment for locations with non-restricted access
• Stationary equipment, mounted on walls, poles or equiva-
lent means: surface mounted
• Class I Equipment
• Mode 3 EVSE
• Operating temperature range: -25°C to 45°C
• Enclosure ratings: IP55, IK10
5
4
3
2
1
Part number: 9835662780

9
EN
Activate wall box
Note: You can use your smart wall box also without RFID card/key fob.
For regular wall box models, the activation of the wall box is not applicable.
The EVBox Connect App is designed for both installers and users and to adjust the wall box settings
(e.g. setting of maximum amperage or adding/activating RFID cards/key fobs).
To nd out more about the App features, please refer to the EVBox Connect App manual.
The Smart Wall Box App is a management App for electric vehicle charging stations.
The App allows both charging station owners and electric vehicle drivers to easily start/stop, track
and invoice charging sessions. It also enables station owners to take full control over the energy
consumption of their charging stations.
For more information about the App features, please refer to the Smart Wall Box App manual.
Please refer to the table on next page for the step-by-step instructions for both Apps.
Please refer to ifz-berlin.de/#/instructions for the latest manuals.
Tools you need to activate the wall box
EVBox Connect App
Smart Wall Box App*
*Applicable for Smart Wall Box only
Part number: 9835662780

10
EN
Wallbox
Descrip-
tion/
reference
number
WALL BOX 7,4 kW S / 9835663080 SMART WALL BOX 22 kW S /
9835662680*
(factory setting)
non active RFID
(factory setting)
active RFID
(user setting)
Activation Not applicable 1. Turn on the power to the
wall box.
2. Download the EVBox
Connect App.
3. Enable Buetooth on your
mobile device. Pair the wall
box with a mobile device
via Bluetooth.
4. Add a charge card or key
fob by entering its ID into
the EVBox Connect App
under “Cards” menu.
Note: You can nd the wall
box ID and security code on
the label inside the cardboard
folder. The charge card and
key fob are also located in the
cardboard folder.
1. Make sure that the power to the
wall box is off.
2. The user to download the Smart
Wall Box App.
3. The user to set up an user
account for the wall box to be
installed in the back-end.
4. The user to register the wall box
in the Smart Wall Box Backend
using the wall box ID (EVB-
PXXXXXXXX).
5. The user to register the charge
card/key fob using the contract
ID (NL-EVB-XXXXXXXX) in the
Smart Wall Box Backend.
6. Turn on the power to the wall
box.
Congura-
tion
Not applicable Select the option “Charge
using charging card“ under
“charging settings” menu in
the EVBox Connect App.
Note: Select the option
“Autostart“ under “charging
settings” menu in the EVBox
Connect App. in order to
disable/enable the charging
card usage.
For more information, please refer
to the Smart Wall Box App manual.
Charging Start charging:
• Plug in the
charging cable
on the EV side
Stop charging:
• Unplug the
charging cable
on the EV side
Refer to the vehicle’s
user manual
Note: RFID reader is
not active.
Note: Charging
sessions are not
logged.
Start charging:
• Plug in the charging cable
on the EV side
• Scan your charge card/
key fob
•Scan your charge card/
key fob
• Unplug the charging cable
on the EV side
Note: RFID reader is active.
Note: Charging sessions are
not logged.
Start charging:
• Plug in the charging cable on
the EV side
• Scan your charge card/key fob
Stop charging:
• Scan your charge card/key fob
• Unplug the charging cable on
the EV side
Note: RFID reader is active.
Note: Charging sessions are
logged.
*The SMART WALL BOX can be congured as a standard WALL BOX using the EVBox Connect App.
Part number: 9835662780

11
EN
Troubleshooting
What you see What it means What to do
LED ring off
or green
Wall box is ready for use. Plug the charging cable into the wall box.
LED ring
green, ashing
Your charge card is being
veried.
Wait until LED ring turns blue.
LED ring
yellow
The car is fully charged. Unplug the charging cable on the EV side.
Refer to the vehicle’s user manual.
LED ring
yellow, ashing
Charging session is in queue
(applicable in the Smart
Charging environment only).
When power becomes available, charging will
start or resume, and the LED ring will turn blue.
LED ring
blue
Wall box is charging the car. The car is charging.
LED ring
red
Wall box is experiencing
an error.
Check the troubleshooting chapter in this man-
ual for solutions. If this does not solve the issue,
contact your installer or supplier.
LED ring
red, ashing
Your charge card is not
authorized to charge.
Check the troubleshooting chapter in this man-
ual for solutions. If this does not solve the issue,
contact your installer or supplier.
LED ring
purple, ashing
The wall box identies itself
to the user during the blue-
tooth pairing process
Continue the bluetooth pairing process.
Led ring status
Part number: 9835662780

12
EN
See next page for more troubleshooting instructions.
Troubleshooting
Problem Possible cause Solution
The wall box
does not react
No power to the wall box • Make sure that the residu-
al-current device and circuit
breaker on the service panel
are on (check by user).
• Make sure that the supply
cable entering the wall box
is energised. The LED ring
should be on.
• Turn off the power to the wall
box. Turn it on again after 20
seconds by ipping the circuit
breaker or main switch to the
wall box.
The LED ring
does not show
any color after
the power to
the wall box is
turned on
Improper installation of the
charging cable
Check/repeat steps 3.3 and 3.4 in
“Install charging cable” chapter.
Residual-current
device prevents
charging.
LED ring ashes
red 10x.
• Grounding error in the
wall box
• Defective charging
cable
•Fault in the vehicle
• Check grounding (check by an
electrician)
• Check charging cable (check
by an electrician)
• Contact your local car dealer
LED ring
lights up red
constantly
Grounding fault Make sure that your electrical instal-
lation is properly grounded (check
by an electrician).
Part number: 9835662780

13
ENEN
Troubleshooting
Problem Possible cause Solution
LED ring
lights up
yellow
constantly
• Vehicle is on a timer
• Vehicle is fully charged
• Grounding resistance
is too high (with spe-
cic vehicles,
this must be
< 50 Ohm)
• Make sure that the charging cable
plug is properly connected to the
vehicle (check by user).
• Change the setting of the timer in
the vehicle (check by user).
• Replace the charging cable (us-
er-serviceable).
• Make sure that the ground resis-
tance is correct (grounding
measurement done by an elec-
trician).
Red LED starts
ashing imme-
diately after the
charge card is
held against the
reader
Note: appli-
cable for RFID
cards/key fobs
only
• Charge card is not
authorized for
charging at this wall
box
• Make sure that the charge card/
key fob is registered correctly
(check by user).
• If you have a Smart Wallbox con-
nected via Wi-Fi, make sure that
there is proper Wi-Fi reception
where the wall box is installed
(check by user).
If the Wi-Fi connectivity of your
smart wall box is lost, rst reboot
your Wi-Fi router, then reboot the
wall box via your App and after-
wards check the Wi-Fi reception
again (check by user).
Part number: 9835662780

14
EN
Declaration of conformity
EVBox B.V.,
NL registration KvK 32165082_000018683428
Fred. Roeskestraat 115, 1076 EE Amsterdam, The Netherlands
declares under its’ sole responsibility that the following products:
• Article no. 9835663180: SMART WALL BOX 7,4 kW C, 1-phase 32A with cable
• Article no. 9835662980: WALL BOX 11 kW C, 3-phase 16A with cable
• Article no. 9835662780: SMART WALL BOX 11 kW C, 3-phase 16A with cable
provided that they are installed, maintained and used in the applications for which they
were designed, in accordance with professional practices, relevant installation standards
and manufacturer’s instructions for use and installation, are CE certied and comply
with the essential requirements of EMC Directive 2014/30/EU, Low Voltage Directive
2014/35/EU and RED Directive 2014/53/EU in accordance with the following standards:
EN/IEC 61851-1 (2017)
EN/IEC 61851-21-2 (2018)
EN/IEC 61000-3-2 (2014)
EN/IEC 61000-3-3 (2013)
EN 301 489-1 V2.2.0
EN 301 489-3 V2.1.1
EN 301 489-17 V3.2.0
EN 301 489-52 V1.1.0
EN 301 908-1 V11.1.1
EN 301 511 V12.5.1
EN 300 330 V2.1.1
EN 300 328 V2.1.1
EN 301 893 V2.1.1
EN 300 220-1 V3.1.1
EN 300 220-2 V3.1.1
Amsterdam, August 7th 2019
Arjan van Rooijen
Chief Technical Ofcer
Part number: 9835662780

Benutzerhandbuch
WALLBOX
DE
Part number: 9835662780

16
DE
Inhalt
Inhalt 16
Sicherheitsmaßnahmen 17
Produktbeschreibung 18
Komponenten & Merkmale 19
Aktivieren Sie die Wallbox 20
Fehlerbehebung 22
Konformitätserklärung 25
Part number: 9835662780

17
Sicherheitsmaßnahmen
DE
Warnung: Risiko eines elektrischen Schocks
• Bitte lesen Sie die mitgelieferte Dokumentation, damit Sie sich
mit den Sicherheitsvorschriften und Hinweisen vertraut machen, bevor Sie dieses Produkt
verwenden.
• Dieses Produkt wurde in Übereinstimmung mit internationalen Standards konzipiert und geprüft.
• Dieses Produkt darf ausschließlich für den Bestimmungszweck verwendet werden.
•Dieses Produkt darf nur durch qualiziertes Personal installiert, gewartet und repariert werden.
• Eine nicht korrekt ausgeführte Installation oder Reparatur kann Gefahren für den Benutzer zur
Folge haben.
• Dieses Produkt wird in Kombination mit einer Stromquelle verwendet.
• Immer die Stromversorgung ausschalten, bevor Sie die Wartung durchführen.
• Dieses Produkt enthält keine vom Benutzer zu wartenden Teile. Wenden Sie sich für weitere
Informationen an Ihren Händler. Nicht selbst Service- oder Reparaturarbeiten an der Wallbox
vornehmen!
• Stellen Sie sicher, dass das Produkt nur unter korrekten Betriebsbedingungen verwendet wird.
• Stellen Sie sicher, dass vor Transport oder Lagerung des Produkts die Hauptstromverbindung
getrennt worden ist.
• Stellen Sie sicher, dass die Stromleitung zur Wallbox an einem dedizierten Leitungsschutzschalter
(MCB) an Ihrem Sicherungskasten installiert ist. Die Installation, einschließlich des Schutzschalters
(RCD) muss den lokalen Vorschriften und IEC 60364 entsprechen. Die Leistung des
Leitungsschutzschalters (MCB) darf den Nennstrom der Wallbox oder des Stromkabels in der
Installation nicht überschreiten. Falls die maximale Stromstärke der Wallbox höher ist als die der
Wallbox zugeteilte Stromstärke, muss der Installateur den internen Nennstrom der Wallbox mit der
EVBox Connect App (die auf dem mobilen Gerät des Installateurs installiert sein muss) anpassen.
•Um die Stromausgabe der Wallbox zu maximieren, installieren Sie die Wallbox in einer Umgebung,
die nicht extremer Sonneneinstrahlung ausgesetzt ist. Dadurch vermeiden Sie eine übermäßige
Leistungsreduzierung der Wallbox aufgrund zu hoher Temperaturen.
• Bewahren Sie das Produkt in einer trockenen Umgebung auf. Die Aufbewahrungstemperatur muss
zwischen -25°C und +60°C liegen.
• Die installierende Person muss immer sichergehen, dass die Wallbox im Sinne der lokalen
Vorschrift installliert wird. Die Installationseinstellungen des Sicherungskastens müssen immer von
einem qualizierten Elektriker vorgenommen werden.
• Der Lieferant haftet nicht für Schäden, die auftreten, wenn dieses Produkt in einer anderen
Verpackung transportiert wird als in der ursprünglich mitgelieferten Verpackung.
Part number: 9835662780

18
DE
Produktbeschreibung
Produktkonguration
Die nachstehende Tabelle enthält die verfügbaren Produktkongurationen für die Wallbox. Dieses
Handbuch beschreibt die Wallbox-Versionen mit fest verbundenem Ladekabel. Für Wallbox-Modelle
mit Steckdose und Verschluss (Referenznummer R9835663080 und 9835662680), siehe das Installa-
tionshandbuch für eine Wallbox mit Stecker und Verschluss..
PSA Strom Fahrzeugverbindungen
(IEC 62196)
Verbindung
PSA
Referenz-
nummer
PSA
Beschrei-
bung
Installation Maximale
Ausgangs-
leistung
Festes
Kabel 6m.
mit Lade-
stecker
Typ 2
Steck-
dose 2
mit Ver-
schluss
Auto-
start
Stan-
dard
Ba-
ckend
bereit
9835662980 WALLBOX
11 kW C
3P+N+PE
- 16 A -
230/400 VAC
11 kW • - • -
9835663180 SMART
WALLBOX
7,4 kW C
1P+N+PE -
32 A - 230
VAC
7,4 kW • - - •
9835662780 SMART
WALLBOX
11 kW C
3P+N+PE
- 16 A -
230/400 Vac
11 kW • - - •
9835663080 WALLBOX
7,4 kW S
1P+N+PE -
32 A - 230
VAC
7,4 kW - • • -
9835662680 SMART
WALL BOX
22 kW S
3P+N+PE
- 32 A -
230/400 VAC
22 kW - • - •
Part number: 9835662780

19
Komponenten & Merkmale
Betriebssystem
Starten und stoppen Sie
den Auadevorgang je
nach Wallbox-Modell:
WALLBOX:
Stecken Sie Ihr Ladekabel
im Auto ein, um mit em
Laden zu beginnen.
WALLBOX mit aktivierter/
aktiviertem RFID-Karte/
Schlüsselanhänger:
Stecken Sie IhrLadeka-
bel auto ein und halten
Sie Ihre(n) RFID-Karte/
Schlüsselanhänger vor das
RFID-Lesegerät, um mit
dem Laden zu beginnen.
SMART WALLBOX:
Mit WLAN, UMTS und
kWh-Messgerät ausges-
tattet.
Stecken Sie Ihr Ladekabel
im Auto ein und halten
Sie Ihre(n) RFID-Karte/
Schlüsselanhänger vor das
RFID-Lesegerät, um mit
dem Laden zu beginnen
und Ihre Sitzungen online
zu verfolgen.
Karte/Schlüsselanhänger-Lesegerät
Hier scannen Sie Ihre Ladekarte
oder den Schlüsselanhänger für
eine WALLBOX mit aktivierter/m
RFID-Karte/Schlüsselanhänger oder
SMART Wallboxen. Die BusinessLine
Wallbox liest die Daten von Ihrer
Karte, um eine Ladesitzung zu begin-
nen oder zu beenden.
3
Ladekabel
Das Ladekabel ist mit allen
Elektrofahrzeugen mit Lades-
teckern vom Typ 2 kompat-
ibel, die mit Kapazitäten für
7,4 kW oder 11 kW ausgestat-
tet sind.
5
2Gehäuse
Die Wallbox besteht aus einer
Wandhalterung, einer Wallbox
und einem Ladekabel.
Die Wallbox besteht aus robust-
em, stoßfestem Kunststoff, der
das Gehäuse langlebig, robust,
wetterbeständig und ver-
schleißfest macht.
4LED-Anzeige
Diese intelligente Statusan-
zeige hilft Ihnen dabei, zu
verstehen, was die Wallbox zu
jedem beliebigen Zeitpunkt
macht.
DE
Product Classication
• EV Supply Equipment mit dem AC-Versorgungsnetz
verbunden
• Elektrisches Verbindungsverfahren: permanent anges-
chlossen
• AC EV Supply Equipment
•Zur Verwendung im Freien
• Ausrüstung für Orte mit uneingeschränktem Zugang
• Stationäre Ausrüstung, an Wänden, Stangen oder Ähnli-
chem montiert: oberächenmontiert
• Ausrüstung Klasse 1
• Mode 3 EVSE
• Betriebstemperaturbereich: -25°C bis 45°C
• Gehäusebewertungen: IP55, IK10
5
4
3
2
1
Part number: 9835662780

20
Aktivieren Sie die Wallbox
Hinweis: Sie können Ihre Wallbox auch ohne RFID-Karte/Schlüsselanhänger verwenden.
Für normale Wallbox-Modelle trifft die Aktivierung der Wallbox nicht zu.
Die EVBox Connect App ist für Installateure und Benutzer konzipiert und um die Wallbox-
Einstellungen (z. B. die maximale Stromstärke oder das Hinzufügen/Aktivieren von RFID-karten/
Schlüsselanhängern) anzupassen.
Mehr zu App-Funktionen nden Sie im EVBox Connect App Handbuch.
Die Smart Wall Box App ist eine Management App EV-Ladestationen.
Mit der App können Eigentümer von Ladestationen und EV-Fahrer Ladesiztungen einfach starten/
stoppen, verfolgen und in Rechnung stellen. Sie gibt Ladestation-Eigentümern auch die vollständige
Kontrolle über den Energieverbrauch ihrer Ladestationen.
Weitere Informationen zu dern App-Funktionen nden Sie im Handbuch zur Smart Wallbox.
Siehe die Tabelle auf der nächsten Seite für schrittweise Anweisungen für beide Apps.
Siehe ifz-berlin.de/#/instructions für die aktuellsten Handbücher.
Werkzeuge, die Sie zum Aktivieren der Wallbox benötigen
EVBox Connect App
Smart Wall Box App*
*Gilt nur für die Smart Wallbox
DE
Part number: 9835662780

21
Wallbox
Beschrei-
bung/
Referenz-
nummer
WALLBOX 7,4 kW S /9835663080 SMART WALLBOX 22 kW S /
9835662680*
(Werkseinstellung)
nicht aktives RFID
(Werkseinstellung) aktives RFID
(Benutzereinstellung)
Aktivie-
rung Nicht zutreffend 1. Schalten Sie den Strom zur
Wallbox ein.
2. Laden Sie die EVBox Con-
nect App herunter.
3. Aktivieren Sie Bluetooth auf
Ihrem Mobilgerät. Koppeln
Sie die Wallbox mit einem
Mobilgerät über Bluetooth.
4. Fügen Sie eine Ladekarte
oder den Schlüsselanhänger
hinzu, indem Sie die ent-
sprechende ID in der EVBox
Connect App unter„Cards“
eingeben.
Hinweis: Sie nden die
Wallbox-ID und den Sicher-
heitscode auf dem Etikett im
Kartonordner. Ladekarte und
Schlüsselanhänger benden
sich auch im Kartonordner.
1. Stellen Sie sicher, dass die
Stromzufuhr zur Wallbox de-
aktiviert ist.
2. Benutzer zum Download der
Smart Wallbox App.
3. Benutzer zur Einrichtung eines
Benutzerkontos für die Wallbox,
die im Backend installiert wird.
4. Benutzer zum Registrieren
der Wallbox im Smart Wallbox
Backend mit der Wallbox-ID
(EVB-PXXXXXXXX).
5. Benutzer zum Registrieren der
Ladekarte/Schlüsselanhänger
mit der Vertrags-ID (NL-EVB-
XXXXXXXX) im Smart Wallbox
Backend.
6. Schalten Sie den Strom zur
Wallbox ein.
Kongura-
tion Nicht zutreffend Wählen Sie die Option „Mit
Ladekarte laden“ unter „Lade-
einstellungen“ in der EVBox
Connect App aus.
Hinweis: Wählen Sie die
Option „Autostart“ unter
Ladeeinstellungen in der
EVBoxConnect App, um die
Ladekartenverwendung zu de-
aktivieren/aktivieren.
Weitere Informationen nden Sie
im Handbuch zur Smart Wallbox
App.
Laden Den Ladevorgang
starten:
• Stecken Sie das
Ladekabel an der
EV-Seite ein
Den Ladevorgang
stoppen:
• Das Ladekabel
an der EV-Seite
herausziehen
Siehe das Benut-
zerhandbuch zum
Fahrzeug
Hinweis: RFID-Lese-
gerät ist
nicht aktiv.
Hinweis: Ladesit-
zungen werden nicht
protokolliert.
Den Ladevorgang starten:
• Stecken Sie das Ladekabel
an der EV-Seite ein
• Scannen Sie Ihre Ladekarte/
Ihren Schlüsselanhänger
Den Ladevorgang stoppen:
• Scannen Sie Ihre Ladekarte/
Ihren Schlüsselanhänger
• Das Ladekabel an der
EV-Seite herausziehen
Hinweis: RFID-Lesegerät ist
aktiv.
Hinweis: Ladesitzungen wer-
den nicht protokolliert.
Den Ladevorgang starten:
• Stecken Sie das Ladekabel an
der EV-Seite ein
• Scannen Sie Ihre Ladekarte/
Ihren Schlüsselanhänger
Den Ladevorgang stoppen:
• Scannen Sie Ihre Ladekarte/
Ihren Schlüsselanhänger
• Das Ladekabel an der EV-Seite
herausziehen
Hinweis: RFID-Lesegerät ist aktiv.
Hinweis: Ladesitzungen werden
nicht aufgezeichnet.
DE
*Die SMART WALLBOX kann mit der EVBox Connect App als Standard-WALLBOX konguriert werden.
Part number: 9835662780
This manual suits for next models
1
Table of contents
Languages:
Other EVBox Batteries Charger manuals

EVBox
EVBox BusinessLine User manual

EVBox
EVBox HomeLine User manual

EVBox
EVBox Elvi User manual

EVBox
EVBox Elvi V3.3 E3320-A555X-10.3 User manual

EVBox
EVBox Elvi User manual

EVBox
EVBox BusinessLine User manual

EVBox
EVBox HomeLine User manual

EVBox
EVBox Iqon Guide

EVBox
EVBox Smart Charging User manual

EVBox
EVBox Iqon Guide

EVBox
EVBox BusinessLine User manual

EVBox
EVBox Elvi User manual

EVBox
EVBox Elvi User manual

EVBox
EVBox 9835662680 User manual

EVBox
EVBox BusinessLine User manual

EVBox
EVBox 9835662680 User manual

EVBox
EVBox Elvi User manual

EVBox
EVBox Elvi User manual

EVBox
EVBox Elvi User manual

EVBox
EVBox BusinessLine User manual