BEGA 84 065 User manual

BEGA Gantenbrink-Leuchten KG · Postfach 31 60 · 58689 Menden · info@bega.com · www.bega.com
32.17 · Technische Änderungen vorbehalten · Technical amendments reserved · Modications techniques réservées
IP 65
!
Lichtbauelement
Light building element
Prolé lumineux
84 065
2
145
□ 220
8x8
85
365365
290290
45004500800800
510510
900900
Gebrauchsanweisung Instructions for use Fiche d’utilisation
Anwendung
Lichtbauelement mit quadratischem
Grundriss und rotationssymmetrischer
Lichtstärkeverteilung.
Lichtbauelemente sind Leuchten, die
Außenräume gliedern und strukturieren können.
Sie haben eine orientierende, leitende und
begrenzende Funktion.
Application
Light building element with square prole and
rotationally symmetrical light distribution.
Light building elements are luminaires which
can devide and structure areas in exterior
application.
They have a orientating, directing and
demarcating function.
Utilisation
Prolé lumineux de section carrée et à
répartition lumineuse à rotation symétrique.
Les prolés lumineux sont des luminaires
permettant de dénir et de structurer les
espaces extérieurs.
Ils ont une fonction d'orientation, de guidage et
de délimitation.
Produktbeschreibung
Leuchte besteht aus Aluminiumprolen,
Aluminiumguss und Edelstahl
Sicherheitsglas klar · Silikondichtung
Reektor aus eloxiertem Reinstaluminium
Leuchte wahlweise mit Erdstück 71137
oder Befestigungssockel 70 829 aus Stahl
feuerverzinkt nach EN ISO 1461
Erdstück mit 2 Kabeleinführungen
50 ×150 mm
Befestigungssockel mit 4 Langlöchern
Breite 18 mm · Abstand 240 x 240 mm
Mit 2 eingesetzten Türen aus Aluminium-
druckguss, Vierkant-Türverschluss (SW 8 mm)
Montagebügel mit Anschlusskasten 70 632
zur Durchverdrahtung – für 2 Kabel bis 5 ×4@
mit Schmelzsicherung Neozed D 01 · 6 A
LED-Netzteil
220-240V x 0/50-60Hz
DC 176-264V
Im Gleichspannungsbetrieb wird die
LED-Leistung auf 50% begrenzt
Dimmbar 1-10 V
Zwischen Netz- und Steuerleitungen ist eine
Basisisolierung vorhanden
Leuchte: Schutzart IP 65
Staubdicht und Schutz gegen Strahlwasser
Schutzklasse II 2
c – Konformitätszeichen
Windangriffsäche:1,14m²
Gewicht: 58,0 kg
Product description
Luminaire made of aluminium proles,
aluminium alloy and stainless steel
Clear safety glass · Silicone gasket
Reector made of pure anodised aluminium
Optional luminaire with anchorage unit 71 137
or mounting base 70 829 made of hot-dip
galvanised steel according to EN ISO 1461
Anchorage unit with
2 cable entries 50 ×150 mm
Mounting base with 4 elongated holes
Width18mm · 240 x 240 mm spacing
With 2 inserted doors made of die
cast aluminium, square door latch
(wrenchsize8mm)
Mounting bracket with connection box 70 632
for through-wiring – for 2 cables up to 5 ×4@
with fuse Neozed D 01 · 6 A
LED power supply unit
220-240V x 0/50-60Hz
DC 176-264V
During DC operation the LED power
is reduced to 50%
Dimmable 1-10 V
A basic isolation exists between power cable
and control line
Luminaire: Protection class IP 65
Dust-tight and protection against water jets
Safety class II 2
c – Conformity mark
Wind catching area:1.14m²
Weight: 58.0 kg
Description du produit
Luminaire fabriqué en fonderie d’aluminium,
prolés en aluminium et acier inoxydable
Verre de sécurité clair · Joint silicone
Réecteur en aluminium pur anodisé
Luminaire avec pièce à enterrer 71 137
ou socle de xation 70 829
en acier galvanisé selon EN ISO 1461
Pièce à enterrer avec 2 entrées de câble
50 ×150 mm
Socle de xation avec 4 trous oblongs
largeur 18 mm · 240 x 240 mm
2portes en fonderie d’aluminium, fermeture à
vis à quatre pans (SW8mm)
Etrier de montage avec boîte de connexion
70 632 pour branchement en dérivation
pour 2 câbles max. 5 ×4@
avec fusible Neozed D 01 · 6 A
Bloc d’alimentation LED
220-240V x 0/50-60Hz
DC 176-264V
En utilisant le tension continu le wattage
est réduit à 50 %
Gradable 1-10 V
Une isolation existe d’origine entre le secteur et
les câbles de commande
Luminaire: Degré de protection IP 65
Etanche à la poussière et protégé contre les
jets d’eau
Classe de protection II 2
c – Sigle de conformité
Prise au vent:1,14m²
Poids: 58,0 kg

BEGA Gantenbrink-Leuchten KG · Postfach 31 60 · 58689 Menden · info@bega.com · www.bega.com
Leuchtmittel
Modul-Anschlussleistung 39,5W
Leuchten-Anschlussleistung 44W
Bemessungstemperatur ta=25 °C
Umgebungstemperatur ta max = 35 °C
84 065 K4
Modul-Bezeichnung LED-0808/840
Farbtemperatur 4000K
Farbwiedergabeindex CRI > 80
Modul-Lichtstrom 7290lm
Leuchten-Lichtstrom 2595lm
Leuchten-Lichtausbeute 59 lm / W
84 065 K3
Modul-Bezeichnung LED-0808/830
Farbtemperatur 3000K
Farbwiedergabeindex CRI > 80
Modul-Lichtstrom 7125lm
Leuchten-Lichtstrom 2536lm
Leuchten-Lichtausbeute 57,6 lm / W
Lamp
Module connected wattage 39.5W
Luminaire connected wattage 44W
Rated temperature ta=25 °C
Ambient temperature ta max =35 °C
84 065 K4
Module designation LED-0808/840
Colour temperature 4000K
Colour rendering index CRI > 80
Module luminous ux 7290lm
Luminaire luminous ux 2595lm
Luminaire luminous efciency 59 lm / W
84 065 K3
Module designation LED-0808/830
Colour temperature 3000K
Colour rendering index CRI > 80
Module luminous ux 7125lm
Luminaire luminous ux 2536lm
Luminaire luminous efciency 57,6 lm / W
Lampe
Puissance raccordée du module 39,5W
Puissance raccordée du luminaire 44W
Température de référence ta=25 °C
Température d’ambiance ta max = 35 °C
84 065 K4
Marquage des modules LED-0808/840
Température de couleur 4000K
Indice de rendu des couleurs CRI > 80
Flux lumineux du module 7290lm
Flux lumineux du luminaire 2595lm
Rendement lum. d’un luminaire 59 lm / W
84 065 K3
Marquage des modules LED-0808/830
Température de couleur 3000K
Indice de rendu des couleurs CRI > 80
Flux lumineux du module 7125lm
Flux lumineux du luminaire 2536lm
Rendement lum. d’un luminaire 57,6 lm / W
Sicherheit
Für die Installation und für den Betrieb
dieser Leuchte sind die nationalen
Sicherheitsvorschriften zu beachten.
Der Hersteller übernimmt keine Haftung für
Schäden, die durch unsachgemäßen Einsatz
oder Montage entstehen.
Werden nachträglich Änderungen an der
Leuchte vorgenommen, so gilt derjenige als
Hersteller, der diese Änderungen vornimmt.
Safety indices
The installation and operation of this luminaire
are subject to national safety regulations.
The manufacturer is then discharged from
liability when damage is caused by improper
use or installation.
If any luminaire is subsequently modied, the
persons responsible for the modication shall
be considered as manufacturer.
Sécurité
Pour l’installation et l’utilisation de ce luminaire,
respecter les normes de sécurité nationales.
Le fabricant décline toute responsabilité
résultant d’une mise en œuvre ou d’une
installation inappropriée du produit.
Toutes les modications apportées au luminaire
se feront sous la responsabilité exclusive de
celui qui les effectuera.
Montage
Vor der Montage zu beachten:
Die Befestigung der Leuchte erfolgt
mit Erdstück oder wahlweise mit
Befestigungssockel 70 829 zum Aufschrauben
auf ein Fundament.
Für den elektrischen Anschluss der Leuchte ist
eine Kabellänge von ca. 1 m über Oberkante
Bodenbelag ausreichend.
Der Fußpunkt der Leuchte darf nicht tiefer als
Oberkante Bodenbelag liegen.
Es ist darauf zu achten, dass die quadratische
Flanschplatte in die gewünschte Leuchten-
position ausgerichtet wird und das Rohr
absolut senkrecht steht.
Die Schutzschicht im Bereich des Erdstückes
darf nicht beschädigt werden.
Installation
Notice prior to installation:
The installation of the luminaire can optionally
be done with an anchorage unit or mounting
base 70 829 for bolting onto a foundation.
A cable length of approx. 1 m above top edge
of the mounting surface is sufcient for the
electrical connection of the luminaire.
The base of the luminaire must not be below
top edge of the mounting surface.
Note that the squared ange plate is aligned
with the desired luminaire position and that the
tube is absolutely vertical.
The protective coating at the anchorage unit
must not be damaged.
Installation
A respecter avant l’installation :
La xation du luminaire est éffectuée au choix
par pièce enterrée ou socle de xation 70 829
pour xation par vis sur un massif de fondation.
Pour le raccordement électrique du luminaire
une longueur de câble d'environ 1 m
au-dessus de la couche de nition du sol est
nécessaire.
Le bas du luminaire ne doit pas se trouver en
dessous de la couche de nition du sol.
Lors de l'installation de la pièce enterrée il faut
bien vérier que la asque carrée de xation
soit positionnée conformément à l’orientation
souhaitée du luminaire et que le tube soit
absolument en position verticale.
La couche protectrice de la pièce à enterrer ne
doit pas être endommagée.
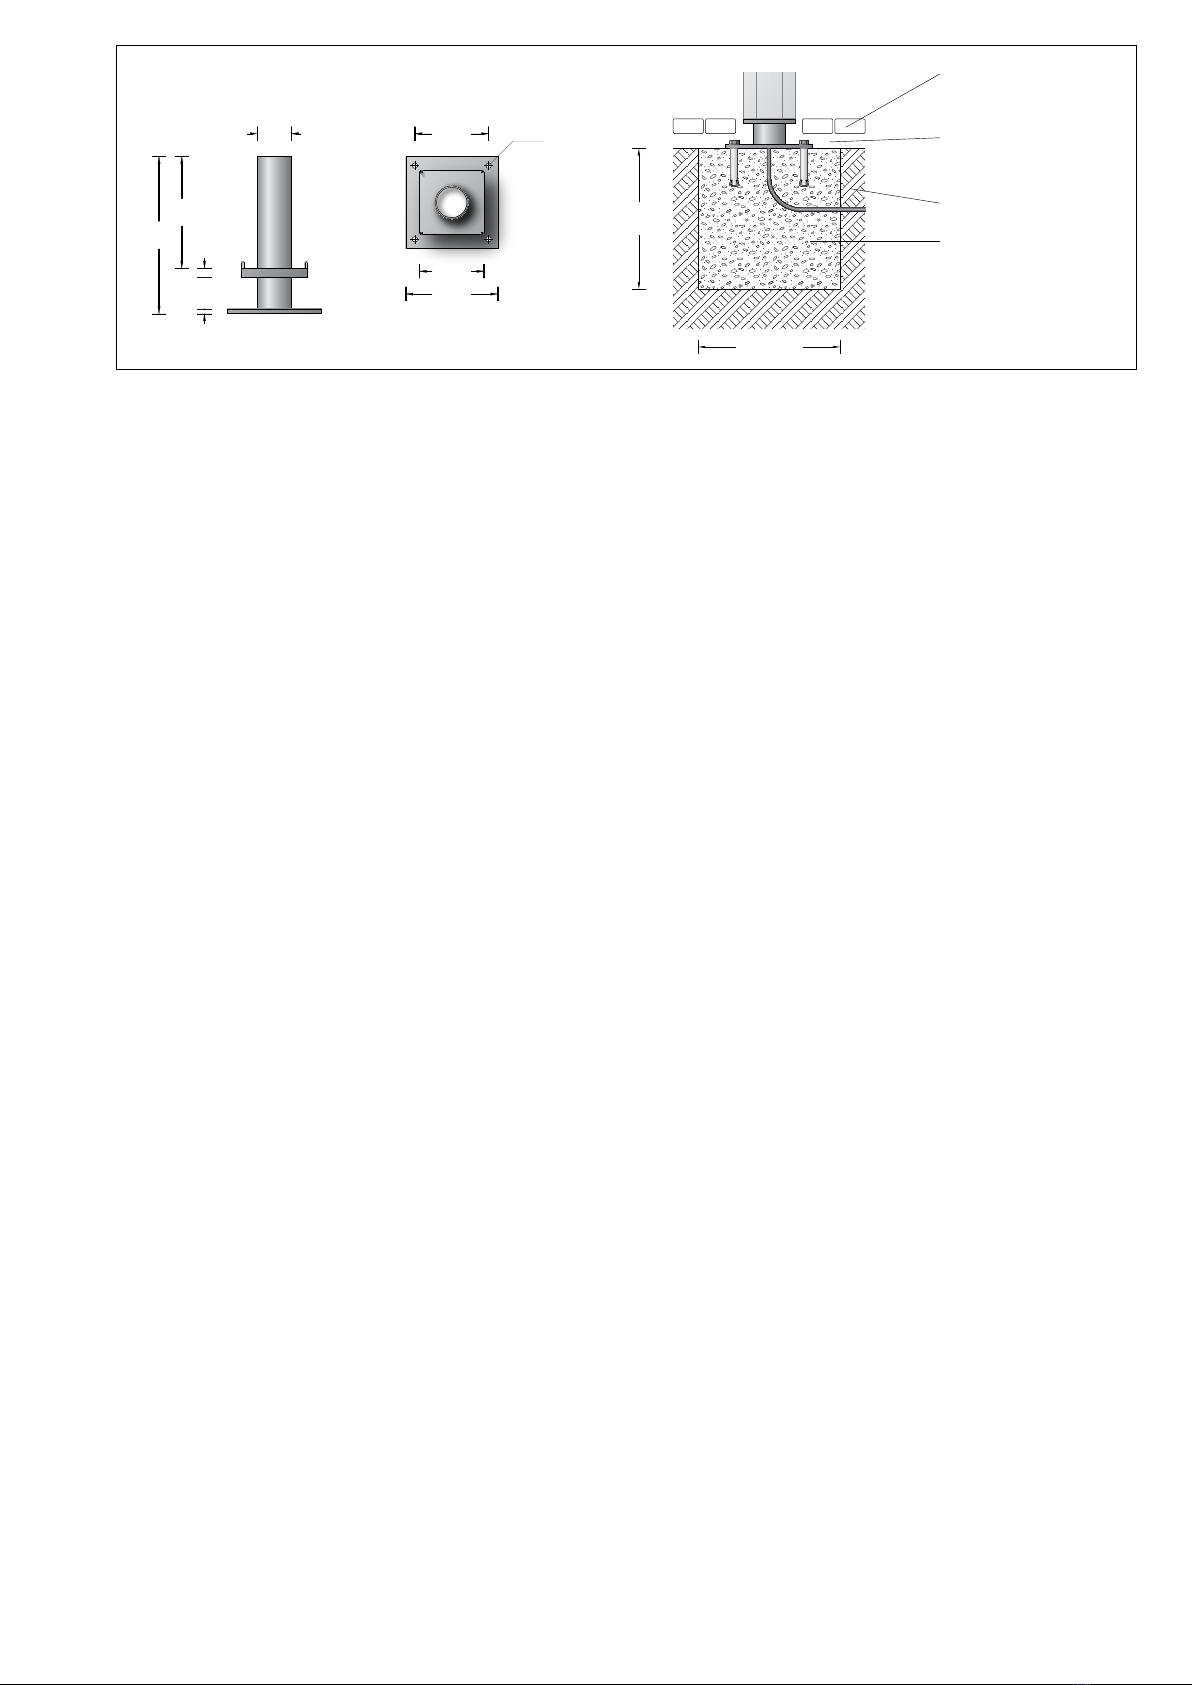
□ 210
500270
130 0
30
50 ×
150
250
Ø108
800 × 800
600
befestigte Oberfläche
Paved surface
Surface consolidée
verdichteter Boden
Compacted soil
Sol damé
Erdreich · Soil · Terre
Sauberkeitsschicht
Sub-base
Couche d’assainissement
Drainage
Beton · Concrete · Béton
Montage Erdstück
Die Fundamentgröße ist abhängig von der
Topographie, Bodenbeschaffenheit und
Windbelastung und muss jeweils bauseits
bestimmt werden.
Dazu gilt die Norm DIN 1045.
Die obige beispielhafte Fundamentempfehlung
gilt nur für einen tragfähigen Baugrund und nur
für das Lichtbauelement 84 065.
Zweiteilige Grundplatte aus dem Erdstück
entnehmen und am Erdstück befestigen.
Erdkabel durch seitliche Leitungseinführung in
das Erdstück einführen.
Erdstück standsicher einbauen.
Installation anchorage unit
The size of the foundation depends on the
topography, condition of the soil and the wind
load and must be determined on site.
DIN1045 applies.
The above exemplary recommendation for
a foundation is only applicable for a stable
subgrade and the light building element 84 065.
Remove the two-part anchor plate from the
anchorage unit and x it at the anchorage unit.
Lead the mains supply cable through the lateral
cable entry into the anchorage unit.
Install anchorage unit stably.
Installation pièce à enterrée
Le volume et les dimensions du massif béton
dépendent de la topographie, de la pression
à fond de fouille du sol, de la zone de vent,
ainsi que des forces et des charges exercées
et doivent être individuellement dénis sur le
chantier.
La norme DIN1045 est alors applicable.
Le massif de fondation recommandé ci-dessus
est un exemple uniquement valable pour
un terrain à bâtir compact, et pour le prolé
lumineux 84 065.
Retirer de la pièce enterrée la plaque de
stabilisation composée de deux pièces.
Fixer la sur la pièce à enterrer. Introduire le
câble réseau dans la pièce à travers l’entrée de
câble latérale.
Installer et stabiliser la pièce à enterrer.

BEGA Gantenbrink-Leuchten KG · Postfach 31 60 · 58689 Menden · info@bega.com · www.bega.com
700 × 700
700
□ 210
□ 240
□ 300
500
645
15 30100
Beton · Concrete · Béton
Ø 18
Ø108 verdichteter Boden
Compacted soil
Sol damé
befestigte Oberfläche
Paved surface
Surface consolidée
Erdreich · Soil · Terre
Montage mit Befestigungssockel 70 829
Die Fundamentgröße ist abhängig von der
Topographie, Bodenbeschaffenheit und
Windbelastung und muss jeweils bauseits
bestimmt werden.
Dazu gilt die Norm DIN 1045.
Die obige beispielhafte Fundamentempfehlung
gilt nur für einen tragfähigen Baugrund und nur
für das Lichtbauelement 84 065.
Erdkabel in den Befestigungssockel führen.
Befestigungssockel auf Fundament standsicher
befestigen.
Das Befestigungsmaterial ist bauseits
festzulegen und zu stellen: z. B.
Steinschrauben aus Edelstahl M16 x 300 DIN
529.
Dabei auf bauaufsichtliche Zulassung achten.
Installation with mounting base 70 829
The size of the foundation depends on the
topography, condition of the soil and the wind
load and must be determined on site.
DIN1045 applies.
The above exemplary recommendation for
a foundation is only applicable for a stable
subgrade and light building element 84 065.
Lead underground cable into the mounting
base.
Fix pole stably on a foundation.
The xing material must be determined and
provided by the customer: e.g. stone bolts
made of stainless steel M16 x 300 DIN 529.
Note authorization through supervision of
construction.
Installation avec socle de xation 70 829
Le volume et les dimensions du massif béton
dépendent de la topographie, la pression
à fond de fouille du sol, de la zone de vent,
ainsi que des forces et des charges exercés
et doivent être individuellement dénis sur le
chantier.
La norme DIN1045 est alors applicable.
Le massif de fondation recommandé ci-dessus
est un exemple uniquement valable pour
un terrain à bâtir compact, et pour le prolé
lumineux 84 065.
Introduire le câble réseau dans le socle de
xation.
Fixer solidement le socle de xation sur le
massif de fondation.
Les matériaux de xation doivent être dénis
et fournis sur le chantier: par exemple vis à
scellement en acier inoxydable
M16 x 300 DIN 529.
Respecter les consignes de la maîtrise
d'ouvrage.
Verschluss der Montagetür entriegeln
und Montagetür entnehmen.
Innensechskantschrauben M 10 im
Leuchtensockel lösen. Leuchte auf Erdstück
oder Befestigungssockel setzen.
Innensechskantschrauben fest anziehen.
Anzugsdrehmoment = 32 Nm.
Anschlusskasten öffnen.
Netzanschlusskabel und Leuchtenanschluss-
leitung durch die Leitungseinführung in den
Anschlusskasten führen.
Schutzleiterverbindung herstellen und
elektrischen Anschluss vornehmen.
Dabei auf richtige Belegung der Anschluss-
leitung achten. Den Netzanschluss an der
braunen, blauen und grün-gelben Ader
vornehmen. Die Dimmung erfolgt über
die beiden mit 1-10 V +und 1-10 V -
gekennzeichneten Adern.
Anschlusskasten schließen.
Montagetür einsetzen und verriegeln.
Unlock fastener of the installation door and
remove it.
Undo hexagon socket head screw M 10 in the
luminaire base. Place luminaire onto anchorage
unit or mounting base. Tighten hexagon socket
head screws rmly. Torque = 32 Nm.
Open the connection box.
Lead the luminaire wiring and mains supply
through the cable entry into the connection
box.
Make earth conductor connection and electrical
connection.
Note correct conguration of the mains supply
cable.
Make mains supply connection at the brown,
blue and green-yellow lead.
Dimming is achieved by means of the both
leads marked with 1-10 V +and 1-10 V - .
Close the connection box
Insert installation door and lock it.
Déverrouiller le dispositif de fermeture
et retirer la porte de montage.
Desserrer les vis à six pans creux M 10 dans le
socle du luminaire. Poser le luminaire sur la
pièce à enterrer ou sur le socle de xation.
Serrer fermement les vis à six pans creux.
Moment de serrage = 32 Nm.
Ouvrir la boîte de connexion.
Faire passer le câble de raccordement et le
câble d’alimentation dans la boîte de connexion
à travers l’entrée de câble.
Mettre à la terre et procéder au raccordement
électrique.
Veiller au bon adressage du câble de
raccordement. Effectuer le raccordement
électrique au l marron, bleu et vert-jaune.
La gradation est effectuée avec les deux ls
marqués 1-10 V +et 1-10 V -
Fermer la boîte de connexion.
Installer la porte de montage et verrouiller.
Lichttechnik
Das teilmattierte Sicherheitsglas des
BEGA Lichtbauelementes ist mit seiner
ganzen Materialstärke sichtbar.
Durch das seitlich austretende Licht wird
die Lichtstärkeverteilung breit gestreut und
der vertikale Beleuchtungsstärkeanteil
erhöht.
Light technique
The partly matted safety glass of the BEGA
light building element is visible with its complete
material thickness.
By means of the laterally emitted light the
light distribution is widely spread and the
vertical illuminance increased.
Technique d’éclairage
Le verre de sécurité du prolé lumineux BEGA
est partiellement mat et demeure visible
sur toute son épaisseur.
La lumière diffusée latéralement assure
une répartition lumineuse extensive et
l'éclairement lumineux vertical est augmenté.
Reinigung · Pege
Leuchte regelmäßig mit lösungsmittelfreien
Reinigungsmitteln von Schmutz und
Ablagerungen säubern.
Dafür keinen Hochdruckreiniger verwenden.
Cleaning · Maintenance
Clean luminaire regularly with solvent-free
cleansers from dirt and deposits.
Do not use high pressure cleaners.
Nettoyage · Entretien
Nettoyer régulièrement le luminaire et le
débarrasser des dépôts et des souillures.
Ne pas utiliser de nettoyeur haute pression.

BEGA Gantenbrink-Leuchten KG · Postfach 31 60 · 58689 Menden · info@bega.com · www.bega.com
Austausch des LED-Moduls · Wartung
Die Bezeichnung des LED-Moduls ist auf einem
Etikett in der Leuchte vermerkt.
BEGA Ersatzmodule entsprechen in
Lichtfarbe und Lichtleistung den ursprünglich
verbauten Modulen. Der Austausch kann mit
handelsüblichem Werkzeug durch qualizierte
Personen erfolgen.
Anlage spannungsfrei schalten.
Zum Austausch des LED-Moduls Innensechs-
kantschrauben lösen und Abdeckrahmen mit
Sicherheitsglas und Reektor abnehmen.
LED-Modul austauschen.
Montagehinweise des LED-Moduls beachten.
Abdeckrahmen auf Gehäuse setzen und
Schrauben über Kreuz gleichmäßig fest
anziehen.
Zum Austausch des Netzteils Verschluss
der Montagetür entriegeln und Montagetür
entnehmen.
Gerätekasten öffnen und Netzteil austauschen.
Gerätekasten schließen.
Montagetür einsetzen und verriegeln.
Replacement of the LED module ·
Maintenance
The designation of the LED module is noted on
a label in the luminaire.
The light colour and light output of BEGA
replacement modules correspond to those
of the modules originally tted. The module
can be replaced by qualied persons using
standard tools.
Disconnect the electrical installation.
To exchange the LED module unit undo
hexagon socket screws and remove cover
frame with safety glass and reector.
LED-module and pull equipment module out of
luminaire head.
Replace LED module. Note installation
instructions of the LED module.
Place the cover frame onto the housing and
tighten irmly screws crosswise.
To exchange the power supply unit unlock the
fastener of the installation door and remove the
installation door.
Open the device box and replace the power
supply unit.
Close the device box.
Insert installation door and lock it.
Remplacement du module LED ·
Maintenance
La désignation du module LED est inscrite sur
une étiquette apposée sur le luminaire.
Les modules de rechange BEGA
correspondent aux modules d’origine en
termes de couleur de lumière et de ux
lumineux. Le module LED peut être remplacé
par une personne qualiée à l’aide d’outils
disponibles dans le commerce.
Travailler hors tension.
Pour remplacer le module LED, desserrer les
vis à 6 pans creux et retirer le cadre avec le
verre et le réecteur.
Remplacer l'élément LED. Respecter la che
d'utilisation du module LED.
Placer le cadre sur le boîtier et serrer en croix et
fort les vis.
Pour changer le bloc d’alimentation
déverrouiller le dispositif de fermeture et retirer
la porte de montage.
Ouvrir le coffret pour appareillage et remplacer
le bloc d’alimentation.
Fermer le coffret pour appareillage.
Installer la porte de montage et verrouiller.
Ersatzteile
Ersatzglas 11 318 7
LED-Netzteil DEV-0131/1400
LED-Modul 3000 K LED-0808/830
LED-Modul 4000 K LED-0808/840
Reektor 761629
DichtungAbdeckrahmen 830845W
Spares
Spare glass 11 318 7
LED power supply unit DEV-0131/1400
LEDmodule3000K LED-0808/830
LEDmodule4000K LED-0808/840
Reector 761629
Gasketcoverframe 830845W
Pièces de rechange
Verre de rechange 11 318 7
Blocd’alimentationLED DEV-0131/1400
Module LED 3000 K LED-0808/830
Module LED 4000 K LED-0808/840
Réecteur 761629
Jointcadre 830845W
Other BEGA Lighting Equipment manuals
Popular Lighting Equipment manuals by other brands

ALS
ALS PEP-11WW2 manual

Larson Electronics
Larson Electronics HALD-24-1X150LED-V3 instruction manual

Eddylight
Eddylight Economy user manual

luminii
luminii QUE Channel installation instructions

Whelen Engineering Company
Whelen Engineering Company TA165NF1 Retrofit Guide

Good Earth Lighting
Good Earth Lighting RE1359-RGB-06LFR-G instructions